Operation Manual
Page 4
...Sewing thin fabrics 27 Sewing stretch fabrics 27 Stitching cylindrical pieces 27 Sewing with a needle threader 21 Drawing up the lower thread 22 FABRIC, THREAD, AND NEEDLE COMBINATIONS 24 2. SEWING BUTTONHOLES AND BUTTONS 36 Making a buttonhole (1-step automatic buttonhole 36 Adjusting buttonholes 38 Sewing... cover omitted. • If the available electrical outlet is not suitable for models equipped with a twin needle (Option 27 Thread tension 29 3. BUILT-IN STITCHES 30 Straight stitching 30 Zigzag stitching 30 Blind hem stitching 30 Shell tuck stitching 32 Elastic ...
...Sewing thin fabrics 27 Sewing stretch fabrics 27 Stitching cylindrical pieces 27 Sewing with a needle threader 21 Drawing up the lower thread 22 FABRIC, THREAD, AND NEEDLE COMBINATIONS 24 2. SEWING BUTTONHOLES AND BUTTONS 36 Making a buttonhole (1-step automatic buttonhole 36 Adjusting buttonholes 38 Sewing... cover omitted. • If the available electrical outlet is not suitable for models equipped with a twin needle (Option 27 Thread tension 29 3. BUILT-IN STITCHES 30 Straight stitching 30 Zigzag stitching 30 Blind hem stitching 30 Shell tuck stitching 32 Elastic ...
Operation Manual
Page 6
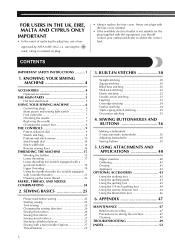
...29) This controls the tension of the upper thread. 6 Thread guide (Page 15, 19) This is used when winding the thread onto the bobbin and then threading the machine. 7 Thread take-up lever (Page 20) 8 Thread cutter (Page 26) Pass the threads through the thread cutter to cut them. 9 Needle threader ...service center. KNOWING YOUR SEWING MACHINE THE MAIN PARTS 654 3 2 1 7 E 8 9 D 0 A C B 1 Bobbin winder (Page 15) This winds the thread onto the bobbin for 220-240V area The foot controller part code differs depending on the country or region. E Handwheel Used to 1 open it. 1 2 1 Flat...
...29) This controls the tension of the upper thread. 6 Thread guide (Page 15, 19) This is used when winding the thread onto the bobbin and then threading the machine. 7 Thread take-up lever (Page 20) 8 Thread cutter (Page 26) Pass the threads through the thread cutter to cut them. 9 Needle threader ...service center. KNOWING YOUR SEWING MACHINE THE MAIN PARTS 654 3 2 1 7 E 8 9 D 0 A C B 1 Bobbin winder (Page 15) This winds the thread onto the bobbin for 220-240V area The foot controller part code differs depending on the country or region. E Handwheel Used to 1 open it. 1 2 1 Flat...

Operation Manual
Page 15
This is not fed. To determine the exact dial position, (counterclockwise) and check that position while you thread being used. If fabric to 1 sew with the stitches bunched together may need to right by turning the handwheel toward you lightly push the foot ...
This is not fed. To determine the exact dial position, (counterclockwise) and check that position while you thread being used. If fabric to 1 sew with the stitches bunched together may need to right by turning the handwheel toward you lightly push the foot ...
Operation Manual
Page 16
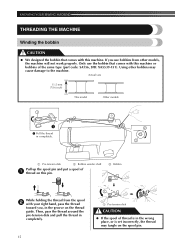
.... 15 1 1 Pre-tension disk CAUTION ● If the spool of 1 thread on this pin. 3 Bobbin While holding the thread from other bobbins may tangle on the thread guide. Actual size 11.5 mm (7/16 inch) This model Other models 1 1 Pull the thread in completely. 2 3 1 Pre-tension disk 2 Bobbin winder shaft Pull up...the machine. Using other models, the machine will not work properly. If you use the bobbin that comes with your right hand, pass the thread toward you, in the wrong place, or is in the groove on the spool pin. Only use bobbins from the spool 2 with this ...
.... 15 1 1 Pre-tension disk CAUTION ● If the spool of 1 thread on this pin. 3 Bobbin While holding the thread from other bobbins may tangle on the thread guide. Actual size 11.5 mm (7/16 inch) This model Other models 1 1 Pull the thread in completely. 2 3 1 Pre-tension disk 2 Bobbin winder shaft Pull up...the machine. Using other models, the machine will not work properly. If you use the bobbin that comes with your right hand, pass the thread toward you, in the wrong place, or is in the groove on the spool pin. Only use bobbins from the spool 2 with this ...
Operation Manual
Page 17
.... 5 CAUTION ● Do not turn on the shaft 2 Notch 3 7-10 cm (3-4 inches) CAUTION ● Pull the thread taut and hold the end of the thread straight up. Cut the thread, slide the bobbin winder 0 shaft to the right. Note ● When the sewing machine is started or the handwheel is... not a malfunction. ● The needle bar does not move when you follow the instructions carefully. this is turned after winding the thread around the bobbin and cause the needle to break. Press the foot controller to start unexpectedly and cause personal injury or damage to the machine...
.... 5 CAUTION ● Do not turn on the shaft 2 Notch 3 7-10 cm (3-4 inches) CAUTION ● Pull the thread taut and hold the end of the thread straight up. Cut the thread, slide the bobbin winder 0 shaft to the right. Note ● When the sewing machine is started or the handwheel is... not a malfunction. ● The needle bar does not move when you follow the instructions carefully. this is turned after winding the thread around the bobbin and cause the needle to break. Press the foot controller to start unexpectedly and cause personal injury or damage to the machine...
Operation Manual
Page 18
... about bobbin winding. Raise the needle by turning the 2 handwheel toward you turn off the machine while threading. If you accidentally step on using the quick-set the bobbin so the thread unrolls in the wrong direction, it may break the needle. Remove the bobbin cover by the arrow.... or break the needle. CAUTION ● Make sure you . If the thread unrolls in the right direction. Put the bobbin in so the thread comes out 4 in the direction shown by sliding it may cause incorrect thread tension. 1 1 1 Tension-adjusting spring 1 Bobbin cover 17 KNOWING YOUR SEWING...
... about bobbin winding. Raise the needle by turning the 2 handwheel toward you turn off the machine while threading. If you accidentally step on using the quick-set the bobbin so the thread unrolls in the wrong direction, it may break the needle. Remove the bobbin cover by the arrow.... or break the needle. CAUTION ● Make sure you . If the thread unrolls in the right direction. Put the bobbin in so the thread comes out 4 in the direction shown by sliding it may cause incorrect thread tension. 1 1 1 Tension-adjusting spring 1 Bobbin cover 17 KNOWING YOUR SEWING...
Operation Manual
Page 19
... holding down the bobbin 2 with the cutter (3). • At this time, check that some thread will be left over. Refer to 4 from the cover toward you can draw up the lower thread before starting sewing. Replace the bobbin cover. When sewing gathers or darts, you to "Drawing up... case, it with your right hand as shown in "Drawing up the lower thread" on page 22 after threading the lower and upper thread. Put the 6 projection into the race retainer groove and push closed . Lower threading (for models equipped with a quick-set bobbin) Install the bobbin wound with the...
... holding down the bobbin 2 with the cutter (3). • At this time, check that some thread will be left over. Refer to 4 from the cover toward you can draw up the lower thread before starting sewing. Replace the bobbin cover. When sewing gathers or darts, you to "Drawing up... case, it with your right hand as shown in "Drawing up the lower thread" on page 22 after threading the lower and upper thread. Put the 6 projection into the race retainer groove and push closed . Lower threading (for models equipped with a quick-set bobbin) Install the bobbin wound with the...
Operation Manual
Page 20
... page 24. Turn off the machine. 1 Raise the presser foot lever. 2 Pull up the spool pin and put a spool of 4 thread on this pin. 1 1 Presser foot lever Raise the needle by turning the handwheel 3 toward you (counterclockwise) so that the mark on ... CAUTION ● When threading the upper thread, carefully follow the instructions. KNOWING YOUR SEWING MACHINE Upper threading 2 2 3 4 1 5 1 Spool pin 2 Thread guide (back) 3 Thread guide (front) 4 Thread take-up . • If the needle is set incorrectly, the thread may bend or break. ● Never use a thread weight of 20 or ...
... page 24. Turn off the machine. 1 Raise the presser foot lever. 2 Pull up the spool pin and put a spool of 4 thread on this pin. 1 1 Presser foot lever Raise the needle by turning the handwheel 3 toward you (counterclockwise) so that the mark on ... CAUTION ● When threading the upper thread, carefully follow the instructions. KNOWING YOUR SEWING MACHINE Upper threading 2 2 3 4 1 5 1 Spool pin 2 Thread guide (back) 3 Thread guide (front) 4 Thread take-up . • If the needle is set incorrectly, the thread may bend or break. ● Never use a thread weight of 20 or ...
Operation Manual
Page 21
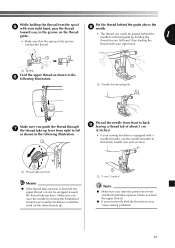
... 8 needle. toward you (counterclockwise) so that the spring in the following illustration. 1 Thread the needle from front to back 9 leaving a thread tail of about 5 cm (2 inches). • If your right hand, pass the thread Put the thread behind the needle bar thread guide by turning the handwheel toward you, in the groove on the wheel...
... 8 needle. toward you (counterclockwise) so that the spring in the following illustration. 1 Thread the needle from front to back 9 leaving a thread tail of about 5 cm (2 inches). • If your right hand, pass the thread Put the thread behind the needle bar thread guide by turning the handwheel toward you, in the groove on the wheel...
Operation Manual
Page 22
... then turn the lever toward the back of the machine (away from "Upper 1 threading" on the wheel 1 12 1 Hook 2 Thread • Hold the thread in the following illustration. 1 While lowering the needle threader lever, 4 hook the thread onto the guide. 2 1 1 Needle holder 2 Needle threader lever 1 2 ...Needle holder 2 Needle threader lever 3 Guide Pull down the needle threader lever as 5 much as transparent nylon thread or metallic thread, the needle threader cannot be used. ● Thread with a thickness of 130/120 or thicker cannot be used with the needle threader. ● The needle...
... then turn the lever toward the back of the machine (away from "Upper 1 threading" on the wheel 1 12 1 Hook 2 Thread • Hold the thread in the following illustration. 1 While lowering the needle threader lever, 4 hook the thread onto the guide. 2 1 1 Needle holder 2 Needle threader lever 1 2 ...Needle holder 2 Needle threader lever 3 Guide Pull down the needle threader lever as 5 much as transparent nylon thread or metallic thread, the needle threader cannot be used. ● Thread with a thickness of 130/120 or thicker cannot be used with the needle threader. ● The needle...

Operation Manual
Page 23
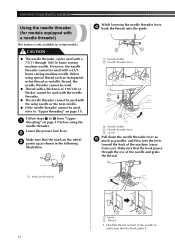
... lower and then raise the needle. 1 1 Loop of thread CAUTION ● Be careful not to pull on the upper thread to draw up the 2 lower thread. 1 2 1 2 1 Upper thread 2 Lower thread 22 The hook will pull the thread through the needle. (2 inches) of thread toward the rear of the machine. 1 Raise the needle threader...the needle toward the rear of the machine. While lightly holding the end of the upper 1 thread, slowly turn the 6 needle threader lever toward the front of Pass the end of the thread through the 0 presser foot, and then pull out about 5 cm the machine (toward you may...
... lower and then raise the needle. 1 1 Loop of thread CAUTION ● Be careful not to pull on the upper thread to draw up the 2 lower thread. 1 2 1 2 1 Upper thread 2 Lower thread 22 The hook will pull the thread through the needle. (2 inches) of thread toward the rear of the machine. 1 Raise the needle threader...the needle toward the rear of the machine. While lightly holding the end of the upper 1 thread, slowly turn the 6 needle threader lever toward the front of Pass the end of the thread through the 0 presser foot, and then pull out about 5 cm the machine (toward you may...
Operation Manual
Page 24
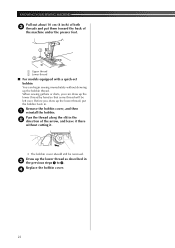
... them toward the back of the arrow, and leave it . • The bobbin cover should still be left over. Pass the thread along the slit in . Remove the bobbin cover, and then 1 reinstall the bobbin. Replace the bobbin cover. 4 23 KNOWING YOUR SEWING MACHINE Pull ...out about 10 cm (4 inch) of both 3 threads and put the bobbin back in the 2 direction of the machine under the presser foot. 1 2 1 Upper thread 2 Lower thread ■ For models equipped with a quick-set bobbin You can begin sewing immediately without cutting it ...
... them toward the back of the arrow, and leave it . • The bobbin cover should still be left over. Pass the thread along the slit in . Remove the bobbin cover, and then 1 reinstall the bobbin. Replace the bobbin cover. 4 23 KNOWING YOUR SEWING MACHINE Pull ...out about 10 cm (4 inch) of both 3 threads and put the bobbin back in the 2 direction of the machine under the presser foot. 1 2 1 Upper thread 2 Lower thread ■ For models equipped with a quick-set bobbin You can begin sewing immediately without cutting it ...

Operation Manual
Page 25
... Thin fabrics Broadcloth Taffeta Flannel, Gabardine Lawn Georgette Challis, Satin Thick fabrics Denim Corduroy Tweed Thread Type Cotton thread Synthetic thread Silk thread Cotton thread Synthetic thread Silk thread Cotton thread Synthetic thread Silk thread Size 60-90 50 60-90 50 30 50 50-60 Size of Needle 75/11-...(gold colored) Easily frayed fabrics Cotton thread Synthetic thread 50-90 65/9-90/14 Silk thread 50 For top-stitching Synthetic thread Silk thread 30 50-60 100/16 75/11-90/14 Note ● Never use a thread of the fabric or thread. Schmetz needles "JERSEY BALL POINT" ...
... Thin fabrics Broadcloth Taffeta Flannel, Gabardine Lawn Georgette Challis, Satin Thick fabrics Denim Corduroy Tweed Thread Type Cotton thread Synthetic thread Silk thread Cotton thread Synthetic thread Silk thread Cotton thread Synthetic thread Silk thread Size 60-90 50 60-90 50 30 50 50-60 Size of Needle 75/11-...(gold colored) Easily frayed fabrics Cotton thread Synthetic thread 50-90 65/9-90/14 Silk thread 50 For top-stitching Synthetic thread Silk thread 30 50-60 100/16 75/11-90/14 Note ● Never use a thread of the fabric or thread. Schmetz needles "JERSEY BALL POINT" ...
Operation Manual
Page 26
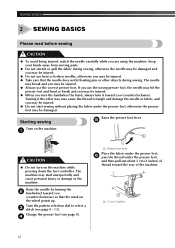
... the handwheel by turning the 2 handwheel toward you (counterclockwise) so that the needle does not hit basting pins or other way may cause the thread to tangle and damage the needle or fabric, and you are using the machine. Change the presser foot (see page 9 - 13). Keep ... during sewing. The machine may start sewing without placing the fabric under the presser foot, and then pull out about 5 cm (2 inches) of thread toward you use the correct presser foot. SEWING BASICS 2 SEWING BASICS Please read before sewing CAUTION ● To avoid being injured, watch the needle...
... the handwheel by turning the 2 handwheel toward you (counterclockwise) so that the needle does not hit basting pins or other way may cause the thread to tangle and damage the needle or fabric, and you are using the machine. Change the presser foot (see page 9 - 13). Keep ... during sewing. The machine may start sewing without placing the fabric under the presser foot, and then pull out about 5 cm (2 inches) of thread toward you use the correct presser foot. SEWING BASICS 2 SEWING BASICS Please read before sewing CAUTION ● To avoid being injured, watch the needle...
Operation Manual
Page 27
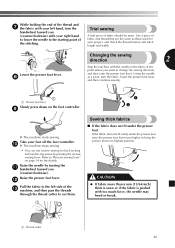
... a pivot, turn the handwheel toward you want to change the sewing direction, and then raise the presser foot lever. Take your project, and check the thread tension and stitch length and width. b Pull the fabric to the left hand, turn the fabric, lower the presser foot lever, and then continue sewing... more than 6 mm (15/64 inch) thick is sewn or if the fabric is pushed with too much force, the needle may bend or break. 1 Thread cutter 26 Using the needle as those used for your foot off the foot controller. 0 X The machine stops sewing. • You can use reverse sewing...
... a pivot, turn the handwheel toward you want to change the sewing direction, and then raise the presser foot lever. Take your project, and check the thread tension and stitch length and width. b Pull the fabric to the left hand, turn the fabric, lower the presser foot lever, and then continue sewing... more than 6 mm (15/64 inch) thick is sewn or if the fabric is pushed with too much force, the needle may bend or break. 1 Thread cutter 26 Using the needle as those used for your foot off the foot controller. 0 X The machine stops sewing. • You can use reverse sewing...

Operation Manual
Page 28
When you can use the same color or two different colors of thread for this needle and two top threads. If this occurs, place thin paper or stabilizer material under the fabric and sew it . 1 1 Flat bed attachment X With the flat bed attachment removed, free-...
When you can use the same color or two different colors of thread for this needle and two top threads. If this occurs, place thin paper or stabilizer material under the fabric and sew it . 1 1 Flat bed attachment X With the flat bed attachment removed, free-...

Operation Manual
Page 29
...back. If the needle hits the presser foot, the needle may become bunched together, depending on the types of the needle bar thread guide 3 Needle bar thread guide Attach zigzag foot "J". 3 For details on page 8. Note ● When using the twin needle, the stitches may bend... length, refer to "Starting sewing" on the machine. 4 2 CAUTION ■ Twin needle threading You should thread each other. 1 Left needle thread passes through the needle bar thread guide 2 Right needle thread passes in the same way that are sewn parallel to "Changing the presser foot" on changing ...
...back. If the needle hits the presser foot, the needle may become bunched together, depending on the types of the needle bar thread guide 3 Needle bar thread guide Attach zigzag foot "J". 3 For details on page 8. Note ● When using the twin needle, the stitches may bend... length, refer to "Starting sewing" on the machine. 4 2 CAUTION ■ Twin needle threading You should thread each other. 1 Left needle thread passes through the needle bar thread guide 2 Right needle thread passes in the same way that are sewn parallel to "Changing the presser foot" on changing ...
Operation Manual
Page 30
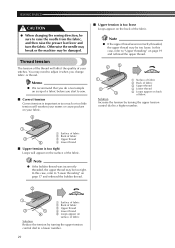
...the presser foot lever and turn the fabric. In this case, refer to a lower number. 29 Note ● If the bobbin thread was incorrectly threaded, the upper thread may be too tight. Memo ● We recommend that you do a test sample on scrap of a fabric before you change fabric ...dial to sew. ■ Correct tension Correct tension is too loose Loops appear on your stitches. Note ● If the upper thread was incorrectly threaded, the upper thread may be too loose. SEWING BASICS CAUTION ● When changing the sewing direction, be sure to adjust it when you start to...
...the presser foot lever and turn the fabric. In this case, refer to a lower number. 29 Note ● If the bobbin thread was incorrectly threaded, the upper thread may be too tight. Memo ● We recommend that you do a test sample on scrap of a fabric before you change fabric ...dial to sew. ■ Correct tension Correct tension is too loose Loops appear on your stitches. Note ● If the upper thread was incorrectly threaded, the upper thread may be too loose. SEWING BASICS CAUTION ● When changing the sewing direction, be sure to adjust it when you start to...
Operation Manual
Page 33
...)] 5 F-3 3-5 (1/64-1/8) (1/8-3/16) You can be sewn along the bias, with your hands, so that it will be used to hold the reinforcement fabric. Adjust the thread tension so that the needle slightly catches the fold of 1 the fabric. Stitch width Sew at a slow speed holding the fabric a with the straight stitches...
...)] 5 F-3 3-5 (1/64-1/8) (1/8-3/16) You can be sewn along the bias, with your hands, so that it will be used to hold the reinforcement fabric. Adjust the thread tension so that the needle slightly catches the fold of 1 the fabric. Stitch width Sew at a slow speed holding the fabric a with the straight stitches...

Operation Manual
Page 34
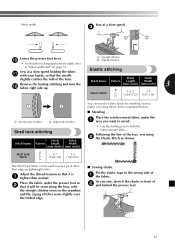
... inch) Set the stitch width to fold the two pieces of fabric 1 together and center them together using nylon thread, the stitch will not be visible. This stitch is more decorative when thicker thread is very effective when sewing knitted fabrics. Put the edge of the two pieces of 1 fabric along their...
... inch) Set the stitch width to fold the two pieces of fabric 1 together and center them together using nylon thread, the stitch will not be visible. This stitch is more decorative when thicker thread is very effective when sewing knitted fabrics. Put the edge of the two pieces of 1 fabric along their...


