
Hand Book - English
Page 2
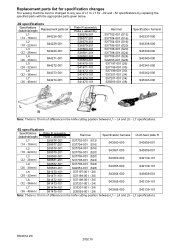
...and L5 - Replacement parts list for specification changes The sewing machine can be changed to any one of L1 to L7 for -02 and -52 specifications by replacing the specified parts with the appropriate parts given below. -02 specifications Specifications (buttonhole length) Replacement parts set L1 (14...is 10 mm of difference in the knife cutting position between L1 - RH-981A 2/8 2002.10 L7 specifications. -52 specifications Specifications (buttonhole length) Plate R assembly Plate L assembly Hammer Specification harness Cloth feed plate R L1 (14 - 18mm) S38576...
...and L5 - Replacement parts list for specification changes The sewing machine can be changed to any one of L1 to L7 for -02 and -52 specifications by replacing the specified parts with the appropriate parts given below. -02 specifications Specifications (buttonhole length) Replacement parts set L1 (14...is 10 mm of difference in the knife cutting position between L1 - RH-981A 2/8 2002.10 L7 specifications. -52 specifications Specifications (buttonhole length) Plate R assembly Plate L assembly Hammer Specification harness Cloth feed plate R L1 (14 - 18mm) S38576...
Parts Manual - English
Page 20
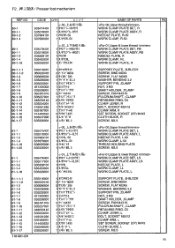
...' k-I RI% / Presser foot mechanism REF.NO 80-1 80-1-1 80-1-2 80-1-4 CODE O'TY L 2.g -r 535474401 S35318001 S37684101 537680001 1 titi7°P-Itiln 1 Raft?' PAN M4X10 FULCRUM SHAFT, ;CLAMP RETAINING RING, C5 CLAMP LEVER, R BOLT, SOCKET M5X12 CLAMP ARM, R SET SCREW, SOCKET (CP) M4X5 CLOTH GUIDE, R SCREW, M3.5 WORK CLAMP PLATE SET, L WORK CLAMP PLATE ASSY, L NEEDLE PLATE, L-50 WORK CLAMP, L-50 THREAD HOLDING PLATE SCREW, M3.5 WORK CLAMP PLATE SET, LS WORK CLAMP PLATE ASSY, LS NEEDLE PLATE, L WORK CLAMP, LL WORK CLAMP PLATE, L SUPPORT PLATE, ;S-BLOCK SCREW, BIND M2X4 SCREW, FLAT M3X6...
...' k-I RI% / Presser foot mechanism REF.NO 80-1 80-1-1 80-1-2 80-1-4 CODE O'TY L 2.g -r 535474401 S35318001 S37684101 537680001 1 titi7°P-Itiln 1 Raft?' PAN M4X10 FULCRUM SHAFT, ;CLAMP RETAINING RING, C5 CLAMP LEVER, R BOLT, SOCKET M5X12 CLAMP ARM, R SET SCREW, SOCKET (CP) M4X5 CLOTH GUIDE, R SCREW, M3.5 WORK CLAMP PLATE SET, L WORK CLAMP PLATE ASSY, L NEEDLE PLATE, L-50 WORK CLAMP, L-50 THREAD HOLDING PLATE SCREW, M3.5 WORK CLAMP PLATE SET, LS WORK CLAMP PLATE ASSY, LS NEEDLE PLATE, L WORK CLAMP, LL WORK CLAMP PLATE, L SUPPORT PLATE, ;S-BLOCK SCREW, BIND M2X4 SCREW, FLAT M3X6...
Parts Manual - English
Page 24
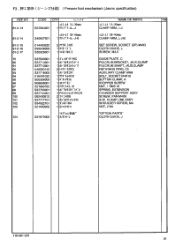
... 1 *vatitrbm.: 1 9''* M4 1 2',2t91.4 537870000 "tiiia>taiii" 1 X/ifIKJ NAME OF PARTS RM CLAMP ARM, L-J CLAMP ARM, L-J-B SET SCREW, SOCKET (CP) M4X5 CLOTH GUIDE, L SCREW, M3.5 GUIDE PLATE, C FULCRUM BRACKET, ;AUX.CLAMP FULCRUM SHAFT, ;AUX.CLAMP RETAINING RING, C5 AUXILIARY CLAMP ARM BOLT. SOCKET M4X10 BUTTON CLAMP, A STOPPER SCREW NUT. 1 SM3.18 SPRING, EXTENSION CYLINDER SUPPORT ASSY SCREW, PAN M4X8 AUX. i Xfia) / Presser foot mechanism (Jeans specification) REF.NO 81-2-14 81-2-14 81-2-15 81-2-16...
... 1 *vatitrbm.: 1 9''* M4 1 2',2t91.4 537870000 "tiiia>taiii" 1 X/ifIKJ NAME OF PARTS RM CLAMP ARM, L-J CLAMP ARM, L-J-B SET SCREW, SOCKET (CP) M4X5 CLOTH GUIDE, L SCREW, M3.5 GUIDE PLATE, C FULCRUM BRACKET, ;AUX.CLAMP FULCRUM SHAFT, ;AUX.CLAMP RETAINING RING, C5 AUXILIARY CLAMP ARM BOLT. SOCKET M4X10 BUTTON CLAMP, A STOPPER SCREW NUT. 1 SM3.18 SPRING, EXTENSION CYLINDER SUPPORT ASSY SCREW, PAN M4X8 AUX. i Xfia) / Presser foot mechanism (Jeans specification) REF.NO 81-2-14 81-2-14 81-2-15 81-2-16...
Parts Manual - English
Page 78
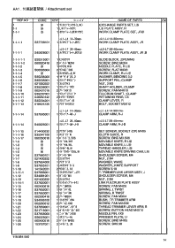
... 118.981-940 NAME OF PARTS RM EXCHANGE PARTS SET, L* L* PLATE ASSY, R WORK CLAMP PLATE SET, JR* WORK CLAMP PLATE ASSY, JR WORK CLAMP PLATE ASSY, JR ;B SLIDE BLOCK, ;OPENING SCREW, BIND M2X4 NEEDLE PLATE, R L* SCREW, FLAT M3X6 WORK CLAMP, R-J L* WASHER, BENDING 3.2 SUPPORT PIN, ;CLAMP NUT, 3 M3 SHAFT HOLDER, ;CLAMP SCREW, PAN M4X10 FULCRUM SHAFT, ;CLAMP RETAINING RING, C5 CLAMP LEVER, R BOLT, SOCKET M5X12 CLAMP ARM, R-J CLAMP ARM, R-J-B SET SCREW, SOCKET (CP) M4X5 CLOTH GUIDE, R SCREW, BIND M3.5X6 MOVABLE KNIFE, R L* MOVABLE KNIFE, L L* THREAD HANDLER, LX MOVABLE KNIFE DRIVING...
... 118.981-940 NAME OF PARTS RM EXCHANGE PARTS SET, L* L* PLATE ASSY, R WORK CLAMP PLATE SET, JR* WORK CLAMP PLATE ASSY, JR WORK CLAMP PLATE ASSY, JR ;B SLIDE BLOCK, ;OPENING SCREW, BIND M2X4 NEEDLE PLATE, R L* SCREW, FLAT M3X6 WORK CLAMP, R-J L* WASHER, BENDING 3.2 SUPPORT PIN, ;CLAMP NUT, 3 M3 SHAFT HOLDER, ;CLAMP SCREW, PAN M4X10 FULCRUM SHAFT, ;CLAMP RETAINING RING, C5 CLAMP LEVER, R BOLT, SOCKET M5X12 CLAMP ARM, R-J CLAMP ARM, R-J-B SET SCREW, SOCKET (CP) M4X5 CLOTH GUIDE, R SCREW, BIND M3.5X6 MOVABLE KNIFE, R L* MOVABLE KNIFE, L L* THREAD HANDLER, LX MOVABLE KNIFE DRIVING...

Parts Manual - English
Page 82
... GUIDE, C-J GIMP THREAD CLAMP PLATE, J SHOULDER SCREW, SM3.18 TENSION SPRING LEVER BRACKET ASSY, B T-TRIMMER LEVER BRACKET, B SCREW, PAN M3X10 LOWER THREAD PRESSER ASSY, J LOWER THREAD PRESSER LOWER THREAD PRESSER BRACKET DOWEL PIN, L NUT, 3 M3 SCREW, SM2.38 SPRING, COMPRESSION NUT, SM2.38-56 MOVABLE KNIFE, B ;UPPER SCREW, SM2.38 SCREW, BIND M3.5X6 GUIDE PLATE, C SCREW, FLAT M3X6 118-981-940 78 k-FirIF'fiC 2 Viafi3X6 NAME OF PARTS RM EXCHANGE PARTS SET, -2 CYLINDER SUPPORT SET CYLINDER SUPPORT ASSY AUX. AA2 11-14AZNIA / Attachment set . OF...
... GUIDE, C-J GIMP THREAD CLAMP PLATE, J SHOULDER SCREW, SM3.18 TENSION SPRING LEVER BRACKET ASSY, B T-TRIMMER LEVER BRACKET, B SCREW, PAN M3X10 LOWER THREAD PRESSER ASSY, J LOWER THREAD PRESSER LOWER THREAD PRESSER BRACKET DOWEL PIN, L NUT, 3 M3 SCREW, SM2.38 SPRING, COMPRESSION NUT, SM2.38-56 MOVABLE KNIFE, B ;UPPER SCREW, SM2.38 SCREW, BIND M3.5X6 GUIDE PLATE, C SCREW, FLAT M3X6 118-981-940 78 k-FirIF'fiC 2 Viafi3X6 NAME OF PARTS RM EXCHANGE PARTS SET, -2 CYLINDER SUPPORT SET CYLINDER SUPPORT ASSY AUX. AA2 11-14AZNIA / Attachment set . OF...
Instruction Manual - English
Page 24
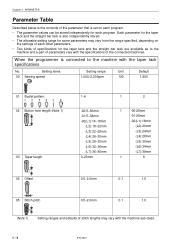
Setting items 00 Sewing speed Setting range Unit 1,000∼2,200rpm 100 Default 1,800 01 Eyelet pattern 02 Button hole length (Note 1) 03 Taper length 1∼6 -00:5∼50mm -01:5∼38mm -02(L1):14∼18mm (L2):18∼22mm (L3):22&#...When the programmer is connected to the machine and a part of parameters vary with the specifications of the connected machines. Chapter 4 PARAMETER Parameter Table Described below is the contents of the parameter that is set on the settings of each other parameters. • Two kinds of specifications for each program. • The...
Setting items 00 Sewing speed Setting range Unit 1,000∼2,200rpm 100 Default 1,800 01 Eyelet pattern 02 Button hole length (Note 1) 03 Taper length 1∼6 -00:5∼50mm -01:5∼38mm -02(L1):14∼18mm (L2):18∼22mm (L3):22&#...When the programmer is connected to the machine and a part of parameters vary with the specifications of the connected machines. Chapter 4 PARAMETER Parameter Table Described below is the contents of the parameter that is set on the settings of each other parameters. • Two kinds of specifications for each program. • The...

Instruction Manual - English
Page 31
... and press the [ENTER] key. Chapter 4 PARAMETER Changing the Parameter Described below is the setting method for parameter No. 00 (sewing speed) from[1800rpm] to [2000 rpm] as an example. (NOTE) The screen shown is an example when the programmer is connected to the machine with the straight bar tack specifications, a partly different screen will be displayed. 1. When the...
... and press the [ENTER] key. Chapter 4 PARAMETER Changing the Parameter Described below is the setting method for parameter No. 00 (sewing speed) from[1800rpm] to [2000 rpm] as an example. (NOTE) The screen shown is an example when the programmer is connected to the machine with the straight bar tack specifications, a partly different screen will be displayed. 1. When the...

Instruction Manual - Spanish
Page 4
... on the pressure gauge to drop to "0" before using the sewing machine. Turn off the power switch. If the machine develops a problem, contact your Brother dealer or a qualified electrician to observe all safety devices before carrying out cleaning, otherwise the machine may result. When carrying out inspection, adjustment and maintenance When replacing consumable parts such as specified by Brother. If any applications other than sewing. RH-981A iii Ask...
... on the pressure gauge to drop to "0" before using the sewing machine. Turn off the power switch. If the machine develops a problem, contact your Brother dealer or a qualified electrician to observe all safety devices before carrying out cleaning, otherwise the machine may result. When carrying out inspection, adjustment and maintenance When replacing consumable parts such as specified by Brother. If any applications other than sewing. RH-981A iii Ask...

Instruction Manual - Spanish
Page 6
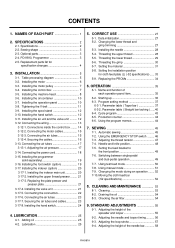
...12-2. Changing the lower thread and gimp trimming 27 5-3. Using the program memos 44 7. Switching between single-pedal and dual-pedal operation 49 7-7. Using manual mode 51 7-9. Adjusting the needle and looper timing........... 56 9-3. SPECIFICATIONS 2 2-1. INSTALLATION 5 3-1. Table processing diagram 5 3-2. Installing the control box 7 3-5. Connecting the motor cables 15 3-12-3. Replacing the plate presser and presser plate 21 3-17-4. Securing the air tubes and cables 23 3-17-8. Adding oil 25 4-2. Setting the installation position for specification changes...
...12-2. Changing the lower thread and gimp trimming 27 5-3. Using the program memos 44 7. Switching between single-pedal and dual-pedal operation 49 7-7. Using manual mode 51 7-9. Adjusting the needle and looper timing........... 56 9-3. SPECIFICATIONS 2 2-1. INSTALLATION 5 3-1. Table processing diagram 5 3-2. Installing the control box 7 3-5. Connecting the motor cables 15 3-12-3. Replacing the plate presser and presser plate 21 3-17-4. Securing the air tubes and cables 23 3-17-8. Adding oil 25 4-2. Setting the installation position for specification changes...

Instruction Manual - Spanish
Page 7
... 9-7. Adjusting the cutting pressure 63 9-14. Adjusting the cloth feed bar home position (-52 specifications 69 9-23.Adjusting the indexer hole spacing (-52 specifications 70 9-24.Adjusting the position of limit switch L (-52 specifications 71 9-25.Adjusting the position of the upper thread 66 9-17. Panel DIP switches 74 11-2. TROUBLESHOOTING 80 RH-981A CHANGING FUNCTIONS USING THE DIP SWITCHES 74 11-1. Adjusting the needle racking width (stitch width 60 9-10.Changing the knife cutting length (Replacing the...
... 9-7. Adjusting the cutting pressure 63 9-14. Adjusting the cloth feed bar home position (-52 specifications 69 9-23.Adjusting the indexer hole spacing (-52 specifications 70 9-24.Adjusting the position of limit switch L (-52 specifications 71 9-25.Adjusting the position of the upper thread 66 9-17. Panel DIP switches 74 11-2. TROUBLESHOOTING 80 RH-981A CHANGING FUNCTIONS USING THE DIP SWITCHES 74 11-1. Adjusting the needle racking width (stitch width 60 9-10.Changing the knife cutting length (Replacing the...

Instruction Manual - Spanish
Page 11
... in the knife cutting position between L1 - L7 for specification changes The sewing machine can be changed to any one of difference in the knife cutting position between L1 - L4 and L5 - L4 and L5 - L7 specifications. (Refer to page 63.) RH-981A 4 Replacement parts list for -02 and -52 specifications by replacing the specified parts with the appropriate parts given below. -02 specifications Specifications (buttonhole length) Replacement parts set Plate R assembly Plate L assembly Hammer Specification harness L1 (14...
... in the knife cutting position between L1 - L7 for specification changes The sewing machine can be changed to any one of difference in the knife cutting position between L1 - L4 and L5 - L4 and L5 - L7 specifications. (Refer to page 63.) RH-981A 4 Replacement parts list for -02 and -52 specifications by replacing the specified parts with the appropriate parts given below. -02 specifications Specifications (buttonhole length) Replacement parts set Plate R assembly Plate L assembly Hammer Specification harness L1 (14...

Instruction Manual - Spanish
Page 32
... needle bar, looper and spreader mechanisms and also the cam groove, roller, the felt at the sight glass. If the oil level is pressed by the arrows. 0861Q RH-981A 25 Raise the machine head. 2. Oil the moving parts of non-use. LUBRICATION CAUTION Turn off the power switch before using the sewing machine for the machine oil. 4-1. Filling the arm oil tank Filling the bed base oil...
... needle bar, looper and spreader mechanisms and also the cam groove, roller, the felt at the sight glass. If the oil level is pressed by the arrows. 0861Q RH-981A 25 Raise the machine head. 2. Oil the moving parts of non-use. LUBRICATION CAUTION Turn off the power switch before using the sewing machine for the machine oil. 4-1. Filling the arm oil tank Filling the bed base oil...

Instruction Manual - Spanish
Page 62
Ask your Brother dealer or a qualified electrician to "0" before using the machine. 9-1. The clearance between the right spreader and the right looper should be as small as the thickness of the lower thread. STANDARD ADJUSTMENTS 9. RH-981A 55 If the power switch and air need to be extremely careful to the same distance as possible. 3. Set the clearance between the right spreader...
Ask your Brother dealer or a qualified electrician to "0" before using the machine. 9-1. The clearance between the right spreader and the right looper should be as small as the thickness of the lower thread. STANDARD ADJUSTMENTS 9. RH-981A 55 If the power switch and air need to be extremely careful to the same distance as possible. 3. Set the clearance between the right spreader...

Instruction Manual - Spanish
Page 87
... RH-981A 80 13. TROUBLESHOOTING 13. Skipped stitches occur. Cause Remedy Thread tension control nut Adjust to pressure. Replace with a new one. Thread tension control nut pressure is too strong. Needle and looper adjustment is pressed by mistake, which could result in injury. the looper and spreader height. CAUTION Turn off the power switch and disconnect the power cord before carrying out troubleshooting, otherwise the machine will operate if the start switch is Adjust the needle bar...
... RH-981A 80 13. TROUBLESHOOTING 13. Skipped stitches occur. Cause Remedy Thread tension control nut Adjust to pressure. Replace with a new one. Thread tension control nut pressure is too strong. Needle and looper adjustment is pressed by mistake, which could result in injury. the looper and spreader height. CAUTION Turn off the power switch and disconnect the power cord before carrying out troubleshooting, otherwise the machine will operate if the start switch is Adjust the needle bar...

Instruction Manual - English
Page 4
... out cleaning, otherwise the machine may result. RH-981A iii Attach all safety precautions. Do not touch any applications other than sewing. If the machine develops a problem, contact your nearest Brother dealer or a qualified technician. Cleaning Turn off the power switch and disconnect the power cord from the air supply and wait for any of the electrical system. Turn off the power switch before using a work table...
... out cleaning, otherwise the machine may result. RH-981A iii Attach all safety precautions. Do not touch any applications other than sewing. If the machine develops a problem, contact your nearest Brother dealer or a qualified technician. Cleaning Turn off the power switch and disconnect the power cord from the air supply and wait for any of the electrical system. Turn off the power switch before using a work table...
Instruction Manual - English
Page 6
...-pedal and dual-pedal operation 49 7-7. PD-9810, Programmer 3 2-5. Setting the installation position for specification changes 4 3. Automatic sewing 45 7-2. Parameter table ( Straight bar tacking ) ......40 6-4. Setting the feed bracket to the front position 49 7-6. Cleaning 53 8-2. CORRECT USE 27 5-1. SEWING 45 7-1. Adding oil 25 4-2. Setting the material 31 5-8. Using test feed mode 50 7-8. STANDARD ADJUSTMENTS 55 9-1. Threading the lower thread 29 5-6. CONTENTS 1. Data initialization 27 5-2. Draining the oil 54 8-3. Installing the machine...
...-pedal and dual-pedal operation 49 7-7. PD-9810, Programmer 3 2-5. Setting the installation position for specification changes 4 3. Automatic sewing 45 7-2. Parameter table ( Straight bar tacking ) ......40 6-4. Setting the feed bracket to the front position 49 7-6. Cleaning 53 8-2. CORRECT USE 27 5-1. SEWING 45 7-1. Adding oil 25 4-2. Setting the material 31 5-8. Using test feed mode 50 7-8. STANDARD ADJUSTMENTS 55 9-1. Threading the lower thread 29 5-6. CONTENTS 1. Data initialization 27 5-2. Draining the oil 54 8-3. Installing the machine...

Instruction Manual - English
Page 7
... specifications 71 9-25.Adjusting the position of the lower thread and gimp 66 9-18.Adjusting the gimp length after trimming (-02, -52 specifications 67 9-19.Lower thread presser (-02, -52 specifications 67 9-20.Auxiliary clamp arm (-02, -52 specifications 68 9-21.Adjusting the cloth feeding speed (-52 specifications 68 9-22. Panel DIP switches 74 11-2. Adjusting the needle guard 59 9-7. Adjusting the cutting pressure 63 9-14. TROUBLESHOOTING 80 RH-981A 9-5. Adjusting the needle racking width (stitch width 60 9-10.Changing...
... specifications 71 9-25.Adjusting the position of the lower thread and gimp 66 9-18.Adjusting the gimp length after trimming (-02, -52 specifications 67 9-19.Lower thread presser (-02, -52 specifications 67 9-20.Auxiliary clamp arm (-02, -52 specifications 68 9-21.Adjusting the cloth feeding speed (-52 specifications 68 9-22. Panel DIP switches 74 11-2. Adjusting the needle guard 59 9-7. Adjusting the cutting pressure 63 9-14. TROUBLESHOOTING 80 RH-981A 9-5. Adjusting the needle racking width (stitch width 60 9-10.Changing...
Instruction Manual - English
Page 11
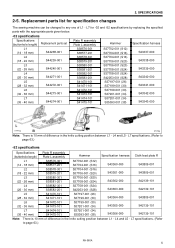
L4 and L5 - L7 specifications. (Refer to any one of L1 - SPECIFICATIONS 2-5. L4 and L5 - Replacement parts list for -02 and -52 specifications by replacing the specified parts with the appropriate parts given below. -02 specifications Specifications (buttonhole length) Replacement parts set Plate R assembly Plate L assembly Hammer Specification harness L1 (14 - 18 mm) S44238-001 S38576-301 S38577-...: There is 10 mm of difference in the knife cutting position between L1 - 2. L7 for specification changes The sewing machine can be changed to page 63.) RH-981A 4
L4 and L5 - L7 specifications. (Refer to any one of L1 - SPECIFICATIONS 2-5. L4 and L5 - Replacement parts list for -02 and -52 specifications by replacing the specified parts with the appropriate parts given below. -02 specifications Specifications (buttonhole length) Replacement parts set Plate R assembly Plate L assembly Hammer Specification harness L1 (14 - 18 mm) S44238-001 S38576-301 S38577-...: There is 10 mm of difference in the knife cutting position between L1 - 2. L7 for specification changes The sewing machine can be changed to page 63.) RH-981A 4

Instruction Manual - English
Page 62
... replacing consumable parts such as possible. 3. Adjust so that they operate correctly before carrying out inspection, adjustment and repair of the lower (looper) thread. 2. Disconnect the air hoses from the wall outlet at the following times, otherwise the machine may operate if the start switch is necessary, loosen the screw (10) and then move smoothly between the left on the pressure gauge to drop to...
... replacing consumable parts such as possible. 3. Adjust so that they operate correctly before carrying out inspection, adjustment and repair of the lower (looper) thread. 2. Disconnect the air hoses from the wall outlet at the following times, otherwise the machine may operate if the start switch is necessary, loosen the screw (10) and then move smoothly between the left on the pressure gauge to drop to...

Instruction Manual - English
Page 87
... could result in injury. Needle and needle adjustment is of poor quality. Repair with an oilstone or replace the looper with a new needle. Replace with a new one. MACHINE HEAD Problem Thread breaks. Thread is incorrect. Needle groove or needle hole are correctly threaded and that the needle is correctly installed. Needle and looper adjustment is damaged. Needle, looper, throat plate or thread path is Adjust the needle bar height or incorrect. Thread tension control nut pressure is bent. Needle is too strong or...
... could result in injury. Needle and needle adjustment is of poor quality. Repair with an oilstone or replace the looper with a new needle. Replace with a new one. MACHINE HEAD Problem Thread breaks. Thread is incorrect. Needle groove or needle hole are correctly threaded and that the needle is correctly installed. Needle and looper adjustment is damaged. Needle, looper, throat plate or thread path is Adjust the needle bar height or incorrect. Thread tension control nut pressure is bent. Needle is too strong or...


