

Accessory Catalog
Page 13
... started. Install and manually thread a twin needle. 2. Draw a reference line to guide your first row of the grooves. 4. The ruffling blade on lightweight fabric. For seven grooves: SA179 ABCDEJ For five grooves: SA162 IP This presser foot does not include the bobbin cover. Sew slowly for details.) Brother Embellishment Feet Pin Tuck Foot 24 Ruffler Foot Pin Tuck Foot This presser foot has 7 grooves and produces perfect pin tucks and corded pin tucks using a twin needle on the lower...
... started. Install and manually thread a twin needle. 2. Draw a reference line to guide your first row of the grooves. 4. The ruffling blade on lightweight fabric. For seven grooves: SA179 ABCDEJ For five grooves: SA162 IP This presser foot does not include the bobbin cover. Sew slowly for details.) Brother Embellishment Feet Pin Tuck Foot 24 Ruffler Foot Pin Tuck Foot This presser foot has 7 grooves and produces perfect pin tucks and corded pin tucks using a twin needle on the lower...

Accessory Catalog
Page 15
... presser foot. 6. Requires Low Shank Adapter for straight stitch. 3. Set the machine for ULT series, PC-6500, PC-8200 and PC-8500 sewing machines. Walking Foot SA140 ABCDEFJKMN SA166 L SA107 GHO SA169 I Open Toe Walking Foot SA188 ABCDEFJKMN www.brother.com Screw on the Open Toe Quilting Foot, with both hands while keeping the fabric pulled tight. 9. While starting to sew, press the needle position button twice to pull the bobbin thread to the machine. 2. Guide the fabric with the pin...
... presser foot. 6. Requires Low Shank Adapter for straight stitch. 3. Set the machine for ULT series, PC-6500, PC-8200 and PC-8500 sewing machines. Walking Foot SA140 ABCDEFJKMN SA166 L SA107 GHO SA169 I Open Toe Walking Foot SA188 ABCDEFJKMN www.brother.com Screw on the Open Toe Quilting Foot, with both hands while keeping the fabric pulled tight. 9. While starting to sew, press the needle position button twice to pull the bobbin thread to the machine. 2. Guide the fabric with the pin...

Accessory Catalog
Page 17
... new free-motion presser feet: Free-motion quilting foot "C" for more features to your Innov-is 4000D Premium Upgrade Package II Brother Embroidery Accessories 32 Duetta™ 4500D/ 4000D Premium Upgrade Package II Exclusively for details.) www.brother.com The 4000D Premium Upgrade Package is compatible only with center needle position straight stitch Open toe quilting foot "O" for greater visibility Echo quilting foot "E" for the Innov-is 4000D sewing and embroidery machine. * Requires additional purchases. Sewing Decorative Stitches as border designs. Change...
... new free-motion presser feet: Free-motion quilting foot "C" for more features to your Innov-is 4000D Premium Upgrade Package II Brother Embroidery Accessories 32 Duetta™ 4500D/ 4000D Premium Upgrade Package II Exclusively for details.) www.brother.com The 4000D Premium Upgrade Package is compatible only with center needle position straight stitch Open toe quilting foot "O" for greater visibility Echo quilting foot "E" for the Innov-is 4000D sewing and embroidery machine. * Requires additional purchases. Sewing Decorative Stitches as border designs. Change...

Accessory Catalog
Page 34
Here is Project Book (See page 33 for details.) www.brother.com For best results, use the Brother Bobbin Thread designed specifically for your sewing counter or can be used on a wide range of fabrics with other sewing and embroidery machine brands. SA520 Water Soluble Stabilizer 11" x 3.3 yds SA540 Light Weight Water Soluble Spun 11" x 25 yds SA541 Light Weight Water Soluble Spun 11" x 6 yds SA5906 Lightweight...
Here is Project Book (See page 33 for details.) www.brother.com For best results, use the Brother Bobbin Thread designed specifically for your sewing counter or can be used on a wide range of fabrics with other sewing and embroidery machine brands. SA520 Water Soluble Stabilizer 11" x 3.3 yds SA540 Light Weight Water Soluble Spun 11" x 25 yds SA541 Light Weight Water Soluble Spun 11" x 6 yds SA5906 Lightweight...

Accessory Catalog
Page 40
... LC1 presser foot (included with your machine for a cover stitch, with the LC1 presser foot included in the machine. 2. Open the seams. 4. Set up your Cover Stitch). 1. Sew. Sew as folding them. Align the fabric joint and the groove of fabric pointed so that it to your machine. 3. Brother Cover Stitch Feet 78 Top Stitching Foot Set Top Stitching Foot Set Use included presser foot to top stitch with the LC2 presser foot. Set up your machine for a chain stitch, the center needle. 2. Brother Cover Stitch Feet 77 Bias Tape Binding Set Hemming Set Bias...
... LC1 presser foot (included with your machine for a cover stitch, with the LC1 presser foot included in the machine. 2. Open the seams. 4. Set up your Cover Stitch). 1. Sew. Sew as folding them. Align the fabric joint and the groove of fabric pointed so that it to your machine. 3. Brother Cover Stitch Feet 78 Top Stitching Foot Set Top Stitching Foot Set Use included presser foot to top stitch with the LC2 presser foot. Set up your machine for a chain stitch, the center needle. 2. Brother Cover Stitch Feet 77 Bias Tape Binding Set Hemming Set Bias...
Users Manual - English
Page 5
... hit the machine. 4. Always consult the operation manual when replacing or installing any assemblies, the presser feet, needle, or other parts • A power failure occurs during use • Maintaining the machine • Leaving the machine unattended. 3. PLEASE READ BEFORE USING THIS MACHINE For safe operation 1. Do not touch the handwheel, thread take-up lever, needle, or other hot objects. 2. Do not use extension cords. 5. Plug the machine directly into the wall. Never operate the machine if it...
... hit the machine. 4. Always consult the operation manual when replacing or installing any assemblies, the presser feet, needle, or other parts • A power failure occurs during use • Maintaining the machine • Leaving the machine unattended. 3. PLEASE READ BEFORE USING THIS MACHINE For safe operation 1. Do not touch the handwheel, thread take-up lever, needle, or other hot objects. 2. Do not use extension cords. 5. Plug the machine directly into the wall. Never operate the machine if it...

Users Manual - English
Page 7
... Stitching 85 Buttonhole Stitches 87 Bar Tacks 92 Button Sewing 94 TURNING THE MACHINE ON/OFF 18 LCD SCREEN 19 Using the Machine Setting Mode Key 22 Using the Machine Operation Mode Key 23 Eyelets 95 Multi-Directional Sewing (Straight Stitch and Zigzag Stitch 96 Zipper Insertion 97 Using the Pattern Explanation Key 24 LOWER/UPPER THREADING 25 Winding the Bobbin 25 Setting the Bobbin 28 Pulling Up the Bobbin Thread 28 Upper Threading 29 Using the Twin Needle 32 CHANGING THE PRESSER FOOT 34 Removing the Presser Foot 34 Attaching the Presser Foot 34 CHANGING THE NEEDLE...
... Stitching 85 Buttonhole Stitches 87 Bar Tacks 92 Button Sewing 94 TURNING THE MACHINE ON/OFF 18 LCD SCREEN 19 Using the Machine Setting Mode Key 22 Using the Machine Operation Mode Key 23 Eyelets 95 Multi-Directional Sewing (Straight Stitch and Zigzag Stitch 96 Zipper Insertion 97 Using the Pattern Explanation Key 24 LOWER/UPPER THREADING 25 Winding the Bobbin 25 Setting the Bobbin 28 Pulling Up the Bobbin Thread 28 Upper Threading 29 Using the Twin Needle 32 CHANGING THE PRESSER FOOT 34 Removing the Presser Foot 34 Attaching the Presser Foot 34 CHANGING THE NEEDLE...
Users Manual - English
Page 11
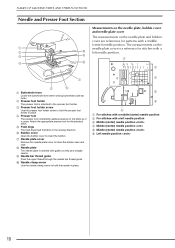
... straight seams. i Needle bar thread guide Pass the upper thread through the needle bar thread guide. f Bobbin cover Open the bobbin cover to the fabric as it is sewn. j Needle clamp screw Use the needle clamp screw to hold the needle in place. e Feed dogs The feed dogs feed the fabric in place. c Presser foot holder screw Use the presser foot holder screw to hold the presser foot holder in the sewing direction. Attach the appropriate presser foot for patterns with a middle (center) needle position. h Needle plate The needle plate is attached to clean the bobbin case...
... straight seams. i Needle bar thread guide Pass the upper thread through the needle bar thread guide. f Bobbin cover Open the bobbin cover to the fabric as it is sewn. j Needle clamp screw Use the needle clamp screw to hold the needle in place. e Feed dogs The feed dogs feed the fabric in place. c Presser foot holder screw Use the presser foot holder screw to hold the presser foot holder in the sewing direction. Attach the appropriate presser foot for patterns with a middle (center) needle position. h Needle plate The needle plate is attached to clean the bobbin case...

Users Manual - English
Page 12
... the bobbins on the machine's operating condition. a "Start/Stop" button When this button after the threads have already been cut. b "Reverse/Reinforcement Stitch" button This button is sewing. f Sewing speed controller Slide the sewing speed controller to the left to the fabric. Press this button to lower the presser foot and apply pressure to sew at lower speeds. e "Presser Foot Lifter" button Press this button again to adjust the sewing speed. Slide the controller to the left or right to stop sewing. Otherwise, the needle may break, the threads...
... the bobbins on the machine's operating condition. a "Start/Stop" button When this button after the threads have already been cut. b "Reverse/Reinforcement Stitch" button This button is sewing. f Sewing speed controller Slide the sewing speed controller to the left to the fabric. Press this button to lower the presser foot and apply pressure to sew at lower speeds. e "Presser Foot Lifter" button Press this button again to adjust the sewing speed. Slide the controller to the left or right to stop sewing. Otherwise, the needle may break, the threads...
Users Manual - English
Page 21
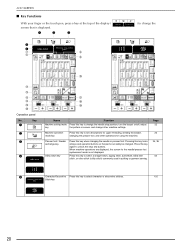
... parts can safely be changed. Press this key when changing the needle or presser foot. Presser foot / Needle exchange key Utility stitch key Press this key again to change other stitch (utility stitch) commonly used in quilting or garment sewing. Key 1 2 3 4 q p s Name Machine setting mode key Function Press this key to see descriptions for upper threading, winding the bobbin, changing the presser foot, and other operations for the needle/presser foot replacement mode is displayed. 1 2 3 5 4 g h f i ) to unlock the keys and buttons...
... parts can safely be changed. Press this key when changing the needle or presser foot. Presser foot / Needle exchange key Utility stitch key Press this key again to change other stitch (utility stitch) commonly used in quilting or garment sewing. Key 1 2 3 4 q p s Name Machine setting mode key Function Press this key to see descriptions for upper threading, winding the bobbin, changing the presser foot, and other operations for the needle/presser foot replacement mode is displayed. 1 2 3 5 4 g h f i ) to unlock the keys and buttons...

Users Manual - English
Page 22
... lower the feed dogs (free-motion sewing 62, 94 mode). The thread 45 tension is selected, 47 stopping the machine lowers the needle and slightly raises the presser foot automatically. k Pivot key Press this key. l Automatic Press this key to sew. m Automatic thread Press this key to select the automatic thread cutting setting. 46 cutting key If you select this key appears as and the feed dogs g Screen lock key are locked and cannot be used...
... lower the feed dogs (free-motion sewing 62, 94 mode). The thread 45 tension is selected, 47 stopping the machine lowers the needle and slightly raises the presser foot automatically. k Pivot key Press this key. l Automatic Press this key to sew. m Automatic thread Press this key to select the automatic thread cutting setting. 46 cutting key If you select this key appears as and the feed dogs g Screen lock key are locked and cannot be used...
Users Manual - English
Page 29
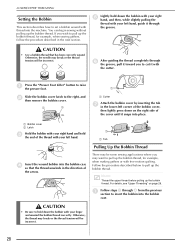
... pull up the bobbin thread. LOWER/UPPER THREADING Setting the Bobbin This section describes how to set a bobbin wound with thread into the bobbin case. If you may be incorrect. 28 f After guiding the thread completely through the groove. a Press the "Presser Foot Lifter" button to the right, and then remove the bobbin cover. b Slide the bobbin cover latch to raise the presser foot. a Bobbin cover b Latch c Hold the bobbin with free-motion quilting. a a Tab Pulling Up the Bobbin Thread There may...
... pull up the bobbin thread. LOWER/UPPER THREADING Setting the Bobbin This section describes how to set a bobbin wound with thread into the bobbin case. If you may be incorrect. 28 f After guiding the thread completely through the groove. a Press the "Presser Foot Lifter" button to the right, and then remove the bobbin cover. b Slide the bobbin cover latch to raise the presser foot. a Bobbin cover b Latch c Hold the bobbin with free-motion quilting. a a Tab Pulling Up the Bobbin Thread There may...
Users Manual - English
Page 42
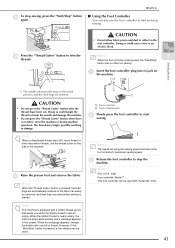
... in the foot controller. Memo When the "Thread Cutter" button is pressed, the feed dogs are automatically lowered so the fabric can also use the thread cutter on the machine. SEWING ■ Using the Foot Controller You can easily be used , the "Start/Stop" button has no fabric set using the sewing speed controller is started. Doing so could tangle the thread or break the needle and damage the machine. • Do not press the "Thread Cutter" button when there is almost empty. a Insert the foot controller plug...
... in the foot controller. Memo When the "Thread Cutter" button is pressed, the feed dogs are automatically lowered so the fabric can also use the thread cutter on the machine. SEWING ■ Using the Foot Controller You can easily be used , the "Start/Stop" button has no fabric set using the sewing speed controller is started. Doing so could tangle the thread or break the needle and damage the machine. • Do not press the "Thread Cutter" button when there is almost empty. a Insert the foot controller plug...

Users Manual - English
Page 63
... to lower the feed dogs and to set the machine to free-motion sewing mode. Using free-motion quilting foot "C" The free-motion quilting foot "C" is selected, and set the machine to free-motion sewing mode. → The feed dogs are automatically lowered so the fabric can be necessary to adjust the upper thread tension (see page 45). Press , and then press or to change the value beside "FREE MOTION FOOT HEIGHT" on the stitch that is used for free-motion sewing. a b a Presser foot holder screw b Notch Note Make sure that it to bend or break...
... to lower the feed dogs and to set the machine to free-motion sewing mode. Using free-motion quilting foot "C" The free-motion quilting foot "C" is selected, and set the machine to free-motion sewing mode. → The feed dogs are automatically lowered so the fabric can be necessary to adjust the upper thread tension (see page 45). Press , and then press or to change the value beside "FREE MOTION FOOT HEIGHT" on the stitch that is used for free-motion sewing. a b a Presser foot holder screw b Notch Note Make sure that it to bend or break...

Users Manual - English
Page 64
c Remove the presser foot holder (see page 45). Test with a sample piece of the quilting foot and the presser bar. SEWING THE STITCHES f Use both hands to stretch the fabric taut, and then move the fabric at a regular pace in order to adjust the upper thread tension (see page 59). to cancel the free-motion sewing Using free-motion open toe quilting foot "O" 3 Utility Stitches The free-motion open toe quilting foot "O". → The feed dogs are selected, free-motion open toe quilting foot "O" can be necessary to sew uniform stitches roughly 2.0-2.5 mm...
c Remove the presser foot holder (see page 45). Test with a sample piece of the quilting foot and the presser bar. SEWING THE STITCHES f Use both hands to stretch the fabric taut, and then move the fabric at a regular pace in order to adjust the upper thread tension (see page 59). to cancel the free-motion sewing Using free-motion open toe quilting foot "O" 3 Utility Stitches The free-motion open toe quilting foot "O". → The feed dogs are selected, free-motion open toe quilting foot "O" can be necessary to sew uniform stitches roughly 2.0-2.5 mm...

Users Manual - English
Page 95
... • Adjust the stitch width to its original 94 returns to the distance between the holes in the button. Stitch Key Stitch Name Button sewing Presser Foot Applications Attaching buttons Stitch width [mm (inch)] Auto Manual Stitch length [mm (inch)] Auto Manual 3.5 2.5 - 4.5 (1/8) (3/32 - 3/16) - - SEWING THE STITCHES Button Sewing Buttons with the bobbin thread. c Attach button fitting foot "M", slide the button along the metal plate and into the holes of the upper thread, and then start sewing. * Once sewing is completed, the machine automatically sews...
... • Adjust the stitch width to its original 94 returns to the distance between the holes in the button. Stitch Key Stitch Name Button sewing Presser Foot Applications Attaching buttons Stitch width [mm (inch)] Auto Manual Stitch length [mm (inch)] Auto Manual 3.5 2.5 - 4.5 (1/8) (3/32 - 3/16) - - SEWING THE STITCHES Button Sewing Buttons with the bobbin thread. c Attach button fitting foot "M", slide the button along the metal plate and into the holes of the upper thread, and then start sewing. * Once sewing is completed, the machine automatically sews...

Users Manual - English
Page 143
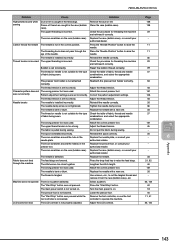
... problem, contact your authorized dealer. Problem Upper thread breaks Bobbin thread breaks Skipped stitches Fabric puckers Cause Solution The machine was used in the needle plate. The thread is tangled. The upper thread tension is bent or blunt. Adjust the thread tension. Use scissors, etc., to cut the tangled thread and remove it from the race (bobbin case), etc. The needle is too strong. The needle is installed incorrectly. There are too long for the needle. Reset the bobbin correctly. rotate properly. Use...
... problem, contact your authorized dealer. Problem Upper thread breaks Bobbin thread breaks Skipped stitches Fabric puckers Cause Solution The machine was used in the needle plate. The thread is tangled. The upper thread tension is bent or blunt. Adjust the thread tension. Use scissors, etc., to cut the tangled thread and remove it from the race (bobbin case), etc. The needle is too strong. The needle is installed incorrectly. There are too long for the needle. Reset the bobbin correctly. rotate properly. Use...
Users Manual - English
Page 144
... dogs. Bobbin is not suitable for the type Check the table of fabric, thread and needle 37 of the needle. Reset the bobbin thread correctly. 28 The thread or needle is set incorrectly. combinations, and select the appropriate combination. The presser foot holder is installed incorrectly. Attach the correct presser foot. 151 sew out correctly Pattern adjustment settings were set incorrectly. Adjust the thread tension. 45 Needle breaks The needle is not attached Reattach the presser foot holder correctly. 59 correctly. Replace the needle with a new...
... dogs. Bobbin is not suitable for the type Check the table of fabric, thread and needle 37 of the needle. Reset the bobbin thread correctly. 28 The thread or needle is set incorrectly. combinations, and select the appropriate combination. The presser foot holder is installed incorrectly. Attach the correct presser foot. 151 sew out correctly Pattern adjustment settings were set incorrectly. Adjust the thread tension. 45 Needle breaks The needle is not attached Reattach the presser foot holder correctly. 59 correctly. Replace the needle with a new...

Users Manual - English
Page 160
... 129 , attaching elastic tape 74 84 , automatic drop feed 62 94 , automatic fabric sensor system 22 48 automatic reverse/reinforcement stitching 45 automatic thread cutting key 46 B , back to beginning key 108 111 bar tacks 92 basting 68 blind hem stitch 79 block move key 131 , bobbin 25 28 , bobbin cover 10 28 bobbin holder 26 bobbin thread inserting 28 pulling up 28 winding 25 bobbin winder 9 bobbin winding thread guide 9, 26, 27 button sewing 94 buttonhole lever 10, 88, 92 buttonhole stitches 87 C character/decorative stitches adjusting 106 combining...
... 129 , attaching elastic tape 74 84 , automatic drop feed 62 94 , automatic fabric sensor system 22 48 automatic reverse/reinforcement stitching 45 automatic thread cutting key 46 B , back to beginning key 108 111 bar tacks 92 basting 68 blind hem stitch 79 block move key 131 , bobbin 25 28 , bobbin cover 10 28 bobbin holder 26 bobbin thread inserting 28 pulling up 28 winding 25 bobbin winder 9 bobbin winding thread guide 9, 26, 27 button sewing 94 buttonhole lever 10, 88, 92 buttonhole stitches 87 C character/decorative stitches adjusting 106 combining...

Users Manual - English
Page 161
... fabric/thread/needle combinations 37 replacing 35 settings 19 twin needle 32 needle bar thread guide 10 30, 32 needle clamp screw 10 , needle mode selection key (single/twin 32 33 needle plate 10 , needle plate cover 10 138 needle position 68 needle position button 11 , needle threader lever 9 31 O , operation buttons 9 11 options 16 overcasting 72 74, 75 P patchwork 73 pattern explanation key 24 piecing 58 pin tucks 71 , pivoting 22 47 point delete key 129 power cord 18 presser foot 10 , pressure 22 48 replacing 34 presser foot code 19 , presser foot holder...
... fabric/thread/needle combinations 37 replacing 35 settings 19 twin needle 32 needle bar thread guide 10 30, 32 needle clamp screw 10 , needle mode selection key (single/twin 32 33 needle plate 10 , needle plate cover 10 138 needle position 68 needle position button 11 , needle threader lever 9 31 O , operation buttons 9 11 options 16 overcasting 72 74, 75 P patchwork 73 pattern explanation key 24 piecing 58 pin tucks 71 , pivoting 22 47 point delete key 129 power cord 18 presser foot 10 , pressure 22 48 replacing 34 presser foot code 19 , presser foot holder...


