
Accessory Catalog - English
Page 22
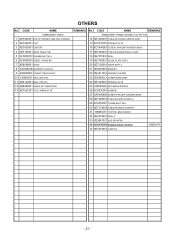
CODE NAME REMARKS EMBROIDERY FRAME HOLDER C (for PR-1000) 14 XE7400001 TUBULAR ROUND ARM RA ASSY 15 XC7076051 SPRING,PLATE 16 XC7644051 SCREW, PAM (S/P WASHER) M3X5 17 XE7149001 TUBLAR ROUND ARM LC ASSY 18 XE7375001 SEAL 19 XE7140001 GUIDE PLATE ASSY 20 XE7152001 HOOP STAY C 21 XE2270001 MAGNET 22 XE2271001 MAGNET HOLDER 23...
CODE NAME REMARKS EMBROIDERY FRAME HOLDER C (for PR-1000) 14 XE7400001 TUBULAR ROUND ARM RA ASSY 15 XC7076051 SPRING,PLATE 16 XC7644051 SCREW, PAM (S/P WASHER) M3X5 17 XE7149001 TUBLAR ROUND ARM LC ASSY 18 XE7375001 SEAL 19 XE7140001 GUIDE PLATE ASSY 20 XE7152001 HOOP STAY C 21 XE2270001 MAGNET 22 XE2271001 MAGNET HOLDER 23...

Users Manual - English
Page 10
... to performing the specified operations at the starting and end positions in the frame. x Since the machine can be freely determined after the fabric is hooped and the embroidery frame is attached to the machine, regardless of thread trimming, you don't need to replace the thread spools With single-needle machines...
... to performing the specified operations at the starting and end positions in the frame. x Since the machine can be freely determined after the fabric is hooped and the embroidery frame is attached to the machine, regardless of thread trimming, you don't need to replace the thread spools With single-needle machines...

Users Manual - English
Page 16
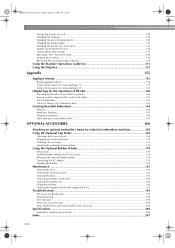
...the embroidering settings screen 25 Specifying Embroidering Setting 26 Previewing the Image ...27 Checking a preview image ...27 Hooping the Fabric in the Embroidery Frame 28 Hooping the fabric in the embroidery frame...28 Attaching the Embroidery Frame to the Machine 30 Attaching the embroidery frame ... Using the Embroidery Frames 63 Embroidery frame types and applications ...63 Attaching Iron-On Stabilizer (Backing) to Fabric 64 Hooping the Fabric...65 Hooping the fabric in the extra-large and large embroidery frames 65 Using the embroidery sheet...66 Large/small pieces of fabric...
...the embroidering settings screen 25 Specifying Embroidering Setting 26 Previewing the Image ...27 Checking a preview image ...27 Hooping the Fabric in the Embroidery Frame 28 Hooping the fabric in the embroidery frame...28 Attaching the Embroidery Frame to the Machine 30 Attaching the embroidery frame ... Using the Embroidery Frames 63 Embroidery frame types and applications ...63 Attaching Iron-On Stabilizer (Backing) to Fabric 64 Hooping the Fabric...65 Hooping the fabric in the extra-large and large embroidery frames 65 Using the embroidery sheet...66 Large/small pieces of fabric...
Users Manual - English
Page 18
...pattern to create appliqués (1 157 Using a frame pattern to create appliqués (2 158 Helpful Tips for the Operation of PR-600 160 Checking the thread tension of built-in patterns 160 Sewing a pattern aligned with a mark on the fabric 161 Color thread table ......163 Colors of Tajima (.dst) embroidery data ...163 Creating Beautiful Embroidery 164 Threads ...164 Stabilizers (Backing) ...165 Hooping Techniques...166 Fabric/stabilizer compatibility chart ...167 OPTIONAL ACCESSORIES 168 Attaching an optional embroidery frame for industrial embroidery machines 168 Using the...
...pattern to create appliqués (1 157 Using a frame pattern to create appliqués (2 158 Helpful Tips for the Operation of PR-600 160 Checking the thread tension of built-in patterns 160 Sewing a pattern aligned with a mark on the fabric 161 Color thread table ......163 Colors of Tajima (.dst) embroidery data ...163 Creating Beautiful Embroidery 164 Threads ...164 Stabilizers (Backing) ...165 Hooping Techniques...166 Fabric/stabilizer compatibility chart ...167 OPTIONAL ACCESSORIES 168 Attaching an optional embroidery frame for industrial embroidery machines 168 Using the...

Users Manual - English
Page 31
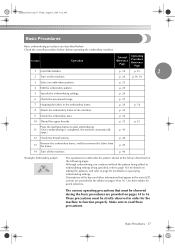
... May Help You 57 Installing the Bobbin 1 Turning ON the Machine 2 Selecting an Embroidery Pattern 3 Editing the Embroidery Pattern 4 Specifying Embroidering Setting 5 Previewing the Image 6 Hooping the Fabric in order-from turning on the machine and sewing a pattern to finishing sewing. Sapphire.book Page 13 Friday, August 1, 2003 9:12 AM 2 EMBROIDERING...
... May Help You 57 Installing the Bobbin 1 Turning ON the Machine 2 Selecting an Embroidery Pattern 3 Editing the Embroidery Pattern 4 Specifying Embroidering Setting 5 Previewing the Image 6 Hooping the Fabric in order-from turning on the machine and sewing a pattern to finishing sewing. Sapphire.book Page 13 Friday, August 1, 2003 9:12 AM 2 EMBROIDERING...
Users Manual - English
Page 35
p. 23 4 Edit the embroidery pattern. p. 27 7 Hooping the fabric in order for details on specifying embroidering settings. p. 33 p.15 Press the start embroidering. 11 (Once embroidering is completed, the machine automatically stops.) p. ...
p. 23 4 Edit the embroidery pattern. p. 27 7 Hooping the fabric in order for details on specifying embroidering settings. p. 33 p.15 Press the start embroidering. 11 (Once embroidering is completed, the machine automatically stops.) p. ...
Users Manual - English
Page 46
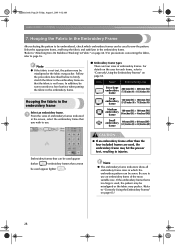
...other than the four included frames are four sizes of embroidery frames. Hooping the Fabric in the embroidery frame so that is too large is not loose. Select the appropriate frame, ...and hoop the fabric and stabilizer in the embroidery frame. (Refer to "Attaching Iron-On Stabilizer (...on a level surface when putting the fabric in the screen, select the embroidery frame that cannot be sewn. Hooping the fabric in the embroidery frame Select an embroidery frame. 1 From the sizes of the most suitable size....
...other than the four included frames are four sizes of embroidery frames. Hooping the Fabric in the embroidery frame so that is too large is not loose. Select the appropriate frame, ...and hoop the fabric and stabilizer in the embroidery frame. (Refer to "Attaching Iron-On Stabilizer (...on a level surface when putting the fabric in the screen, select the embroidery frame that cannot be sewn. Hooping the fabric in the embroidery frame Select an embroidery frame. 1 From the sizes of the most suitable size....
Users Manual - English
Page 47
... the outer frame. 2 1 1 Screw Place the fabric with the optional cap frames. (Refer to "Hooping Techniques" on page 166.) 10 Memo 11 ● This embroidery machine can be used to "Hooping the Fabric" on the type of stabilizer material differ depending on page 65. Press the inner frame into... to 9 achieve the best embroidering results. (Refer to 12 "Using the Optional Cap Frame" on hooping fabric in the large embroidery frame and the extra-large embroidery frame, refer to hoop the fabric in the small embroidery frame is used with the right side up on top 3 of the...
... the outer frame. 2 1 1 Screw Place the fabric with the optional cap frames. (Refer to "Hooping Techniques" on page 166.) 10 Memo 11 ● This embroidery machine can be used to "Hooping the Fabric" on the type of stabilizer material differ depending on page 65. Press the inner frame into... to 9 achieve the best embroidering results. (Refer to 12 "Using the Optional Cap Frame" on hooping fabric in the large embroidery frame and the extra-large embroidery frame, refer to hoop the fabric in the small embroidery frame is used with the right side up on top 3 of the...

Users Manual - English
Page 48
... red. As an example, the procedure for attaching the small embroidery frame is lit in the bobbin. Attaching the Embroidery Frame to the Machine After hooping the fabric in injuries. ● When attaching the embroidery frame, make sure that the start sewing. Attaching the embroidery frame Adjust the width of the...
... red. As an example, the procedure for attaching the small embroidery frame is lit in the bobbin. Attaching the Embroidery Frame to the Machine After hooping the fabric in injuries. ● When attaching the embroidery frame, make sure that the start sewing. Attaching the embroidery frame Adjust the width of the...
Users Manual - English
Page 77
... Replacing the needle / 61 Correctly Using the Embroidery Frames 63 Embroidery frame types and applications / 63 Attaching Iron-On Stabilizer (Backing) to Fabric 64 Hooping the Fabric 65 Hooping the fabric in chapter 2, such as sewing a pattern with Designs of Seven or More Colors 75 Change thread spools message / 75 Easily changing...
... Replacing the needle / 61 Correctly Using the Embroidery Frames 63 Embroidery frame types and applications / 63 Attaching Iron-On Stabilizer (Backing) to Fabric 64 Hooping the Fabric 65 Hooping the fabric in chapter 2, such as sewing a pattern with Designs of Seven or More Colors 75 Change thread spools message / 75 Easily changing...
Users Manual - English
Page 81
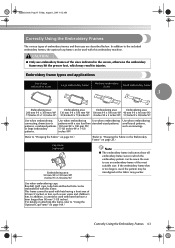
... 63 Friday, August 1, 2003 9:12 AM Correctly Using the Embroidery Frames The various types of 50 mm (2 inches) or less, such as nametags. (Refer to "Hooping the Fabric" on page 28.) Cap frame (optional) Embroidering area: 50 mm (H) × 130 mm (W) (2 inches (H) × 5-1/8 inches (W)) Note ● ...their uses are described below. CAUTION ● Only use an embroidery frame of the sizes indicated in which may pucker. In addition to "Hooping the Fabric in the Embroidery Frame" on page 65.) (Refer to the included embroidery frames, the optional cap frame can be used , the...
... 63 Friday, August 1, 2003 9:12 AM Correctly Using the Embroidery Frames The various types of 50 mm (2 inches) or less, such as nametags. (Refer to "Hooping the Fabric" on page 28.) Cap frame (optional) Embroidering area: 50 mm (H) × 130 mm (W) (2 inches (H) × 5-1/8 inches (W)) Note ● ...their uses are described below. CAUTION ● Only use an embroidery frame of the sizes indicated in which may pucker. In addition to "Hooping the Fabric in the Embroidery Frame" on page 65.) (Refer to the included embroidery frames, the optional cap frame can be used , the...
Users Manual - English
Page 82
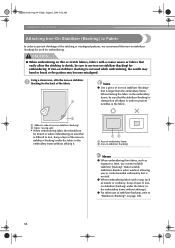
... is not stiff. ● When embroidering fabric with a coarse weave or fabrics that easily allow the stitching to shrink, be sure to iron, hoop a layer of the iron-on stabilizer (backing) under the fabric in the embroidery frame without affixing it . 12 1 Area of embroidery frame 2... Iron-on stabilizer (backing) Memo ● When embroidering thin fabrics, such as towels or corduroy, hoop a layer of ironon stabilizer (backing) under the fabric in the fabric. 2 1 Adhesive side of iron-on stabilizer (backing) 2 Fabric (wrong side) &#...
... is not stiff. ● When embroidering fabric with a coarse weave or fabrics that easily allow the stitching to shrink, be sure to iron, hoop a layer of the iron-on stabilizer (backing) under the fabric in the embroidery frame without affixing it . 12 1 Area of embroidery frame 2... Iron-on stabilizer (backing) Memo ● When embroidering thin fabrics, such as towels or corduroy, hoop a layer of ironon stabilizer (backing) under the fabric in the fabric. 2 1 Adhesive side of iron-on stabilizer (backing) 2 Fabric (wrong side) &#...
Users Manual - English
Page 83
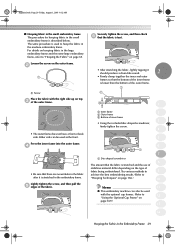
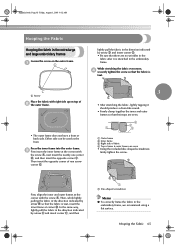
Sapphire.book Page 65 Friday, August 1, 2003 9:12 AM Hooping the Fabric Hooping the fabric in the extra-large and large embroidery frames Loosen the screw on top of inner & outer frames are even. 4 2 1 3 1 Outer frame 2 Inner frame 3 ... indicated by arrow D and insert corner D. • Be sure that their tops are even • Using the included disc-shaped screwdriver, firmly tighten the screw. Hooping the Fabric 65 Press the inner frame into the outer frame. 3 First insert the inner frame at the corner with the screw A. First, align the...
Sapphire.book Page 65 Friday, August 1, 2003 9:12 AM Hooping the Fabric Hooping the fabric in the extra-large and large embroidery frames Loosen the screw on top of inner & outer frames are even. 4 2 1 3 1 Outer frame 2 Inner frame 3 ... indicated by arrow D and insert corner D. • Be sure that their tops are even • Using the included disc-shaped screwdriver, firmly tighten the screw. Hooping the Fabric 65 Press the inner frame into the outer frame. 3 First insert the inner frame at the corner with the screw A. First, align the...
Users Manual - English
Page 84
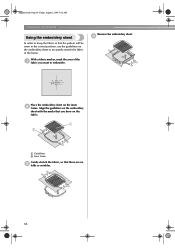
... you drew on the inner 2 frame. Sapphire.book Page 66 Friday, August 1, 2003 9:12 AM OTHER BASIC PROCEDURES Using the embroidery sheet In order to hoop the fabric so that the pattern will be sewn in the frame. Remove the embroidery sheet. 4 Place the embroidery sheet on the fabric. 1 Guidelines 2 Inner...
... you drew on the inner 2 frame. Sapphire.book Page 66 Friday, August 1, 2003 9:12 AM OTHER BASIC PROCEDURES Using the embroidery sheet In order to hoop the fabric so that the pattern will be sewn in the frame. Remove the embroidery sheet. 4 Place the embroidery sheet on the fabric. 1 Guidelines 2 Inner...
Users Manual - English
Page 85
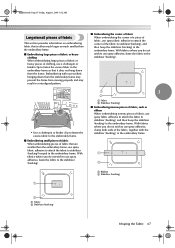
... such as ribbon When embroidering narrow pieces of fabric, use spray fabric adhesive to attach the fabric to stabilizer (backing), and then hoop the stabilizer (backing) in the embroidery frame. Embroidering with the stabilizer (backing), in the embroidery frame. ■ Embroidering small pieces..., use spray adhesive, baste the fabric to the stabilizer (backing). 2 1 Ribbon 2 Stabilizer (backing) 1 2 1 Fabric 2 Stabilizer (backing) Hooping the Fabric 67 With fabrics where you do not wish to use spray adhesive, clamp both ends of the fabric, together with excess fabric hanging...
... such as ribbon When embroidering narrow pieces of fabric, use spray fabric adhesive to attach the fabric to stabilizer (backing), and then hoop the stabilizer (backing) in the embroidery frame. Embroidering with the stabilizer (backing), in the embroidery frame. ■ Embroidering small pieces..., use spray adhesive, baste the fabric to the stabilizer (backing). 2 1 Ribbon 2 Stabilizer (backing) 1 2 1 Fabric 2 Stabilizer (backing) Hooping the Fabric 67 With fabrics where you do not wish to use spray adhesive, clamp both ends of the fabric, together with excess fabric hanging...
Users Manual - English
Page 88
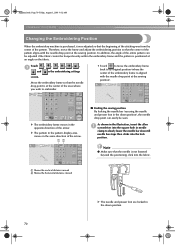
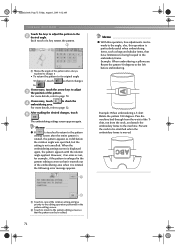
... is positioned at the sewing position. X The pattern in the pattern display area moves in the same direction of the entire pattern can easily be hooped evenly within the embroidery frame and the pattern is not lowered beyond the positioning click into the fabric. 1 Shows the vertical distance moved 2 Shows the...
... is positioned at the sewing position. X The pattern in the pattern display area moves in the same direction of the entire pattern can easily be hooped evenly within the embroidery frame and the pattern is not lowered beyond the positioning click into the fabric. 1 Shows the vertical distance moved 2 Shows the...
Users Manual - English
Page 90
.... 2 Touch to return to the pattern editing screen so that have limitations to the angle; also, this operation, fine adjustments can be made to being hooped in the pattern editing screen so that it did before embroidering. The embroidering settings screen appears again. Example: When embroidering a T-shirt Rotate the pattern 180...
.... 2 Touch to return to the pattern editing screen so that have limitations to the angle; also, this operation, fine adjustments can be made to being hooped in the pattern editing screen so that it did before embroidering. The embroidering settings screen appears again. Example: When embroidering a T-shirt Rotate the pattern 180...
Users Manual - English
Page 173
... to create appliqués (1) / 157 Using a frame pattern to create appliqués (2) / 158 Helpful Tips for the Operation of PR-600 160 Checking the thread tension of built-in patterns / 160 Sewing a pattern aligned with a mark on the fabric / 161 Color thread ...table / 163 Colors of Tajima (.dst) embroidery data / 163 Creating Beautiful Embroidery 164 Threads / 164 Stabilizers (Backing) / 165 Hooping Techniques / 166 Fabric/stabilizer compatibility chart / 167 OPTIONAL ACCESSORIES Attaching an optional embroidery frame for industrial embroidery machines ......168 Using the ...
... to create appliqués (1) / 157 Using a frame pattern to create appliqués (2) / 158 Helpful Tips for the Operation of PR-600 160 Checking the thread tension of built-in patterns / 160 Sewing a pattern aligned with a mark on the fabric / 161 Color thread ...table / 163 Colors of Tajima (.dst) embroidery data / 163 Creating Beautiful Embroidery 164 Threads / 164 Stabilizers (Backing) / 165 Hooping Techniques / 166 Fabric/stabilizer compatibility chart / 167 OPTIONAL ACCESSORIES Attaching an optional embroidery frame for industrial embroidery machines ......168 Using the ...

Users Manual - English
Page 183
... where the desired result is less likely to hold a tremendous amount of stitches. Water-soluble stabilizer is ideal whenever you may cause the design to -hoop fabrics. This backing is completed and 2. When the embroidery is finished, the fabric can be removed, the excess backing can easily be disposed of an...
... where the desired result is less likely to hold a tremendous amount of stitches. Water-soluble stabilizer is ideal whenever you may cause the design to -hoop fabrics. This backing is completed and 2. When the embroidery is finished, the fabric can be removed, the excess backing can easily be disposed of an...

Users Manual - English
Page 184
...on a tubular machine). Overstretching the fabric during sewing or damage the product altogether. Sapphire.book Page 166 Friday, August 1, 2003 9:12 AM Appendix Hooping Techniques "Use the right tool for the right job" is necessary to make the fabric flat and smooth. Cap frames: These are available in ...garments to hold caps for use on a flat machine) or one that you pull on the back side. They are specialized embroidery frames (hoops) designed to be sure that allows sewing a flattened cap (for embroidering. If there are bubbles or wrinkles that must be removed, be ...
...on a tubular machine). Overstretching the fabric during sewing or damage the product altogether. Sapphire.book Page 166 Friday, August 1, 2003 9:12 AM Appendix Hooping Techniques "Use the right tool for the right job" is necessary to make the fabric flat and smooth. Cap frames: These are available in ...garments to hold caps for use on a flat machine) or one that you pull on the back side. They are specialized embroidery frames (hoops) designed to be sure that allows sewing a flattened cap (for embroidering. If there are bubbles or wrinkles that must be removed, be ...


