

Users Manual - English
Page 2
... be taken, DANGER - Close attention is necessary when the sewing machine is used by pulling on cord. Keep ventilation openings of the sewing machine and foot control free from outlet. G Do not use the proper needle plate. G Do not unplug by or near children. To unplug, grasp the plug,... accumulation of electric shock, this plug is not intended for use as threading the needle, changing the needle, threading the bobbin or changing the presser foot etc. When using ." Replace bulb with any object into water. G Never operate this sewing machine if it has a damaged cord or plug, if ...
... be taken, DANGER - Close attention is necessary when the sewing machine is used by pulling on cord. Keep ventilation openings of the sewing machine and foot control free from outlet. G Do not use the proper needle plate. G Do not unplug by or near children. To unplug, grasp the plug,... accumulation of electric shock, this plug is not intended for use as threading the needle, changing the needle, threading the bobbin or changing the presser foot etc. When using ." Replace bulb with any object into water. G Never operate this sewing machine if it has a damaged cord or plug, if ...

Users Manual - English
Page 4
...not use G Maintaining the machine G Leaving the machine unattended G Do not place anything on the foot controller. If the problem persists, please consult your authorised Brother service center visit www.brother.com and use . To find out the name and phone number for home use our convenient ...USING YOUR SEWING MACHINE For safe operation G Be sure to watch the placement of the finest sewing machines available for your nearest authorized Brother service center. G Plug the machine directly into it, we suggest that a malfunction occurs or adjustment is one of your sewing machine...
...not use G Maintaining the machine G Leaving the machine unattended G Do not place anything on the foot controller. If the problem persists, please consult your authorised Brother service center visit www.brother.com and use . To find out the name and phone number for home use our convenient ...USING YOUR SEWING MACHINE For safe operation G Be sure to watch the placement of the finest sewing machines available for your nearest authorized Brother service center. G Plug the machine directly into it, we suggest that a malfunction occurs or adjustment is one of your sewing machine...

Users Manual - English
Page 5
...Needle Threader 10 Stitch Samples and Needle Chart 12 Stitch Samples 12 Thread Tension 12 Changing Presser Feet 13 Changing Presser Feet (Zipper Foot 13 Presser Feet 13 Basic Sewing 14 Basic Sewing 14 Pin Feeding (for hard-to-handle fabrics 14 Pin Feeding Mechanism 14 Rolled ...Hem Foot 15 Zipper Foot 16 Invisible Zipper Foot 17 1/4" Foot 17 Quilting Foot 18 Walking Foot 18 Fabric Separator (for joining lining to fabric 19 Seam Guide 19 Caring for Your Machine 20 Cleaning the...
...Needle Threader 10 Stitch Samples and Needle Chart 12 Stitch Samples 12 Thread Tension 12 Changing Presser Feet 13 Changing Presser Feet (Zipper Foot 13 Presser Feet 13 Basic Sewing 14 Basic Sewing 14 Pin Feeding (for hard-to-handle fabrics 14 Pin Feeding Mechanism 14 Rolled ...Hem Foot 15 Zipper Foot 16 Invisible Zipper Foot 17 1/4" Foot 17 Quilting Foot 18 Walking Foot 18 Fabric Separator (for joining lining to fabric 19 Seam Guide 19 Caring for Your Machine 20 Cleaning the...

Users Manual - English
Page 6
... 7 Lining Plate Screw (2) 8 Fabric Separator 9 Feed Pin 10 Feed Pin Changer 11 General Purpose Foot 12 Bobbin (5) 13 Spool Cap 14 Rolled Hem Foot 15 Zipper Foot 16 Invisible Zipper Foot 17 1/4" Foot 18 Quilting Foot 19 Walking Foot 20 Seam Guide 21 Foot Controller 22 Fabric Extension Table Part Code XA0917-052 125877-001 125878-001 XA4527...-051 XA1425-001 SA159 XA2111-000 X57138-001 112797-001 148475-001 XA7258-001 XA7255-201 XA7253-001 XA7256-001 XC1220-051 XC1387-051 Note Foot controller: Model P This foot controller is used for sewing machine model PQ1500S. 1
... 7 Lining Plate Screw (2) 8 Fabric Separator 9 Feed Pin 10 Feed Pin Changer 11 General Purpose Foot 12 Bobbin (5) 13 Spool Cap 14 Rolled Hem Foot 15 Zipper Foot 16 Invisible Zipper Foot 17 1/4" Foot 18 Quilting Foot 19 Walking Foot 20 Seam Guide 21 Foot Controller 22 Fabric Extension Table Part Code XA0917-052 125877-001 125878-001 XA4527...-051 XA1425-001 SA159 XA2111-000 X57138-001 112797-001 148475-001 XA7258-001 XA7255-201 XA7253-001 XA7256-001 XC1220-051 XC1387-051 Note Foot controller: Model P This foot controller is used for sewing machine model PQ1500S. 1

Users Manual - English
Page 7
Machine Features Presser Foot Pressure Three Holed Adjustment Dial (Page 4) Thread Guide (Page 10) Light Switch (Page 5) Thread Trimmer Sewing Area Light (Page 6) Automatic Needle Threader (Page 10 and ... 7) Hand Wheel (Page 3) Indicator Lamp Needle Stop Position Button (Page 5) Power Switch (Page 3) Reverse Stitch Lever (Page 3) Power Socket (Page 3) Feed Dog Adjustment Knob (Page 5) Foot Controller Jack (Page 3) Knee Lift (Page 4) Air Vents Handle Thread Guide for Bobbin Winding (Page 7) Presser...
Machine Features Presser Foot Pressure Three Holed Adjustment Dial (Page 4) Thread Guide (Page 10) Light Switch (Page 5) Thread Trimmer Sewing Area Light (Page 6) Automatic Needle Threader (Page 10 and ... 7) Hand Wheel (Page 3) Indicator Lamp Needle Stop Position Button (Page 5) Power Switch (Page 3) Reverse Stitch Lever (Page 3) Power Socket (Page 3) Feed Dog Adjustment Knob (Page 5) Foot Controller Jack (Page 3) Knee Lift (Page 4) Air Vents Handle Thread Guide for Bobbin Winding (Page 7) Presser...

Users Manual - English
Page 8
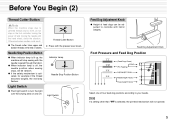
...✽ When the feed adjustment dial is set between 5-7mm, the reverse stitch length is desired, turn on right side of fabric. Power Cord Foot Controller Power Switch I " position to turn the tension dial to "I O Thread Tension Dial G When tighter thread tension is always 5 mm....Higher number = longer stitches 45 Reverse Stitch Lever G Sewing in reverse is possible when the reverse stitch lever is in cord. G Plug foot controller into machine. G When looser thread tension is used for sewing machine model PQ1500S. Upper and bobbin threads will then meet on . Before...
...✽ When the feed adjustment dial is set between 5-7mm, the reverse stitch length is desired, turn on right side of fabric. Power Cord Foot Controller Power Switch I " position to turn the tension dial to "I O Thread Tension Dial G When tighter thread tension is always 5 mm....Higher number = longer stitches 45 Reverse Stitch Lever G Sewing in reverse is possible when the reverse stitch lever is in cord. G Plug foot controller into machine. G When looser thread tension is used for sewing machine model PQ1500S. Upper and bobbin threads will then meet on . Before...

Users Manual - English
Page 9
...✽ See "Thread Tension" on page 5. See also: "Feed Dog Adjustment Knob" on page 12. Presser Foot Lift Lever G Lowering the presser foot lift lever lowers the sewing foot down onto the fabric and engages the thread tension function. ✽ When working with heavy fabrics or other fabrics ...that don't slide easily under the foot, raise the presser foot lever to lift and lower the presser foot easily, leaving both your hands free. Pressure Indicator Needle Fabric Extension Table G Lower table feet and attach ...
...✽ See "Thread Tension" on page 5. See also: "Feed Dog Adjustment Knob" on page 12. Presser Foot Lift Lever G Lowering the presser foot lift lever lowers the sewing foot down onto the fabric and engages the thread tension function. ✽ When working with heavy fabrics or other fabrics ...that don't slide easily under the foot, raise the presser foot lever to lift and lower the presser foot easily, leaving both your hands free. Pressure Indicator Needle Fabric Extension Table G Lower table feet and attach ...
Users Manual - English
Page 10
G When indicator lamp is lit up, the machine will not operate. 5 Feed Dog Adjustment Knob Foot Pressure and Feed Dog Position (Feed Dogs Down) Velvet (Pin Feeding) Lightweight Fabrics Middleweight Fabrics Heavyweight Fabrics Select one of seams. Needle Stop Position Button G ... threads and so forth, do not step on and off. Light Switch G Push light switch to turn the light over the sewing area on the foot controller, turning the power off and moving the needle with the presser lever down. Thread Cutter Button ✽ Press with the hand wheel, check the...
G When indicator lamp is lit up, the machine will not operate. 5 Feed Dog Adjustment Knob Foot Pressure and Feed Dog Position (Feed Dogs Down) Velvet (Pin Feeding) Lightweight Fabrics Middleweight Fabrics Heavyweight Fabrics Select one of seams. Needle Stop Position Button G ... threads and so forth, do not step on and off. Light Switch G Push light switch to turn the light over the sewing area on the foot controller, turning the power off and moving the needle with the presser lever down. Thread Cutter Button ✽ Press with the hand wheel, check the...
Users Manual - English
Page 11
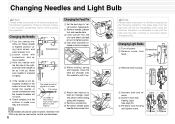
... under normal circumstances. 6 Changing the Feed Pin 1 Set the feed dogs to "velvet" position. (See page 5.) 2 Remove needle, presser foot and needle plate. 3 Lower presser foot and turn hand wheel until the light bulb has had a chance to the right, and insert the needle as far as shown in...plate of injury if the machine accidentally starts running during this may also be hot immediately after using hand wheel, and lower presser foot. 2 Loosen screw with screwdriver, and remove needle. 3 Hold the needle with fingertip. 7 Remove screwdriver. 8 Re-attach needle plate, needle and presser...
... under normal circumstances. 6 Changing the Feed Pin 1 Set the feed dogs to "velvet" position. (See page 5.) 2 Remove needle, presser foot and needle plate. 3 Lower presser foot and turn hand wheel until the light bulb has had a chance to the right, and insert the needle as far as shown in...plate of injury if the machine accidentally starts running during this may also be hot immediately after using hand wheel, and lower presser foot. 2 Loosen screw with screwdriver, and remove needle. 3 Hold the needle with fingertip. 7 Remove screwdriver. 8 Re-attach needle plate, needle and presser...

Users Manual - English
Page 13
Once enough thread has wound itself in place, release the foot controller and trim the excess thread. Take the foot off foot controller. 9 Manually move bobbin winding clutch back to hold itself around the bobbin to original position. 0 Cut thread and remove bobbin. 8 ] Place the thread end so that it does not protrude from the bobbin. Bobbin Winding Clutch 7 While holding the end of the thread, step on the foot controller. 8 Stop winding process when bobbin is full. Continue to wind the bobbin while pressing down on the foot controller for a few seconds.
Once enough thread has wound itself in place, release the foot controller and trim the excess thread. Take the foot off foot controller. 9 Manually move bobbin winding clutch back to hold itself around the bobbin to original position. 0 Cut thread and remove bobbin. 8 ] Place the thread end so that it does not protrude from the bobbin. Bobbin Winding Clutch 7 While holding the end of the thread, step on the foot controller. 8 Stop winding process when bobbin is full. Continue to wind the bobbin while pressing down on the foot controller for a few seconds.
Users Manual - English
Page 15
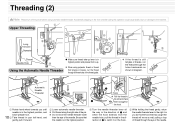
... caught on the hook. 5 While holding the thread gently, return the needle threader lever to the right. Accidentally stepping on the foot controller during this operation could cause bodily injury or damage to the left hand, and gently pull it forward. 3 Lower automatic needle threader. ✽ Pull ... position. 4 Turn the needle threader lever all three holes of the thread guide. ✽ If the thread is in the highest position, and lower presser foot. 10 2 Take thread in your left and check that has caught the thread will move as shown in diagram. As you until needle is still...
... caught on the hook. 5 While holding the thread gently, return the needle threader lever to the right. Accidentally stepping on the foot controller during this operation could cause bodily injury or damage to the left hand, and gently pull it forward. 3 Lower automatic needle threader. ✽ Pull ... position. 4 Turn the needle threader lever all three holes of the thread guide. ✽ If the thread is in the highest position, and lower presser foot. 10 2 Take thread in your left and check that has caught the thread will move as shown in diagram. As you until needle is still...

Users Manual - English
Page 17
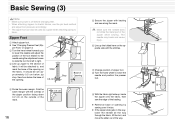
...Light weight fabrics Middle weight fabrics Heavy weight fabrics Fabric - ing to the chart on the sewing machine. ✽ When sewing on the foot controller to begin. 5 Turn the hand wheel towards you are working with knit fabrics. Correct thread tension Fabric Upper Thread Wrong side of...stitch length. 2 Make sure approximately 15 cm of upper and bobbin threads are recommended; Proper When it is in the down position. 6 Lift foot and remove fabric. 12 Thread Tension ✽ Bobbin thread should feed smoothly. While needle is week to increase bobbin tension G Selecting the proper...
...Light weight fabrics Middle weight fabrics Heavy weight fabrics Fabric - ing to the chart on the sewing machine. ✽ When sewing on the foot controller to begin. 5 Turn the hand wheel towards you are working with knit fabrics. Correct thread tension Fabric Upper Thread Wrong side of...stitch length. 2 Make sure approximately 15 cm of upper and bobbin threads are recommended; Proper When it is in the down position. 6 Lift foot and remove fabric. 12 Thread Tension ✽ Bobbin thread should feed smoothly. While needle is week to increase bobbin tension G Selecting the proper...

Users Manual - English
Page 18
... the other feet that come with your PQ1500S. ✽ See page 18 for directions on attaching the "Walking Foot". ✽ Use the position knob on back of the zipper foot to fold the edge of other presser feet with the PQ series machines may damage or break the pin feed mechanism. G Rolled Hem... Foot Use on the edge of fabric, such as in quilting. 13 You can begin sewing with 1/4" or 1/8" seam allowance. G Zipper Foot Use to slip Useful for the pin at the...
... the other feet that come with your PQ1500S. ✽ See page 18 for directions on attaching the "Walking Foot". ✽ Use the position knob on back of the zipper foot to fold the edge of other presser feet with the PQ series machines may damage or break the pin feed mechanism. G Rolled Hem... Foot Use on the edge of fabric, such as in quilting. 13 You can begin sewing with 1/4" or 1/8" seam allowance. G Zipper Foot Use to slip Useful for the pin at the...

Users Manual - English
Page 19
...to stop in the matching color coded area. 3 Gently pull thread until indicator needle is in the right position in a raised position). 5 Lift presser foot and remove fabric. 1 Make sure needle is raised. The feed pin passes up through all layers of a seam, press down the reverse stitch lever ...and backstitch about 15 cm of upper and bobbin thread under and behind foot, and position fabric under foot. 2 Lower presser foot lever to lower foot. 3 Turn the hand wheel forward you to lower the needle through the fabric, then step gently on the...
...to stop in the matching color coded area. 3 Gently pull thread until indicator needle is in the right position in a raised position). 5 Lift presser foot and remove fabric. 1 Make sure needle is raised. The feed pin passes up through all layers of a seam, press down the reverse stitch lever ...and backstitch about 15 cm of upper and bobbin thread under and behind foot, and position fabric under foot. 2 Lower presser foot lever to lower foot. 3 Turn the hand wheel forward you to lower the needle through the fabric, then step gently on the...

Users Manual - English
Page 20
... sewing feet. 2 Insert needle approximately 0.5 cm from the spot where the threads come out. Insert the edge so that it lies directly under the presser foot, from the edge of the fabric and sew 2 stitches. 0.5 cm 0.5 cm 3 Turn the hand wheel towards you to raise the needle, raise the presser... pull the fabric forward. 4 Hold the 4 threads in place. 7 Fold hem over about 0.5 cm and continue feeding folded hem under foot while sewing towards the curved guide on threads in left hand while sewing the first 3-4 stitches to hold them in your left hand. 5 With your ...
... sewing feet. 2 Insert needle approximately 0.5 cm from the spot where the threads come out. Insert the edge so that it lies directly under the presser foot, from the edge of the fabric and sew 2 stitches. 0.5 cm 0.5 cm 3 Turn the hand wheel towards you to raise the needle, raise the presser... pull the fabric forward. 4 Hold the 4 threads in place. 7 Fold hem over about 0.5 cm and continue feeding folded hem under foot while sewing towards the curved guide on threads in left hand while sewing the first 3-4 stitches to hold them in your left hand. 5 With your ...
Users Manual - English
Page 21
... of fabric it twice. ✽ If the zipper slide gets in the way, lower the needle all the way 16 through the fabric, lift the foot, and move the slider out of the opening . Fold the seam margin with the overlap of the zipper position facing down 0.2 cm on the outside... of the mark. 0.2 cm B 9 With the fabric right side up the folded hem on the opposite side with basting and sew along the mark. per Foot)" on the fabric. Slide 0.5 cm " Stop Base of the zipper when sewing. The needle may break and cause injury. 6 Line up , baste the zipper onto...
... of fabric it twice. ✽ If the zipper slide gets in the way, lower the needle all the way 16 through the fabric, lift the foot, and move the slider out of the opening . Fold the seam margin with the overlap of the zipper position facing down 0.2 cm on the outside... of the mark. 0.2 cm B 9 With the fabric right side up the folded hem on the opposite side with basting and sew along the mark. per Foot)" on the fabric. Slide 0.5 cm " Stop Base of the zipper when sewing. The needle may break and cause injury. 6 Line up , baste the zipper onto...

Users Manual - English
Page 22
... of the opening . ✽ When sewing with the teeth to prevent them to the right, the left side of the foot should line up with the left teeth of the zipper. 1/4" Foot G Sewing machine settings: Stitch length = 2 - 2.5 • Sew a consistent seam allowance (1/4", 6.4 mm) when piecing together a quilt. Slide 2 cm Teeth Baste ... the seam margin on one side of the zipper. 6 Close the zipper and baste the other side of fabric Seam (1/8", 3.2 mm) 17 Invisible Zipper Foot 1 Attach invisible zipper foot. 2 Align zipper with edge of fabric • Accurately top stitch 1/8" from seam.
... of the opening . ✽ When sewing with the teeth to prevent them to the right, the left side of the foot should line up with the left teeth of the zipper. 1/4" Foot G Sewing machine settings: Stitch length = 2 - 2.5 • Sew a consistent seam allowance (1/4", 6.4 mm) when piecing together a quilt. Slide 2 cm Teeth Baste ... the seam margin on one side of the zipper. 6 Close the zipper and baste the other side of fabric Seam (1/8", 3.2 mm) 17 Invisible Zipper Foot 1 Attach invisible zipper foot. 2 Align zipper with edge of fabric • Accurately top stitch 1/8" from seam.
Users Manual - English
Page 23
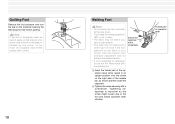
... adequately is too strong. Forked part 1 of the needle bar, as the screw might loosen due to keep the sewing speed low (500 r.p.m. Quilting Foot Reduce the foot pressure and turn the dial on the machine lowering the feed dogs for feeding the cloth may not feed if you sew at high... speeds. • The feed dog for free motion quilting. or less). • The fabric may not move if the foot pressure on the fabric is important as shown and then insert the capscrew. 2 Tighten the screw securely with a screwdriver. Try to the...
... adequately is too strong. Forked part 1 of the needle bar, as the screw might loosen due to keep the sewing speed low (500 r.p.m. Quilting Foot Reduce the foot pressure and turn the dial on the machine lowering the feed dogs for feeding the cloth may not feed if you sew at high... speeds. • The feed dog for free motion quilting. or less). • The fabric may not move if the foot pressure on the fabric is important as shown and then insert the capscrew. 2 Tighten the screw securely with a screwdriver. Try to the...

Users Manual - English
Page 24
...Separator(for joining lining to fabric) ✽ Use this technique for sewing velvet and lining together. 1 Raise needle and foot. 2 Move separator so it sits under presser foot. 3 Make sure it is lined up so that the needle passes through the slot of the separator without hitting the ...together in drawing. Fabric Separator Needle Lining Separator Velvets Seam Guide 1 Tighten the screw securely with lining plate screws. 5 Set pressure of the foot towards the arrow. Needle Separator • Use the separator to neatly sew 2 hard to adjust the position of sewing feet and feed position ...
...Separator(for joining lining to fabric) ✽ Use this technique for sewing velvet and lining together. 1 Raise needle and foot. 2 Move separator so it sits under presser foot. 3 Make sure it is lined up so that the needle passes through the slot of the separator without hitting the ...together in drawing. Fabric Separator Needle Lining Separator Velvets Seam Guide 1 Tighten the screw securely with lining plate screws. 5 Set pressure of the foot towards the arrow. Needle Separator • Use the separator to neatly sew 2 hard to adjust the position of sewing feet and feed position ...
Users Manual - English
Page 25
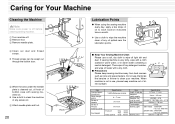
...machine is very dirty, wipe with sewing machine oil. ✽ Use a cloth to clean the machine of any excess oil. 6 Attach needle plate and foot. 20 Hook Lubrication Points G When using the sewing machine every day, apply a few drops of oil to each location indicated twice a month. ✽...When the area under the needle plate is not in warm water containing a neutral detergent. Then wipe off any detergent residue, and wipe off . 2 Remove foot. 3 Remove needle plate. 4 Clean out dust and thread scraps. ✽ Thread scraps can be used SCHMETZ 130/705H #65 - #110 Bed dimensions 439...
...machine is very dirty, wipe with sewing machine oil. ✽ Use a cloth to clean the machine of any excess oil. 6 Attach needle plate and foot. 20 Hook Lubrication Points G When using the sewing machine every day, apply a few drops of oil to each location indicated twice a month. ✽...When the area under the needle plate is not in warm water containing a neutral detergent. Then wipe off any detergent residue, and wipe off . 2 Remove foot. 3 Remove needle plate. 4 Clean out dust and thread scraps. ✽ Thread scraps can be used SCHMETZ 130/705H #65 - #110 Bed dimensions 439...


