Users Manual - English
Page 4
... the thread color and sew type ......... 39 Specifying sewing attributes 41 Understanding the Window and Using Tools.... 9 Adding Text and Converting an Image to an Embroidery Design (Auto Punch Function)..... 10 Step1 Entering text 10 Step2 Adjusting the text layout ... an Image to an Embroidery Pattern (Auto Punch 23 Arranging Embroidery Designs 25 Opening/Importing Embroidery Designs ......... 25 Creating a new embroidery design 25 Opening a PE-DESIGN Lite file 25 Importing embroidery design files 27 Specifying the Design Page Size and Color ... 29 Saving the Image Data 30 i
... the thread color and sew type ......... 39 Specifying sewing attributes 41 Understanding the Window and Using Tools.... 9 Adding Text and Converting an Image to an Embroidery Design (Auto Punch Function)..... 10 Step1 Entering text 10 Step2 Adjusting the text layout ... an Image to an Embroidery Pattern (Auto Punch 23 Arranging Embroidery Designs 25 Opening/Importing Embroidery Designs ......... 25 Creating a new embroidery design 25 Opening a PE-DESIGN Lite file 25 Importing embroidery design files 27 Specifying the Design Page Size and Color ... 29 Saving the Image Data 30 i
Users Manual - English
Page 12
...PE-DESIGN Lite to start up the installed Web browser and open Programs and Features.) Select a program, and then click Uninstall. 8 Uninstallation 1. b Memo: • The uninstallation procedure is entered in the Address bar of the computer that you can register your product online by following address is described for software updates, visit the Brother.... Click the Start button in your questions more quickly. To view the FAQ and information for Windows XP. • For Windows 2000, click Settings in the Start menu, and then click Control Panel. This information will help...
...PE-DESIGN Lite to start up the installed Web browser and open Programs and Features.) Select a program, and then click Uninstall. 8 Uninstallation 1. b Memo: • The uninstallation procedure is entered in the Address bar of the computer that you can register your product online by following address is described for software updates, visit the Brother.... Click the Start button in your questions more quickly. To view the FAQ and information for Windows XP. • For Windows 2000, click Settings in the Start menu, and then click Control Panel. This information will help...
Users Manual - English
Page 24
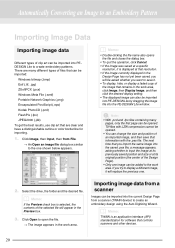
..., a message appears, asking whether to input the image at its original position (the center of the Design Page). • Only one image can be imported into the PE-DESIGN Lite window. The next time that can be opened . Select the drive, the folder and the desired file. b Memo:... setting. • The displayed image can also be imported into PE-DESIGN Lite by dragging the image file into PEDESIGN Lite to create embroidery patterns. Importing image data from a scanner (TWAIN device) to create an embroidery design using the Auto Digitizing Wizard. If you want to save that ...
..., a message appears, asking whether to input the image at its original position (the center of the Design Page). • Only one image can be imported into the PE-DESIGN Lite window. The next time that can be opened . Select the drive, the folder and the desired file. b Memo:... setting. • The displayed image can also be imported into PE-DESIGN Lite by dragging the image file into PEDESIGN Lite to create embroidery patterns. Importing image data from a scanner (TWAIN device) to create an embroidery design using the Auto Digitizing Wizard. If you want to save that ...
Users Manual - English
Page 30
.... 26 b Memo: • To return to the one shown below appears. 4. a Note: If a .pes file is displayed in Explorer can also be opened by dragging to the PE-DESIGN Lite window. → If the current Design Page has not been saved, you want to modify it , and then click Open, or double-click... the file's icon. → If the current Design Page has already been saved or has not been edited...
.... 26 b Memo: • To return to the one shown below appears. 4. a Note: If a .pes file is displayed in Explorer can also be opened by dragging to the PE-DESIGN Lite window. → If the current Design Page has not been saved, you want to modify it , and then click Open, or double-click... the file's icon. → If the current Design Page has already been saved or has not been edited...
Users Manual - English
Page 53
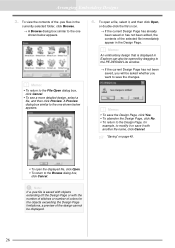
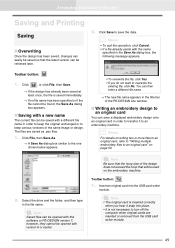
... file name in order to keep various versions of the design does not exceed the hoop that the latest version can be opened with the name specified in the title bar of the PE-DESIGN Lite window. ■ Writing an embroidery design to an original card You can be saved with this ...software or PE-DESIGN version 7; Insert an original card into place. • It is inserted correctly when you...
... file name in order to keep various versions of the design does not exceed the hoop that the latest version can be opened with the name specified in the title bar of the PE-DESIGN Lite window. ■ Writing an embroidery design to an original card You can be saved with this ...software or PE-DESIGN version 7; Insert an original card into place. • It is inserted correctly when you...

Users Manual - English
Page 57
... reduce the page, click Zoom In or Zoom Out. c "Specifying print settings" on page 52, "Printing" on page 54 and "Checking embroidery design information" on page 47.) 4. Realistic: Select this option to represent the grid printed on page 46. ■ Checking the print image You can ...Print sewing area box & center axes: Select this check box to print black lines for individual objects in the Print Setup dialog box, the PE-DESIGN Lite window appears as lines and dots. To change the printer settings, click Properties. • To quit the operation, click Cancel. Enlarge the image...
... reduce the page, click Zoom In or Zoom Out. c "Specifying print settings" on page 52, "Printing" on page 54 and "Checking embroidery design information" on page 47.) 4. Realistic: Select this option to represent the grid printed on page 46. ■ Checking the print image You can ...Print sewing area box & center axes: Select this check box to print black lines for individual objects in the Print Setup dialog box, the PE-DESIGN Lite window appears as lines and dots. To change the printer settings, click Properties. • To quit the operation, click Cancel. Enlarge the image...


