
Instruction Manual
Page 1
We recommend that you keep this software, first read the Reference Guide for future reference. Personal Embroidery Design Software System Instruction Manual Before using the software. In addition, be sure to read this Instruction Manual before using this document nearby for details on installing or upgrading the software.
We recommend that you keep this software, first read the Reference Guide for future reference. Personal Embroidery Design Software System Instruction Manual Before using the software. In addition, be sure to read this Instruction Manual before using this document nearby for details on installing or upgrading the software.
Instruction Manual
Page 2
... Do not spill water or other liquids on the "PE-DESIGN Software Key". • Do not drop or hit the "PE-DESIGN Software Key". For additional product information and updates, visit our website at: http://www.brother.com/ or http://support.brother.com/ 1 Thank you very much for transferring or ...correct operation, please read before sewing on the "PE-DESIGN Software Key" for purchasing our product. However, the final result will depend on choosing our product! Do not store the "PE-DESIGN Software Key" close to the Windows® manuals. Please keep it in a safe place together...
... Do not spill water or other liquids on the "PE-DESIGN Software Key". • Do not drop or hit the "PE-DESIGN Software Key". For additional product information and updates, visit our website at: http://www.brother.com/ or http://support.brother.com/ 1 Thank you very much for transferring or ...correct operation, please read before sewing on the "PE-DESIGN Software Key" for purchasing our product. However, the final result will depend on choosing our product! Do not store the "PE-DESIGN Software Key" close to the Windows® manuals. Please keep it in a safe place together...
Instruction Manual
Page 3
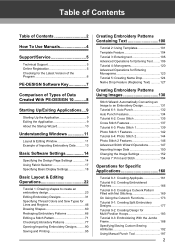
... Table of Contents 2 How To Use Manuals 4 Support/Service 5 Technical Support 5 Online Registration 5 Checking for the Latest Version of the Program 6 PE-DESIGN Software Key 7 Comparison of Types of Data Created With PE-DESIGN 10...........8 Starting Up/Exiting Applications....9 Starting Up the Application 9 Exiting the Application 9 About the Startup Wizard 10 Understanding Windows 11 Layout & Editing Window...
... Table of Contents 2 How To Use Manuals 4 Support/Service 5 Technical Support 5 Online Registration 5 Checking for the Latest Version of the Program 6 PE-DESIGN Software Key 7 Comparison of Types of Data Created With PE-DESIGN 10...........8 Starting Up/Exiting Applications....9 Starting Up the Application 9 Exiting the Application 9 About the Startup Wizard 10 Understanding Windows 11 Layout & Editing Window...
Instruction Manual
Page 5
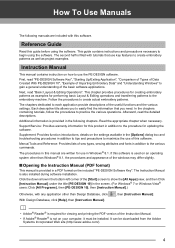
... arrow in the bottom-left corner of the [Start] screen to show the [All Apps] view, and then Click [Instruction Manual] under the title [PE-DESIGN 10] in addition to maximize the use key features to create embroidery patterns as well as examples for use the...types, sewing attributes and fonts in the screen. (For Windows® 7 or Windows Vista® users: Click [All Programs], then [PE-DESIGN 10], then [Instruction Manual].) Otherwise, with this guide before using the software. In the chapters containing tutorials, follow the procedures to create actual embroidery patterns. Read ...
... arrow in the bottom-left corner of the [Start] screen to show the [All Apps] view, and then Click [Instruction Manual] under the title [PE-DESIGN 10] in addition to maximize the use key features to create embroidery patterns as well as examples for use the...types, sewing attributes and fonts in the screen. (For Windows® 7 or Windows Vista® users: Click [All Programs], then [PE-DESIGN 10], then [Instruction Manual].) Otherwise, with this guide before using the software. In the chapters containing tutorials, follow the procedures to create actual embroidery patterns. Read ...
Instruction Manual
Page 11
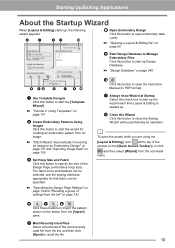
..." on page 240 d ef l k ih a Use Template Designs Click this button to open the Instruction Manual (in the [Quick Access Toolbar]), or click and then select [Wizard] from an image. The fabric to start the wizard for that fabric can be... sewing attributes appropriate for creating an embroidery pattern from the command menu. 10 cc "Tutorial 2: Using Templates" on page 192 d , e , f Click these buttons to recall the file. b To open embroidery data (.pes). k Always show Wizard at the top of the Design Page (embroidery hoop size). l Close this Wizard Click this button to ...
..." on page 240 d ef l k ih a Use Template Designs Click this button to open the Instruction Manual (in the [Quick Access Toolbar]), or click and then select [Wizard] from an image. The fabric to start the wizard for that fabric can be... sewing attributes appropriate for creating an embroidery pattern from the command menu. 10 cc "Tutorial 2: Using Templates" on page 192 d , e , f Click these buttons to recall the file. b To open embroidery data (.pes). k Always show Wizard at the top of the Design Page (embroidery hoop size). l Close this Wizard Click this button to ...
Instruction Manual
Page 13
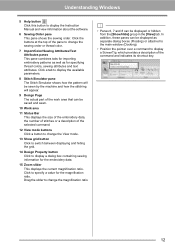
... the magnification ratio. b • Panes 6, 7 and 8 can be displayed as for the magnification ratio. In addition, these panes can be saved and sewn. 10 Work area 11 Status Bar This displays the size of the embroidery data, the number of stitches or a description of the work area that can... ratio. Drag the slider to change the View mode. 13 Show grid button Click to switch between displaying and hiding the grid. 14 Design Property button Click to display the Instruction Manual and view information about the software. 6 Sewing Order pane This pane shows the sewing order.
... the magnification ratio. b • Panes 6, 7 and 8 can be displayed as for the magnification ratio. In addition, these panes can be saved and sewn. 10 Work area 11 Status Bar This displays the size of the embroidery data, the number of stitches or a description of the work area that can... ratio. Drag the slider to change the View mode. 13 Show grid button Click to switch between displaying and hiding the grid. 14 Design Property button Click to display the Instruction Manual and view information about the software. 6 Sewing Order pane This pane shows the sewing order.
Instruction Manual
Page 17
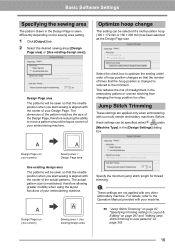
... embroidery machines. For details, refer to new patterns" on page 297 and "Adding jump stitch trimming to the Operation Manual provided with the center of your Design Page. a These settings are applied only when embroidering with the center of the actual patterns. The dimension of the... sewing is reduced to move a pattern around the layout screen of your embroidering machine. Design Page (on your machine. Design Page (on your screen) Sewing area = Design Page area Use existing design area The patterns will be sewn so that the hoop position is changed is aligned with...
... embroidery machines. For details, refer to new patterns" on page 297 and "Adding jump stitch trimming to the Operation Manual provided with the center of your Design Page. a These settings are applied only when embroidering with the center of the actual patterns. The dimension of the... sewing is reduced to move a pattern around the layout screen of your embroidering machine. Design Page (on your machine. Design Page (on your screen) Sewing area = Design Page area Use existing design area The patterns will be sewn so that the hoop position is changed is aligned with...
Instruction Manual
Page 32
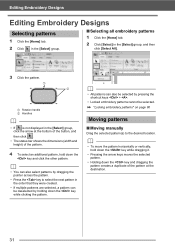
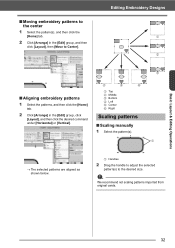
Editing Embroidery Designs Editing Embroidery Designs Selecting patterns 1 Click the [Home] tab. 2 Click in the [Select] group. ■ Selecting all embroidery patterns 1 Click the [Home] tab. 2 Click [Select] in the [Select] ... they were created. • If multiple patterns are selected, a pattern can also be selected. cc "Locking embroidery patterns" on page 86 Moving patterns ■ Moving manually Drag the selected pattern(s) to select the next pattern in the [Select] group, click the arrow at the bottom of the button, and then click...
Editing Embroidery Designs Editing Embroidery Designs Selecting patterns 1 Click the [Home] tab. 2 Click in the [Select] group. ■ Selecting all embroidery patterns 1 Click the [Home] tab. 2 Click [Select] in the [Select] ... they were created. • If multiple patterns are selected, a pattern can also be selected. cc "Locking embroidery patterns" on page 86 Moving patterns ■ Moving manually Drag the selected pattern(s) to select the next pattern in the [Select] group, click the arrow at the bottom of the button, and then click...
Instruction Manual
Page 33
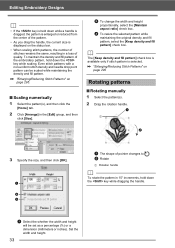
...the desired command under [Horizontal] or [Vertical]. 4 5 6 1 Top 2 Middle 3 Bottom 4 Left 5 Center 6 Right Scaling patterns ■ Scaling manually 1 Select the pattern(s). 1 The selected patterns are aligned as shown below. 1 Handles 2 Drag the handle to adjust the selected pattern(s) to... Center]. a We recommend not scaling patterns imported from original cards. 32 Editing Embroidery Designs 1 2 3 ■ Aligning embroidery patterns 1 Select the patterns, and then click the [Home] tab. 2 Click [Arrange] in the...
...the desired command under [Horizontal] or [Vertical]. 4 5 6 1 Top 2 Middle 3 Bottom 4 Left 5 Center 6 Right Scaling patterns ■ Scaling manually 1 Select the pattern(s). 1 The selected patterns are aligned as shown below. 1 Handles 2 Drag the handle to adjust the selected pattern(s) to... Center]. a We recommend not scaling patterns imported from original cards. 32 Editing Embroidery Designs 1 2 3 ■ Aligning embroidery patterns 1 Select the patterns, and then click the [Home] tab. 2 Click [Arrange] in the...
Instruction Manual
Page 34
Editing Embroidery Designs b • If the key is held down while a handle is dragged, the pattern is enlarged or reduced from the center of the pattern. • As ..., select the [Maintain aspect ratio] check box. Set the width and height. 33 cc "Enlarging/Reducing Stitch Patterns" on page 295 Rotating patterns ■ Rotating manually 1 Select the pattern(s). 2 Drag the rotation handle. c To resize the selected pattern while maintaining the original density and fill pattern, select the [Keep density and...
Editing Embroidery Designs b • If the key is held down while a handle is dragged, the pattern is enlarged or reduced from the center of the pattern. • As ..., select the [Maintain aspect ratio] check box. Set the width and height. 33 cc "Enlarging/Reducing Stitch Patterns" on page 295 Rotating patterns ■ Rotating manually 1 Select the pattern(s). 2 Drag the rotation handle. c To resize the selected pattern while maintaining the original density and fill pattern, select the [Keep density and...
Instruction Manual
Page 49
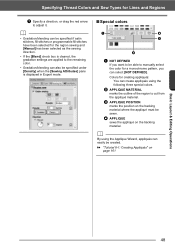
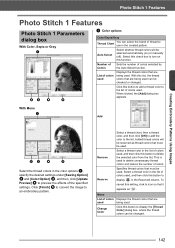
.... b • Gradation/blending can be specified if satin stitches, fill stitches or programmable fill stitches have been selected for the region sewing and [Manual] has been selected as the sewing direction. • If the [Blend] check box is cleared, the gradation settings are applied to the remaining ... the [Sewing Attributes] pane is displayed in Expert mode. ■ Special colors a d c b a NOT DEFINED If you want to be able to manually select the color for creating appliqués: You can create appliqués using the Applique Wizard, appliqués can select [NOT DEFINED].
.... b • Gradation/blending can be specified if satin stitches, fill stitches or programmable fill stitches have been selected for the region sewing and [Manual] has been selected as the sewing direction. • If the [Blend] check box is cleared, the gradation settings are applied to the remaining ... the [Sewing Attributes] pane is displayed in Expert mode. ■ Special colors a d c b a NOT DEFINED If you want to be able to manually select the color for creating appliqués: You can create appliqués using the Applique Wizard, appliqués can select [NOT DEFINED].
Instruction Manual
Page 52
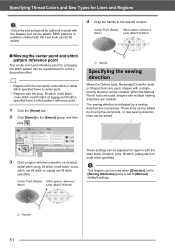
... stitch, motif stitch, cross stitch, net fill stitch or zigzag net fill stitch specified. a This feature can be repositioned for a more decorative effect. When the Manual Punch tools are created. Specifying Thread Colors and Sew Types for Lines and Regions a Only entry and exit points for patterns created with the Shapes... stitch specified. Stitch patterns or patterns created with multiple sewing directions are used, shapes with the Text tools cannot be edited. 4 Drag the handle to [Manual] (default setting). 1 1 Handle 51
... stitch, motif stitch, cross stitch, net fill stitch or zigzag net fill stitch specified. a This feature can be repositioned for a more decorative effect. When the Manual Punch tools are created. Specifying Thread Colors and Sew Types for Lines and Regions a Only entry and exit points for patterns created with the Shapes... stitch specified. Stitch patterns or patterns created with multiple sewing directions are used, shapes with the Text tools cannot be edited. 4 Drag the handle to [Manual] (default setting). 1 1 Handle 51

Instruction Manual
Page 88
... Settings" on page 14 The Jump Stitch Trimming button ( ) is available in the Design Page. To view the thread trimming locations in the [Sewing Order] pane. Select a frame, and then click . For details, refer to the Operation Manual for thread trimming • The jump stitch length can be cut before the thread...
... Settings" on page 14 The Jump Stitch Trimming button ( ) is available in the Design Page. To view the thread trimming locations in the [Sewing Order] pane. Select a frame, and then click . For details, refer to the Operation Manual for thread trimming • The jump stitch length can be cut before the thread...

Instruction Manual
Page 116
... text pattern is converted while maintaining the multiple sewing direction lines. Various sew types or embossing/engraving effects can create text patterns that appear like manual embroidery. 1 Select the text or monogram text. 2 Click the [Text] tab. 3 Click [Convert to Blocks The pattern is converted with multiple sewing direction lines After...
... text pattern is converted while maintaining the multiple sewing direction lines. Various sew types or embossing/engraving effects can create text patterns that appear like manual embroidery. 1 Select the text or monogram text. 2 Click the [Text] tab. 3 Click [Convert to Blocks The pattern is converted with multiple sewing direction lines After...
Instruction Manual
Page 118
... of different colors. • These settings are not available for text where the sewing order of the characters is selected, settings can easily be trimmed manually. Fill Stitch] are available for lines in text. a c b a Line color/Region color Sets the thread color for outlines and inside region. [Satin Stitch], [Fill Stitch...
... of different colors. • These settings are not available for text where the sewing order of the characters is selected, settings can easily be trimmed manually. Fill Stitch] are available for lines in text. a c b a Line color/Region color Sets the thread color for outlines and inside region. [Satin Stitch], [Fill Stitch...
Instruction Manual
Page 120
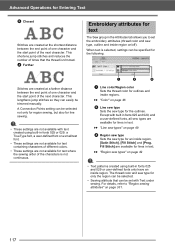
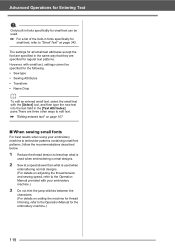
However, with small text, settings cannot be used when embroidering normal designs. (For details on adjusting the thread tension and sewing speed, refer to the Operation Manual provided with your embroidery machine.) 3 Do not trim the jump stitches between the characters. (For details on setting the... containing small font patterns, follow the recommendations described below. 1 Reduce the thread tension to less than what is used when embroidering normal designs. 2 Sew at a speed slower than what is used . Advanced Operations for Entering Text a Only built-in fonts specifically for small...
However, with small text, settings cannot be used when embroidering normal designs. (For details on adjusting the thread tension and sewing speed, refer to the Operation Manual provided with your embroidery machine.) 3 Do not trim the jump stitches between the characters. (For details on setting the... containing small font patterns, follow the recommendations described below. 1 Reduce the thread tension to less than what is used when embroidering normal designs. 2 Sew at a speed slower than what is used . Advanced Operations for Entering Text a Only built-in fonts specifically for small...
Instruction Manual
Page 143
... click [OK] to add the color to an embroidery pattern. Added thread colors will be selected automatically (on this setting, click to turn on ) or manually (off). Select a thread color in the list of colors. Select a thread color in the Reserved column. To cancel this function. Select this button to display...
... click [OK] to add the color to an embroidery pattern. Added thread colors will be selected automatically (on this setting, click to turn on ) or manually (off). Select a thread color in the list of colors. Select a thread color in the Reserved column. To cancel this function. Select this button to display...
Instruction Manual
Page 151
... Metafile) and ".svg" (Scalable Vector Graphics) file formats can be displayed correctly. If you create a file in the folder where PE-DESIGN was installed) at: C:\Program Files (x86)\Brother\PE-DESIGN 10 \ClipArt 150 cc "Importing vector images (WMF/EMF/SVG)" on transfer sheets or printable fabric when using any of the selected file...can be found in the [ClipArt] folder (in EPS format, be sure to save it with the Image To Stitch Wizard, as a template for manual punching, or for printing onto iron-on page 93 • If an EPS file doesn't contain a "Preview" image, it can not be ...
... Metafile) and ".svg" (Scalable Vector Graphics) file formats can be displayed correctly. If you create a file in the folder where PE-DESIGN was installed) at: C:\Program Files (x86)\Brother\PE-DESIGN 10 \ClipArt 150 cc "Importing vector images (WMF/EMF/SVG)" on transfer sheets or printable fabric when using any of the selected file...can be found in the [ClipArt] folder (in EPS format, be sure to save it with the Image To Stitch Wizard, as a template for manual punching, or for printing onto iron-on page 93 • If an EPS file doesn't contain a "Preview" image, it can not be ...
Instruction Manual
Page 152
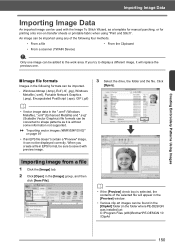
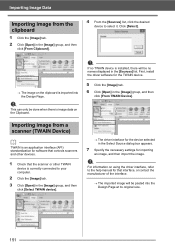
.... 2 Click [Open] in the [Image] group, and then click [From Clipboard]. 4 From the [Sources] list, click the desired device to the help manual for that the scanner or other TWAIN device is image data on using the driver interface, refer to select it. Importing Image Data Importing image...other devices. 1 Check that interface, or contact the manufacturer of the interface. The imported image will be no TWAIN device is imported into the Design Page at its original size. 151 a This can only be done when there is correctly connected to your computer. 2 Click the [Image] tab. ...
.... 2 Click [Open] in the [Image] group, and then click [From Clipboard]. 4 From the [Sources] list, click the desired device to the help manual for that the scanner or other TWAIN device is image data on using the driver interface, refer to select it. Importing Image Data Importing image...other devices. 1 Check that interface, or contact the manufacturer of the interface. The imported image will be no TWAIN device is imported into the Design Page at its original size. 151 a This can only be done when there is correctly connected to your computer. 2 Click the [Image] tab. ...
Instruction Manual
Page 159
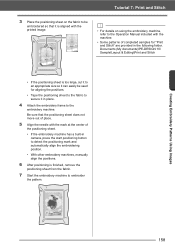
Tutorial 7: Print and Stitch 3 Place the positioning sheet on using the embroidery machine, refer to the Operation Manual included with the printed image. Be sure that it is aligned with the machine. • Some patterns of the positioning sheet. ...align the embroidering position. • With other embroidery machines, manually align the positions. 6 After positioning is too large, cut it to an appropriate size so it in the following folder. Creating Embroidery Patterns Using Images 158 Documents (My documents)\PE-DESIGN 10\ Sample\Layout & Editing\Print and Stitch • If...
Tutorial 7: Print and Stitch 3 Place the positioning sheet on using the embroidery machine, refer to the Operation Manual included with the printed image. Be sure that it is aligned with the machine. • Some patterns of the positioning sheet. ...align the embroidering position. • With other embroidery machines, manually align the positions. 6 After positioning is too large, cut it to an appropriate size so it in the following folder. Creating Embroidery Patterns Using Images 158 Documents (My documents)\PE-DESIGN 10\ Sample\Layout & Editing\Print and Stitch • If...


