
Accessory Catalog
Page 34
...series, PC and ULT series machines and the PE-400D and Innov-is also recommended for Brother® Embroidery Machines, but compatible with straight, zig zag or decorative stitches. Brother Embroidery Accessories PacesetterTM Polyester Threads 65 Brother Country Yarn Embroidery Threads Metallic Threads For the best... a useful and decorative wooden thread rack that no stabilizer remains after the embroidery is important that can stand on your instruction manual for advice on the wall for fabrics and applications when it is completed. Out metallic thread maintains its color, heat...
...series, PC and ULT series machines and the PE-400D and Innov-is also recommended for Brother® Embroidery Machines, but compatible with straight, zig zag or decorative stitches. Brother Embroidery Accessories PacesetterTM Polyester Threads 65 Brother Country Yarn Embroidery Threads Metallic Threads For the best... a useful and decorative wooden thread rack that no stabilizer remains after the embroidery is important that can stand on your instruction manual for advice on the wall for fabrics and applications when it is completed. Out metallic thread maintains its color, heat...

Users Manual - English
Page 2
...of electric shock 1 Always unplug the machine from the electrical outlet when removing covers, lubricating, or when making any adjustments mentioned in the instruction manual. • To unplug the machine, switch the machine to the symbol "O" position to turn it off , then grasp the plug... pull it could cause the needle to break. • Do not push or pull the fabric when embroidering. 1 Important Safety Instructions Please read these safety instructions before attempting to use an extension cord. • Always unplug your work area clear: • Never operate the machine with ...
...of electric shock 1 Always unplug the machine from the electrical outlet when removing covers, lubricating, or when making any adjustments mentioned in the instruction manual. • To unplug the machine, switch the machine to the symbol "O" position to turn it off , then grasp the plug... pull it could cause the needle to break. • Do not push or pull the fabric when embroidering. 1 Important Safety Instructions Please read these safety instructions before attempting to use an extension cord. • Always unplug your work area clear: • Never operate the machine with ...

Users Manual - English
Page 3
...When storing this product are subject to change without notice. Save these instructions. Never use a fuse approved by ASTA to BS 1362, i.e. For additional product information and updates, visit our web site at www.brother.com FOR USERS IN THE UK, EIRE, MALTA AND CYPRUS ONLY IMPORTANT...and high humidity locations. Benzene, thinner, and scouring powders can damage the case and machine, and should contact your local authorized Brother dealer. If the problem persists, please consult your authorized dealer to obtain the correct lead. The contents of this manual and specifications...
...When storing this product are subject to change without notice. Save these instructions. Never use a fuse approved by ASTA to BS 1362, i.e. For additional product information and updates, visit our web site at www.brother.com FOR USERS IN THE UK, EIRE, MALTA AND CYPRUS ONLY IMPORTANT...and high humidity locations. Benzene, thinner, and scouring powders can damage the case and machine, and should contact your local authorized Brother dealer. If the problem persists, please consult your authorized dealer to obtain the correct lead. The contents of this manual and specifications...
Users Manual - English
Page 4
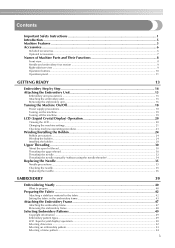
Contents Important Safety Instructions 1 Introduction ...5 Machine Features ...5 Accessories...6 Included accessories ...6 Optional accessories ...7 Names of Machine Parts and Their Functions 8 Front view ...8 Needle and embroidery foot section ...9 Right-side/rear ...
Contents Important Safety Instructions 1 Introduction ...5 Machine Features ...5 Accessories...6 Included accessories ...6 Optional accessories ...7 Names of Machine Parts and Their Functions 8 Front view ...8 Needle and embroidery foot section ...9 Right-side/rear ...

Users Manual - English
Page 6
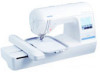
... (page 28). b Quick-set bobbin You can quickly and easily be wound with thread (page 24). Before using the machine, carefully read the "Important Safety Instructions" (page 1), and then study this embroidery machine. In addition, after embroidering (page 51). d Embroidery You can quickly be cut automatically after you for purchasing this...
... (page 28). b Quick-set bobbin You can quickly and easily be wound with thread (page 24). Before using the machine, carefully read the "Important Safety Instructions" (page 1), and then study this embroidery machine. In addition, after embroidering (page 51). d Embroidery You can quickly be cut automatically after you for purchasing this...

Users Manual - English
Page 17
... screen with hands or objects near the d embroidery unit and press . Removing the embroidery unit • When an animation is completely stopped and follow the instructions below. a • For details on removing the embroidery frame, refer to "Selecting Embroidery Patterns" (page 49). 16 CAUTION ● Do not put your finger. CAUTION...
... screen with hands or objects near the d embroidery unit and press . Removing the embroidery unit • When an animation is completely stopped and follow the instructions below. a • For details on removing the embroidery frame, refer to "Selecting Embroidery Patterns" (page 49). 16 CAUTION ● Do not put your finger. CAUTION...

Users Manual - English
Page 31
... button) until it is too small for the upper thread, and then thread the needle. CAUTION ● When threading the upper thread, carefully follow the instructions. If the upper threading is not at the top, as shown below . GETTING READY Upper Threading This section describes how to choose a spool cap that...
... button) until it is too small for the upper thread, and then thread the needle. CAUTION ● When threading the upper thread, carefully follow the instructions. If the upper threading is not at the top, as shown below . GETTING READY Upper Threading This section describes how to choose a spool cap that...

Users Manual - English
Page 36
... flat side of the needle. Do not use home sewing machine needles. Replacing the Needle This section describes how to read and carefully follow the instructions below. Failure to observe the following precautions concerning the handling of the needle on a flat surface and check that the distance between the needle and...
... flat side of the needle. Do not use home sewing machine needles. Replacing the Needle This section describes how to read and carefully follow the instructions below. Failure to observe the following precautions concerning the handling of the needle on a flat surface and check that the distance between the needle and...

Users Manual - English
Page 37
... raise the needle. 1 Note z Before replacing the needle, cover the hole in the needle plate with your left hand, and then e use a screwdriver to the instructions in the needle plate. c 2 a Screwdriver b Needle clamp screw • Do not apply a strong force when loosening or tightening the needle clamp screw, otherwise certain parts...
... raise the needle. 1 Note z Before replacing the needle, cover the hole in the needle plate with your left hand, and then e use a screwdriver to the instructions in the needle plate. c 2 a Screwdriver b Needle clamp screw • Do not apply a strong force when loosening or tightening the needle clamp screw, otherwise certain parts...

Users Manual - English
Page 49
... embroidery b frame holder to the left, lift the embroidery frame up to remove it. Make sure that the machine is completely stopped and follow the instructions below. EMBROIDERY Removing the embroidery frame Pass the embroidery frame under the c embroidery foot while raising the presser foot lever even further. Raise the presser...
... embroidery b frame holder to the left, lift the embroidery frame up to remove it. Make sure that the machine is completely stopped and follow the instructions below. EMBROIDERY Removing the embroidery frame Pass the embroidery frame under the c embroidery foot while raising the presser foot lever even further. Raise the presser...

Users Manual - English
Page 50
.../lower case/numbers/ symbols. • For details, refer to "Selecting characters" (page 52). The patterns are completed by changing the upper thread according to the instructions displayed on the various types of embroidery patterns available and the procedure for private use of copyrighted patterns is an • For details, refer to...
.../lower case/numbers/ symbols. • For details, refer to "Selecting characters" (page 52). The patterns are completed by changing the upper thread according to the instructions displayed on the various types of embroidery patterns available and the procedure for private use of copyrighted patterns is an • For details, refer to...

Users Manual - English
Page 61
Follow the instructions on the screen, and j change thread colors as you embroider. 60 EMBROIDERY Lower the presser foot lever, and press i (Start/stop button). Note z When "APPLIQUE MATERIAL", "APPLIQUE POSITION" and "APPLIQUE" are displayed, a specific color thread does not appear. Use a proper color thread to match the appliqué piece.
Follow the instructions on the screen, and j change thread colors as you embroider. 60 EMBROIDERY Lower the presser foot lever, and press i (Start/stop button). Note z When "APPLIQUE MATERIAL", "APPLIQUE POSITION" and "APPLIQUE" are displayed, a specific color thread does not appear. Use a proper color thread to match the appliqué piece.

Users Manual - English
Page 85
APPENDIX R race 70 recalling a pattern 63 release button 17 resewing 65 S safety instructions 1 scissors 6 screwdriver 6 seam ripper 6 , settings key 11 22 spool cap 6 , spool net 6 25 spool of thread 30 spool pin 8 , stabilizer material 7 42 start/stop button 10 storing pattern 63 T thread cutter 8 thread cutter button 10 thread guide cover 8 thread guide disk 9 thread guide plate 8 thread take-up lever check window 8 thread tension adjustment 64 top cover 8 touch panel 11 troubleshooting 74 turning machine on/off 19 U upper threading 30 84
APPENDIX R race 70 recalling a pattern 63 release button 17 resewing 65 S safety instructions 1 scissors 6 screwdriver 6 seam ripper 6 , settings key 11 22 spool cap 6 , spool net 6 25 spool of thread 30 spool pin 8 , stabilizer material 7 42 start/stop button 10 storing pattern 63 T thread cutter 8 thread cutter button 10 thread guide cover 8 thread guide disk 9 thread guide plate 8 thread take-up lever check window 8 thread tension adjustment 64 top cover 8 touch panel 11 troubleshooting 74 turning machine on/off 19 U upper threading 30 84
Quick Setup Guide USB - English
Page 2
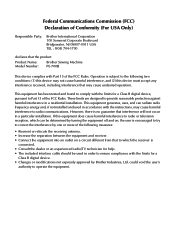
... be determined by turning the equipment off and on, the user is encouraged to try to correct the interference by Brother Industries, Ltd. If this device must accept any interference received, including interference that may cause harmful interference to radio ...(For USA Only) Responsible Party: Brother International Corporation 100 Somerset Corporate Boulevard Bridgewater, NJ 08807-0911 USA TEL : (908) 704-1700 declares that the product Product Name: Model Number: Brother Sewing Machine PE-700II This device complies with the instructions, may cause undesired operation. These ...
... be determined by turning the equipment off and on, the user is encouraged to try to correct the interference by Brother Industries, Ltd. If this device must accept any interference received, including interference that may cause harmful interference to radio ...(For USA Only) Responsible Party: Brother International Corporation 100 Somerset Corporate Boulevard Bridgewater, NJ 08807-0911 USA TEL : (908) 704-1700 declares that the product Product Name: Model Number: Brother Sewing Machine PE-700II This device complies with the instructions, may cause undesired operation. These ...

