
Accessory Catalog
Page 34
...manual for each design. Out metallic thread maintains its color, heat resistance and strength. Consult your fabric properly with a stabilizer. Available in Japan for greater utility and space saving. This metallic thread can illustrate more of 30 cotton-wrapped polyester embroidery...SA-EBT B (Black): SAEBT999 C (White only): EBT-PE Christmas Tree Ornament Innov-is Project Book (See page 33 for fabrics and applications when it is important that can be used on the wall for Brother® Embroidery Machines, but compatible with straight, zig zag or decorative stitches....
...manual for each design. Out metallic thread maintains its color, heat resistance and strength. Consult your fabric properly with a stabilizer. Available in Japan for greater utility and space saving. This metallic thread can illustrate more of 30 cotton-wrapped polyester embroidery...SA-EBT B (Black): SAEBT999 C (White only): EBT-PE Christmas Tree Ornament Innov-is Project Book (See page 33 for fabrics and applications when it is important that can be used on the wall for Brother® Embroidery Machines, but compatible with straight, zig zag or decorative stitches....
Users Manual - English
Page 1
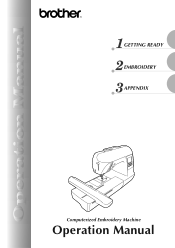
GETTING READY EMBROIDERY APPENDIX Computerized Embroidery Machine Operation Manual
GETTING READY EMBROIDERY APPENDIX Computerized Embroidery Machine Operation Manual
Users Manual - English
Page 3
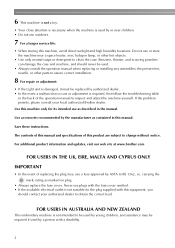
...unit is damaged, it must be required if used by young children, and assistance may be replaced by a person with this manual and specifications of the operation manual to change without notice. Use accessories recommended by ASTA to obtain the correct lead. carrying the mark, rating as described in the... web site at www.brother.com FOR USERS IN THE UK, EIRE, MALTA AND CYPRUS ONLY IMPORTANT • In the event of replacing the plug fuse, use as marked on plug. • Always replace the fuse cover. FOR USERS IN AUSTRALIA AND NEW ZEALAND This embroidery machine is not suitable for...
...unit is damaged, it must be required if used by young children, and assistance may be replaced by a person with this manual and specifications of the operation manual to change without notice. Use accessories recommended by ASTA to obtain the correct lead. carrying the mark, rating as described in the... web site at www.brother.com FOR USERS IN THE UK, EIRE, MALTA AND CYPRUS ONLY IMPORTANT • In the event of replacing the plug fuse, use as marked on plug. • Always replace the fuse cover. FOR USERS IN AUSTRALIA AND NEW ZEALAND This embroidery machine is not suitable for...
Users Manual - English
Page 4
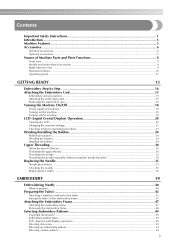
...GETTING READY 13 Embroidery Step by Step 14 Attaching the Embroidery Unit 15 Embroidery unit precautions ...15 Attaching the embroidery unit ...15 Removing the embroidery unit ...16 Turning the Machine On/Off 18 Power supply precautions ...18 Turning on the machine ...19 Turning off the machine ...19 LCD ... thread ...30 Threading the needle ...32 Threading the needle manually (without using the needle threader 34 Replacing the Needle ...35 Needle precautions ...35 Checking the needle ...35 Replacing the needle...36 EMBROIDERY 39 Embroidering Neatly ...40 What to prepare ...40 Preparing ...
...GETTING READY 13 Embroidery Step by Step 14 Attaching the Embroidery Unit 15 Embroidery unit precautions ...15 Attaching the embroidery unit ...15 Removing the embroidery unit ...16 Turning the Machine On/Off 18 Power supply precautions ...18 Turning on the machine ...19 Turning off the machine ...19 LCD ... thread ...30 Threading the needle ...32 Threading the needle manually (without using the needle threader 34 Replacing the Needle ...35 Needle precautions ...35 Checking the needle ...35 Replacing the needle...36 EMBROIDERY 39 Embroidering Neatly ...40 What to prepare ...40 Preparing ...
Users Manual - English
Page 6
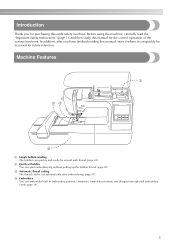
... easily be accessed for future reference. Before using the machine, carefully read the "Important Safety Instructions" (page 1), and then study this manual for purchasing this manual, store it where it can be cut automatically after embroidering (page 51). Introduction Thank you have finished reading this embroidery machine. In addition, after you for the correct operation...
... easily be accessed for future reference. Before using the machine, carefully read the "Important Safety Instructions" (page 1), and then study this manual for purchasing this manual, store it where it can be cut automatically after embroidering (page 51). Introduction Thank you have finished reading this embroidery machine. In addition, after you for the correct operation...
Users Manual - English
Page 7
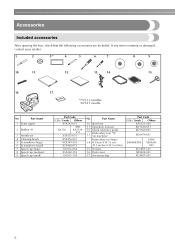
Part Name 10 Spool net 11 Operation manual 12 Quick reference guide 13 Embroidery foot "Q" (on machine) Embroidery set 4 Cleaning brush 5 Screwdriver (large) 6 Screwdriver (small) 7 Spool cap (large) 8 Spool cap (medium) 9 Spool cap (small) Part Code U.S.A. / Canada Others X54243-051 SA156 SFB: XA5539- ...
Part Name 10 Spool net 11 Operation manual 12 Quick reference guide 13 Embroidery foot "Q" (on machine) Embroidery set 4 Cleaning brush 5 Screwdriver (large) 6 Screwdriver (small) 7 Spool cap (large) 8 Spool cap (medium) 9 Spool cap (small) Part Code U.S.A. / Canada Others X54243-051 SA156 SFB: XA5539- ...
Users Manual - English
Page 14
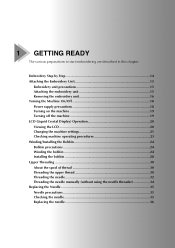
... 14 Attaching the Embroidery Unit 15 Embroidery unit precautions 15 Attaching the embroidery unit 15 Removing the embroidery unit 16 Turning the Machine On/Off 18 Power supply precautions 18 Turning on the machine 19 Turning off the machine 19 LCD (Liquid Crystal Display) Operation 20 Viewing the LCD 20 Changing the machine settings 21 Checking machine operating procedures...
... 14 Attaching the Embroidery Unit 15 Embroidery unit precautions 15 Attaching the embroidery unit 15 Removing the embroidery unit 16 Turning the Machine On/Off 18 Power supply precautions 18 Turning on the machine 19 Turning off the machine 19 LCD (Liquid Crystal Display) Operation 20 Viewing the LCD 20 Changing the machine settings 21 Checking machine operating procedures...
Users Manual - English
Page 24
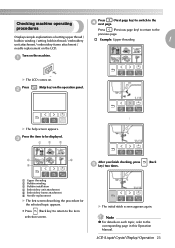
...The LCD comes on the machine. Note z For details on the operation panel. procedures Press (Previous page key) to return to the d next page. Press b (Help key) on each topic, refer to the corresponding page in this Operation Manual. X The help screen appears.... X The initial stitch screen appears again. Press the item to the item selection screen. Displays simple explanations of setting upper thread / bobbin winding / setting bobbin thread / embroidery † Example: Upper threading 1 unit attachment / embroidery ...
...The LCD comes on the machine. Note z For details on the operation panel. procedures Press (Previous page key) to return to the d next page. Press b (Help key) on each topic, refer to the corresponding page in this Operation Manual. X The help screen appears.... X The initial stitch screen appears again. Press the item to the item selection screen. Displays simple explanations of setting upper thread / bobbin winding / setting bobbin thread / embroidery † Example: Upper threading 1 unit attachment / embroidery ...

Users Manual - English
Page 33
...guides in the order shown below. 1 a Shutter Note z If the embroidery foot has been lowered and the shutter is equipped with sewing machine needles 75/11 through the take -up lever. Look through this window...threader. z If the needle threader cannot be sure to thread the needle. Be sure to raise the embroidery foot and open the shutter before removing the upper thread, be used with a thickness of the thread passed...thread with your right hand to "Threading the needle manually (without using your right hand, as shown. 1 a Needle bar thread guide 32 In addition, before threading...
...guides in the order shown below. 1 a Shutter Note z If the embroidery foot has been lowered and the shutter is equipped with sewing machine needles 75/11 through the take -up lever. Look through this window...threader. z If the needle threader cannot be sure to thread the needle. Be sure to raise the embroidery foot and open the shutter before removing the upper thread, be used with a thickness of the thread passed...thread with your right hand to "Threading the needle manually (without using your right hand, as shown. 1 a Needle bar thread guide 32 In addition, before threading...

Users Manual - English
Page 35
...(page 30). Raise the presser foot lever, pass the end of the d thread through the embroidery foot hole. GETTING READY Raise the presser foot lever, pass the end of the e thread through the embroidery foot hole. 34 b Note z If the needle is finished. When using the needle threader) ... threading is not raised, the needle threader cannot thread the needle. Thread the machine to the needle bar thread a guide. • For details, refer to back. Lower the presser foot lever. Threading the needle manually (without using special thread, thread with a thickness of 130/20 or thicker which...
...(page 30). Raise the presser foot lever, pass the end of the d thread through the embroidery foot hole. GETTING READY Raise the presser foot lever, pass the end of the e thread through the embroidery foot hole. 34 b Note z If the needle is finished. When using the needle threader) ... threading is not raised, the needle threader cannot thread the needle. Thread the machine to the needle bar thread a guide. • For details, refer to back. Lower the presser foot lever. Threading the needle manually (without using special thread, thread with a thickness of 130/20 or thicker which...
Users Manual - English
Page 84
... 8 M Brother poly #90 bobbin thread 7 buzzer 82 machine settings 21 , main power switch 9 19 C characters 52 maintenance 70 manual needle threading 34 , memory key 11 63 cleaning 70 cleaning brush 6 N D dust cover 6 E , embroidery card 7 55 embroidery card slot 9 , Embroidery foot "Q 6 9 embroidery foot attachment 72 embroidery frame 43 embroidery frame attachment 47 embroidery frame removal 48 embroidery key 11 embroidery pattern 53 embroidery pattern...
... 8 M Brother poly #90 bobbin thread 7 buzzer 82 machine settings 21 , main power switch 9 19 C characters 52 maintenance 70 manual needle threading 34 , memory key 11 63 cleaning 70 cleaning brush 6 N D dust cover 6 E , embroidery card 7 55 embroidery card slot 9 , Embroidery foot "Q 6 9 embroidery foot attachment 72 embroidery frame 43 embroidery frame attachment 47 embroidery frame removal 48 embroidery key 11 embroidery pattern 53 embroidery pattern...

