
Users Manual - English
Page 2
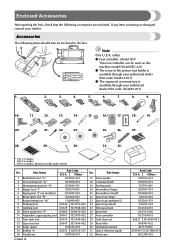
...Name 1 Buttonhole foot "A" 2 Overcasting foot "G" 3 Monogramming foot "N" 4 Zipper foot "I" 5 Zigzag foot "J" (on this machine model NX-400/PC-420. ● The screw of the presser foot holder is available through your retailer. Part Name 17 Twin needle 18 Cleaning brush ...colored) No. Accessories The following accessories are enclosed. Enclosed Accessories After opening the box, check that the following items should also be used on machine) 6 Blind stitch foot "R" 7 Button fitting foot "M" 8 Walking foot 9 Quilting foot 10 Stitch guide foot "P" 11 Adjustable zipper/piping...
...Name 1 Buttonhole foot "A" 2 Overcasting foot "G" 3 Monogramming foot "N" 4 Zipper foot "I" 5 Zigzag foot "J" (on this machine model NX-400/PC-420. ● The screw of the presser foot holder is available through your retailer. Part Name 17 Twin needle 18 Cleaning brush ...colored) No. Accessories The following accessories are enclosed. Enclosed Accessories After opening the box, check that the following items should also be used on machine) 6 Blind stitch foot "R" 7 Button fitting foot "M" 8 Walking foot 9 Quilting foot 10 Stitch guide foot "P" 11 Adjustable zipper/piping...
Users Manual - English
Page 8
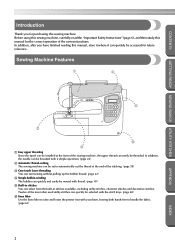
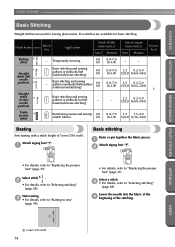
... utility stitches, character stitches and decorative stitches. Before using this sewing machine, carefully read the "Important Safety Instructions" (page 6), and then study this manual, store it where it can easily be accessed for future reference. Sewing Machine Features 1 4 5 2 6 3 1 Easy upper threading Since...automatically cut the thread at the front of the sewing machine, the upper thread can quickly be threaded. CONTENTS GETTING READY SEWING BASICS UTILITY STITCHES Introduction Thank you have finished reading this manual for the correct operation of the various functions.
... utility stitches, character stitches and decorative stitches. Before using this sewing machine, carefully read the "Important Safety Instructions" (page 6), and then study this manual, store it where it can easily be accessed for future reference. Sewing Machine Features 1 4 5 2 6 3 1 Easy upper threading Since...automatically cut the thread at the front of the sewing machine, the upper thread can quickly be threaded. CONTENTS GETTING READY SEWING BASICS UTILITY STITCHES Introduction Thank you have finished reading this manual for the correct operation of the various functions.

Users Manual - English
Page 12
... never be left unattended while plugged in this manual. To disconnect, turn the main switch to break. 14. Always use outdoors. 7. It may deflect the needle causing it must be taken, including the following: Read all moving parts. This sewing machine is damaged, it to the symbol "{" position which represents off, then remove...
... never be left unattended while plugged in this manual. To disconnect, turn the main switch to break. 14. Always use outdoors. 7. It may deflect the needle causing it must be taken, including the following: Read all moving parts. This sewing machine is damaged, it to the symbol "{" position which represents off, then remove...

Users Manual - English
Page 14
... the most advanced computerized household sewing machines. When storing this machine, avoid direct sunlight and high humidity locations. For additional product information and updates, visit our web site at www.brother.com 8 APPENDIX INDEX To fully enjoy all the features, we suggest that you study the manual before using the machine. PLEASE READ BEFORE USING THIS...
... the most advanced computerized household sewing machines. When storing this machine, avoid direct sunlight and high humidity locations. For additional product information and updates, visit our web site at www.brother.com 8 APPENDIX INDEX To fully enjoy all the features, we suggest that you study the manual before using the machine. PLEASE READ BEFORE USING THIS...
Users Manual - English
Page 19
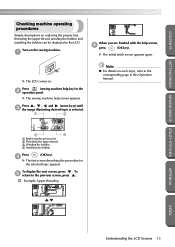
... corresponding page in this Operation Manual. 3 4 1 Replacing the presser foot 2 Threading the upper thread 3 Winding the bobbin 4 Installing the bobbin Press (OK key). 4 X The first screen describing the procedure for the selected topic appears. X The sewing machine help screen, 6 press ...134; Example: Upper threading APPENDIX INDEX Understanding the LCD Screens 13 Press (sewing machine help key) in the LCD. CONTENTS GETTING READY SEWING BASICS UTILITY STITCHES Checking machine operating procedures Simple descriptions on replacing the presser foot, threading the upper ...
... corresponding page in this Operation Manual. 3 4 1 Replacing the presser foot 2 Threading the upper thread 3 Winding the bobbin 4 Installing the bobbin Press (OK key). 4 X The first screen describing the procedure for the selected topic appears. X The sewing machine help screen, 6 press ...134; Example: Upper threading APPENDIX INDEX Understanding the LCD Screens 13 Press (sewing machine help key) in the LCD. CONTENTS GETTING READY SEWING BASICS UTILITY STITCHES Checking machine operating procedures Simple descriptions on replacing the presser foot, threading the upper ...
Users Manual - English
Page 35
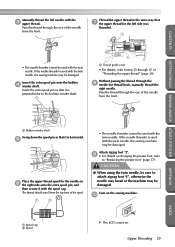
...from the front. If the needle threader is horizontal. 5 Place the upper thread spool for the left needle with the twin needle, the sewing machine may be damaged. Without passing the thread through the eye of the spool. 1 2 • The needle threader cannot be used with ...the twin needle. Pass the thread through the 8 needle bar thread hook, manually thread the right needle. CONTENTS Manually thread the left side was threaded. 1 • The needle threader cannot be used with the 3 upper thread. If the needle ...
...from the front. If the needle threader is horizontal. 5 Place the upper thread spool for the left needle with the twin needle, the sewing machine may be damaged. Without passing the thread through the eye of the spool. 1 2 • The needle threader cannot be used with ...the twin needle. Pass the thread through the 8 needle bar thread hook, manually thread the right needle. CONTENTS Manually thread the left side was threaded. 1 • The needle threader cannot be used with the 3 upper thread. If the needle ...

Users Manual - English
Page 59
... cut automatically, refer to "Automatically cutting the thread" (page 58). ■ Using the manual thread cutter When sewing with thread thicker than #30, nylon or metallic threads, or other special threads, use the thread cutter on setting the machine so that the threads will be set so that the threads are cut the...
... cut automatically, refer to "Automatically cutting the thread" (page 58). ■ Using the manual thread cutter When sewing with thread thicker than #30, nylon or metallic threads, or other special threads, use the thread cutter on setting the machine so that the threads will be set so that the threads are cut the...
Users Manual - English
Page 76
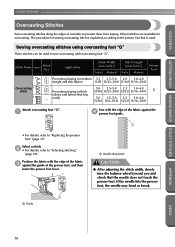
...• For details, refer to prevent them from fraying. Stitch Name Pattern Stitch Key Application Stitch Width [mm (inch.)] Auto Manual Stitch Length [mm (inch.)] Auto Manual Presser Foot 11 Preventing fraying in medium 3.5 2.5-5.0 2.0 1.0-4.0 weight and thin fabrics (1/8) (3/32-3/16) (1/16) (1/16-3/16... is explained according to "Selecting stitching" (page 68). The procedure for overcasting. Fifteen stitches are available for sewing overcasting stitch is used to sew overcasting with the edge of the fabric against the guide of cut fabric to "Replacing the presser foot" (...
...• For details, refer to prevent them from fraying. Stitch Name Pattern Stitch Key Application Stitch Width [mm (inch.)] Auto Manual Stitch Length [mm (inch.)] Auto Manual Presser Foot 11 Preventing fraying in medium 3.5 2.5-5.0 2.0 1.0-4.0 weight and thin fabrics (1/8) (3/32-3/16) (1/16) (1/16-3/16... is explained according to "Selecting stitching" (page 68). The procedure for overcasting. Fifteen stitches are available for sewing overcasting stitch is used to sew overcasting with the edge of the fabric against the guide of cut fabric to "Replacing the presser foot" (...
Users Manual - English
Page 77
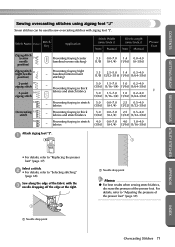
... in thick fabrics and stretch fabrics - Sew along the edge of the fabric with zigzag...Manual Presser Foot 3.5 0.0-7.0 1.4 0.0-4.0 (1/8) (0-1/4) (1/16) (0-3/16) 3.5 2.5-5.0 1.4 0.3-4.0 (1/8) (3/32-3/16) (1/16) (1/64-3/16) 5.0 1.5-7.0 1.0 0.2-4.0 (3/16) (1/16-1/4) (1/16) (1/64-3/16) J 5.0 1.5-7.0 1.0 0.2-4.0 (3/16) (1/16-1/4) (1/16) (1/64-3/16) 5.0 0.0-7.0 2.5 0.5-4.0 (3/16) (0-1/4) (3/32) (1/32-3/16) 5.0 0.0-7.0 2.5 0.5-4.0 (3/16) (0-1/4) (3/32) (1/32-3/16) 4.0 0.0-7.0 4.0 1.0-4.0 (3/16) (0-1/4) (3/16) (1/16-3/16) Attach zigzag foot "J". 1 1 J • For details, refer to sew...
... in thick fabrics and stretch fabrics - Sew along the edge of the fabric with zigzag...Manual Presser Foot 3.5 0.0-7.0 1.4 0.0-4.0 (1/8) (0-1/4) (1/16) (0-3/16) 3.5 2.5-5.0 1.4 0.3-4.0 (1/8) (3/32-3/16) (1/16) (1/64-3/16) 5.0 1.5-7.0 1.0 0.2-4.0 (3/16) (1/16-1/4) (1/16) (1/64-3/16) J 5.0 1.5-7.0 1.0 0.2-4.0 (3/16) (1/16-1/4) (1/16) (1/64-3/16) 5.0 0.0-7.0 2.5 0.5-4.0 (3/16) (0-1/4) (3/32) (1/32-3/16) 5.0 0.0-7.0 2.5 0.5-4.0 (3/16) (0-1/4) (3/32) (1/32-3/16) 4.0 0.0-7.0 4.0 1.0-4.0 (3/16) (0-1/4) (3/16) (1/16-3/16) Attach zigzag foot "J". 1 1 J • For details, refer to sew...
Users Manual - English
Page 78
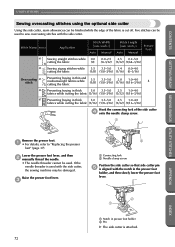
... 37). Stitch Name Pattern Application Stitch Width [mm (inch.)] Auto Manual Stitch Length [mm (inch.)] Auto Manual Presser Foot 63 Sewing straight stitches while 0.0 0.0-2.5 2.5 0.2-5.0 cutting the fabric (0) (0-3/32) (3/32) (1/64-3/16) 64 Sewing zigzag stitches while 3.5 3.5-5.0 1.4 0.0-4.0 cutting the fabric (1/8) (1/8-3/16...(3/16) (1/8-3/16) (3/32) (1/16-3/16) Hook the connecting fork of the fabric is aligned with the side cutter, the sewing machine may be damaged. Raise the presser foot lever. 3 2 1 Connecting fork 2 Needle clamp screw Position the side cutter so that...
... 37). Stitch Name Pattern Application Stitch Width [mm (inch.)] Auto Manual Stitch Length [mm (inch.)] Auto Manual Presser Foot 63 Sewing straight stitches while 0.0 0.0-2.5 2.5 0.2-5.0 cutting the fabric (0) (0-3/32) (3/32) (1/64-3/16) 64 Sewing zigzag stitches while 3.5 3.5-5.0 1.4 0.0-4.0 cutting the fabric (1/8) (1/8-3/16...(3/16) (1/8-3/16) (3/32) (1/16-3/16) Hook the connecting fork of the fabric is aligned with the side cutter, the sewing machine may be damaged. Raise the presser foot lever. 3 2 1 Connecting fork 2 Needle clamp screw Position the side cutter so that...
Users Manual - English
Page 80
Stitch Name Pattern Stitch Key Application Stitch Width [mm (inch.)] Auto Manual Stitch Length [mm (inch.)] Auto Manual Presser Foot Basting 6 stitch - INDEX 1 1 5 mm (3/16 inch) 74 Lower the needle... stitching" (page 68). baseline/reverse stitching) - 2.5 0.2-5.0 (3/32) (1/64-3/16) Triple 4 stretch stitch Reinforcing seams and sewing 0.0 stretch fabrics (0) 0.0-7.0 2.5 1.5-4.0 (0-1/4) (3/32) (1/16-3/16) Basting Sew basting with a stitch length of the stitching. Temporarily securing 0.0 0.0-7.0 (0) (0-1/4) - - 1 Straight stitch (left needle position)...
Stitch Name Pattern Stitch Key Application Stitch Width [mm (inch.)] Auto Manual Stitch Length [mm (inch.)] Auto Manual Presser Foot Basting 6 stitch - INDEX 1 1 5 mm (3/16 inch) 74 Lower the needle... stitching" (page 68). baseline/reverse stitching) - 2.5 0.2-5.0 (3/32) (1/64-3/16) Triple 4 stretch stitch Reinforcing seams and sewing 0.0 stretch fabrics (0) 0.0-7.0 2.5 1.5-4.0 (0-1/4) (3/32) (1/16-3/16) Basting Sew basting with a stitch length of the stitching. Temporarily securing 0.0 0.0-7.0 (0) (0-1/4) - - 1 Straight stitch (left needle position)...
Users Manual - English
Page 82
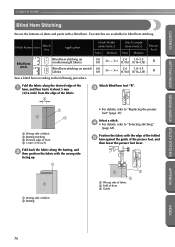
.... Stitch Name Pattern Stitch Key Application Stitch Width [mm (inch.)] Auto Manual Stitch Length [mm (inch.)] Auto Manual Presser Foot 17 Blind hem stitch 18 Blind hem stitching on mediumweight fabrics ...0.0 (0) 3← - 3→ 2.0 (1/16) 1.0-3.5 (1/16-1/8) R Blind hem stitching on stretch 0.0 fabrics (0) 3← - 3→ 2.0 (1/16) 1.0-3.5 (1/16-1/8) R Sew a blind hem according to "Selecting stitching" (page 68). UTILITY STITCHES CONTENTS GETTING READY SEWING...
.... Stitch Name Pattern Stitch Key Application Stitch Width [mm (inch.)] Auto Manual Stitch Length [mm (inch.)] Auto Manual Presser Foot 17 Blind hem stitch 18 Blind hem stitching on mediumweight fabrics ...0.0 (0) 3← - 3→ 2.0 (1/16) 1.0-3.5 (1/16-1/8) R Blind hem stitching on stretch 0.0 fabrics (0) 3← - 3→ 2.0 (1/16) 1.0-3.5 (1/16-1/8) R Sew a blind hem according to "Selecting stitching" (page 68). UTILITY STITCHES CONTENTS GETTING READY SEWING...
Users Manual - English
Page 84
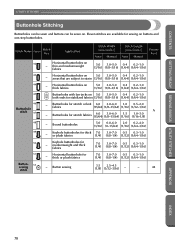
...) (1/64-1/16) 50 Keyhole buttonholes for thick or plush fabrics 7.0 3.0-7.0 0.5 0.3-1.0 (1/4) (1/8-1/4) (1/32) (1/64-1/16) Button- 55 sewing stitch - Horizontal buttonhole for - Horizontal buttonholes on thick fabrics 5.0 3.0-5.0 0.4 0.2-1.0 (3/16) (1/8-3/16) (1/64) (1/64-1/16) 45... (1/64-1/16) 44 - Button sewing 3.5 2.5-4.5 (1/8) (3/32-3/16) - - Stitch Name Pattern Stitch Key Application Stitch Width [mm (inch.)] Auto Manual Stitch Length [mm (inch.)] Auto Manual Presser Foot 42 Horizontal buttonholes on . Buttonholes for sewing on 5.0 3.0-5.0 0.4 0.2-1.0 both ...
...) (1/64-1/16) 50 Keyhole buttonholes for thick or plush fabrics 7.0 3.0-7.0 0.5 0.3-1.0 (1/4) (1/8-1/4) (1/32) (1/64-1/16) Button- 55 sewing stitch - Horizontal buttonhole for - Horizontal buttonholes on thick fabrics 5.0 3.0-5.0 0.4 0.2-1.0 (3/16) (1/8-3/16) (1/64) (1/64-1/16) 45... (1/64-1/16) 44 - Button sewing 3.5 2.5-4.5 (1/8) (3/32-3/16) - - Stitch Name Pattern Stitch Key Application Stitch Width [mm (inch.)] Auto Manual Stitch Length [mm (inch.)] Auto Manual Presser Foot 42 Horizontal buttonholes on . Buttonholes for sewing on 5.0 3.0-5.0 0.4 0.2-1.0 both ...
Users Manual - English
Page 91
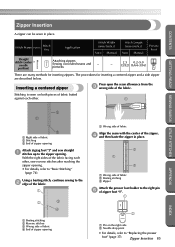
...foot "I". 1 I (3/32) (1/64-3/16) There are described below. Using a basting stitch, continue sewing to the 2 edge of the fabric. 1 2 3 4 1 Basting stitching 2 Reverse stitches 3 Wrong...the 3 wrong side of the fabric facing each other , sew reverse stitches after reaching the zipper opening. • For ...foot" (page 37). Zipper Insertion 85 INDEX CONTENTS GETTING READY SEWING BASICS UTILITY STITCHES Zipper Insertion A zipper can be sewn in place...the right pin 5 of zipper opening Attach zigzag foot "J" and sew straight 1 stitches up to the zipper opening. With the right sides...
...foot "I". 1 I (3/32) (1/64-3/16) There are described below. Using a basting stitch, continue sewing to the 2 edge of the fabric. 1 2 3 4 1 Basting stitching 2 Reverse stitches 3 Wrong...the 3 wrong side of the fabric facing each other , sew reverse stitches after reaching the zipper opening. • For ...foot" (page 37). Zipper Insertion 85 INDEX CONTENTS GETTING READY SEWING BASICS UTILITY STITCHES Zipper Insertion A zipper can be sewn in place...the right pin 5 of zipper opening Attach zigzag foot "J" and sew straight 1 stitches up to the zipper opening. With the right sides...
Users Manual - English
Page 95
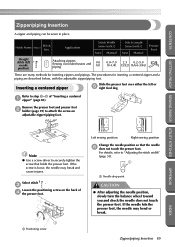
... in place. APPENDIX Note ● Use a screw driver to step - 1 4 of 4 the presser foot. 1 1 Positioning screw Left sewing position Right sewing position Change the needle position so that holds the presser foot. If the screw is loose, the needle may bend or break. The procedures... needle 6 does not touch the presser foot. Stitch Name Pattern Stitch Key Application Stitch Width [mm (inch.)] Auto Manual Stitch Length [mm (inch.)] Auto Manual Presser Foot Straight stitch (left or 5 right feed dog. Zipper/piping Insertion 89 INDEX Remove the presser foot and ...
... in place. APPENDIX Note ● Use a screw driver to step - 1 4 of 4 the presser foot. 1 1 Positioning screw Left sewing position Right sewing position Change the needle position so that holds the presser foot. If the screw is loose, the needle may bend or break. The procedures... needle 6 does not touch the presser foot. Stitch Name Pattern Stitch Key Application Stitch Width [mm (inch.)] Auto Manual Stitch Length [mm (inch.)] Auto Manual Presser Foot Straight stitch (left or 5 right feed dog. Zipper/piping Insertion 89 INDEX Remove the presser foot and ...
Users Manual - English
Page 97
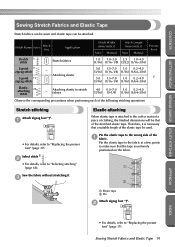
... (inch.)] Auto Manual Presser Foot Stretch 5 stitch Stretch fabrics 1.0 1.0-3.0 2.5 1.0-4.0 (1/16) (1/16-1/8) (3/32) (1/16-3/16) 2-point 9 zigzag stitch 3-point 10 zigzag stitch - Stretch stitching Attach zigzag foot "J". 1 J • For details, refer to "Selecting stitching" (page 68). Sewing Stretch Fabrics and...16) Elastic- 28 attaching stitch - Select stitch 5 . 2 • For details, refer to "Replacing the presser foot" (page 37). Sew the fabric without stretching it is uniformly positioned on the fabric. 1 2 1 Elastic tape 2 Pin Attach zigzag foot "J". 2 J APPENDIX ...
... (inch.)] Auto Manual Presser Foot Stretch 5 stitch Stretch fabrics 1.0 1.0-3.0 2.5 1.0-4.0 (1/16) (1/16-1/8) (3/32) (1/16-3/16) 2-point 9 zigzag stitch 3-point 10 zigzag stitch - Stretch stitching Attach zigzag foot "J". 1 J • For details, refer to "Selecting stitching" (page 68). Sewing Stretch Fabrics and...16) Elastic- 28 attaching stitch - Select stitch 5 . 2 • For details, refer to "Replacing the presser foot" (page 37). Sew the fabric without stretching it is uniformly positioned on the fabric. 1 2 1 Elastic tape 2 Pin Attach zigzag foot "J". 2 J APPENDIX ...

Users Manual - English
Page 99
...1.5 0.5-5.0 1.2 1.0-4.0 (1/16) (1/32-3/16) (1/16) (1/16-3/16) 57 Piecing straight stitch 58 - Straight stitch quilting that can be used for sewing appliqués, patchwork and quilts are described below. Patchwork stitching - 5.0 2.5-7.0 2.5 1.0-4.0 (3/16) (3/32-1/4) (3/32) (1/16-3/16) 5.0 0.0-7.0 1.2...(1/16-3/16) Quilting 62 stippling - Stitch Name Pattern Stitch Key Application Stitch Width [mm (inch.)] Auto Manual Stitch Length [mm (inch.)] Auto Manual Presser Foot 7 Zigzag stitch 60 Attaching appliqués (center baseline/reverse stitching) 3.5 0.0-7.0 1.4 0.0-4.0 (1/8) ...
...1.5 0.5-5.0 1.2 1.0-4.0 (1/16) (1/32-3/16) (1/16) (1/16-3/16) 57 Piecing straight stitch 58 - Straight stitch quilting that can be used for sewing appliqués, patchwork and quilts are described below. Patchwork stitching - 5.0 2.5-7.0 2.5 1.0-4.0 (3/16) (3/32-1/4) (3/32) (1/16-3/16) 5.0 0.0-7.0 1.2...(1/16-3/16) Quilting 62 stippling - Stitch Name Pattern Stitch Key Application Stitch Width [mm (inch.)] Auto Manual Stitch Length [mm (inch.)] Auto Manual Presser Foot 7 Zigzag stitch 60 Attaching appliqués (center baseline/reverse stitching) 3.5 0.0-7.0 1.4 0.0-4.0 (1/8) ...
Users Manual - English
Page 106
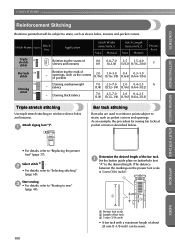
...the ends of sleeves and inseams 0.0 0.0-7.0 2.5 1.5-4.0 (0) (0-1/4) (3/32) (1/16-3/16) J Bar tack 54 stitch - GETTING READY SEWING BASICS UTILITY STITCHES UTILITY STITCHES CONTENTS Reinforcement Stitching Reinforce points that will be sewn. Stitch Name Pattern Stitch Key Application Stitch Width [mm (inch....)] Auto Manual Stitch Length [mm (inch.)] Auto Manual Presser Foot Triple 4 stretch stitch Reinforcing the seams of openings, such as sleeve holes, inseams and ...
...the ends of sleeves and inseams 0.0 0.0-7.0 2.5 1.5-4.0 (0) (0-1/4) (3/32) (1/16-3/16) J Bar tack 54 stitch - GETTING READY SEWING BASICS UTILITY STITCHES UTILITY STITCHES CONTENTS Reinforcement Stitching Reinforce points that will be sewn. Stitch Name Pattern Stitch Key Application Stitch Width [mm (inch....)] Auto Manual Stitch Length [mm (inch.)] Auto Manual Presser Foot Triple 4 stretch stitch Reinforcing the seams of openings, such as sleeve holes, inseams and ...
Users Manual - English
Page 110
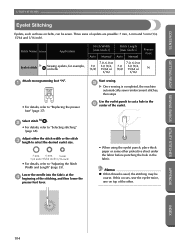
If this occurs, sew the eyelet twice, one on belts Stitch Width [mm (inch.)] Auto Manual Stitch Length [mm (inch.)] Auto Manual Presser Foot 7.0, 6.0 or 7.0, 6.0 or 7.0 5.0 (1/4, 7.0 5.0 (1/4, (1/4) 15/64 or (1/4) 15/64 or N 3/16) 3/16) Attach monogramming foot "N". 1 • For details, refer ... are possible: 7 mm, 6 mm and 5 mm (1/4, 15/64 and 3/16 inch). Memo ● If thin thread is completed, the machine automatically sews reinforcement stitches, then stops Use the eyelet punch to "Replacing the presser foot" (page 37). Adjust either the stitch width or the stitch 3 ...
If this occurs, sew the eyelet twice, one on belts Stitch Width [mm (inch.)] Auto Manual Stitch Length [mm (inch.)] Auto Manual Presser Foot 7.0, 6.0 or 7.0, 6.0 or 7.0 5.0 (1/4, 7.0 5.0 (1/4, (1/4) 15/64 or (1/4) 15/64 or N 3/16) 3/16) Attach monogramming foot "N". 1 • For details, refer ... are possible: 7 mm, 6 mm and 5 mm (1/4, 15/64 and 3/16 inch). Memo ● If thin thread is completed, the machine automatically sews reinforcement stitches, then stops Use the eyelet punch to "Replacing the presser foot" (page 37). Adjust either the stitch width or the stitch 3 ...
Users Manual - English
Page 111
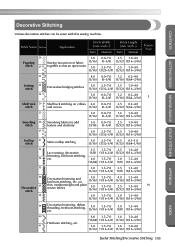
Stitch Name Pattern Application Stitch Width [mm (inch.)] Auto Manual Stitch Length [mm (inch.)] Auto Manual Presser Foot 26 Fagoting stitch 27 Sewing two pieces of fabric together across an open seam 5.0 (3/16) 5.0 (3/16) 0.0-7.0 (0-1/4) 2.5-7.0 (3/25-1/4) ...(1/16-1/4) (1/16) (1/16-3/16) APPENDIX INDEX Eyelet Stitching/Decorative Stitching 105 Decorative Stitching CONTENTS GETTING READY SEWING BASICS UTILITY STITCHES Various decorative stitches can be sewn with this sewing machine. on collars 4.0 0.0-7.0 2.5 0.2-4.0 and curves (3/16) (0-1/4) (3/32) (1/64-3/16) 25 5.0 ...
Stitch Name Pattern Application Stitch Width [mm (inch.)] Auto Manual Stitch Length [mm (inch.)] Auto Manual Presser Foot 26 Fagoting stitch 27 Sewing two pieces of fabric together across an open seam 5.0 (3/16) 5.0 (3/16) 0.0-7.0 (0-1/4) 2.5-7.0 (3/25-1/4) ...(1/16-1/4) (1/16) (1/16-3/16) APPENDIX INDEX Eyelet Stitching/Decorative Stitching 105 Decorative Stitching CONTENTS GETTING READY SEWING BASICS UTILITY STITCHES Various decorative stitches can be sewn with this sewing machine. on collars 4.0 0.0-7.0 2.5 0.2-4.0 and curves (3/16) (0-1/4) (3/32) (1/64-3/16) 25 5.0 ...


