

Users Manual - English
Page 3
When sewing cylindrical pieces, remove the flat bed attachment. B Thread cutter Pass the threads through the thread cutter to adjust the tension of the upper thread. D Thread tension dial Use the thread tension dial to cut the thread. (page Cover D) A Flat bed attachment with...the sewing machine and automatically cut them. CONTENTS GETTING READY SEWING BASICS UTILITY STITCHES Names of Machine Parts and Their Functions The names of the various parts of the machine parts. Before using the sewing machine, carefully read these descriptions to learn the names of the sewing machine ...
When sewing cylindrical pieces, remove the flat bed attachment. B Thread cutter Pass the threads through the thread cutter to adjust the tension of the upper thread. D Thread tension dial Use the thread tension dial to cut the thread. (page Cover D) A Flat bed attachment with...the sewing machine and automatically cut them. CONTENTS GETTING READY SEWING BASICS UTILITY STITCHES Names of Machine Parts and Their Functions The names of the various parts of the machine parts. Before using the sewing machine, carefully read these descriptions to learn the names of the sewing machine ...
Users Manual - English
Page 10
CONTENTS GETTING READY SEWING BASICS UTILITY STITCHES SEWING BASICS 45 Sewing ...46 General sewing procedure ...47 Positioning the fabric ...48 Starting to sew ...49 Securing the stitching ...51 Cutting the thread ...53 Adjusting the Thread Tension 54 Changing the tension of theupper thread ...54 Adjusting the Stitch Width and Length 55 Adjusting the stitch width ...55 Adjusting the...
CONTENTS GETTING READY SEWING BASICS UTILITY STITCHES SEWING BASICS 45 Sewing ...46 General sewing procedure ...47 Positioning the fabric ...48 Starting to sew ...49 Securing the stitching ...51 Cutting the thread ...53 Adjusting the Thread Tension 54 Changing the tension of theupper thread ...54 Adjusting the Stitch Width and Length 55 Adjusting the stitch width ...55 Adjusting the...
Users Manual - English
Page 27
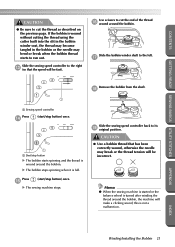
... or the thread tension will make a clicking sound; CAUTION ● Use a bobbin thread that the speed will be incorrect. this is full. Slide the bobbin winder shaft to its i original position. g Remove the bobbin from the shaft. Memo ● When the sewing machine is started or ... (start /stop button X The bobbin starts spinning and the thread is turned after winding the thread around the bobbin, the machine will be fast). X The sewing machine stops. APPENDIX INDEX Winding/Installing the Bobbin 21 Use scissors to cut the thread as described on the previous page. Press e ...
... or the thread tension will make a clicking sound; CAUTION ● Use a bobbin thread that the speed will be incorrect. this is full. Slide the bobbin winder shaft to its i original position. g Remove the bobbin from the shaft. Memo ● When the sewing machine is started or ... (start /stop button X The bobbin starts spinning and the thread is turned after winding the thread around the bobbin, the machine will be fast). X The sewing machine stops. APPENDIX INDEX Winding/Installing the Bobbin 21 Use scissors to cut the thread as described on the previous page. Press e ...
Users Manual - English
Page 28
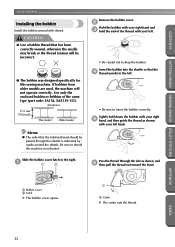
... wound, otherwise the needle may break or the thread tension will not operate correctly. APPENDIX 1 Bobbin cover 2 Latch X The bobbin cover opens. 1 1 Cutter X The cutter cuts the thread. Slide the bobbin cover latch to thread the machine as indicated. Lightly hold the end of the same type... the bobbin into the shuttle so that the 4 thread unrolls to the left. • Be sure to drop the bobbin. GETTING READY SEWING BASICS UTILITY STITCHES GETTING READY CONTENTS Installing the bobbin Install the bobbin wound with your left hand. CAUTION ● Use a bobbin thread that...
... wound, otherwise the needle may break or the thread tension will not operate correctly. APPENDIX 1 Bobbin cover 2 Latch X The bobbin cover opens. 1 1 Cutter X The cutter cuts the thread. Slide the bobbin cover latch to thread the machine as indicated. Lightly hold the end of the same type... the bobbin into the shuttle so that the 4 thread unrolls to the left. • Be sure to drop the bobbin. GETTING READY SEWING BASICS UTILITY STITCHES GETTING READY CONTENTS Installing the bobbin Install the bobbin wound with your left hand. CAUTION ● Use a bobbin thread that...
Users Manual - English
Page 29
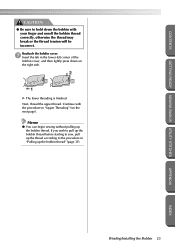
...bobbin with your finger and unroll the bobbin thread correctly, otherwise the thread may break or the thread tension will be incorrect. If you wish to pull up the bobbin thread before starting to sew, pull up the thread according to hold down on the next page). Winding/Installing the Bobbin 23... APPENDIX INDEX CONTENTS GETTING READY SEWING BASICS UTILITY STITCHES CAUTION ● Be sure to the procedure in "Pulling up the bobbin thread" (page 31). Reattach the bobbin cover. 7 Insert the ...
...bobbin with your finger and unroll the bobbin thread correctly, otherwise the thread may break or the thread tension will be incorrect. If you wish to pull up the bobbin thread before starting to sew, pull up the thread according to hold down on the next page). Winding/Installing the Bobbin 23... APPENDIX INDEX CONTENTS GETTING READY SEWING BASICS UTILITY STITCHES CAUTION ● Be sure to the procedure in "Pulling up the bobbin thread" (page 31). Reattach the bobbin cover. 7 Insert the ...
Users Manual - English
Page 46
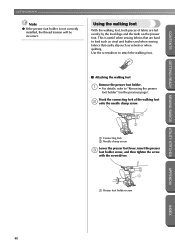
...This is not correctly installed, the thread tension will be incorrect. GETTING READY SEWING BASICS UTILITY STITCHES ■ Attaching the walking foot Remove the presser foot holder. 1 • For details, refer to feed such as vinyl and leather and when sewing fabrics that are fed evenly by the feed..."Removing the presser foot holder" (on the presser foot. GETTING READY CONTENTS Note ● If the presser foot holder is useful when sewing fabrics that easily slip such as velvets or when quilting. Using the walking foot With the walking foot, both pieces of the walking foot...
...This is not correctly installed, the thread tension will be incorrect. GETTING READY SEWING BASICS UTILITY STITCHES ■ Attaching the walking foot Remove the presser foot holder. 1 • For details, refer to feed such as vinyl and leather and when sewing fabrics that are fed evenly by the feed..."Removing the presser foot holder" (on the presser foot. GETTING READY CONTENTS Note ● If the presser foot holder is useful when sewing fabrics that easily slip such as velvets or when quilting. Using the walking foot With the walking foot, both pieces of the walking foot...
Users Manual - English
Page 51
CONTENTS GETTING READY SEWING BASICS UTILITY STITCHES 2 SEWING BASICS The necessary preparations for sewing are described in this chapter. Sewing ...46 Adjusting the Thread Tension 54 Adjusting the Stitch Width and Length 55 Useful Functions ...57 Useful Sewing Tips 62 APPENDIX INDEX
CONTENTS GETTING READY SEWING BASICS UTILITY STITCHES 2 SEWING BASICS The necessary preparations for sewing are described in this chapter. Sewing ...46 Adjusting the Thread Tension 54 Adjusting the Stitch Width and Length 55 Useful Functions ...57 Useful Sewing Tips 62 APPENDIX INDEX
Users Manual - English
Page 60
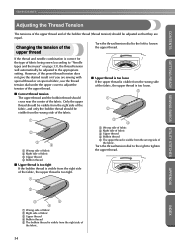
... the bobbin thread should be adjusted so that they are sewing with special thread or on page 33), the thread tension will automatically be adjusted to adjust the tension of the upper thread. ■ Correct thread tension The upper thread and the bobbin thread should cross near the...center of the fabric. Turn the thread tension dial to the right to loosen the upper thread. SEWING BASICS CONTENTS GETTING READY SEWING BASICS UTILITY STITCHES Adjusting the Thread Tension The tensions of the upper thread and of the bobbin thread (thread tension) should be visible from the wrong side...
... the bobbin thread should be adjusted so that they are sewing with special thread or on page 33), the thread tension will automatically be adjusted to adjust the tension of the upper thread. ■ Correct thread tension The upper thread and the bobbin thread should cross near the...center of the fabric. Turn the thread tension dial to the right to loosen the upper thread. SEWING BASICS CONTENTS GETTING READY SEWING BASICS UTILITY STITCHES Adjusting the Thread Tension The tensions of the upper thread and of the bobbin thread (thread tension) should be visible from the wrong side...

Users Manual - English
Page 61
...keys. For details on the range of utility stitches can be set so that the stitch width can easily be adjusted with the sewing speed controller. Turn on the sewing machine. 1 X The LCD comes on selecting a stitch, refer to the highlighted value. ● If the straight stitch (left .... the needle does not touch the presser foot. APPENDIX INDEX Adjusting the Thread Tension/Adjusting the Stitch Width and Length 55 For details, refer to "Saving stitch settings" (page 60). ● The sewing machine can be changed , the highlighted value is selected, the appropriate width and ...
...keys. For details on the range of utility stitches can be set so that the stitch width can easily be adjusted with the sewing speed controller. Turn on the sewing machine. 1 X The LCD comes on selecting a stitch, refer to the highlighted value. ● If the straight stitch (left .... the needle does not touch the presser foot. APPENDIX INDEX Adjusting the Thread Tension/Adjusting the Stitch Width and Length 55 For details, refer to "Saving stitch settings" (page 60). ● The sewing machine can be changed , the highlighted value is selected, the appropriate width and ...

Users Manual - English
Page 68
... be used for your project, and check the thread tension and stitch length and width. Leave the needle lowered (in order to obtain a finer stitch. If the needle remained up the machine with an even seam allowance, refer to "Sewing an even seam allowance" (page 64). SEWING BASICS CONTENTS GETTING READY SEWING BASICS UTILITY STITCHES Useful...
... be used for your project, and check the thread tension and stitch length and width. Leave the needle lowered (in order to obtain a finer stitch. If the needle remained up the machine with an even seam allowance, refer to "Sewing an even seam allowance" (page 64). SEWING BASICS CONTENTS GETTING READY SEWING BASICS UTILITY STITCHES Useful...
Users Manual - English
Page 113
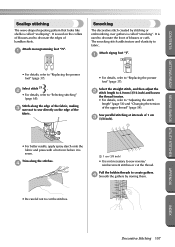
...thread. Attach zigzag foot "J". 1 J • For details, refer to "Adjusting the stitch length" (page 56) and "Changing the tension of handkerchiefs. Sew parallel stitching at intervals of blouses or cuffs. Select the straight stitch, and then adjust the 2 stitch length to 4.0 mm (3/16 ...inch) and loosen the thread tension. • For details, refer to "Replacing the presser foot" (page 37). APPENDIX INDEX Decorative Stitching 107 CONTENTS GETTING READY SEWING BASICS UTILITY STITCHES Scallop stitching The wave-shaped repeating pattern that looks ...
...thread. Attach zigzag foot "J". 1 J • For details, refer to "Adjusting the stitch length" (page 56) and "Changing the tension of handkerchiefs. Sew parallel stitching at intervals of blouses or cuffs. Select the straight stitch, and then adjust the 2 stitch length to 4.0 mm (3/16 ...inch) and loosen the thread tension. • For details, refer to "Replacing the presser foot" (page 37). APPENDIX INDEX Decorative Stitching 107 CONTENTS GETTING READY SEWING BASICS UTILITY STITCHES Scallop stitching The wave-shaped repeating pattern that looks ...
Users Manual - English
Page 114
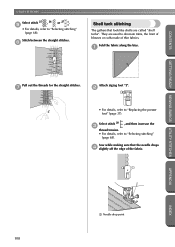
... 4 slightly off the edge of thin fabrics. Select stitch 20 , and then increase the 3 thread tension. • For details, refer to "Selecting stitching" (page 68). They are called "shell tucks". Sew while making sure that look like shells are used to "Replacing the presser foot" (page 37). Fold... the fabric along the bias. 1 GETTING READY SEWING BASICS UTILITY STITCHES Pull out the threads for the straight stitches. 7 Attach zigzag foot "J". 2 J • For details, refer to decorate trims, ...
... 4 slightly off the edge of thin fabrics. Select stitch 20 , and then increase the 3 thread tension. • For details, refer to "Selecting stitching" (page 68). They are called "shell tucks". Sew while making sure that look like shells are used to "Replacing the presser foot" (page 37). Fold... the fabric along the bias. 1 GETTING READY SEWING BASICS UTILITY STITCHES Pull out the threads for the straight stitches. 7 Attach zigzag foot "J". 2 J • For details, refer to decorate trims, ...
Users Manual - English
Page 143
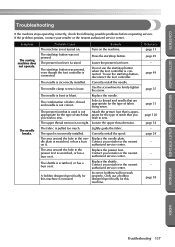
...burr Contact your retailer or the nearest authorized service center. Loosen the upper thread tension. The fabric is too tight. The needle breaks. Select a thread and needle that is loose. The upper thread tension is pulled too much. Lightly guide the fabric. Replace the needle plate. The ...the presser foot lever. The needle clamp screw is appro- The presser foot that priate for this machine is not turned on it. dle plate is connected. Symptom The sewing machine does not operate. The combination of fabric, thread and needle is bent or blunt. appropriate for ...
...burr Contact your retailer or the nearest authorized service center. Loosen the upper thread tension. The fabric is too tight. The needle breaks. Select a thread and needle that is loose. The upper thread tension is pulled too much. Lightly guide the fabric. Replace the needle plate. The ...the presser foot lever. The needle clamp screw is appro- The presser foot that priate for this machine is not turned on it. dle plate is connected. Symptom The sewing machine does not operate. The combination of fabric, thread and needle is bent or blunt. appropriate for ...
Users Manual - English
Page 144
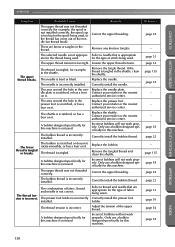
... being used . Replace the bobbin. Correct the upper threading. Adjust the tension of fabric, thread and needle is not used . Reference page 24 - APPENDIX CONTENTS GETTING READY SEWING BASICS UTILITY STITCHES Symptom Probable Cause Remedy The upper thread was not threaded correctly...the shuttle. The bobbin thread is incorrect. Incorrect bobbins will not work properly. The thread tension is incorrectly installed. Correct the upper threading. There are appropriate for this machine is not correct. Select a needle that are knots or tangles in the nee- The ...
... being used . Replace the bobbin. Correct the upper threading. Adjust the tension of fabric, thread and needle is not used . Reference page 24 - APPENDIX CONTENTS GETTING READY SEWING BASICS UTILITY STITCHES Symptom Probable Cause Remedy The upper thread was not threaded correctly...the shuttle. The bobbin thread is incorrect. Incorrect bobbins will not work properly. The thread tension is incorrectly installed. Correct the upper threading. There are appropriate for this machine is not correct. Select a needle that are knots or tangles in the nee- The ...

Users Manual - English
Page 145
... the shuttle. The needle threader cannot be used . The needle is incorrectly installed. The thread tension is wrinkled. Shorten the stitch length or sew with stabilizer material under the needle plate or in the shuttle. Correctly install the needle. Incorrect ...tension of the upper thread. Replace the needle. Remove the needle plate cover and clean the shuttle. Clean the shuttle. Correct the upper threading. Contact your retailer or the nearest authorized service center. Only use a bobbin designed specifically for this machine. Press the needle position button to sew...
... the shuttle. The needle threader cannot be used . The needle is incorrectly installed. The thread tension is wrinkled. Shorten the stitch length or sew with stabilizer material under the needle plate or in the shuttle. Correctly install the needle. Incorrect ...tension of the upper thread. Replace the needle. Remove the needle plate cover and clean the shuttle. Clean the shuttle. Correct the upper threading. Contact your retailer or the nearest authorized service center. Only use a bobbin designed specifically for this machine. Press the needle position button to sew...
Users Manual - English
Page 151
... screwdriver Cover A, 35 seam ripper Cover A, 81 selecting stitching 68 settings 14 settings key Cover E, 14 sewing machine help key Cover E, 13 sewing machine needles 33 sewing speed 49 sewing speed controller Cover B, Cover D, 99 shell tuck stitch 108 shutter 26 shuttle 22, 135 shuttle hook 136... C, 27 thread guide for bobbin winding Cover B, 20 thread guide plate Cover B, 20, 26 thread tension 54 thread tension dial Cover B, 54 thread that quickly unwinds 31 trial sewing 62 triple stretch stitch 100 troubleshooting 137 twin needle Cover A, 28, 35 U upper cover Cover B,...
... screwdriver Cover A, 35 seam ripper Cover A, 81 selecting stitching 68 settings 14 settings key Cover E, 14 sewing machine help key Cover E, 13 sewing machine needles 33 sewing speed 49 sewing speed controller Cover B, Cover D, 99 shell tuck stitch 108 shutter 26 shuttle 22, 135 shuttle hook 136... C, 27 thread guide for bobbin winding Cover B, 20 thread guide plate Cover B, 20, 26 thread tension 54 thread tension dial Cover B, 54 thread that quickly unwinds 31 trial sewing 62 triple stretch stitch 100 troubleshooting 137 twin needle Cover A, 28, 35 U upper cover Cover B,...


