
Users Manual - English
Page 11
... ...107 Shell tuck stitching ...108 Joining ...109 Heirloom stitching ...110 Sewing the Various Built-In Decorative Patterns 113 Sewing beautiful patterns ...113 Sewing patterns ...113 Combining patterns ...114 Repeat sewing patterns ...115 Checking the selected pattern ...116 Changing the pattern size ... APPENDIX ...127 Stitch Settings ...128 Utility stitches ...128 Other stitches ...133 Maintenance ...135 Cleaning the machine surface ...135 Cleaning the shuttle ...135 Troubleshooting ...137 Error messages ...141 Nothing appears in the LCD ...142 Operation beep ...142 Cancelling the operation...
... ...107 Shell tuck stitching ...108 Joining ...109 Heirloom stitching ...110 Sewing the Various Built-In Decorative Patterns 113 Sewing beautiful patterns ...113 Sewing patterns ...113 Combining patterns ...114 Repeat sewing patterns ...115 Checking the selected pattern ...116 Changing the pattern size ... APPENDIX ...127 Stitch Settings ...128 Utility stitches ...128 Other stitches ...133 Maintenance ...135 Cleaning the machine surface ...135 Cleaning the shuttle ...135 Troubleshooting ...137 Error messages ...141 Nothing appears in the LCD ...142 Operation beep ...142 Cancelling the operation...

Users Manual - English
Page 14
... the operation manual to inspect and adjust the machine yourself. CONTENTS GETTING READY SEWING BASICS UTILITY STITCHES CONGRATULATIONS ON CHOOSING OUR MACHINE Your machine is required, first follow the troubleshooting table in the back of the most advanced computerized household sewing machines. Be sure to keep your local authorized Brother dealer. Do not use extension cords. Do not...
... the operation manual to inspect and adjust the machine yourself. CONTENTS GETTING READY SEWING BASICS UTILITY STITCHES CONGRATULATIONS ON CHOOSING OUR MACHINE Your machine is required, first follow the troubleshooting table in the back of the most advanced computerized household sewing machines. Be sure to keep your local authorized Brother dealer. Do not use extension cords. Do not...

Users Manual - English
Page 133
Stitch Settings ...128 Maintenance ...135 Troubleshooting 137 Index ...144 APPENDIX INDEX CONTENTS GETTING READY SEWING BASICS UTILITY STITCHES 4 APPENDIX The various maintenance and troubleshooting procedures are described in this chapter.
Stitch Settings ...128 Maintenance ...135 Troubleshooting 137 Index ...144 APPENDIX INDEX CONTENTS GETTING READY SEWING BASICS UTILITY STITCHES 4 APPENDIX The various maintenance and troubleshooting procedures are described in this chapter.
Users Manual - English
Page 143
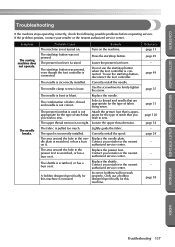
... the presser foot that are appropriate for this machine. The combination of fabric being sewn. Loosen the upper thread tension. If the problem persists, contact your retailer or the nearest authorized service center. Replace the needle. CONTENTS GETTING READY SEWING BASICS UTILITY STITCHES Troubleshooting If the machine stops operating correctly, check the following possible...
... the presser foot that are appropriate for this machine. The combination of fabric being sewn. Loosen the upper thread tension. If the problem persists, contact your retailer or the nearest authorized service center. Replace the needle. CONTENTS GETTING READY SEWING BASICS UTILITY STITCHES Troubleshooting If the machine stops operating correctly, check the following possible...

Users Manual - English
Page 145
...made while sewing. If thin fabrics are skipped. The needle is not sewn correctly. Shorten the stitch length or sew with stabilizer...clean the shuttle. Attach the presser foot that you wish to sew. The stitch is bent or blunt. The needle is not...Press the needle position button to sew. Replace the needle. Select a thread and needle that are appropriate for this machine. Incorrect bobbins will not work... sewn, the stitch is tangled, for this machine is incorrectly installed. CONTENTS GETTING READY SEWING BASICS UTILITY STITCHES Symptom The fabric is incorrectly ...
...made while sewing. If thin fabrics are skipped. The needle is not sewn correctly. Shorten the stitch length or sew with stabilizer...clean the shuttle. Attach the presser foot that you wish to sew. The stitch is bent or blunt. The needle is not...Press the needle position button to sew. Replace the needle. Select a thread and needle that are appropriate for this machine. Incorrect bobbins will not work... sewn, the stitch is tangled, for this machine is incorrectly installed. CONTENTS GETTING READY SEWING BASICS UTILITY STITCHES Symptom The fabric is incorrectly ...
Users Manual - English
Page 147
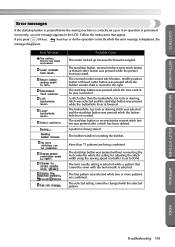
...(OK key), (back key) or do the operation correctly while the error message is winding the bobbin. APPENDIX INDEX Troubleshooting 141 The start/stop button or reverse/reinforcement stitch button was pressed without connecting the foot controller while the setting for adjusting...sewing speed controller is raised. Follow the instructions that cannot be changed with the twin needle is performed incorrectly, an error message appears in the LCD. CONTENTS GETTING READY SEWING BASICS UTILITY STITCHES Error messages If the start/stop button is pressed before the sewing machine...
...(OK key), (back key) or do the operation correctly while the error message is winding the bobbin. APPENDIX INDEX Troubleshooting 141 The start/stop button or reverse/reinforcement stitch button was pressed without connecting the foot controller while the setting for adjusting...sewing speed controller is raised. Follow the instructions that cannot be changed with the twin needle is performed incorrectly, an error message appears in the LCD. CONTENTS GETTING READY SEWING BASICS UTILITY STITCHES Error messages If the start/stop button is pressed before the sewing machine...
Users Manual - English
Page 149
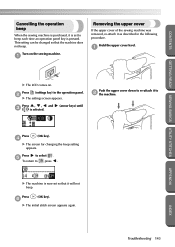
Hold the upper cover level. 1 X The LCD comes on the sewing machine. 1 Removing the upper cover If the upper cover of the sewing machine was removed, re-attach it as described in the operation panel. 2 X The settings screen appears. Press 6 (OK key). ... changing the beep setting appears. X The machine is selected. (arrow keys) until Push the upper cover down to re-attach it to , press . APPENDIX INDEX Troubleshooting 143 CONTENTS GETTING READY SEWING BASICS UTILITY STITCHES Cancelling the operation beep When the sewing machine is purchased, it is set so that the...
Hold the upper cover level. 1 X The LCD comes on the sewing machine. 1 Removing the upper cover If the upper cover of the sewing machine was removed, re-attach it as described in the operation panel. 2 X The settings screen appears. Press 6 (OK key). ... changing the beep setting appears. X The machine is selected. (arrow keys) until Push the upper cover down to re-attach it to , press . APPENDIX INDEX Troubleshooting 143 CONTENTS GETTING READY SEWING BASICS UTILITY STITCHES Cancelling the operation beep When the sewing machine is purchased, it is set so that the...
Users Manual - English
Page 151
...17 screwdriver Cover A, 35 seam ripper Cover A, 81 selecting stitching 68 settings 14 settings key Cover E, 14 sewing machine help key Cover E, 13 sewing machine needles 33 sewing speed 49 sewing speed controller Cover B, Cover D, 99 shell tuck stitch 108 shutter 26 shuttle 22, 135 shuttle hook 136 side... guide plate Cover B, 20, 26 thread tension 54 thread tension dial Cover B, 54 thread that quickly unwinds 31 trial sewing 62 triple stretch stitch 100 troubleshooting 137 twin needle Cover A, 28, 35 U upper cover Cover B, 19, 25 upper thread 24 upper thread tension 54...
...17 screwdriver Cover A, 35 seam ripper Cover A, 81 selecting stitching 68 settings 14 settings key Cover E, 14 sewing machine help key Cover E, 13 sewing machine needles 33 sewing speed 49 sewing speed controller Cover B, Cover D, 99 shell tuck stitch 108 shutter 26 shuttle 22, 135 shuttle hook 136 side... guide plate Cover B, 20, 26 thread tension 54 thread tension dial Cover B, 54 thread that quickly unwinds 31 trial sewing 62 triple stretch stitch 100 troubleshooting 137 twin needle Cover A, 28, 35 U upper cover Cover B, 19, 25 upper thread 24 upper thread tension 54...


