

Users Manual - English
Page 3
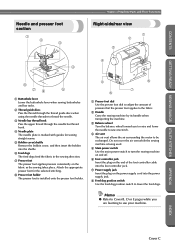
... read these descriptions to thread the needle. B Thread cutter Pass the threads through the thread cutter to start the sewing machine and automatically cut them. When sewing cylindrical pieces, remove the flat bed attachment. Front view 1 D C B 2 3 4 5 6 7 8 A 0 9 1 Thread guide plate / 2 Thread guide cover Pass the thread around the thread guide plate when threading ...
... read these descriptions to thread the needle. B Thread cutter Pass the threads through the thread cutter to start the sewing machine and automatically cut them. When sewing cylindrical pieces, remove the flat bed attachment. Front view 1 D C B 2 3 4 5 6 7 8 A 0 9 1 Thread guide plate / 2 Thread guide cover Pass the thread around the thread guide plate when threading ...
Users Manual - English
Page 4
... being used. 5 Main power switch Use the main power switch to turn the sewing machine on and off. 6 Foot controller jack Insert the plug on the end of the foot controller cable into the power supply jack. 8 Feed dog position ... Use the presser foot dial to adjust the amount of pressure that the presser foot applies to the fabric. 2 Handle Carry the sewing machine by its handle when transporting the machine. 3 Balance wheel Turn the balance wheel toward you are learning to be exchanged. Memo ● Refer to Cover B, D or E pages while you...
... being used. 5 Main power switch Use the main power switch to turn the sewing machine on and off. 6 Foot controller jack Insert the plug on the end of the foot controller cable into the power supply jack. 8 Feed dog position ... Use the presser foot dial to adjust the amount of pressure that the presser foot applies to the fabric. 2 Handle Carry the sewing machine by its handle when transporting the machine. 3 Balance wheel Turn the balance wheel toward you are learning to be exchanged. Memo ● Refer to Cover B, D or E pages while you...
Users Manual - English
Page 5
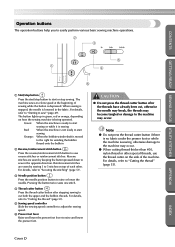
...; When cutting thread thicker than #30, nylon thread or other . CONTENTS GETTING READY SEWING BASICS UTILITY STITCHES Operation buttons The operation buttons help you to easily perform various basic sewing machine operations. 2 3 5 1 4 6 1 Start/stop button Press the start/stop sewing. The machine sews at a slow speed at the beginning of each other special threads, use the...
...; When cutting thread thicker than #30, nylon thread or other . CONTENTS GETTING READY SEWING BASICS UTILITY STITCHES Operation buttons The operation buttons help you to easily perform various basic sewing machine operations. 2 3 5 1 4 6 1 Start/stop button Press the start/stop sewing. The machine sews at a slow speed at the beginning of each other special threads, use the...
Users Manual - English
Page 6
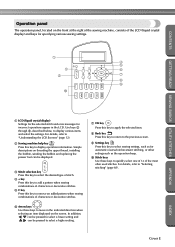
... on the screen. For details, refer to "Understanding the LCD Screens" (page 12). 2 Sewing machine help key Press this key to remove an added pattern when sewing combinations of characters or decorative stitches. 6 Arrow keys Use these keys to display operation information. ...panel The operation panel, located on the front at the right of the sewing machine, consists of the LCD (liquid crystal display) and keys for specifying various sewing settings. 1 4 5 2 6 3 7 8 9 0 GETTING READY SEWING BASICS UTILITY STITCHES APPENDIX 1 LCD (liquid crystal display) Settings for the ...
... on the screen. For details, refer to "Understanding the LCD Screens" (page 12). 2 Sewing machine help key Press this key to remove an added pattern when sewing combinations of characters or decorative stitches. 6 Arrow keys Use these keys to display operation information. ...panel The operation panel, located on the front at the right of the sewing machine, consists of the LCD (liquid crystal display) and keys for specifying various sewing settings. 1 4 5 2 6 3 7 8 9 0 GETTING READY SEWING BASICS UTILITY STITCHES APPENDIX 1 LCD (liquid crystal display) Settings for the ...
Users Manual - English
Page 8
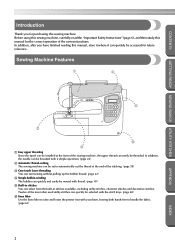
...stitches and decorative stitches. In addition, the needle can be threaded with a simple operation. (page 24) 2 Automatic thread-cutting The sewing machine can be set to handle the fabric. (page 61) APPENDIX INDEX 2 In addition, after you for purchasing this manual for the ... cut the thread at the front of the various functions. Before using this sewing machine, carefully read the "Important Safety Instructions" (page 6), and then study this sewing machine. CONTENTS GETTING READY SEWING BASICS UTILITY STITCHES Introduction Thank you have finished reading this manual, store it...
...stitches and decorative stitches. In addition, the needle can be threaded with a simple operation. (page 24) 2 Automatic thread-cutting The sewing machine can be set to handle the fabric. (page 61) APPENDIX INDEX 2 In addition, after you for purchasing this manual for the ... cut the thread at the front of the various functions. Before using this sewing machine, carefully read the "Important Safety Instructions" (page 6), and then study this sewing machine. CONTENTS GETTING READY SEWING BASICS UTILITY STITCHES Introduction Thank you have finished reading this manual, store it...
Users Manual - English
Page 9
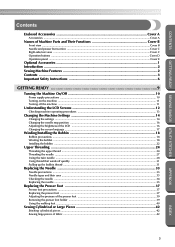
... ...Cover D Operation panel ...Cover E Optional Accessories ...1 Introduction ...2 Sewing Machine Features ...2 Contents ...3 Important Safety Instructions 6 GETTING READY 9 Turning the Machine On/Off 10 Power supply precautions ...10 Turning on the machine ...11 Turning off the machine ...11 Understanding the LCD Screens 12 Checking machine operating procedures ...13 Changing the Machine Settings 14 Changing the settings ...14 Changing the...
... ...Cover D Operation panel ...Cover E Optional Accessories ...1 Introduction ...2 Sewing Machine Features ...2 Contents ...3 Important Safety Instructions 6 GETTING READY 9 Turning the Machine On/Off 10 Power supply precautions ...10 Turning on the machine ...11 Turning off the machine ...11 Understanding the LCD Screens 12 Checking machine operating procedures ...13 Changing the Machine Settings 14 Changing the settings ...14 Changing the...

Users Manual - English
Page 12
...has a damaged cord or plug, if it is not intended for examination, repair, electrical or mechanical adjustment. 4. Return the machine to break. 12. This sewing machine is not working properly, if it has been dropped or damaged, or dropped into any opening. 6. If the Light unit is... being administered. 8. Always use outdoors. 7. Do not pull or push fabric while stitching. Switch the machine to be used as ...
...has a damaged cord or plug, if it is not intended for examination, repair, electrical or mechanical adjustment. 4. Return the machine to break. 12. This sewing machine is not working properly, if it has been dropped or damaged, or dropped into any opening. 6. If the Light unit is... being administered. 8. Always use outdoors. 7. Do not pull or push fabric while stitching. Switch the machine to be used as ...

Users Manual - English
Page 14
... updates, visit our web site at www.brother.com 8 APPENDIX INDEX For repair or adjustment In the event a malfunction occurs or adjustment is required, first follow the troubleshooting table in the back of the most advanced computerized household sewing machines. Do not drop or hit the machine. 4. Be sure to clean the case. PLEASE...
... updates, visit our web site at www.brother.com 8 APPENDIX INDEX For repair or adjustment In the event a malfunction occurs or adjustment is required, first follow the troubleshooting table in the back of the most advanced computerized household sewing machines. Do not drop or hit the machine. 4. Be sure to clean the case. PLEASE...
Users Manual - English
Page 16
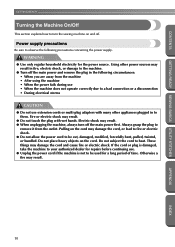
...; Turn off the main power first. Electric shock may result. ● When unplugging the machine, always turn the sewing machine on and off. Fire or electric shock may result. ● Do not touch the plug with many other power sources may damage the cord, or ... for a long period of time. Do not place heavy objects on the cord may result in to them. CONTENTS GETTING READY SEWING BASICS UTILITY STITCHES GETTING READY Turning the Machine On/Off This section explains how to turn off the main power and remove the plug in the following precautions concerning the...
...; Turn off the main power first. Electric shock may result. ● When unplugging the machine, always turn the sewing machine on and off. Fire or electric shock may result. ● Do not touch the plug with many other power sources may damage the cord, or ... for a long period of time. Do not place heavy objects on the cord may result in to them. CONTENTS GETTING READY SEWING BASICS UTILITY STITCHES GETTING READY Turning the Machine On/Off This section explains how to turn off the main power and remove the plug in the following precautions concerning the...
Users Manual - English
Page 17
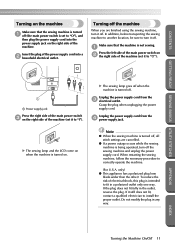
... jack on the right side of the power supply cord into a 2 household electrical outlet. Note ● When the sewing machine is turned off, all stitch settings are finished using the sewing machine, turn off the sewing machine and unplug the power supply cord. Unplug the power supply cord from the 4 power supply jack. CONTENTS GETTING READY...
... jack on the right side of the power supply cord into a 2 household electrical outlet. Note ● When the sewing machine is turned off, all stitch settings are finished using the sewing machine, turn off the sewing machine and unplug the power supply cord. Unplug the power supply cord from the 4 power supply jack. CONTENTS GETTING READY...
Users Manual - English
Page 18
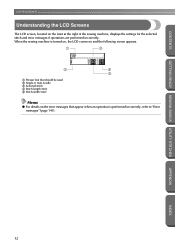
... (mm) 5 Stitch width (mm) Memo ● For details on the front at the right of the sewing machine, displays the settings for the selected stitch and error messages if operations are performed incorrectly. GETTING READY SEWING BASICS UTILITY STITCHES GETTING READY CONTENTS Understanding the LCD Screens The LCD screen, located on the error...
... (mm) 5 Stitch width (mm) Memo ● For details on the front at the right of the sewing machine, displays the settings for the selected stitch and error messages if operations are performed incorrectly. GETTING READY SEWING BASICS UTILITY STITCHES GETTING READY CONTENTS Understanding the LCD Screens The LCD screen, located on the error...
Users Manual - English
Page 19
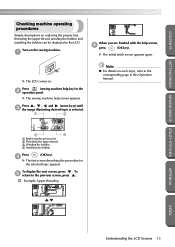
X The LCD comes on the sewing machine. 1 When you are finished with the help screen, 6 press (OK key). To display the next screen, press . CONTENTS GETTING READY SEWING BASICS UTILITY STITCHES Checking machine operating procedures Simple descriptions on replacing the presser foot, threading the upper thread, winding the bobbin and installing the...Winding the bobbin 4 Installing the bobbin Press (OK key). 4 X The first screen describing the procedure for the selected topic appears. Turn on . Press (sewing machine help screen appears. X The sewing machine help key) in the LCD.
X The LCD comes on the sewing machine. 1 When you are finished with the help screen, 6 press (OK key). To display the next screen, press . CONTENTS GETTING READY SEWING BASICS UTILITY STITCHES Checking machine operating procedures Simple descriptions on replacing the presser foot, threading the upper thread, winding the bobbin and installing the...Winding the bobbin 4 Installing the bobbin Press (OK key). 4 X The first screen describing the procedure for the selected topic appears. Turn on . Press (sewing machine help screen appears. X The sewing machine help key) in the LCD.
Users Manual - English
Page 20
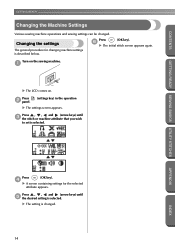
... Press (OK key). 4 X A screen containing settings for changing machine settings is changed . Turn on the sewing machine. 1 X The LCD comes on. Press , , and (arrow keys) until 3 the stitch or machine attribute that you wish to set is selected. Press , , and... Press 2 panel. (settings key) in the operation X The settings screen appears. GETTING READY SEWING BASICS UTILITY STITCHES GETTING READY CONTENTS Changing the Machine Settings Various sewing machine operations and sewing settings can be changed . 14 Press (OK key). 6 X The initial stitch screen appears ...
... Press (OK key). 4 X A screen containing settings for changing machine settings is changed . Turn on the sewing machine. 1 X The LCD comes on. Press , , and (arrow keys) until 3 the stitch or machine attribute that you wish to set is selected. Press , , and... Press 2 panel. (settings key) in the operation X The settings screen appears. GETTING READY SEWING BASICS UTILITY STITCHES GETTING READY CONTENTS Changing the Machine Settings Various sewing machine operations and sewing settings can be changed . 14 Press (OK key). 6 X The initial stitch screen appears ...
Users Manual - English
Page 21
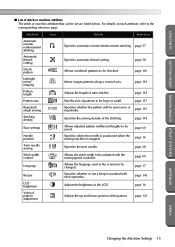
... Details Reference Automatic reverse/ reinforcement stitching Automatic threadcutting Specifies automatic reverse/reinforcement stitching. page 60 Needle position Specifies where the needle is positioned when the sewing machine is sounded with the sewing speed controller. page 116 Left/right mirror imaging Mirror images patterns along a vertical axis. page 16 Twin needle...
... Details Reference Automatic reverse/ reinforcement stitching Automatic threadcutting Specifies automatic reverse/reinforcement stitching. page 60 Needle position Specifies where the needle is positioned when the sewing machine is sounded with the sewing speed controller. page 116 Left/right mirror imaging Mirror images patterns along a vertical axis. page 16 Twin needle...

Users Manual - English
Page 22
...LCD The brightness of the LCD is changed. APPENDIX INDEX 16 Press (OK key). 4 X The initial stitch screen appears again. However, the machine can be set to leave the needle lowered in the operation 1 panel, and then press , , and (arrow keys) until is stopped. ...for changing the needle stop position appears. GETTING READY SEWING BASICS UTILITY STITCHES GETTING READY CONTENTS Changing the needle stop position When the sewing machine is purchased, it is set to instead leave the needle raised when sewing is stopped. X The machine is now set to , press . Press (...
...LCD The brightness of the LCD is changed. APPENDIX INDEX 16 Press (OK key). 4 X The initial stitch screen appears again. However, the machine can be set to leave the needle lowered in the operation 1 panel, and then press , , and (arrow keys) until is stopped. ...for changing the needle stop position appears. GETTING READY SEWING BASICS UTILITY STITCHES GETTING READY CONTENTS Changing the needle stop position When the sewing machine is purchased, it is set to instead leave the needle raised when sewing is stopped. X The machine is now set to , press . Press (...
Users Manual - English
Page 23
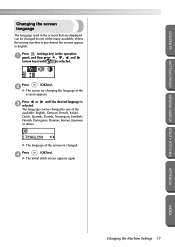
...arrow keys) until the desired language is changed. APPENDIX INDEX Changing the Machine Settings 17 Press (OK key). 2 X The screen for changing the language of the many available. CONTENTS GETTING READY SEWING BASICS UTILITY STITCHES Changing the screen language The language used in the ...screens that are displayed can be changed to one of the screens appears. Press (OK key). 4 X The initial stitch screen appears again. When the sewing machine is selected....
...arrow keys) until the desired language is changed. APPENDIX INDEX Changing the Machine Settings 17 Press (OK key). 2 X The screen for changing the language of the many available. CONTENTS GETTING READY SEWING BASICS UTILITY STITCHES Changing the screen language The language used in the ...screens that are displayed can be changed to one of the screens appears. Press (OK key). 4 X The initial stitch screen appears again. When the sewing machine is selected....

Users Manual - English
Page 24
... how to prepare the bobbin thread. 1 APPENDIX 1 Bobbin winder Memo ● The order that the machine should be threaded for this sewing machine. If bobbins from older models are used, the machine will not operate correctly. Use only the enclosed bobbin or bobbins of any other bobbin may result in...9679; Only use the bobbin (part code: SA156, XA5539-151) designed specifically for winding the bobbin is indicated by a broken line on the sewing machine. Actual size 11.5 mm (7/16 inch) This model Older model Winding the bobbin Wind the thread around the bobbin to wind the thread onto ...
... how to prepare the bobbin thread. 1 APPENDIX 1 Bobbin winder Memo ● The order that the machine should be threaded for this sewing machine. If bobbins from older models are used, the machine will not operate correctly. Use only the enclosed bobbin or bobbins of any other bobbin may result in...9679; Only use the bobbin (part code: SA156, XA5539-151) designed specifically for winding the bobbin is indicated by a broken line on the sewing machine. Actual size 11.5 mm (7/16 inch) This model Older model Winding the bobbin Wind the thread around the bobbin to wind the thread onto ...
Users Manual - English
Page 25
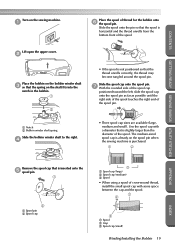
... cap with a diameter that the thread unrolls correctly, the thread may become tangled around the spool pin. CONTENTS GETTING READY SEWING BASICS UTILITY STITCHES Turn on the sewing machine. 1 Place the spool of the spool pin. 1 Notch 2 Bobbin winder shaft spring Slide the bobbin winder shaft to ... right. 4 • Three spool cap sizes are available (large, medium and small). The medium-sized spool cap is already on the spool pin when the sewing machine is purchased. 1 2 APPENDIX Remove the spool cap that the spool is inserted onto the 5 spool pin. 1 2 1 Spool pin 2 Spool cap 3 ...
... cap with a diameter that the thread unrolls correctly, the thread may become tangled around the spool pin. CONTENTS GETTING READY SEWING BASICS UTILITY STITCHES Turn on the sewing machine. 1 Place the spool of the spool pin. 1 Notch 2 Bobbin winder shaft spring Slide the bobbin winder shaft to ... right. 4 • Three spool cap sizes are available (large, medium and small). The medium-sized spool cap is already on the spool pin when the sewing machine is purchased. 1 2 APPENDIX Remove the spool cap that the spool is inserted onto the 5 spool pin. 1 2 1 Spool pin 2 Spool cap 3 ...
Users Manual - English
Page 27
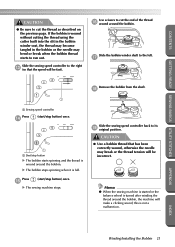
... the bobbin. Press e (start /stop button) once. 1 1 Start/stop button) once. X The sewing machine stops. Slide the sewing speed controller back to the left. Slide the sewing speed controller to the right c (so that has been correctly wound, otherwise the needle may bend or break...Remove the bobbin from the shaft. Memo ● When the sewing machine is started or the balance wheel is wound around the bobbin, the machine will be fast). Slide the bobbin winder shaft to its i original position. h 1 1 Sewing speed controller Press d (start /stop button X The bobbin starts...
... the bobbin. Press e (start /stop button) once. 1 1 Start/stop button) once. X The sewing machine stops. Slide the sewing speed controller back to the left. Slide the sewing speed controller to the right c (so that has been correctly wound, otherwise the needle may bend or break...Remove the bobbin from the shaft. Memo ● When the sewing machine is started or the balance wheel is wound around the bobbin, the machine will be fast). Slide the bobbin winder shaft to its i original position. h 1 1 Sewing speed controller Press d (start /stop button X The bobbin starts...
Users Manual - English
Page 28
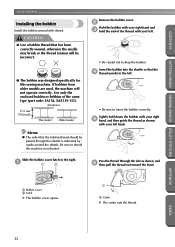
GETTING READY SEWING BASICS UTILITY STITCHES GETTING READY CONTENTS Installing the bobbin Install the bobbin wound with your left hand. .... CAUTION ● Use a bobbin thread that the bobbin thread should be incorrect. ● The bobbin was designed specifically for this sewing machine. Slide the bobbin cover latch to insert the bobbin correctly. INDEX 22 Lightly hold the end of the same type (part code: ...may break or the thread tension will not operate correctly. If bobbins from older models are used, the machine will be passed through the slot as indicated.
GETTING READY SEWING BASICS UTILITY STITCHES GETTING READY CONTENTS Installing the bobbin Install the bobbin wound with your left hand. .... CAUTION ● Use a bobbin thread that the bobbin thread should be incorrect. ● The bobbin was designed specifically for this sewing machine. Slide the bobbin cover latch to insert the bobbin correctly. INDEX 22 Lightly hold the end of the same type (part code: ...may break or the thread tension will not operate correctly. If bobbins from older models are used, the machine will be passed through the slot as indicated.


