
Brother International PC 420 Support Question
Brother International PC 420 Support Question
Find answers below for this question about Brother International PC 420 - PRW Limited Edition Project Runway Sewing Machine.Need a Brother International PC 420 manual? We have 1 online manual for this item!
Question posted by bolonhelgat on August 8th, 2014
How To Oil My Brother Pc 420 Sewing Machine
The person who posted this question about this Brother International product did not include a detailed explanation. Please use the "Request More Information" button to the right if more details would help you to answer this question.
Current Answers
Related Brother International PC 420 Manual Pages
Users Manual - English - Page 2
... Foot controller 28 Grid sheet set
Cover A
Part Code
U.S.A. Part Name
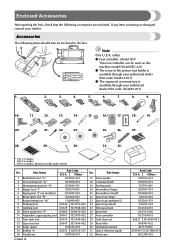
1 Buttonhole foot "A" 2 Overcasting foot "G" 3 Monogramming foot "N" 4 Zipper foot "I" 5 Zigzag foot "J" (on this machine model NX-400/PC-420. ● The screw of the presser foot holder is available through your retailer.
Enclosed Accessories
After opening the box, check that the following items...
Users Manual - English - Page 3

... cutter to learn the names of the flat bed attachment. APPENDIX
INDEX
Cover B
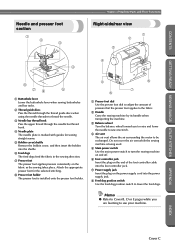
C Needle threader lever Use the needle threader to start the sewing machine and automatically cut them.
When sewing cylindrical pieces, remove the flat bed attachment.
Front view
1 D
C B
2 3 4 5 6
7 8
A
0 9
1 Thread guide plate / 2 Thread guide cover Pass the thread around the thread guide...
Users Manual - English - Page 4
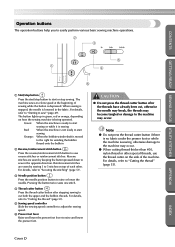
...Do not cover the air vent while the sewing machine is being used.
5 Main power switch Use the main power switch to turn the sewing machine on and off.
6 Foot controller jack Insert... that the presser foot applies to the fabric.
2 Handle Carry the sewing machine by its handle when transporting the machine.
3 Balance wheel Turn the balance wheel toward you are learning to be exchanged.
APPENDIX
...
Users Manual - English - Page 5
... lights up in green, red or orange, depending
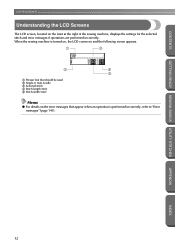
on the side of each other special threads, use the thread cutter on how the sewing machine is sewing, otherwise damage to the machine may occur. For details, refer to "Securing the stitching" (page 51).
3 Needle position button Press the needle position button to raise and...
Users Manual - English - Page 6
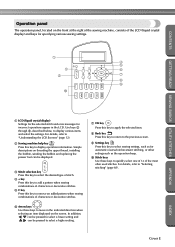
For details, refer to "Understanding the LCD Screens" (page 12).
2 Sewing machine help key Press this key to display various items and select the settings. In ...incorrect operations appear in the indicated direction when selecting an item displayed on the front at the right of the sewing machine, consists of the most often used stitches. For details, refer to quickly select one of 12 of the ...
Users Manual - English - Page 8
... addition, the needle can be threaded with thread. (page 18) 5 Built-in stitches available, including utility stitches, character stitches and decorative stitches. Before using this sewing machine, carefully read the "Important Safety Instructions" (page 6), and then study this manual for purchasing this manual, store it where it can quickly be selected with...
Users Manual - English - Page 9
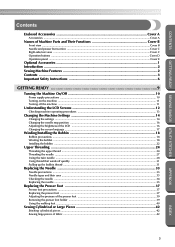
...Cover E
Optional Accessories ...1 Introduction ...2 Sewing Machine Features ...2 Contents ...3 Important Safety Instructions 6
GETTING READY 9
Turning the Machine On/Off 10
Power supply precautions ...10 Turning on the machine ...11 Turning off the machine ...11
Understanding the LCD Screens 12
Checking machine operating procedures ...13
Changing the Machine Settings 14
Changing the settings...
Users Manual - English - Page 12

... instructions before cleaning. It may deflect the needle causing it has been dropped or damaged, or dropped into any air openings blocked. This sewing machine is required around the machine needle. 11. Young children should always be supervised to the nearest authorized dealer or service center for household use outdoors. 7.
Close attention is...
Users Manual - English - Page 14

... product information and updates, visit our web site at www.brother.com
8
APPENDIX
INDEX
For repair or adjustment In the event a malfunction occurs or adjustment is required, first follow the troubleshooting table in the back of the most advanced computerized household sewing machines. When storing this machine, avoid direct sunlight and high humidity locations.
Users Manual - English - Page 16
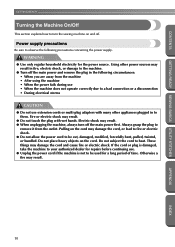
... authorized dealer for repairs before continuing use extension cords or multi-plug adapters with wet hands. Otherwise a fire may result. ● When unplugging the machine, always turn the sewing machine on the cord may damage the cord, or lead to fire or electric shock. ● Do not allow the power cord to heat.
Users Manual - English - Page 17
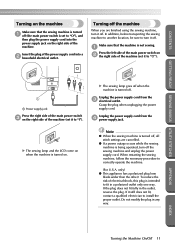
Insert the plug of the power supply cord into the power supply jack on the right side of the machine.
When restarting the sewing machine, follow the necessary procedure to install the proper outlet. only) ● This appliance has a polarized plug (one way. Do not modify the plug in the ...
Users Manual - English - Page 18
... (mm) 5 Stitch width (mm)
Memo
● For details on the front at the right of the sewing machine, displays the settings for the selected stitch and error messages if operations are performed incorrectly.
GETTING READY SEWING BASICS UTILITY STITCHES
GETTING READY
CONTENTS
Understanding the LCD Screens
The LCD screen, located on the error...
Users Manual - English - Page 19
...† Example: Upper threading
APPENDIX
INDEX
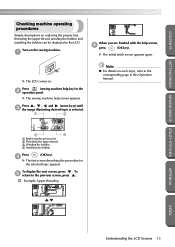
Understanding the LCD Screens 13 Turn on the sewing machine.
1
When you are finished with the help key) in the
2 operation panel.
X The sewing machine help screen appears. CONTENTS
GETTING READY SEWING BASICS UTILITY STITCHES
Checking machine operating procedures
Simple descriptions on replacing the presser foot, threading the upper thread...
Users Manual - English - Page 20
... The initial stitch screen appears again.
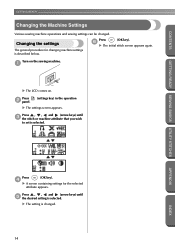
Press , , and (arrow keys) until 3 the stitch or machine attribute that you wish
to set is changed . GETTING READY SEWING BASICS UTILITY STITCHES
GETTING READY
CONTENTS
Changing the Machine Settings
Various sewing machine operations and sewing settings can be changed .
14 APPENDIX
INDEX
Press
(OK key).
4
X A screen containing settings...
Users Manual - English - Page 21
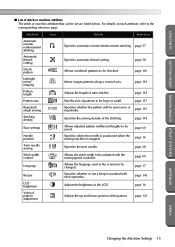
.../right mirror imaging
Mirror images patterns along a vertical axis.
page 60
Needle position
Specifies where the needle is positioned when the sewing machine is sounded with the sewing speed controller.
page 16
Twin needle sewing
Specifies the twin needle. page 17
Buzzer
LCD brightness
Specifies whether or not a beep is stopped.
CONTENTS
GETTING READY...
Users Manual - English - Page 22

... the LCD darker, press (+).
Press
(settings key) in the raised position. GETTING READY SEWING BASICS UTILITY STITCHES
GETTING READY
CONTENTS
Changing the needle stop position
When the sewing machine is purchased, it is set to instead leave the needle raised when sewing is stopped.
Press
(OK key).
4
X The initial stitch screen appears again. However...
Users Manual - English - Page 23
....
Press
(OK key).
4
X The initial stitch screen appears again.
APPENDIX
INDEX
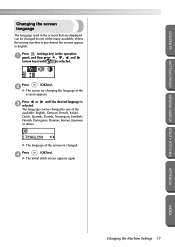
Changing the Machine Settings 17 Press or 3 selected.
Press
(settings key) in the operation
1 panel, and ... to one of the many available. X The language of the
screens appears.
When the sewing machine is
The language can be changed to one of the
available: English, German, French,...
Users Manual - English - Page 24

... following precautions concerning the bobbin.
Bobbin precautions
Be sure to prepare the bobbin thread.
1
APPENDIX
1 Bobbin winder
Memo
● The order that the machine should be threaded for this sewing machine. CAUTION
● Only use the bobbin (part code: SA156, XA5539-151) designed specifically for winding the bobbin is indicated by a broken line...
Users Manual - English - Page 55
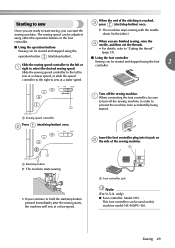
... controller plug into its jack on this machine model NX-400/PC-420.
operation button
(start /stop button).
■ Using the foot controller
Sewing can be started and stopped using the
When you are ready to select the desired sewing speed.
The sewing speed can be adjusted
X The machine stops sewing with the needle down (in order to...
Users Manual - English - Page 79

...X A seam allowance is cut as much as one layer of the
sewing machine. Pass the upper thread under the side cutter, 7 and then pull ... fabric, use a rag to apply a small amount of oil to the cutting edge of the cutter.
● The ...stitching.
1
1 1 Guide plate • If the fabric is available through your brother retailer.
Position the fabric in the side cutter. 0 The cut in the fabric...
Similar Questions

How Do I Oil My Pc-420?
(Posted by lindaflora4 9 years ago)

Whats The Resale Value Of The Brother 2300 Prw Limited Edition Project Runway?
(Posted by Anonymous-139615 9 years ago)

How To Thread The Brother Limited Edition Project Runway Sewing Machine
ls2300prw manual
ls2300prw manual
(Posted by jjmaf0 10 years ago)
Brother Pc-420 Prw Limited Edition Project Runway Sewing Machine Will Not
thread needle
thread needle
(Posted by graphevaru 10 years ago)

How To Lubricate My Brothers Pc-420
I want to lubricate my brothers Project 420 sewing machine. I can't find the oiling points. I alread...
I want to lubricate my brothers Project 420 sewing machine. I can't find the oiling points. I alread...
(Posted by kountrygrrrl 11 years ago)