
Users Manual - English
Page 2
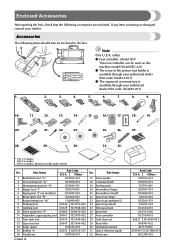
... Part Code U.S.A. Enclosed Accessories After opening the box, check that the following items should also be used on machine) 6 Blind stitch foot "R" 7 Button fitting foot "M" 8 Walking foot 9 Quilting foot 10 Stitch guide foot "P" 11 Adjustable zipper/piping foot 12 Non stick foot 13 Open toe foot 14...Accessories The following accessories are enclosed. Part Name 1 Buttonhole foot "A" 2 Overcasting foot "G" 3 Monogramming foot "N" 4 Zipper foot "I" 5 Zigzag foot "J" (on this machine model NX-400/PC-420. ● The screw of the presser foot holder is available through your retailer.
... Part Code U.S.A. Enclosed Accessories After opening the box, check that the following items should also be used on machine) 6 Blind stitch foot "R" 7 Button fitting foot "M" 8 Walking foot 9 Quilting foot 10 Stitch guide foot "P" 11 Adjustable zipper/piping foot 12 Non stick foot 13 Open toe foot 14...Accessories The following accessories are enclosed. Part Name 1 Buttonhole foot "A" 2 Overcasting foot "G" 3 Monogramming foot "N" 4 Zipper foot "I" 5 Zigzag foot "J" (on this machine model NX-400/PC-420. ● The screw of the presser foot holder is available through your retailer.
Users Manual - English
Page 7
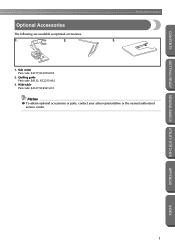
Side cutter Part code: SA177,XC3879-002 2. Quilting guide Part code: SA132, XC2215-002 3. Wide table Part code: SA537,XC4541-051 Memo ● To obtain optional accessories or parts, contact your sales representative or the nearest authorized service center. GETTING READY SEWING BASICS UTILITY STITCHES APPENDIX INDEX 1 CONTENTS Enclosed Accessories Optional Accessories The following are available as optional accessories. 1. 2. 3. 1.
Side cutter Part code: SA177,XC3879-002 2. Quilting guide Part code: SA132, XC2215-002 3. Wide table Part code: SA537,XC4541-051 Memo ● To obtain optional accessories or parts, contact your sales representative or the nearest authorized service center. GETTING READY SEWING BASICS UTILITY STITCHES APPENDIX INDEX 1 CONTENTS Enclosed Accessories Optional Accessories The following are available as optional accessories. 1. 2. 3. 1.
Users Manual - English
Page 10
... zipper ...86 Zipper/piping Insertion ...89 Inserting a centered zipper ...89 Inserting a piping ...90 Sewing Stretch Fabrics and Elastic Tape 91 Stretch stitching ...91 Elastic attaching ...91 Appliqué, Patchwork and Quilt Stitching 93 Appliqué stitching ...93 Patchwork (crazy quilt) stitching ...95 Piecing ...95 Quilting ...96 Free-motion quilting ...97 Satin stitching ...99 4 APPENDIX INDEX
... zipper ...86 Zipper/piping Insertion ...89 Inserting a centered zipper ...89 Inserting a piping ...90 Sewing Stretch Fabrics and Elastic Tape 91 Stretch stitching ...91 Elastic attaching ...91 Appliqué, Patchwork and Quilt Stitching 93 Appliqué stitching ...93 Patchwork (crazy quilt) stitching ...95 Piecing ...95 Quilting ...96 Free-motion quilting ...97 Satin stitching ...99 4 APPENDIX INDEX
Users Manual - English
Page 37
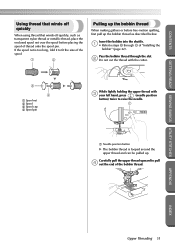
...with 3 your left hand, press (needle position button) twice to fit the size of thread onto the spool pin. CONTENTS GETTING READY SEWING BASICS UTILITY STITCHES Using thread that winds off quickly When using thread that winds off quickly, such as transparent nylon thread or metallic thread,... place the enclosed spool net over the spool before free-motion quilting, first pull up the bobbin thread as described below. APPENDIX INDEX Upper Threading 31 Pass the bobbin thread through 5 of the bobbin thread...
...with 3 your left hand, press (needle position button) twice to fit the size of thread onto the spool pin. CONTENTS GETTING READY SEWING BASICS UTILITY STITCHES Using thread that winds off quickly When using thread that winds off quickly, such as transparent nylon thread or metallic thread,... place the enclosed spool net over the spool before free-motion quilting, first pull up the bobbin thread as described below. APPENDIX INDEX Upper Threading 31 Pass the bobbin thread through 5 of the bobbin thread...

Users Manual - English
Page 45
... UTILITY STITCHES Adjusting the pressure of the presser foot The amount of pressure that does not use the presser foot holder, such as the quilting foot. Turn the dial to loosen the presser foot 2 holder screw. 1 1 Screwdriver ■ Attaching the presser foot holder Align the presser ... Replacing the Presser Foot 39 INDEX Lower the presser foot lever. 1 1 1 Presser foot lever Turn the presser foot dial at the back of the 2 sewing machine. Use the screwdriver to remove the presser foot holder. ■ Removing the presser foot holder Remove the presser foot. 1 • For details, refer to...
... UTILITY STITCHES Adjusting the pressure of the presser foot The amount of pressure that does not use the presser foot holder, such as the quilting foot. Turn the dial to loosen the presser foot 2 holder screw. 1 1 Screwdriver ■ Attaching the presser foot holder Align the presser ... Replacing the Presser Foot 39 INDEX Lower the presser foot lever. 1 1 1 Presser foot lever Turn the presser foot dial at the back of the 2 sewing machine. Use the screwdriver to remove the presser foot holder. ■ Removing the presser foot holder Remove the presser foot. 1 • For details, refer to...
Users Manual - English
Page 46
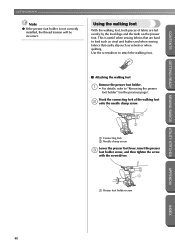
Hook the connecting fork of fabric are hard to feed such as vinyl and leather and when sewing fabrics that easily slip such as velvets or when quilting. Using the walking foot With the walking foot, both pieces of the walking foot 2 onto the needle clamp screw. 1 2 1 Connecting fork... incorrect. GETTING READY CONTENTS Note ● If the presser foot holder is useful when sewing fabrics that are fed evenly by the feed dogs and the teeth on the previous page). GETTING READY SEWING BASICS UTILITY STITCHES ■ Attaching the walking foot Remove the presser foot holder. 1 ...
Hook the connecting fork of fabric are hard to feed such as vinyl and leather and when sewing fabrics that easily slip such as velvets or when quilting. Using the walking foot With the walking foot, both pieces of the walking foot 2 onto the needle clamp screw. 1 2 1 Connecting fork... incorrect. GETTING READY CONTENTS Note ● If the presser foot holder is useful when sewing fabrics that are fed evenly by the feed dogs and the teeth on the previous page). GETTING READY SEWING BASICS UTILITY STITCHES ■ Attaching the walking foot Remove the presser foot holder. 1 ...
Users Manual - English
Page 73
CONTENTS GETTING READY SEWING BASICS UTILITY STITCHES 3 UTILITY STITCHES The various stitches and their applications are described in this chapter. Selecting Stitching 68 Overcasting Stitches 70 Basic Stitching ...74 Blind Hem Stitching 76 Buttonhole Stitching 78 Zipper Insertion ...85 Zipper/piping Insertion 89 Sewing Stretch Fabrics and Elastic Tape 91 Appliqué, Patchwork and Quilt Stitching 93 Reinforcement Stitching 100 Eyelet Stitching ...104 Decorative Stitching 105 Sewing the Various Built-In Decorative Patterns 113 Designing a Pattern 123 APPENDIX INDEX
CONTENTS GETTING READY SEWING BASICS UTILITY STITCHES 3 UTILITY STITCHES The various stitches and their applications are described in this chapter. Selecting Stitching 68 Overcasting Stitches 70 Basic Stitching ...74 Blind Hem Stitching 76 Buttonhole Stitching 78 Zipper Insertion ...85 Zipper/piping Insertion 89 Sewing Stretch Fabrics and Elastic Tape 91 Appliqué, Patchwork and Quilt Stitching 93 Reinforcement Stitching 100 Eyelet Stitching ...104 Decorative Stitching 105 Sewing the Various Built-In Decorative Patterns 113 Designing a Pattern 123 APPENDIX INDEX

Users Manual - English
Page 99
... seam allowance using an iron. 1 APPENDIX INDEX 1 Seam allowance • Remove the thick paper after pressing the seam allowance. Straight stitch quilting that can be used for sewing appliqués, patchwork and quilts are described below. Attaching appliqués and binding 3.5 2.5-5.0 2.5 1.6-4.0 (1/8) (3/32-3/16) (3/32) (1/16-3/16) 1.5 0.5-5.0 1.2 1.0-4.0 (1/16) (1/32-3/16) (1/16) (1/16-3/16) 57...
... seam allowance using an iron. 1 APPENDIX INDEX 1 Seam allowance • Remove the thick paper after pressing the seam allowance. Straight stitch quilting that can be used for sewing appliqués, patchwork and quilts are described below. Attaching appliqués and binding 3.5 2.5-5.0 2.5 1.6-4.0 (1/8) (3/32-3/16) (3/32) (1/16-3/16) 1.5 0.5-5.0 1.2 1.0-4.0 (1/16) (1/32-3/16) (1/16) (1/16-3/16) 57...

Users Manual - English
Page 101
...Baste or pin along the seam allowance of the fabric, and sew using stitch 58 . 1 INDEX 1 6.5 mm (1/4 inch) Appliqué, Patchwork and Quilt Stitching 95 Select stitch 57 3 or 58 . • For details, refer to piece together. Sew the two pieces of fabric is called "piecing". Attach zigzag foot...side of fabric and 1 place it over both pieces. Piecing Sewing together two pieces of fabric together so the 2 pattern spans over the lower piece. CONTENTS GETTING READY SEWING BASICS UTILITY STITCHES Patchwork (crazy quilt) stitching Fold the edge of the top piece of the ...
...Baste or pin along the seam allowance of the fabric, and sew using stitch 58 . 1 INDEX 1 6.5 mm (1/4 inch) Appliqué, Patchwork and Quilt Stitching 95 Select stitch 57 3 or 58 . • For details, refer to piece together. Sew the two pieces of fabric is called "piecing". Attach zigzag foot...side of fabric and 1 place it over both pieces. Piecing Sewing together two pieces of fabric together so the 2 pattern spans over the lower piece. CONTENTS GETTING READY SEWING BASICS UTILITY STITCHES Patchwork (crazy quilt) stitching Fold the edge of the top piece of the ...

Users Manual - English
Page 102
... using the walking foot and the quilting guide. Note ● When sewing with the walking foot, sew at a speed between the top and bottom layers of fabric is called "quilting". Quilting Sandwiching batting between slow and medium. GETTING READY SEWING BASICS UTILITY STITCHES UTILITY STITCHES CONTENTS ... the presser 4 foot, and then evenly stretch the fabric while sewing. Place one hand on each side of the seam allowance (the needle position), adjust the stitch width. APPENDIX INDEX 96 Quilts can easily be quilted. 1 Attach the walking foot. 2 • For details, refer...
... using the walking foot and the quilting guide. Note ● When sewing with the walking foot, sew at a speed between the top and bottom layers of fabric is called "quilting". Quilting Sandwiching batting between slow and medium. GETTING READY SEWING BASICS UTILITY STITCHES UTILITY STITCHES CONTENTS ... the presser 4 foot, and then evenly stretch the fabric while sewing. Place one hand on each side of the seam allowance (the needle position), adjust the stitch width. APPENDIX INDEX 96 Quilts can easily be quilted. 1 Attach the walking foot. 2 • For details, refer...
Users Manual - English
Page 103
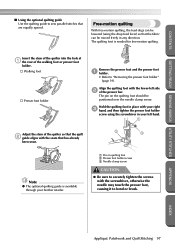
... right 3 hand, and then tighten the presser foot holder screw using the drop feed lever) so that are equally spaced. Hold the quilting foot in place with the screwdriver, otherwise the needle may touch the presser foot, causing it to "Removing the presser foot holder" (...■ Using the optional quilting guide Use the quilting guide to sew parallel stitches that the fabric can be positioned over the needle clamp screw. Free-motion quilting With free-motion quilting, the feed dogs can be moved freely in your brother retailer. 1 Pin on the quilting foot should be lowered (using...
... right 3 hand, and then tighten the presser foot holder screw using the drop feed lever) so that are equally spaced. Hold the quilting foot in place with the screwdriver, otherwise the needle may touch the presser foot, causing it to "Removing the presser foot holder" (...■ Using the optional quilting guide Use the quilting guide to sew parallel stitches that the fabric can be positioned over the needle clamp screw. Free-motion quilting With free-motion quilting, the feed dogs can be moved freely in your brother retailer. 1 Pin on the quilting foot should be lowered (using...

Users Manual - English
Page 105
...type of fabric being sewn and the thickness of a satin stitch. Memo ● Although the stitching result differs depending on the sewing machine, and then press 3 (settings key) in the operation panel. Slide the controller to the right to make the width narrower. ... that the stitch width can be adjusted. X The initial stitch screen appears again. While sewing, slide the sewing speed 9 controller to sew" (page 49). X The settings screen appears. APPENDIX INDEX Appliqué, Patchwork and Quilt Stitching 99 Attach zigzag foot "J". 2 J Press 7 (OK key). Press , , ...
...type of fabric being sewn and the thickness of a satin stitch. Memo ● Although the stitching result differs depending on the sewing machine, and then press 3 (settings key) in the operation panel. Slide the controller to the right to make the width narrower. ... that the stitch width can be adjusted. X The initial stitch screen appears again. While sewing, slide the sewing speed 9 controller to sew" (page 49). X The settings screen appears. APPENDIX INDEX Appliqué, Patchwork and Quilt Stitching 99 Attach zigzag foot "J". 2 J Press 7 (OK key). Press , , ...

Users Manual - English
Page 115
...1 1 Right side of fabric APPENDIX INDEX Decorative Stitching 109 This is used when making a crazy quilt. Sew together the right sides of the two pieces 2 of fabric, and then open up , and then sew over the seam allowance of fabric 2 6.5 mm (1/4 inch) seam allowance 3 Straight stitch Select ...stitch 22 , 23 3 or 24 . • For details, refer to "Selecting stitching" (page 68). CONTENTS GETTING READY SEWING BASICS UTILITY STITCHES Unfold the fabric, and then iron the tucks 5 down to "Replacing the presser foot" (page 37). Turn the fabric over so that...
...1 1 Right side of fabric APPENDIX INDEX Decorative Stitching 109 This is used when making a crazy quilt. Sew together the right sides of the two pieces 2 of fabric, and then open up , and then sew over the seam allowance of fabric 2 6.5 mm (1/4 inch) seam allowance 3 Straight stitch Select ...stitch 22 , 23 3 or 24 . • For details, refer to "Selecting stitching" (page 68). CONTENTS GETTING READY SEWING BASICS UTILITY STITCHES Unfold the fabric, and then iron the tucks 5 down to "Replacing the presser foot" (page 37). Turn the fabric over so that...

Users Manual - English
Page 137
...- No ting J Appliqué quilting, freemotion quilting, satin stitching 3.5 (1/8) 0.0-7.0 1.4 0.0-4.0 (0-1/4) (1/16) (0-3/16) Reinforce- No ting APPENDIX INDEX Stitch Settings 131 Reinforce- - CONTENTS GETTING READY SEWING BASICS UTILITY STITCHES Presser Foot Twin ...foot) 1.5 (1/16) 0.0-7.0 (0-1/4) Reinforce- 1.6 0.2-5.0 (1/16) (1/64-3/16) No Reinforcement ment + thread-cut- No ting N Sewing eyelets, for thick or furry fabrics 7.0 (1/4) 3.0-7.0 (1/8-1/4) 0.5 0.3-1.0 (1/32) (1/64-1/16) No Automatic reinforcement Thread-cutting No ...
...- No ting J Appliqué quilting, freemotion quilting, satin stitching 3.5 (1/8) 0.0-7.0 1.4 0.0-4.0 (0-1/4) (1/16) (0-3/16) Reinforce- No ting APPENDIX INDEX Stitch Settings 131 Reinforce- - CONTENTS GETTING READY SEWING BASICS UTILITY STITCHES Presser Foot Twin ...foot) 1.5 (1/16) 0.0-7.0 (0-1/4) Reinforce- 1.6 0.2-5.0 (1/16) (1/64-3/16) No Reinforcement ment + thread-cut- No ting N Sewing eyelets, for thick or furry fabrics 7.0 (1/4) 3.0-7.0 (1/8-1/4) 0.5 0.3-1.0 (1/32) (1/64-1/16) No Automatic reinforcement Thread-cutting No ...

Users Manual - English
Page 138
...16) 2.5 1.0-4.0 (3/32) (1/16-3/16) No Reinforcement ment + thread-cut - No the fabric ting GETTING READY SEWING BASICS UTILITY STITCHES APPENDIX INDEX 132 ment + ment thread-cut - Reinforce- S umweight and thick fabrics while cutting 5.0...Quilting background stitching (stippling) Reinforce- 7.0 (1/4) 1.0--7.0 (1/16-1/4) 1.6 1.0-4.0 (1/16) (1/16-3/16) No Reinforce- No ting Overcasting on thin S and mediumweight fabrics while cutting the fabric Reinforce- 3.5 (1/8) 3.5-5.0 (1/8-3/16) 2.0 1.0-4.0 (1/16) (1/16-3/16) No Reinforce- No ting S Sewing...
...16) 2.5 1.0-4.0 (3/32) (1/16-3/16) No Reinforcement ment + thread-cut - No the fabric ting GETTING READY SEWING BASICS UTILITY STITCHES APPENDIX INDEX 132 ment + ment thread-cut - Reinforce- S umweight and thick fabrics while cutting 5.0...Quilting background stitching (stippling) Reinforce- 7.0 (1/4) 1.0--7.0 (1/16-1/4) 1.6 1.0-4.0 (1/16) (1/16-3/16) No Reinforce- No ting Overcasting on thin S and mediumweight fabrics while cutting the fabric Reinforce- 3.5 (1/8) 3.5-5.0 (1/8-3/16) 2.0 1.0-4.0 (1/16) (1/16-3/16) No Reinforce- No ting S Sewing...

Users Manual - English
Page 150
... 80, 101, 103 buttonhole stitching 78 C C key Cover E changing sewing direction 62 changing the needle 35 checking patterns 116 cleaning 135 cleaning brush Cover A, 136 combining patterns 114 crazy quilt stitching 95 creating patterns 123 cross-stitch 113 cross-wound thread 19 curves ...dog position switch Cover C, 98 feed dogs Cover C, 97 flipping 119 foot controller Cover A, 49 foot controller jack Cover C free-arm sewing 42 free-motion quilting 97 front view Cover B H handle Cover C hard case Cover A heirloom stitching 110 J joining 109 joining stitch 93 K knee lifter...
... 80, 101, 103 buttonhole stitching 78 C C key Cover E changing sewing direction 62 changing the needle 35 checking patterns 116 cleaning 135 cleaning brush Cover A, 136 combining patterns 114 crazy quilt stitching 95 creating patterns 123 cross-stitch 113 cross-wound thread 19 curves ...dog position switch Cover C, 98 feed dogs Cover C, 97 flipping 119 foot controller Cover A, 49 foot controller jack Cover C free-arm sewing 42 free-motion quilting 97 front view Cover B H handle Cover C hard case Cover A heirloom stitching 110 J joining 109 joining stitch 93 K knee lifter...
Users Manual - English
Page 151
... 39 programmed thread-cutting 58 Q quick reference guide Cover A quilting 96 quilting foot Cover A, 97 quilting guide 1, 96, 97 R realigning 121 rear view Cover C recalling a pattern 120 reinforcement stitching 51, 100 repeat sewing 115 reverse/reinforcement stitch button Cover D S satin stitch 113...Cover A, 35 seam ripper Cover A, 81 selecting stitching 68 settings 14 settings key Cover E, 14 sewing machine help key Cover E, 13 sewing machine needles 33 sewing speed 49 sewing speed controller Cover B, Cover D, 99 shell tuck stitch 108 shutter 26 shuttle 22, 135 shuttle ...
... 39 programmed thread-cutting 58 Q quick reference guide Cover A quilting 96 quilting foot Cover A, 97 quilting guide 1, 96, 97 R realigning 121 rear view Cover C recalling a pattern 120 reinforcement stitching 51, 100 repeat sewing 115 reverse/reinforcement stitch button Cover D S satin stitch 113...Cover A, 35 seam ripper Cover A, 81 selecting stitching 68 settings 14 settings key Cover E, 14 sewing machine help key Cover E, 13 sewing machine needles 33 sewing speed 49 sewing speed controller Cover B, Cover D, 99 shell tuck stitch 108 shutter 26 shuttle 22, 135 shuttle ...


