
Accessory Catalog
Page 11
... and pull the braid behind the presser foot. 4. SA141 All Brother home-use the center guide). 2. Sew. SA157 ABCDEFJKMN Cording Foot (7-hole) Used for quilting appliqué! 1. Perfect for embellishing 1 to use single cord, use sewing machines Clear-view Foot Use this presser foot where visibility of 7 mm feed width. 1. Insert cords or threads into each hole on the presser foot. 2. Insert cords or threads into each hole on the presser foot. 2. Attach the presser foot and pull cords under the presser foot. 3. Set the zigzag width slightly wider than the width...
... and pull the braid behind the presser foot. 4. SA141 All Brother home-use the center guide). 2. Sew. SA157 ABCDEFJKMN Cording Foot (7-hole) Used for quilting appliqué! 1. Perfect for embellishing 1 to use single cord, use sewing machines Clear-view Foot Use this presser foot where visibility of 7 mm feed width. 1. Insert cords or threads into each hole on the presser foot. 2. Insert cords or threads into each hole on the presser foot. 2. Attach the presser foot and pull cords under the presser foot. 3. Set the zigzag width slightly wider than the width...

Accessory Catalog
Page 13
....) Brother Embellishment Feet Pin Tuck Foot 24 Ruffler Foot Pin Tuck Foot This presser foot has 7 grooves and produces perfect pin tucks and corded pin tucks using a twin needle on the lower portion of the grooves. 4. The ruffling blade on lightweight fabric. www.brother.com The intervals of stitching and use that to get started. SA143 AFJKM Ruffler Foot Makes ruffles with this presser foot. 1. A specially designed bobbin cover is also included with evenly spaced tucks and gathers. Install and manually thread a twin needle...
....) Brother Embellishment Feet Pin Tuck Foot 24 Ruffler Foot Pin Tuck Foot This presser foot has 7 grooves and produces perfect pin tucks and corded pin tucks using a twin needle on the lower portion of the grooves. 4. The ruffling blade on lightweight fabric. www.brother.com The intervals of stitching and use that to get started. SA143 AFJKM Ruffler Foot Makes ruffles with this presser foot. 1. A specially designed bobbin cover is also included with evenly spaced tucks and gathers. Install and manually thread a twin needle...

Accessory Catalog
Page 15
...-8500 sewing machines. Lower the feed dogs. 3. While starting to sew, press the needle position button twice to pull the bobbin thread to hold fabric in place while stitches are free to sew such as zigzag stitch. 5. Set the machine for free-motion, outline quilting, etc. 1. Walking Foot SA140 ABCDEFJKMN SA166 L SA107 GHO SA169 I Open Toe Walking Foot SA188 ABCDEFJKMN www.brother.com Set the fabric under the presser foot. 6. Requires Low Shank Adapter for ULT series, PC-6500, PC-8200 and PC-8500 sewing machines. Use...
...-8500 sewing machines. Lower the feed dogs. 3. While starting to sew, press the needle position button twice to pull the bobbin thread to hold fabric in place while stitches are free to sew such as zigzag stitch. 5. Set the machine for free-motion, outline quilting, etc. 1. Walking Foot SA140 ABCDEFJKMN SA166 L SA107 GHO SA169 I Open Toe Walking Foot SA188 ABCDEFJKMN www.brother.com Set the fabric under the presser foot. 6. Requires Low Shank Adapter for ULT series, PC-6500, PC-8200 and PC-8500 sewing machines. Use...

Accessory Catalog
Page 17
... frame simplifies the process of embroidery designs - New Border Frame and 28 Unique Embroidery Patterns. Expand the functionality of the line machine. Add appliqué capability to embroider 150 decorative sewing stitches within the frame. - Character/Font Pattern Separation. Add even more control with center needle position straight stitch Open toe quilting foot "O" for greater visibility Echo quilting foot "E" for easier viewing of Brother Embroidery Cards, including licensed content. Use the Border Frame to your...
... frame simplifies the process of embroidery designs - New Border Frame and 28 Unique Embroidery Patterns. Expand the functionality of the line machine. Add appliqué capability to embroider 150 decorative sewing stitches within the frame. - Character/Font Pattern Separation. Add even more control with center needle position straight stitch Open toe quilting foot "O" for greater visibility Echo quilting foot "E" for easier viewing of Brother Embroidery Cards, including licensed content. Use the Border Frame to your...

Accessory Catalog
Page 33
... for thread delivery or bobbin storage. Ask your selected dealer or check on to your machine. Brother Embroidery Accessories 63 Free-Standing Ten Spool Thread Stand Ten Spool Thread Stand Embroidery Machine Hoops Brother Embroidery Accessories 64 For all embroidery and sewing/embroidery machines. Spend less time changing threads, and more on this stand that conveniently sits behind your machine to the machine as well as a thread locking system which keeps those loose ends tamed when not in use. Allows...
... for thread delivery or bobbin storage. Ask your selected dealer or check on to your machine. Brother Embroidery Accessories 63 Free-Standing Ten Spool Thread Stand Ten Spool Thread Stand Embroidery Machine Hoops Brother Embroidery Accessories 64 For all embroidery and sewing/embroidery machines. Spend less time changing threads, and more on this stand that conveniently sits behind your machine to the machine as well as a thread locking system which keeps those loose ends tamed when not in use. Allows...

Accessory Catalog
Page 34
..., 100% polyester thread developed and made for Brother® Embroidery Machines, but compatible with straight, zig zag or decorative stitches. It is also recommended for placement on the wall for each design. Brother Embroidery Accessories PacesetterTM Polyester Threads 65 Brother Country Yarn Embroidery Threads Metallic Threads For the best embroidery results, use these embroidery threads especially designed for Brother sewing and embroidering machines. 61 Color Thread Set with Wooden Rack ETKSP999 PacesetterTM Polyester Threads (61 Color Thread Set with Wooden Rack...
..., 100% polyester thread developed and made for Brother® Embroidery Machines, but compatible with straight, zig zag or decorative stitches. It is also recommended for placement on the wall for each design. Brother Embroidery Accessories PacesetterTM Polyester Threads 65 Brother Country Yarn Embroidery Threads Metallic Threads For the best embroidery results, use these embroidery threads especially designed for Brother sewing and embroidering machines. 61 Color Thread Set with Wooden Rack ETKSP999 PacesetterTM Polyester Threads (61 Color Thread Set with Wooden Rack...

Accessory Catalog
Page 40
... cover stitch. 3. The stitches are always smooth. 1. Sew. Insert the tab on the bias tape attachment into the guide. 4. Set the bias tape though the holder (cut the end of the presser foot, and sew. Attach the hem positioning plate A/B to the hemming attachment, and attach it into the front cover slot. 3. Set up your machine for a cover stitch, with the LC1 presser foot included in the machine. 2. Set up your machine. 3. Fold fabric and set through the holder). 4. Set T1/T2 presser foot. 2. Open the seams. 4. Brother Cover Stitch Feet...
... cover stitch. 3. The stitches are always smooth. 1. Sew. Insert the tab on the bias tape attachment into the guide. 4. Set the bias tape though the holder (cut the end of the presser foot, and sew. Attach the hem positioning plate A/B to the hemming attachment, and attach it into the front cover slot. 3. Set up your machine for a cover stitch, with the LC1 presser foot included in the machine. 2. Set up your machine. 3. Fold fabric and set through the holder). 4. Set T1/T2 presser foot. 2. Open the seams. 4. Brother Cover Stitch Feet...

Users Manual - English
Page 5
... the needle ...31 Threading the needle manually (without using the needle threader 33 Using the twin needle ...33 Pulling up the bobbin thread...36 Replacing the Needle ...37 Needle precautions ...37 Needle types and their uses...38 Checking the needle ...39 Replacing the needle...39 Replacing the Presser Foot 41 Presser foot precautions ...41 Replacing the presser foot ...41 Adjusting the pressure of the presser foot ...43 Removing the presser foot holder ...43 Using the walking foot ...44 Sewing Cylindrical or Large Pieces 46 Stitching cylindrical pieces...46 Sewing large pieces of fabric...
... the needle ...31 Threading the needle manually (without using the needle threader 33 Using the twin needle ...33 Pulling up the bobbin thread...36 Replacing the Needle ...37 Needle precautions ...37 Needle types and their uses...38 Checking the needle ...39 Replacing the needle...39 Replacing the Presser Foot 41 Presser foot precautions ...41 Replacing the presser foot ...41 Adjusting the pressure of the presser foot ...43 Removing the presser foot holder ...43 Using the walking foot ...44 Sewing Cylindrical or Large Pieces 46 Stitching cylindrical pieces...46 Sewing large pieces of fabric...
Users Manual - English
Page 6
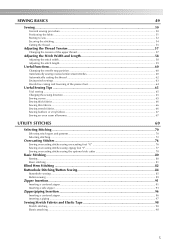
... Adjusting the Stitch Width and Length 58 Adjusting the stitch width...58 Adjusting the stitch length ...59 Useful Functions...60 Changing the needle stop position ...60 Automatically sewing reverse/reinforcement stitches 60 Automatically cutting the thread ...62 Saving stitch settings ...63 Hands-free raising and lowering of the presser foot 64 Useful Sewing Tips ...65 Trial sewing ...65 Changing the sewing direction ...65 Sewing curves ...65 Sewing thick fabrics ...66 Sewing thin fabrics...66 Sewing stretch fabrics...66 Sewing leathers or vinyl fabrics ...67 Sewing an even seam allowance...
... Adjusting the Stitch Width and Length 58 Adjusting the stitch width...58 Adjusting the stitch length ...59 Useful Functions...60 Changing the needle stop position ...60 Automatically sewing reverse/reinforcement stitches 60 Automatically cutting the thread ...62 Saving stitch settings ...63 Hands-free raising and lowering of the presser foot 64 Useful Sewing Tips ...65 Trial sewing ...65 Changing the sewing direction ...65 Sewing curves ...65 Sewing thick fabrics ...66 Sewing thin fabrics...66 Sewing stretch fabrics...66 Sewing leathers or vinyl fabrics ...67 Sewing an even seam allowance...
Users Manual - English
Page 10
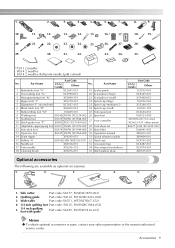
... F007N (XC1949-002) 29 Knee lifter 13 Open toe foot SA147 F027N (XC1964-002) 30 Operation manual 14 Seam ripper X54243-051 31 Quick reference guide 15 Bobbin (4) SA156 SFB (XA5539-151) 32 Hard case 16 Needle set X58358-051 33 Accessory bag 17 Twin needle X59296-151 34 Disc-shaped screwdriver 18 Cleaning brush X59476-051 35 Stitch pattern plate Part Code U.S.A./ Canada Others 135793-001 XC8349-051 X55468...
... F007N (XC1949-002) 29 Knee lifter 13 Open toe foot SA147 F027N (XC1964-002) 30 Operation manual 14 Seam ripper X54243-051 31 Quick reference guide 15 Bobbin (4) SA156 SFB (XA5539-151) 32 Hard case 16 Needle set X58358-051 33 Accessory bag 17 Twin needle X59296-151 34 Disc-shaped screwdriver 18 Cleaning brush X59476-051 35 Stitch pattern plate Part Code U.S.A./ Canada Others 135793-001 XC8349-051 X55468...
Users Manual - English
Page 12
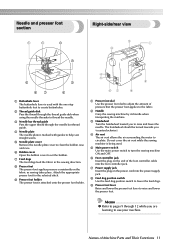
.... i Presser foot lever Raise and lower the presser foot lever to set the bobbin. h Presser foot The presser foot applies pressure consistently on the end of Machine Parts and Their Functions 11 Names of the foot controller cable into the power supply jack. f Bobbin cover Open the bobbin cover to raise and lower the presser foot. Memo z Refer to pages 9 through the thread guide disk when using the needle threader to thread the needle. f Foot controller jack Insert the plug on the fabric as sewing takes place. d Needle plate The needle plate is...
.... i Presser foot lever Raise and lower the presser foot lever to set the bobbin. h Presser foot The presser foot applies pressure consistently on the end of Machine Parts and Their Functions 11 Names of the foot controller cable into the power supply jack. f Bobbin cover Open the bobbin cover to raise and lower the presser foot. Memo z Refer to pages 9 through the thread guide disk when using the needle threader to thread the needle. f Foot controller jack Insert the plug on the fabric as sewing takes place. d Needle plate The needle plate is...
Users Manual - English
Page 13
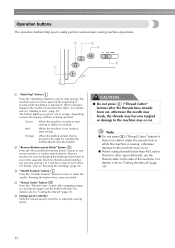
... the sewing speed controller to sew reverse stitches or reinforcement stitches. When sewing is stopped, the needle is lowered in green, red or orange, depending on the side of sewing while the button is sewing, otherwise damage to "Cutting the thread" (page 55). 12 The button lights up in the fabric. Note z Do not press ("Thread Cutter" button) if there is no fabric under the presser foot or while the machine is depressed. The machine sews...
... the sewing speed controller to sew reverse stitches or reinforcement stitches. When sewing is stopped, the needle is lowered in green, red or orange, depending on the side of sewing while the button is sewing, otherwise damage to "Cutting the thread" (page 55). 12 The button lights up in the fabric. Note z Do not press ("Thread Cutter" button) if there is no fabric under the presser foot or while the machine is depressed. The machine sews...
Users Manual - English
Page 16
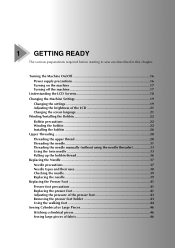
... 22 Winding the bobbin 22 Installing the bobbin 26 Upper Threading ...28 Threading the upper thread 28 Threading the needle 31 Threading the needle manually (without using the needle threader 33 Using the twin needle 33 Pulling up the bobbin thread 36 Replacing the Needle 37 Needle precautions 37 Needle types and their uses 38 Checking the needle 39 Replacing the needle 39 Replacing the Presser Foot 41 Presser foot precautions 41 Replacing the presser foot 41 Adjusting the pressure of the presser foot 43 Removing the presser foot holder 43 Using the walking foot 44 Sewing...
... 22 Winding the bobbin 22 Installing the bobbin 26 Upper Threading ...28 Threading the upper thread 28 Threading the needle 31 Threading the needle manually (without using the needle threader 33 Using the twin needle 33 Pulling up the bobbin thread 36 Replacing the Needle 37 Needle precautions 37 Needle types and their uses 38 Checking the needle 39 Replacing the needle 39 Replacing the Presser Foot 41 Presser foot precautions 41 Replacing the presser foot 41 Adjusting the pressure of the presser foot 43 Removing the presser foot holder 43 Using the walking foot 44 Sewing...

Users Manual - English
Page 34
... twin needle (part code: X59296-151). spool pin and the spool cap. For details on installing a needle, refer to the needle bar thread a guide. Raise the presser foot lever, pass the end of the d thread through the eye of the needle c from the front. • The needle threader cannot be used with the twin needle, the sewing machine may bend the needle or damage the machine. ● Never use bent needles. Bent needles can easily break, possibly resulting in injuries. Install the twin needle...
... twin needle (part code: X59296-151). spool pin and the spool cap. For details on installing a needle, refer to the needle bar thread a guide. Raise the presser foot lever, pass the end of the d thread through the eye of the needle c from the front. • The needle threader cannot be used with the twin needle, the sewing machine may bend the needle or damage the machine. ● Never use bent needles. Bent needles can easily break, possibly resulting in injuries. Install the twin needle...
Users Manual - English
Page 36
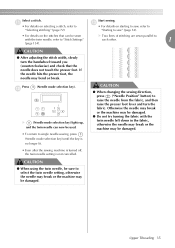
... details on selecting a stitch, refer to "Stitch Settings" (page 134). CAUTION ● When changing the sewing direction, press ("Needle Position" button) to select the twin needle setting, otherwise the needle may break or the machine may be damaged. Start sewing. Select a stitch. Otherwise the needle may break or the machine may bend or break. CAUTION ● When using the twin needle, be sure to raise the needle from the fabric, and then raise the presser foot lever and turn the...
... details on selecting a stitch, refer to "Stitch Settings" (page 134). CAUTION ● When changing the sewing direction, press ("Needle Position" button) to select the twin needle setting, otherwise the needle may break or the machine may be damaged. Start sewing. Select a stitch. Otherwise the needle may break or the machine may bend or break. CAUTION ● When using the twin needle, be sure to raise the needle from the fabric, and then raise the presser foot lever and turn the...
Users Manual - English
Page 59
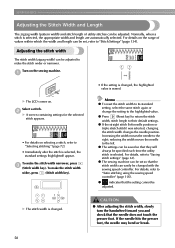
... automatically selected. Increasing the width moves the needle to their default settings. For details on selecting a stitch, refer to "Saving stitch settings" (page 63). If the needle hits the presser foot, the needle may bend or break. 58 a -+ • If the setting is changed . To make the stitch width narrower, press c (Stitch width key). z Press (Reset key) to return the stitch width, stitch length to the right; z The sewing machine can be adjusted...
... automatically selected. Increasing the width moves the needle to their default settings. For details on selecting a stitch, refer to "Saving stitch settings" (page 63). If the needle hits the presser foot, the needle may bend or break. 58 a -+ • If the setting is changed . To make the stitch width narrower, press c (Stitch width key). z Press (Reset key) to return the stitch width, stitch length to the right; z The sewing machine can be adjusted...
Users Manual - English
Page 87
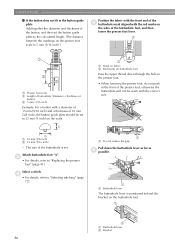
..., refer to "Replacing the presser foot" (page 41). a a Do not reduce the gap. a a Buttonhole lever The buttonhole lever is positioned behind the bracket on buttonhole foot Pass the upper thread down the buttonhole lever as far as f possible. c • For details, refer to "Selecting stitching" (page 72). Select a stitch. UTILITY STITCHES ■ If the button does not fit in the front of the presser foot, otherwise the buttonhole will not be set . Attach buttonhole foot "A".
..., refer to "Replacing the presser foot" (page 41). a a Do not reduce the gap. a a Buttonhole lever The buttonhole lever is positioned behind the bracket on buttonhole foot Pass the upper thread down the buttonhole lever as far as f possible. c • For details, refer to "Selecting stitching" (page 72). Select a stitch. UTILITY STITCHES ■ If the button does not fit in the front of the presser foot, otherwise the buttonhole will not be set . Attach buttonhole foot "A".

Users Manual - English
Page 90
... the needle correctly goes into button-sewing foot "M". d • For details, refer to "Selecting stitching" (page 72). • Since the end of the thread will hit the button, remeasure the distance between the button holes. • For details, refer to the left as seen from the rear of the machine) X The feed dogs are lowered. a a Drop feed lever (as seen from the rear of the machine). Button sewing Buttons can...
... the needle correctly goes into button-sewing foot "M". d • For details, refer to "Selecting stitching" (page 72). • Since the end of the thread will hit the button, remeasure the distance between the button holes. • For details, refer to the left as seen from the rear of the machine) X The feed dogs are lowered. a a Drop feed lever (as seen from the rear of the machine). Button sewing Buttons can...
Users Manual - English
Page 145
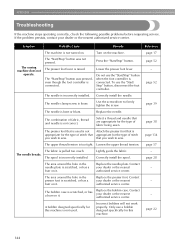
... on the machine. Replace the needle plate. A bobbin designed specifically for the type of fabric, thread and needle is connected. Reference page 17 page 52 - Do not use the "Start/Stop" button when the foot controller is bent or blunt. The needle is connected. The spool is scratched, or has a burr on . The area around the hole in the presser foot is used . The bobbin case is incorrectly installed. Use the screwdriver to sew. Lightly guide the fabric. Symptom Probable...
... on the machine. Replace the needle plate. A bobbin designed specifically for the type of fabric, thread and needle is connected. Reference page 17 page 52 - Do not use the "Start/Stop" button when the foot controller is bent or blunt. The needle is connected. The spool is scratched, or has a burr on . The area around the hole in the presser foot is used . The bobbin case is incorrectly installed. Use the screwdriver to sew. Lightly guide the fabric. Symptom Probable...
Users Manual - English
Page 148
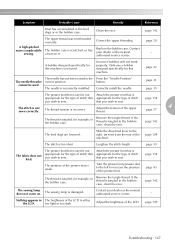
... use a bobbin designed specifically for example, in The brightness of stitch that appropriate for the type of the machine) page 104 The stitch is weak. that you wish to sew. If the thread is incorrectly installed. The pressure of the upper thread. The upper thread was not threaded correctly. The needle is tangled in the bobbin case. The thread tension is made while sewing. Adjust the tension of the presser foot is too short. page 142 The feed dogs...
... use a bobbin designed specifically for example, in The brightness of stitch that appropriate for the type of the machine) page 104 The stitch is weak. that you wish to sew. If the thread is incorrectly installed. The pressure of the upper thread. The upper thread was not threaded correctly. The needle is tangled in the bobbin case. The thread tension is made while sewing. Adjust the tension of the presser foot is too short. page 142 The feed dogs...


