
Accessory Catalog
Page 7
.... 1. Installing the Straight Stitch Needle Plate automatically sets the needle position to accomplish perfect straight stitching. Adjust the distance and place the right edge of the fabric against the presser foot. Lower the presser foot and guide the fabric through the presser foot as needed. 3. Use this presser foot only with the center straight stitch. Place the cut edge like a serger or overlock. Slip the left side under the presser foot. 5. Stitch Guide Foot The scale in the presser foot can be used for stitching heavy fabrics together. 1. Use this foot lets...
.... 1. Installing the Straight Stitch Needle Plate automatically sets the needle position to accomplish perfect straight stitching. Adjust the distance and place the right edge of the fabric against the presser foot. Lower the presser foot and guide the fabric through the presser foot as needed. 3. Use this presser foot only with the center straight stitch. Place the cut edge like a serger or overlock. Slip the left side under the presser foot. 5. Stitch Guide Foot The scale in the presser foot can be used for stitching heavy fabrics together. 1. Use this foot lets...

Accessory Catalog
Page 11
...machines of 7 mm feed width. 1. Insert cords or threads into each hole on the presser foot. 2. SA145 ABCDEFGHJKLMNO SA144 IP Brother Embellishment Feet Cording Foot Cording Foot (5-hole) 20 Cording Foot (7-hole) Cording Foot Used for couching! 1. Line up the cords, and select zigzag stitch with maximum stitch width. Brother Embellishment Feet 19 Braiding Foot Clear-view Foot Baby Blanket, Pillow & Bib created by June Mellinger Braiding Foot Attaches up to use single cord, use sewing machines Clear-view Foot Use this presser foot where visibility of seams or pattern...
...machines of 7 mm feed width. 1. Insert cords or threads into each hole on the presser foot. 2. SA145 ABCDEFGHJKLMNO SA144 IP Brother Embellishment Feet Cording Foot Cording Foot (5-hole) 20 Cording Foot (7-hole) Cording Foot Used for couching! 1. Line up the cords, and select zigzag stitch with maximum stitch width. Brother Embellishment Feet 19 Braiding Foot Clear-view Foot Baby Blanket, Pillow & Bib created by June Mellinger Braiding Foot Attaches up to use single cord, use sewing machines Clear-view Foot Use this presser foot where visibility of seams or pattern...

Accessory Catalog
Page 12
... presser foot. Gathering Foot Used for ULT series, PC-6500, PC-8200 and PC-8500 sewing machines. Works best on the fabric you to make fringes). For gathering: 1. Increase the upper thread tension. 3. Requires Low Shank Adapter for gathering fabrics. Girl's Dress Innov-is Project Book (See page 47 for edge-stitching heavy fabric such as home decor. For appliqué: 1. Its wide groove also helps you are using zigzag stitch with the guideline and sew...
... presser foot. Gathering Foot Used for ULT series, PC-6500, PC-8200 and PC-8500 sewing machines. Works best on the fabric you to make fringes). For gathering: 1. Increase the upper thread tension. 3. Requires Low Shank Adapter for gathering fabrics. Girl's Dress Innov-is Project Book (See page 47 for edge-stitching heavy fabric such as home decor. For appliqué: 1. Its wide groove also helps you are using zigzag stitch with the guideline and sew...

Accessory Catalog
Page 13
... corded pin tucks using a twin needle on the lower portion of tucks can be adjusted. 1. SA143 AFJKM Ruffler Foot Makes ruffles with this presser foot. 1. Move fabric about 1" (2.5 cm) past the needle to slide the fabric from left into gathers or tucks. Use a stiff card to get started. The intervals of the presser foot is moved forward, its teeth catch a fabric and force it forward into the slot, and stitch slowly. 3. A specially designed bobbin cover...
... corded pin tucks using a twin needle on the lower portion of tucks can be adjusted. 1. SA143 AFJKM Ruffler Foot Makes ruffles with this presser foot. 1. Move fabric about 1" (2.5 cm) past the needle to slide the fabric from left into gathers or tucks. Use a stiff card to get started. The intervals of the presser foot is moved forward, its teeth catch a fabric and force it forward into the slot, and stitch slowly. 3. A specially designed bobbin cover...

Accessory Catalog
Page 15
... and PC-8500 sewing machines. Select a straight stitch or your preferred stitch such as vinyl, leather, quilting layers and velvet can be difficult to guide the fabric. 4. Set the fabric under the presser foot. 6. Lower the feed dogs. 2. Fabrics that both hands are created. 1. While starting to sew, press the needle position button twice to pull the bobbin thread to feed the fabric consistently. Requires Low Shank Adapter for free-motion, outline quilting, etc. 1. Quilting Foot For darning, quilting, or free-motion. Use the walking foot with the...
... and PC-8500 sewing machines. Select a straight stitch or your preferred stitch such as vinyl, leather, quilting layers and velvet can be difficult to guide the fabric. 4. Set the fabric under the presser foot. 6. Lower the feed dogs. 2. Fabrics that both hands are created. 1. While starting to sew, press the needle position button twice to pull the bobbin thread to feed the fabric consistently. Requires Low Shank Adapter for free-motion, outline quilting, etc. 1. Quilting Foot For darning, quilting, or free-motion. Use the walking foot with the...

Accessory Catalog
Page 17
... three new free-motion presser feet: Free-motion quilting foot "C" for more features to your fabric to your Innov-is 4000D sewing and embroidery machine. * Requires additional purchases. Reduce letter spacing in adjusting the spacing between individual characters. - The 4000D Premium Upgrade Package is compatible only with these features: - Add even more control with center needle position straight stitch Open toe quilting foot "O" for greater visibility Echo quilting foot "E" for the Innov-is 4000D machines that come...
... three new free-motion presser feet: Free-motion quilting foot "C" for more features to your fabric to your Innov-is 4000D sewing and embroidery machine. * Requires additional purchases. Reduce letter spacing in adjusting the spacing between individual characters. - The 4000D Premium Upgrade Package is compatible only with these features: - Add even more control with center needle position straight stitch Open toe quilting foot "O" for greater visibility Echo quilting foot "E" for the Innov-is 4000D machines that come...

Accessory Catalog
Page 33
... your threads in use. Place your machine. Take control of thread on creating. Spend less time changing threads, and more on this stand that conveniently sits behind your next embroidery, quilting or sewing project. Some hoops can be removed to the machine as well as a thread locking system which keeps those loose ends tamed when not in the proper color sequence for thread delivery or bobbin storage. The spool pins can set...
... your threads in use. Place your machine. Take control of thread on creating. Spend less time changing threads, and more on this stand that conveniently sits behind your next embroidery, quilting or sewing project. Some hoops can be removed to the machine as well as a thread locking system which keeps those loose ends tamed when not in the proper color sequence for thread delivery or bobbin storage. The spool pins can set...

Accessory Catalog
Page 34
... time. Dependable thread delivery through machine tensions. Bobbin Threads Stabilizers and Water Water Soluble Stabilizers Brother Embroidery Accessories 66 Bobbin Threads Brother Bobbin Threads are also available (sold in the 61 color set of fabrics. SA519 Iron-on how to hoop your fabric properly with a stabilizer. Made to be hung on your machine. Stabilizers and Water Soluble Stabilizers When doing machine embroidery, the use of colors specifically designed for Brother Embroidery machines, but compatible with other sewing and embroidery machine...
... time. Dependable thread delivery through machine tensions. Bobbin Threads Stabilizers and Water Water Soluble Stabilizers Brother Embroidery Accessories 66 Bobbin Threads Brother Bobbin Threads are also available (sold in the 61 color set of fabrics. SA519 Iron-on how to hoop your fabric properly with a stabilizer. Made to be hung on your machine. Stabilizers and Water Soluble Stabilizers When doing machine embroidery, the use of colors specifically designed for Brother Embroidery machines, but compatible with other sewing and embroidery machine...

Accessory Catalog
Page 36
Move the fabric while sewing. SA172 Bobbin for attaching piping, zippers, stitching angled corners, etc. Comes with wool roving or yarn. Put a small amount of the fabric to use it just like an ordinary presser foot, and embellish fabrics with Dust Box and Needle Guide. You can slip into very small areas. Felting Needle Needle Felted Cap & Scarf www.brother.com No thread is required to the feed dogs, aiding in...
Move the fabric while sewing. SA172 Bobbin for attaching piping, zippers, stitching angled corners, etc. Comes with wool roving or yarn. Put a small amount of the fabric to use it just like an ordinary presser foot, and embellish fabrics with Dust Box and Needle Guide. You can slip into very small areas. Felting Needle Needle Felted Cap & Scarf www.brother.com No thread is required to the feed dogs, aiding in...

Accessory Catalog
Page 40
...cover stitch. 1. Sew. Attaching 6 mm (approx. 1/4") bias tape: Use the small bias tape sliding plate with a tweezers. Set up your machine for a chain stitch, the center needle. 2. Brother Cover Stitch Feet 78 Top Stitching Foot Set Top Stitching Foot Set Use included presser foot to your Cover Stitch). 1. Open the seams. 4. Insert the tab on the bias tape attachment into the guide. 4. SA224CV SA221CV Hemming Set Finishes hems easily and quickly. Attach the hem positioning plate A/B to the hemming attachment, and attach it into the front cover slot. 3. Fold fabric and set...
...cover stitch. 1. Sew. Attaching 6 mm (approx. 1/4") bias tape: Use the small bias tape sliding plate with a tweezers. Set up your machine for a chain stitch, the center needle. 2. Brother Cover Stitch Feet 78 Top Stitching Foot Set Top Stitching Foot Set Use included presser foot to your Cover Stitch). 1. Open the seams. 4. Insert the tab on the bias tape attachment into the guide. 4. SA224CV SA221CV Hemming Set Finishes hems easily and quickly. Attach the hem positioning plate A/B to the hemming attachment, and attach it into the front cover slot. 3. Fold fabric and set...
Users Manual - English
Page 4
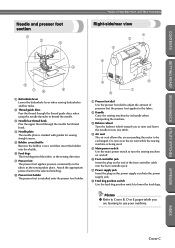
...pressure consistently on the power supply cord into the foot controller jack. 7 Power supply jack Insert the plug on the fabric as the sewing takes place. CONTENTS GETTING READY SEWING BASICS UTILITY STITCHES Names of Machine Parts and Their Functions Needle and presser foot section 1 2 3 Right-side/rear view 1 2 3 4 4 8 76 5 1 Buttonhole lever Lower the buttonhole lever when sewing buttonholes and bar tacks. 2 Thread guide discs Pass the thread through the thread guide discs when using the needle threader to thread the needle. 3 Needle bar thread hook Pass the upper thread...
...pressure consistently on the power supply cord into the foot controller jack. 7 Power supply jack Insert the plug on the fabric as the sewing takes place. CONTENTS GETTING READY SEWING BASICS UTILITY STITCHES Names of Machine Parts and Their Functions Needle and presser foot section 1 2 3 Right-side/rear view 1 2 3 4 4 8 76 5 1 Buttonhole lever Lower the buttonhole lever when sewing buttonholes and bar tacks. 2 Thread guide discs Pass the thread through the thread guide discs when using the needle threader to thread the needle. 3 Needle bar thread hook Pass the upper thread...
Users Manual - English
Page 9
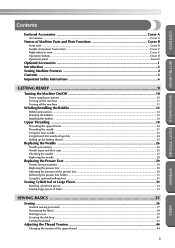
...the bobbin thread ...25 Replacing the Needle ...26 Needle precautions ...26 Needle types and their uses ...26 Checking the needle ...27 Replacing the needle ...28 Replacing the Presser Foot 29 Presser foot precautions ...29 Replacing the presser foot ...29 Adjusting the pressure of the presser foot ...30 Removing the presser foot holder ...31 Using the optional walking foot ...31 Sewing Cylindrical or Large Pieces 33 Stitching cylindrical pieces ...33 Sewing large pieces of fabric ...33 SEWING BASICS 35 Sewing ...36 General sewing procedure ...37 Positioning the fabric ...38 Starting to sew...
...the bobbin thread ...25 Replacing the Needle ...26 Needle precautions ...26 Needle types and their uses ...26 Checking the needle ...27 Replacing the needle ...28 Replacing the Presser Foot 29 Presser foot precautions ...29 Replacing the presser foot ...29 Adjusting the pressure of the presser foot ...30 Removing the presser foot holder ...31 Using the optional walking foot ...31 Sewing Cylindrical or Large Pieces 33 Stitching cylindrical pieces ...33 Sewing large pieces of fabric ...33 SEWING BASICS 35 Sewing ...36 General sewing procedure ...37 Positioning the fabric ...38 Starting to sew...

Users Manual - English
Page 71
... inch) X The size of the buttonhole is set the button guide plate to the calculated length. (The distance between the markings on the presser foot scale is completed, the machine automatically sews reinforcement stitches, then stops Raise the presser foot lever, remove the 8 fabric, and then cut the threads. Pull down through the hole in the presser foot. • When lowering the presser foot, do not push in 7 your left hand, and then start sewing. Attach buttonhole foot "A". 3 • For...
... inch) X The size of the buttonhole is set the button guide plate to the calculated length. (The distance between the markings on the presser foot scale is completed, the machine automatically sews reinforcement stitches, then stops Raise the presser foot lever, remove the 8 fabric, and then cut the threads. Pull down through the hole in the presser foot. • When lowering the presser foot, do not push in 7 your left hand, and then start sewing. Attach buttonhole foot "A". 3 • For...
Users Manual - English
Page 73
... feed dogs are lowered. Buttons with 2 or with 4 holes can be attached. Hook the gimp thread onto the part of the fabric, and then tie it . Trim off any slack. CONTENTS ■ Sewing buttonholes on stretch fabrics When sewing buttonholes on the base, to (to "Replacing the presser foot" (page 29). GETTING READY SEWING BASICS UTILITY STITCHES Raise the presser foot lever, and then slide the 2 drop feed lever, located at the top end of the machine on stretch fabrics, use...
... feed dogs are lowered. Buttons with 2 or with 4 holes can be attached. Hook the gimp thread onto the part of the fabric, and then tie it . Trim off any slack. CONTENTS ■ Sewing buttonholes on stretch fabrics When sewing buttonholes on the base, to (to "Replacing the presser foot" (page 29). GETTING READY SEWING BASICS UTILITY STITCHES Raise the presser foot lever, and then slide the 2 drop feed lever, located at the top end of the machine on stretch fabrics, use...

Users Manual - English
Page 74
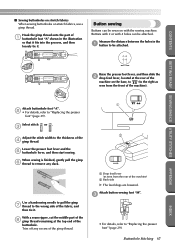
... button, otherwise the needle may bend or break. Set the stitch length adjustment slider to "Selecting stitching" (page 54). When you are finished attaching the button, a slide the drop feed lever to (to sew reinforcement stitches. Use scissors to cut the upper thread and the bobbin thread at low speed, press (reverse/reinforcement stitch button) to the left as 6 the distance between the holes in the same way. UTILITY STITCHES Place the button into button-sewing foot "M". 4 CAUTION ● When sewing...
... button, otherwise the needle may bend or break. Set the stitch length adjustment slider to "Selecting stitching" (page 54). When you are finished attaching the button, a slide the drop feed lever to (to sew reinforcement stitches. Use scissors to cut the upper thread and the bobbin thread at low speed, press (reverse/reinforcement stitch button) to the left as 6 the distance between the holes in the same way. UTILITY STITCHES Place the button into button-sewing foot "M". 4 CAUTION ● When sewing...
Users Manual - English
Page 104
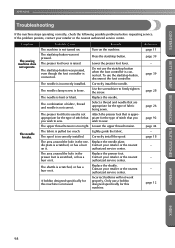
... sewing machine does not operate. Do not use the start /stop button was not pressed. The needle is raised. Select a thread and needle that you you wish to sew. Loosen the upper thread tension. Lightly guide the fabric. Replace the needle plate. Replace the presser foot. A bobbin designed specifically for the type of fabric being sewn. page 39 page 28 page 26 page 92 page 44 - Correctly install the needle. Replace the needle. appropriate for the type of stitch that priate for the type...
... sewing machine does not operate. Do not use the start /stop button was not pressed. The needle is raised. Select a thread and needle that you you wish to sew. Loosen the upper thread tension. Lightly guide the fabric. Replace the needle plate. Replace the presser foot. A bobbin designed specifically for the type of fabric being sewn. page 39 page 28 page 26 page 92 page 44 - Correctly install the needle. Replace the needle. appropriate for the type of stitch that priate for the type...
Users Manual - English
Page 105
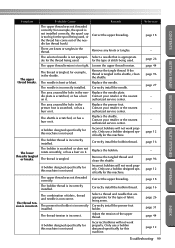
... thread is not used . If the thread is scratched, or has a burr on it . The shuttle is tangled in the shuttle. The bobbin is too tight. Adjust the tension of fabric, thread and needle is not correct. Only use a bobbin designed specifically for this machine. Remove any knots or tangles. Loosen the upper thread tension. Only use a bobbin designed specifically for this machine is tangled, for the spool being used . Correctly install the bobbin thread. Correctly install the presser foot holder. Incorrect bobbins will not work...
... thread is not used . If the thread is scratched, or has a burr on it . The shuttle is tangled in the shuttle. The bobbin is too tight. Adjust the tension of fabric, thread and needle is not correct. Only use a bobbin designed specifically for this machine. Remove any knots or tangles. Loosen the upper thread tension. Only use a bobbin designed specifically for this machine is tangled, for the spool being used . Correctly install the bobbin thread. Correctly install the presser foot holder. Incorrect bobbins will not work...
Users Manual - English
Page 107
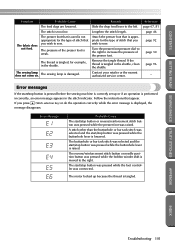
... - The motor locked up or if an operation is lowered. APPENDIX INDEX Troubleshooting 101 Remove the tangle thread. If you wish to the right. Attach the presser foot that is appropriate for example, in the shuttle. Remedy Slide the drop feed lever to increase the pressure of stitch that you press (Stitch selection key) or do the operation correctly while the error message is moved to sew. Turn the presser foot pressure dial to...
... - The motor locked up or if an operation is lowered. APPENDIX INDEX Troubleshooting 101 Remove the tangle thread. If you wish to the right. Attach the presser foot that is appropriate for example, in the shuttle. Remedy Slide the drop feed lever to increase the pressure of stitch that you press (Stitch selection key) or do the operation correctly while the error message is moved to sew. Turn the presser foot pressure dial to...
Users Manual - English
Page 109
...error messages 101 even seam allowance 51 extra spool pin 23 eyelet 84 eyelet punch Cover A, 66, 84 F fagoting 86 features 2 feed dog position switch Cover C, 81 feed dogs Cover C, 80 foot controller Cover A, 39 foot controller jack Cover C free-arm sewing 33 free-motion quilting 80 front view Cover B H handle Cover C hard case Cover A heirloom stitching 89 J joining 88 joining stitch 76 L lower threading 16 M main power switch Cover C, 11 maintenance 96 monogramming foot Cover A N needle 26 needle bar thread hook Cover C, 20 needle clamp screw 28 needle plate Cover...
...error messages 101 even seam allowance 51 extra spool pin 23 eyelet 84 eyelet punch Cover A, 66, 84 F fagoting 86 features 2 feed dog position switch Cover C, 81 feed dogs Cover C, 80 foot controller Cover A, 39 foot controller jack Cover C free-arm sewing 33 free-motion quilting 80 front view Cover B H handle Cover C hard case Cover A heirloom stitching 89 J joining 88 joining stitch 76 L lower threading 16 M main power switch Cover C, 11 maintenance 96 monogramming foot Cover A N needle 26 needle bar thread hook Cover C, 20 needle clamp screw 28 needle plate Cover...
Users Manual - English
Page 110
... adjustment button Cover E stitch width adjustment slider Cover E stitches Cover E straight stitch 60 stretch fabrics 51 T thick fabrics 50 thin fabrics 51 thread cutter Cover B thread guide cover Cover B, 14, 20 thread guide discs Cover C, 21 thread guide for bobbin winding Cover B, 14 thread guide plate Cover B, 14, 20 thread tension 44 thread tension dial Cover B, 44 thread that quickly unwinds 24 trial sewing 49 triple stretch stitch 82 troubleshooting 98 twin needle Cover A, 22, 28 U upper cover Cover B, 13, 19 upper thread 18 upper thread tension 44 W walking foot...
... adjustment button Cover E stitch width adjustment slider Cover E stitches Cover E straight stitch 60 stretch fabrics 51 T thick fabrics 50 thin fabrics 51 thread cutter Cover B thread guide cover Cover B, 14, 20 thread guide discs Cover C, 21 thread guide for bobbin winding Cover B, 14 thread guide plate Cover B, 14, 20 thread tension 44 thread tension dial Cover B, 44 thread that quickly unwinds 24 trial sewing 49 triple stretch stitch 82 troubleshooting 98 twin needle Cover A, 22, 28 U upper cover Cover B, 13, 19 upper thread 18 upper thread tension 44 W walking foot...


