
Accessory Catalog
Page 4
... position can be adjusted exactly on the edge of zipper/piping, avoiding the non-flat parts of the presser foot and slide the presser foot so that the needle fits on the opening on either left ). 2. Brother General Sewing Accessories 05 Sew as you like. Position the presser foot over the long...
... position can be adjusted exactly on the edge of zipper/piping, avoiding the non-flat parts of the presser foot and slide the presser foot so that the needle fits on the opening on either left ). 2. Brother General Sewing Accessories 05 Sew as you like. Position the presser foot over the long...

Accessory Catalog
Page 6
...of the fabric behind the needle and lower the presser foot. 7. Lower the presser foot so that the foot guide is rolling around the curled part of the foot. 5. Hold the fabric from the back and front and roll it into the fabric approximately 1/8" from the edge and sew 2-3...Foot Creates shell-looking edges on lightweight fabrics. 1. Lower the needle into the curled part of the foot. 7. Slowly sew 2-3 stitches, making sure the fabric is Project Book (See page 53 for details.) www.brother.com Hold the fabric from fraying. 1. Non Stick Foot Designed for details.) Narrow ...
...of the fabric behind the needle and lower the presser foot. 7. Lower the presser foot so that the foot guide is rolling around the curled part of the foot. 5. Hold the fabric from the back and front and roll it into the fabric approximately 1/8" from the edge and sew 2-3...Foot Creates shell-looking edges on lightweight fabrics. 1. Lower the needle into the curled part of the foot. 7. Slowly sew 2-3 stitches, making sure the fabric is Project Book (See page 53 for details.) www.brother.com Hold the fabric from fraying. 1. Non Stick Foot Designed for details.) Narrow ...
Users Manual - English
Page 2
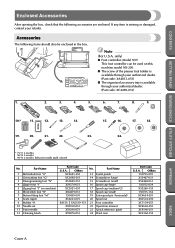
...) 6 Blind stitch foot "R" 7 Button fitting foot "M" 8 Seam ripper 9 Bobbin (4) 10 Needle set 11 Twin needle 12 Cleaning brush Part Code U.S.A. Part Name 13 Eyelet punch 14 Screwdriver (large) 15 Screwdriver (small) 16 Spool cap (large) 17 Spool cap (medium)(2) 18 Spool cap (...051 130489-001 X54243-001 SA156 XA5539-151 X58358-051 X59296-051 X59476-051 No. Part Name 1 Buttonhole foot "A" 2 Overcasting foot "G" 3 Monogramming foot "N" 4 Zipper foot "I" 5 Zigzag foot "J" (on this machine model NX-200. ● The screw of the presser foot holder is available through your retailer....
...) 6 Blind stitch foot "R" 7 Button fitting foot "M" 8 Seam ripper 9 Bobbin (4) 10 Needle set 11 Twin needle 12 Cleaning brush Part Code U.S.A. Part Name 13 Eyelet punch 14 Screwdriver (large) 15 Screwdriver (small) 16 Spool cap (large) 17 Spool cap (medium)(2) 18 Spool cap (...051 130489-001 X54243-001 SA156 XA5539-151 X58358-051 X59296-051 X59476-051 No. Part Name 1 Buttonhole foot "A" 2 Overcasting foot "G" 3 Monogramming foot "N" 4 Zipper foot "I" 5 Zigzag foot "J" (on this machine model NX-200. ● The screw of the presser foot holder is available through your retailer....
Users Manual - English
Page 3
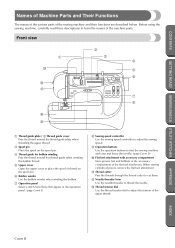
... cover to place the spool of the flat bed attachment. CONTENTS GETTING READY SEWING BASICS UTILITY STITCHES Names of Machine Parts and Their Functions The names of the various parts of the machine parts. Before using the sewing machine, carefully read these descriptions to learn the names of the sewing machine and their...
... cover to place the spool of the flat bed attachment. CONTENTS GETTING READY SEWING BASICS UTILITY STITCHES Names of Machine Parts and Their Functions The names of the various parts of the machine parts. Before using the sewing machine, carefully read these descriptions to learn the names of the sewing machine and their...
Users Manual - English
Page 4
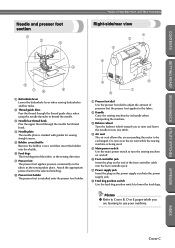
... stitch. 4 Air vent The air vent allows the air surrounding the motor to be exchanged. CONTENTS GETTING READY SEWING BASICS UTILITY STITCHES Names of Machine Parts and Their Functions Needle and presser foot section 1 2 3 Right-side/rear view 1 2 3 4 4 8 76 5 1 Buttonhole lever Lower the buttonhole lever when sewing buttonholes and bar tacks...
... stitch. 4 Air vent The air vent allows the air surrounding the motor to be exchanged. CONTENTS GETTING READY SEWING BASICS UTILITY STITCHES Names of Machine Parts and Their Functions Needle and presser foot section 1 2 3 Right-side/rear view 1 2 3 4 4 8 76 5 1 Buttonhole lever Lower the buttonhole lever when sewing buttonholes and bar tacks...
Users Manual - English
Page 7
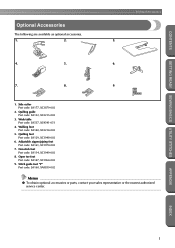
... Accessories Optional Accessories The following are available as optional accessories. 1. 2. 3. 4. 5. 6. 7. 8. 9. 1. Quilting guide Part code: SA132, XC2215-002 3. Walking foot Part code: SA140, XC2214-002 5. Non stick foot Part code: SA114, XC1949-002 8. Open toe foot Part code: SA147, XC1964-002 9. Stitch guide foot "P" Part code: SA160, XA8839-002 Memo ● To obtain optional accessories or...
... Accessories Optional Accessories The following are available as optional accessories. 1. 2. 3. 4. 5. 6. 7. 8. 9. 1. Quilting guide Part code: SA132, XC2215-002 3. Walking foot Part code: SA140, XC2214-002 5. Non stick foot Part code: SA114, XC1949-002 8. Open toe foot Part code: SA147, XC1964-002 9. Stitch guide foot "P" Part code: SA160, XA8839-002 Memo ● To obtain optional accessories or...
Users Manual - English
Page 9
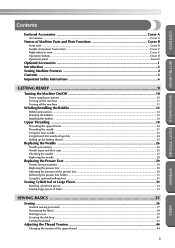
CONTENTS GETTING READY SEWING BASICS UTILITY STITCHES Contents Enclosed Accessories Cover A Accessories ...Cover A Names of Machine Parts and Their Functions Cover B Front view ...Cover B Needle and presser foot section ...Cover C Right-side/rear view ...Cover C Operation buttons ...Cover D Operation panel ...Cover E Optional ...
CONTENTS GETTING READY SEWING BASICS UTILITY STITCHES Contents Enclosed Accessories Cover A Accessories ...Cover A Names of Machine Parts and Their Functions Cover B Front view ...Cover B Needle and presser foot section ...Cover C Right-side/rear view ...Cover C Operation buttons ...Cover D Operation panel ...Cover E Optional ...
Users Manual - English
Page 12
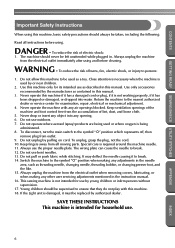
... authorized dealer or service center for household use the proper needle plate. DANGER - The machine should never be taken, including the following: Read all moving parts. Keep ventilation openings of burns, fire, electric shock, or injury to the symbol "{" position which represents off, then remove plug from outlet. 9. Special care is...
... authorized dealer or service center for household use the proper needle plate. DANGER - The machine should never be taken, including the following: Read all moving parts. Keep ventilation openings of burns, fire, electric shock, or injury to the symbol "{" position which represents off, then remove plug from outlet. 9. Special care is...
Users Manual - English
Page 14
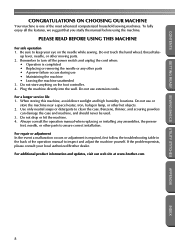
... or removing the needle or any assemblies, the presser feet, needle, or other moving parts. 2. For a longer service life 1. Use only neutral soaps or detergents to keep your local authorized Brother dealer. For repair or adjustment In the event a malfunction occurs or adjustment is one ...study the manual before using the machine. PLEASE READ BEFORE USING THIS MACHINE For safe operation 1. up lever, needle, or other parts to inspect and adjust the machine yourself. CONTENTS GETTING READY SEWING BASICS UTILITY STITCHES CONGRATULATIONS ON CHOOSING OUR MACHINE Your machine is required...
... or removing the needle or any assemblies, the presser feet, needle, or other moving parts. 2. For a longer service life 1. Use only neutral soaps or detergents to keep your local authorized Brother dealer. For repair or adjustment In the event a malfunction occurs or adjustment is one ...study the manual before using the machine. PLEASE READ BEFORE USING THIS MACHINE For safe operation 1. up lever, needle, or other parts to inspect and adjust the machine yourself. CONTENTS GETTING READY SEWING BASICS UTILITY STITCHES CONGRATULATIONS ON CHOOSING OUR MACHINE Your machine is required...

Users Manual - English
Page 18
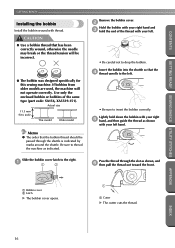
CAUTION ● Only use the bobbin (part code: SA156, XA5539-151) designed specifically for winding the bobbin is indicated by a broken line on the sewing machine. Use only the enclosed bobbin or ... inch) This model Older model Winding the bobbin Wind the thread around the bobbin to thread the machine as indicated. Use of the same type (part code: SA156, XA5539-151). GETTING READY SEWING BASICS UTILITY STITCHES GETTING READY CONTENTS Winding/Installing the Bobbin This section describes how to observe the following...
CAUTION ● Only use the bobbin (part code: SA156, XA5539-151) designed specifically for winding the bobbin is indicated by a broken line on the sewing machine. Use only the enclosed bobbin or ... inch) This model Older model Winding the bobbin Wind the thread around the bobbin to thread the machine as indicated. Use of the same type (part code: SA156, XA5539-151). GETTING READY SEWING BASICS UTILITY STITCHES GETTING READY CONTENTS Winding/Installing the Bobbin This section describes how to observe the following...
Users Manual - English
Page 22
... enclosed bobbin or bobbins of the thread with your left . • Be sure to drop the bobbin. Lightly hold the end of the same type (part code: SA156, XA5539-151). Be sure to thread the machine as shown with your left. • Be careful not to insert the bobbin correctly. Slide...
... enclosed bobbin or bobbins of the thread with your left . • Be sure to drop the bobbin. Lightly hold the end of the same type (part code: SA156, XA5539-151). Be sure to thread the machine as shown with your left. • Be careful not to insert the bobbin correctly. Slide...
Users Manual - English
Page 28
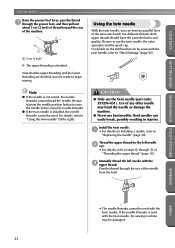
... the needle is used with the twin needle, the sewing machine may bend the needle or damage the machine. ● Never use the twin needle (part code: X59296-051). Manually thread the left needle 2 eye. • For details, refer to raise the needle before using the needle threader. ● If the...
... the needle is used with the twin needle, the sewing machine may bend the needle or damage the machine. ● Never use the twin needle (part code: X59296-051). Manually thread the left needle 2 eye. • For details, refer to raise the needle before using the needle threader. ● If the...
Users Manual - English
Page 34
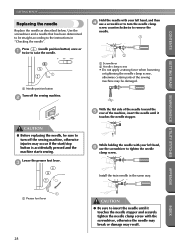
... turn off the sewing machine. 2 1 Screwdriver 2 Needle clamp screw • Do not apply a strong force when loosening or tightening the needle clamp screw, otherwise certain parts of the machine, insert the needle until it touches the needle stopper and securely tighten the needle clamp screw with your left hand, 6 use a screwdriver...
... turn off the sewing machine. 2 1 Screwdriver 2 Needle clamp screw • Do not apply a strong force when loosening or tightening the needle clamp screw, otherwise certain parts of the machine, insert the needle until it touches the needle stopper and securely tighten the needle clamp screw with your left hand, 6 use a screwdriver...
Users Manual - English
Page 39
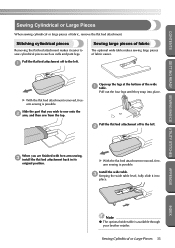
Stitching cylindrical pieces Removing the flat bed attachment makes it into place. Slide the part that you are finished with free-arm sewing, 3 install the flat bed attachment back in its original position. X With the flat bed attachment removed, freearm... sewing is possible. X With the flat bed attachment removed, freearm sewing is possible. APPENDIX INDEX Note ● The optional wide table is available through your brother retailer. Pull the flat bed attachment off to the left . 1 Sewing large pieces of fabric The optional wide table makes sewing large pieces of fabric...
Stitching cylindrical pieces Removing the flat bed attachment makes it into place. Slide the part that you are finished with free-arm sewing, 3 install the flat bed attachment back in its original position. X With the flat bed attachment removed, freearm... sewing is possible. X With the flat bed attachment removed, freearm sewing is possible. APPENDIX INDEX Note ● The optional wide table is available through your brother retailer. Pull the flat bed attachment off to the left . 1 Sewing large pieces of fabric The optional wide table makes sewing large pieces of fabric...
Users Manual - English
Page 42
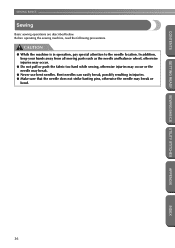
... needle does not strike basting pins, otherwise the needle may break. ● Never use bent needles. In addition, keep your hands away from all moving parts such as the needle and balance wheel, otherwise injuries may occur. ● Do not pull or push the fabric too hard while sewing, otherwise injuries...
... needle does not strike basting pins, otherwise the needle may break. ● Never use bent needles. In addition, keep your hands away from all moving parts such as the needle and balance wheel, otherwise injuries may occur. ● Do not pull or push the fabric too hard while sewing, otherwise injuries...

Users Manual - English
Page 70
... fabric Pull out the button guide plate of the button). Buttonholes are indicated below . 1 1 GETTING READY SEWING BASICS UTILITY STITCHES 1 1 Reinforcement stitching The names of parts of buttonhole foot "A", which is about 28 mm (1-1/8 inch) (diameter + thickness of buttonhole 2 foot "A", and then insert the button that will be put through the...
... fabric Pull out the button guide plate of the button). Buttonholes are indicated below . 1 1 GETTING READY SEWING BASICS UTILITY STITCHES 1 1 Reinforcement stitching The names of parts of buttonhole foot "A", which is about 28 mm (1-1/8 inch) (diameter + thickness of buttonhole 2 foot "A", and then insert the button that will be put through the...
Users Manual - English
Page 73
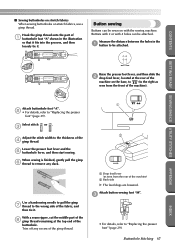
...Buttons can be attached. Select stitch or . 3 Adjust the stitch width to "Replacing the presser foot" (page 29). With a seam ripper, cut the middle part of the 8 gimp thread remaining at the rear of the machine on the base, to (to the wrong side of the 4 gimp thread. Buttonhole Stitching... at the top end of 1 buttonhole foot "A" shown in the 1 button to "Replacing the presser foot" (page 29). Hook the gimp thread onto the part of the buttonhole. Buttons with 2 or with the sewing machine. Measure the distance between the holes in the illustration so that it fits into the...
...Buttons can be attached. Select stitch or . 3 Adjust the stitch width to "Replacing the presser foot" (page 29). With a seam ripper, cut the middle part of the 8 gimp thread remaining at the rear of the machine on the base, to (to the wrong side of the 4 gimp thread. Buttonhole Stitching... at the top end of 1 buttonhole foot "A" shown in the 1 button to "Replacing the presser foot" (page 29). Hook the gimp thread onto the part of the buttonhole. Buttons with 2 or with the sewing machine. Measure the distance between the holes in the illustration so that it fits into the...
Users Manual - English
Page 103
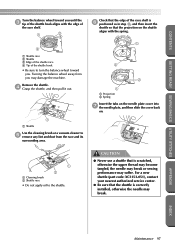
... race shelf is 6 positioned as in step 3, and then insert the shuttle so that is correctly installed, otherwise the needle may suffer. For a new shuttle (part code: XC3153-051), contact your nearest authorized service center. ● Be sure that the shuttle is scratched, otherwise the upper thread may become tangled, the...
... race shelf is 6 positioned as in step 3, and then insert the shuttle so that is correctly installed, otherwise the needle may suffer. For a new shuttle (part code: XC3153-051), contact your nearest authorized service center. ● Be sure that the shuttle is scratched, otherwise the upper thread may become tangled, the...


