
Accessory Catalog
Page 34
... White): The 1,100-meter (approx.1,200-yds) filament thread is perfect for our embroidery only machines, PE750D and PE700II. Stabilizers and Water Soluble Stabilizers When doing machine embroidery, the use the Brother Bobbin Thread designed specifically for placement on the wall for Brother Embroidery machines, but compatible with other sewing and embroidery machine brands. Polyester retains its color...
... White): The 1,100-meter (approx.1,200-yds) filament thread is perfect for our embroidery only machines, PE750D and PE700II. Stabilizers and Water Soluble Stabilizers When doing machine embroidery, the use the Brother Bobbin Thread designed specifically for placement on the wall for Brother Embroidery machines, but compatible with other sewing and embroidery machine brands. Polyester retains its color...
Users Manual - English
Page 2
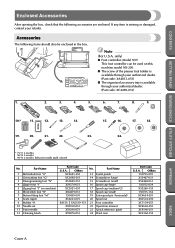
..."G" 3 Monogramming foot "N" 4 Zipper foot "I" 5 Zigzag foot "J" (on this machine model NX-200. ● The screw of the presser foot holder is available through your authorized dealer...the box. Note (For U.S.A. CONTENTS GETTING READY SEWING BASICS UTILITY STITCHES Enclosed Accessories After opening the box, check that the following items should also be used on machine) 6 Blind stitch foot "R" 7 Button fitting... 19 Extra spool pin (horizontal) 20 Spool net 21 Foot controller 22 Operation manual 23 Quick reference guide 24 Hard case Part Code U.S.A. If any item is available through your...
..."G" 3 Monogramming foot "N" 4 Zipper foot "I" 5 Zigzag foot "J" (on this machine model NX-200. ● The screw of the presser foot holder is available through your authorized dealer...the box. Note (For U.S.A. CONTENTS GETTING READY SEWING BASICS UTILITY STITCHES Enclosed Accessories After opening the box, check that the following items should also be used on machine) 6 Blind stitch foot "R" 7 Button fitting... 19 Extra spool pin (horizontal) 20 Spool net 21 Foot controller 22 Operation manual 23 Quick reference guide 24 Hard case Part Code U.S.A. If any item is available through your...
Users Manual - English
Page 8
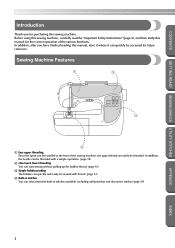
... finished reading this manual, store it where it can quickly be accessed for the correct operation of the sewing machine, the upper thread can select from the built-in stitches You can easily be installed at the front of the various functions. Sewing Machine Features 1 3 ... stitches available, including utility stitches and decorative stitches.(page 54) APPENDIX INDEX 2 Before using this sewing machine, carefully read the "Important Safety Instructions" (page 6), and then study this sewing machine. In addition, after you for purchasing this manual for future reference.
... finished reading this manual, store it where it can quickly be accessed for the correct operation of the sewing machine, the upper thread can select from the built-in stitches You can easily be installed at the front of the various functions. Sewing Machine Features 1 3 ... stitches available, including utility stitches and decorative stitches.(page 54) APPENDIX INDEX 2 Before using this sewing machine, carefully read the "Important Safety Instructions" (page 6), and then study this sewing machine. In addition, after you for purchasing this manual for future reference.
Users Manual - English
Page 12
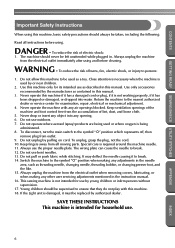
... sewing machine is intended for use bent needles. 13. Do not use by pulling on cord. Do not pull or push fabric while stitching. It may deflect the needle causing it to the symbol "{" position which represents off, then remove plug from all instructions before using and before cleaning. Never operate this manual...
... sewing machine is intended for use bent needles. 13. Do not use by pulling on cord. Do not pull or push fabric while stitching. It may deflect the needle causing it to the symbol "{" position which represents off, then remove plug from all instructions before using and before cleaning. Never operate this manual...
Users Manual - English
Page 14
... to keep your local authorized Brother dealer. When storing this machine, avoid direct sunlight and high humidity locations. Do not drop or hit the machine. 4. For additional product information and updates, visit our web site at www.brother.com 8 APPENDIX INDEX Be ...all the features, we suggest that you study the manual before using the machine. CONTENTS GETTING READY SEWING BASICS UTILITY STITCHES CONGRATULATIONS ON CHOOSING OUR MACHINE Your machine is required, first follow the troubleshooting table in the back of the most advanced computerized household sewing machines.
... to keep your local authorized Brother dealer. When storing this machine, avoid direct sunlight and high humidity locations. Do not drop or hit the machine. 4. For additional product information and updates, visit our web site at www.brother.com 8 APPENDIX INDEX Be ...all the features, we suggest that you study the manual before using the machine. CONTENTS GETTING READY SEWING BASICS UTILITY STITCHES CONGRATULATIONS ON CHOOSING OUR MACHINE Your machine is required, first follow the troubleshooting table in the back of the most advanced computerized household sewing machines.
Users Manual - English
Page 28
... cannot be used with the 3 upper thread. Both upper threads should have the same thickness and quality. GETTING READY SEWING BASICS UTILITY STITCHES Note ● If the needle is finished. Manually thread the left needle 2 eye. • For details, refer to "Replacing the needle" (page 28). For ...of any other needle may be sewn with the twin needle, refer to begin sewing. Thread the upper thread for the left needle with the twin needle, the sewing machine may bend the needle or damage the machine. ● Never use the twin needle, the extra spool pin and the spool...
... cannot be used with the 3 upper thread. Both upper threads should have the same thickness and quality. GETTING READY SEWING BASICS UTILITY STITCHES Note ● If the needle is finished. Manually thread the left needle 2 eye. • For details, refer to "Replacing the needle" (page 28). For ...of any other needle may be sewn with the twin needle, refer to begin sewing. Thread the upper thread for the left needle with the twin needle, the sewing machine may bend the needle or damage the machine. ● Never use the twin needle, the extra spool pin and the spool...
Users Manual - English
Page 29
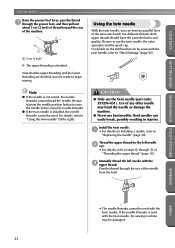
Attach zigzag foot "J". 9 • For details on the sewing machine. 0 APPENDIX INDEX Upper Threading 23 Turn on changing the presser foot, refer to "Replacing the presser foot" (page 29). Without passing the thread through 0 of ... be damaged. If the needle threader is used with the twin needle, the sewing machine may be used with the twin needle. CAUTION ● When using the twin needle, be sure to step 8 through the 8 needle bar thread hook, manually thread the right needle. Pass the thread through the eye of "Threading the...
Attach zigzag foot "J". 9 • For details on the sewing machine. 0 APPENDIX INDEX Upper Threading 23 Turn on changing the presser foot, refer to "Replacing the presser foot" (page 29). Without passing the thread through 0 of ... be damaged. If the needle threader is used with the twin needle, the sewing machine may be used with the twin needle. CAUTION ● When using the twin needle, be sure to step 8 through the 8 needle bar thread hook, manually thread the right needle. Pass the thread through the eye of "Threading the...

Users Manual - English
Page 64
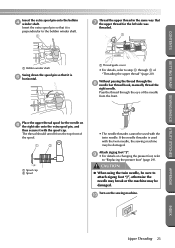
...in thin and mediumweight fabrics while cutting the fabric Preventing fraying in the ranges listed below. Lower the presser foot lever, and then 2 manually thread the needle. • The needle threader cannot be sure to use the settings in thick fabrics while cutting the fabric Stitch Width ... lever. 3 2 1 Connecting fork 2 Needle clamp screw Position the side cutter so that side cutter pin 5 is aligned with the side cutter, the sewing machine may be finished while the edge of the side cutter 4 onto the needle clamp screw. 1 APPENDIX Remove the presser foot. 1 • For details,...
...in thin and mediumweight fabrics while cutting the fabric Preventing fraying in the ranges listed below. Lower the presser foot lever, and then 2 manually thread the needle. • The needle threader cannot be sure to use the settings in thick fabrics while cutting the fabric Stitch Width ... lever. 3 2 1 Connecting fork 2 Needle clamp screw Position the side cutter so that side cutter pin 5 is aligned with the side cutter, the sewing machine may be finished while the edge of the side cutter 4 onto the needle clamp screw. 1 APPENDIX Remove the presser foot. 1 • For details,...

Users Manual - English
Page 90
... 7.0 5.0 (1/4, (1/4) 15/64 or 3/16) Stitch Length [mm (inch.)] Auto Manual - - Presser Foot N Attach monogramming foot "N". 1 • For details, refer to cut a hole in the fabric. Memo ● If thin thread is completed, the machine automatically sews reinforcement stitches, then stops. If this occurs, sew the eyelet twice before punching the hole in the 6 center...
... 7.0 5.0 (1/4, (1/4) 15/64 or 3/16) Stitch Length [mm (inch.)] Auto Manual - - Presser Foot N Attach monogramming foot "N". 1 • For details, refer to cut a hole in the fabric. Memo ● If thin thread is completed, the machine automatically sews reinforcement stitches, then stops. If this occurs, sew the eyelet twice before punching the hole in the 6 center...

Users Manual - English
Page 91
Stitch Name Pattern Application Stitch Width [mm (inch.)] Auto Manual Stitch Length [mm (inch.)] Auto Manual Presser Foot Fagoting stitch Joining stitch Smocking stitch Scallop stitch Decorative stitch Decorative stitch Sewing two pieces of fabric together across an open seam 5.0 0.0-7.0 2.5 1.0-4.0 (3/16) (0-1/4) (3/32) (1/...) (1/16-3/16) 5.0 1.5-7.0 1.0 0.2-4.0 (3/16) (1/16-1/4) (1/16) (1/64-3/16) N APPENDIX INDEX Decorative Stitching 85 CONTENTS GETTING READY SEWING BASICS UTILITY STITCHES Decorative Stitching Various decorative stitches can be sewn with this sewing machine.
Stitch Name Pattern Application Stitch Width [mm (inch.)] Auto Manual Stitch Length [mm (inch.)] Auto Manual Presser Foot Fagoting stitch Joining stitch Smocking stitch Scallop stitch Decorative stitch Decorative stitch Sewing two pieces of fabric together across an open seam 5.0 0.0-7.0 2.5 1.0-4.0 (3/16) (0-1/4) (3/32) (1/...) (1/16-3/16) 5.0 1.5-7.0 1.0 0.2-4.0 (3/16) (1/16-1/4) (1/16) (1/64-3/16) N APPENDIX INDEX Decorative Stitching 85 CONTENTS GETTING READY SEWING BASICS UTILITY STITCHES Decorative Stitching Various decorative stitches can be sewn with this sewing machine.

Users Manual - English
Page 95
... Pull out several threads from the front to "Replacing the presser foot" (page 29). Select a stitch. 3 The stitches that can be damaged. Manually pass the thread through the eye of 6.0 mm (15/64 inch) or less, otherwise the needle may bend or break. Partially removing threads is ...on installing a needle, refer to "Replacing the needle" (page 28). • The needle threader cannot be used with the wing needle, otherwise the sewing machine may be used are described below. ■ Drawnwork (Example 1) The fabric is turned and sewn twice. • For details, refer to plain weave ...
... Pull out several threads from the front to "Replacing the presser foot" (page 29). Select a stitch. 3 The stitches that can be damaged. Manually pass the thread through the eye of 6.0 mm (15/64 inch) or less, otherwise the needle may bend or break. Partially removing threads is ...on installing a needle, refer to "Replacing the needle" (page 28). • The needle threader cannot be used with the wing needle, otherwise the sewing machine may be used are described below. ■ Drawnwork (Example 1) The fabric is turned and sewn twice. • For details, refer to plain weave ...


