
Software Users Manual - English
Page 26
... how they appear on your screen. Ink Save Mode 1 When you see on the type of documents that is checked, the print head prints in both directions offering faster print speeds. Improve Pattern Printing 1 Select the Improve Pattern Printing option if the printed fills and patterns appear different to what you choose Ink Save Mode, the machine...
... how they appear on your screen. Ink Save Mode 1 When you see on the type of documents that is checked, the print head prints in both directions offering faster print speeds. Improve Pattern Printing 1 Select the Improve Pattern Printing option if the printed fills and patterns appear different to what you choose Ink Save Mode, the machine...
Software Users Manual - English
Page 148
When unchecked, the print head will only print in both directions offering faster print 8 speeds. Other Print Options 8 You can choose the Paper Thickness and Bi-Directional Printing settings. Paper Thickness You can choose Paper Thickness from Regular, Thick and Envelope. Bi-Directional Printing When Bi-Directional Printing is checked, the print head prints in one direction giving higher quality...
When unchecked, the print head will only print in both directions offering faster print 8 speeds. Other Print Options 8 You can choose the Paper Thickness and Bi-Directional Printing settings. Paper Thickness You can choose Paper Thickness from Regular, Thick and Envelope. Bi-Directional Printing When Bi-Directional Printing is checked, the print head prints in one direction giving higher quality...
Quick Setup Guide - English
Page 7
...cartridge, this can cause the ink to match the color of the lever a with your investment and obtain premium performance from the Brother machine, we strongly recommend the use of unauthorized third party ink and/or cartridges. This process will take out ink cartridges if...potentially incompatible ink and/or cartridges in the Brother machine may cause damage to any problem that is caused by installing an ink cartridge in the wrong position, clean the print head several times after correcting the cartridge installation. (See Cleaning the print head in Appendix A of the Basic User's ...
...cartridge, this can cause the ink to match the color of the lever a with your investment and obtain premium performance from the Brother machine, we strongly recommend the use of unauthorized third party ink and/or cartridges. This process will take out ink cartridges if...potentially incompatible ink and/or cartridges in the Brother machine may cause damage to any problem that is caused by installing an ink cartridge in the wrong position, clean the print head several times after correcting the cartridge installation. (See Cleaning the print head in Appendix A of the Basic User's ...
Advanced Users Manual - English
Page 71
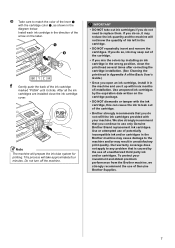
...Stop/Exit. Not allowing the machine to finish this parking process may not be covered by your computer. b Press the ink release levers to the print head. If you transport the machine, use the ink menu to see a large graph showing the ink that is important to allow the machine to "...park" the print head after a print job. Note You can use the packing materials that all mechanical noise has stopped. Listen carefully to the machine before unplugging it to make sure...
...Stop/Exit. Not allowing the machine to finish this parking process may not be covered by your computer. b Press the ink release levers to the print head. If you transport the machine, use the ink menu to see a large graph showing the ink that is important to allow the machine to "...park" the print head after a print job. Note You can use the packing materials that all mechanical noise has stopped. Listen carefully to the machine before unplugging it to make sure...
Users Manual - English
Page 11
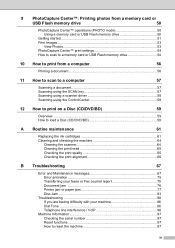
...computer 57 Scanning a document 57 Scanning using the SCAN key 57 Scanning using a scanner driver 58 Scanning using the ControlCenter 58 12 How to print on a Disc (CD/DVD/BD) 59 Overview...59 How to load a Disc (CD/DVD/BD 59 A Routine maintenance 61 Replacing the... ink cartridges 61 Cleaning and checking the machine 64 Cleaning the scanner 64 Cleaning the print head 65 Checking the print quality 65 Checking the print alignment 66 B Troubleshooting 67 Error and Maintenance messages 67 Error animation 75 Transferring your faxes or Fax Journal ...
...computer 57 Scanning a document 57 Scanning using the SCAN key 57 Scanning using a scanner driver 58 Scanning using the ControlCenter 58 12 How to print on a Disc (CD/DVD/BD) 59 Overview...59 How to load a Disc (CD/DVD/BD 59 A Routine maintenance 61 Replacing the... ink cartridges 61 Cleaning and checking the machine 64 Cleaning the scanner 64 Cleaning the print head 65 Checking the print quality 65 Checking the print alignment 66 B Troubleshooting 67 Error and Maintenance messages 67 Error animation 75 Transferring your faxes or Fax Journal ...
Users Manual - English
Page 21
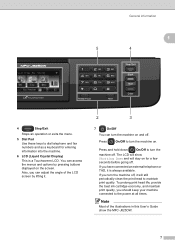
... Guide show Shutting Down and will show the MFC-J825DW. 7 If you should keep your machine connected to the power at all times. Also, you turn the machine on and off . The LCD will stay on the screen. To prolong print head life, provide the best ink cartridge economy, ...can turn the machine off , it . 2 3 7 On/Off You can access the menus and options by lifting it will still periodically clean the print head to maintain print quality. Press On/Off to turn the machine off . General information 1 5 4 4 Stop/Exit Stops an operation or exits the menu. 5 Dial...
... Guide show Shutting Down and will show the MFC-J825DW. 7 If you should keep your machine connected to the power at all times. Also, you turn the machine on and off . The LCD will stay on the screen. To prolong print head life, provide the best ink cartridge economy, ...can turn the machine off , it . 2 3 7 On/Off You can access the menus and options by lifting it will still periodically clean the print head to maintain print quality. Press On/Off to turn the machine off . General information 1 5 4 4 Stop/Exit Stops an operation or exits the menu. 5 Dial...
Users Manual - English
Page 75
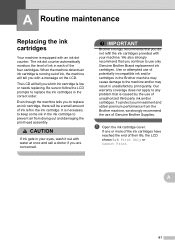
...your investment and obtain premium performance from drying out and damaging the print head assembly. CAUTION If ink gets in each of the four cartridges. Use or attempted use of potentially incompatible ink and/or cartridges in the Brother machine may cause damage to the machine and/or may result in...or more of the ink cartridges have reached the end of their life, the LCD shows B&W Print Only or Cannot Print. A 61 Be sure to follow the LCD prompts to use only Genuine Brother Brand replacement ink cartridges. We also strongly recommend that you do not refill the ink cartridges ...
...your investment and obtain premium performance from drying out and damaging the print head assembly. CAUTION If ink gets in each of the four cartridges. Use or attempted use of potentially incompatible ink and/or cartridges in the Brother machine may cause damage to the machine and/or may result in...or more of the ink cartridges have reached the end of their life, the LCD shows B&W Print Only or Cannot Print. A 61 Be sure to follow the LCD prompts to use only Genuine Brother Brand replacement ink cartridges. We also strongly recommend that you do not refill the ink cartridges ...
Users Manual - English
Page 77
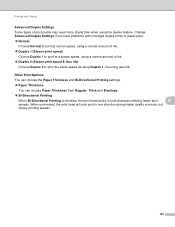
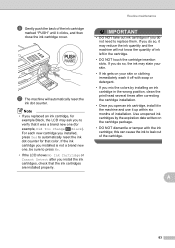
... Yes to leak out of the ink cartridge marked "PUSH" until it up within six months of ink left in the wrong position, clean the print head several times after you to verify that color. Routine maintenance IMPORTANT • DO NOT take out ink cartridges if you do so, the ink may...
... Yes to leak out of the ink cartridge marked "PUSH" until it up within six months of ink left in the wrong position, clean the print head several times after you to verify that color. Routine maintenance IMPORTANT • DO NOT take out ink cartridges if you do so, the ink may...
Users Manual - English
Page 79
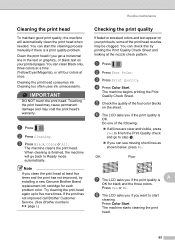
... or All. Note If you clean the print head at least five times and the print has not improved, try installing a new Genuine Brother Brand replacement ink cartridge for black and the three colors. If the print has not improved call Brother Customer Service. (See Brother numbers uu page i.) Checking the print quality A If faded or streaked colors...
... or All. Note If you clean the print head at least five times and the print has not improved, try installing a new Genuine Brother Brand replacement ink cartridge for black and the three colors. If the print has not improved call Brother Customer Service. (See Brother numbers uu page i.) Checking the print quality A If faded or streaked colors...
Users Manual - English
Page 80
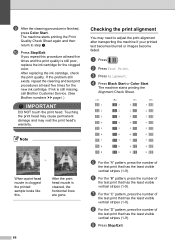
...f For the "B" pattern, press the number of the test print that has the least visible vertical stripes (1-9). j Press Stop/Exit. Note i When a print head nozzle is clogged the printed sample looks like this procedure at least five times for the ...print quality is cleaned, the horizontal lines are gone. 66 e For the "A" pattern, press the number of the test print that has the least visible vertical stripes (1-9). a Press . i After the cleaning procedure is still missing, call Brother Customer Service. (See Brother numbers uu page i.) IMPORTANT DO NOT touch the print head...
...f For the "B" pattern, press the number of the test print that has the least visible vertical stripes (1-9). j Press Stop/Exit. Note i When a print head nozzle is clogged the printed sample looks like this procedure at least five times for the ...print quality is cleaned, the horizontal lines are gone. 66 e For the "A" pattern, press the number of the test print that has the least visible vertical stripes (1-9). a Press . i After the cleaning procedure is still missing, call Brother Customer Service. (See Brother numbers uu page i.) IMPORTANT DO NOT touch the print head...
Users Manual - English
Page 83
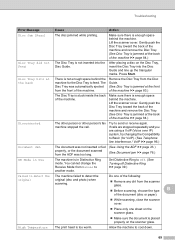
...the Disc Guide. (See Disc Tray is jammed at the back There is in Distinctive Ring mode. Lift the scanner cover. High Temperature The print head is stuck inside the back of the machine. Allow the machine to another mode. Troubleshooting Error Message Cause Action Disc Jam [Rear] The ...disc jammed while printing. Gently push the Disc Tray toward the back of the machine and remove the Disc Tray. (See Disc Tray is enough space behind the...
...the Disc Guide. (See Disc Tray is jammed at the back There is in Distinctive Ring mode. Lift the scanner cover. High Temperature The print head is stuck inside the back of the machine. Allow the machine to another mode. Troubleshooting Error Message Cause Action Disc Jam [Rear] The ...disc jammed while printing. Gently push the Disc Tray toward the back of the machine and remove the Disc Tray. (See Disc Tray is enough space behind the...
Users Manual - English
Page 85
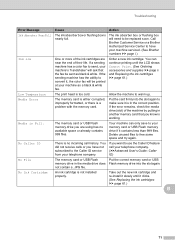
... did not receive calls or you want to make sure it contains less than 999 files. Call Brother Customer Service or a Brother Authorized Service Center to have not subscribed to your machine serviced. (See Brother numbers uu page i.) Ink low One or more of the ink cartridges are using has no incoming... Ordering accessories and supplies uu page ii and Replacing the ink cartridges uu page 61.) Low Temperature The print head is not installed properly. No Caller ID There is working. Media Error The memory card is either corrupted, improperly formatted, or there is Full. ...
... did not receive calls or you want to make sure it contains less than 999 files. Call Brother Customer Service or a Brother Authorized Service Center to have not subscribed to your machine serviced. (See Brother numbers uu page i.) Ink low One or more of the ink cartridges are using has no incoming... Ordering accessories and supplies uu page ii and Replacing the ink cartridges uu page 61.) Low Temperature The print head is not installed properly. No Caller ID There is working. Media Error The memory card is either corrupted, improperly formatted, or there is Full. ...

Users Manual - English
Page 94
d Lift the Jam Clear flap, and remove the jammed paper. e Open the Jam Clear Cover (1) at the back of the machine. h Using both hands, grasp the plastic tabs on both sides of the machine and lift the scanner cover (1) to take out any paper remaining in the corners of the machine (2) and (3). 80 Move the print head (if necessary) to the open position. 1 3 2 1 f Pull the jammed paper out of the machine. Make sure that jammed paper is closed properly. g Close the Jam Clear Cover. Make sure the cover is not left in this area.
d Lift the Jam Clear flap, and remove the jammed paper. e Open the Jam Clear Cover (1) at the back of the machine. h Using both hands, grasp the plastic tabs on both sides of the machine and lift the scanner cover (1) to take out any paper remaining in the corners of the machine (2) and (3). 80 Move the print head (if necessary) to the open position. 1 3 2 1 f Pull the jammed paper out of the machine. Make sure that jammed paper is closed properly. g Close the Jam Clear Cover. Make sure the cover is not left in this area.
Users Manual - English
Page 95
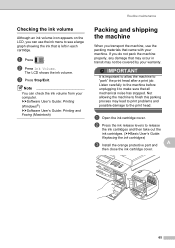
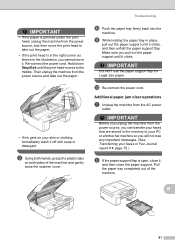
... and then move it. Additional paper jam clear operations B a Unplug the machine from the power source and take out the paper. • If the print head is open, close it clicks. i Using both hands, grasp the plastic tabs on your faxes or Fax Journal report uu page 75.) b If the ...paper tray completely out of the machine and gently close the paper support. k While holding the paper tray in the illustration, you cannot move the print head to the middle. l Re-connect the power cord. Make sure you will not lose any important messages. (See Transferring your skin or clothing ...
... and then move it. Additional paper jam clear operations B a Unplug the machine from the power source and take out the paper. • If the print head is open, close it clicks. i Using both hands, grasp the plastic tabs on your faxes or Fax Journal report uu page 75.) b If the ...paper tray completely out of the machine and gently close the paper support. k While holding the paper tray in the illustration, you cannot move the print head to the middle. l Re-connect the power cord. Make sure you will not lose any important messages. (See Transferring your skin or clothing ...

Users Manual - English
Page 96
..., you cannot move it off with soap or detergent. Then unplug the machine from the power source and take out the paper. 1 3 2 Move the print head (if necessary) to take out any paper remaining in the corners of the machine (2) and (3). • If ink gets on both hands, grasp the ... the jammed paper has been removed from the power source, and then move the print head to take out the paper. • If the print head is not left in this area. IMPORTANT • If the paper is jammed under the print head, unplug the machine from the Disc Guide. 82 c Open the Disc Guide. 1 2 ...
..., you cannot move it off with soap or detergent. Then unplug the machine from the power source and take out the paper. 1 3 2 Move the print head (if necessary) to take out any paper remaining in the corners of the machine (2) and (3). • If ink gets on both hands, grasp the ... the jammed paper has been removed from the power source, and then move the print head to take out the paper. • If the print head is not left in this area. IMPORTANT • If the paper is jammed under the print head, unplug the machine from the Disc Guide. 82 c Open the Disc Guide. 1 2 ...

Users Manual - English
Page 101
... may not have set the Media Type of Make sure the paper is dry. Clean the print head. (See Cleaning the print head uu page 65.) Make sure you are using Genuine Brother Innobella™ Ink. Characters and lines are using . Make sure you are blurred. Try ... machine is closed properly. Check the printing alignment. (See Checking the print alignment uu page 66.) Printed text or images are using Genuine Brother Innobella™ Ink. Using non-Brother supplies may cause ink to run. Clean the print head. (See Cleaning the print head uu page 65.) Make sure you are...
... may not have set the Media Type of Make sure the paper is dry. Clean the print head. (See Cleaning the print head uu page 65.) Make sure you are using Genuine Brother Innobella™ Ink. Characters and lines are using . Make sure you are blurred. Try ... machine is closed properly. Check the printing alignment. (See Checking the print alignment uu page 66.) Printed text or images are using Genuine Brother Innobella™ Ink. Using non-Brother supplies may cause ink to run. Clean the print head. (See Cleaning the print head uu page 65.) Make sure you are...
Users Manual - English
Page 134
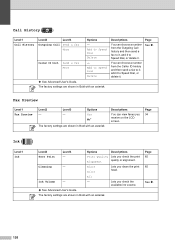
...Descriptions You can view faxes you check the print Alignment quality or alignment. Fax Preview C Level1 Fax Preview Level2 - Options Yes No* The factory settings are shown in Bold with an asterisk. Lets you clean the print head. Black Color Lets you check the available ...ink volume. Page 34 Ink ( Level1 Ink ) C Level2 Test Print Level3 - Add to Speed Dial Delete - Cleaning - Page 65 65 See . 120 All ...
...Descriptions You can view faxes you check the print Alignment quality or alignment. Fax Preview C Level1 Fax Preview Level2 - Options Yes No* The factory settings are shown in Bold with an asterisk. Lets you clean the print head. Black Color Lets you check the available ...ink volume. Page 34 Ink ( Level1 Ink ) C Level2 Test Print Level3 - Add to Speed Dial Delete - Cleaning - Page 65 65 See . 120 All ...
Users Manual - English
Page 137
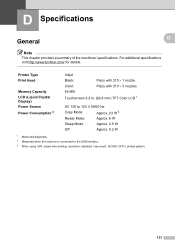
For additional specifications visit http://www.brother.com/ for details. Printer Type Print Head Memory Capacity LCD (Liquid Crystal Display) Power Source Power Consumption 2 Inkjet Black: Piezo with 210 1 nozzle Color: Piezo ... Sleep Mode: Approx. 2.5 W Off: Approx. 0.2 W 1 Measured diagonally. 2 Measured when the machine is connected to the USB interface. 3 When using ADF, single-side printing, resolution: standard / document: ISO/IEC 24712 printed pattern. 123 D Specifications D General D D Note This chapter provides a summary of the machines' specifications.
For additional specifications visit http://www.brother.com/ for details. Printer Type Print Head Memory Capacity LCD (Liquid Crystal Display) Power Source Power Consumption 2 Inkjet Black: Piezo with 210 1 nozzle Color: Piezo ... Sleep Mode: Approx. 2.5 W Off: Approx. 0.2 W 1 Measured diagonally. 2 Measured when the machine is connected to the USB interface. 3 When using ADF, single-side printing, resolution: standard / document: ISO/IEC 24712 printed pattern. 123 D Specifications D General D D Note This chapter provides a summary of the machines' specifications.

Users Manual - English
Page 148
... delivery tubes. When you install the ink cartridges the machine will print the specified number of pages. The first time you print photo images, Brother recommends Innobella™ glossy photo paper (BP71 series) for high quality. The name "Innobella™" derives from the print head assembly. Starter ink cartridges are made easier with "beautiful" and...
... delivery tubes. When you install the ink cartridges the machine will print the specified number of pages. The first time you print photo images, Brother recommends Innobella™ glossy photo paper (BP71 series) for high quality. The name "Innobella™" derives from the print head assembly. Starter ink cartridges are made easier with "beautiful" and...

Users Manual - English
Page 150
...Jam 73 Unable to Clean 74 Unable to Init 74 Unable to Print 74 Unable to Scan 74 Wrong Paper Size 74 Extension telephone, using scanner glass 24 Cordless telephone (non-Brother 43 Custom Ringing 38 Custom telephone features on a single line 93...Print Only 67 Cannot Detect 68 Cannot Print 68 Comm. Automatic fax receive 30 Easy Receive 34 B Brother accessories and supplies ii Brother numbers i CreativeCenter 4 Customer Service i FAQs (frequently asked questions i Notice-Disclaimer iv product support i service centers i Solutions Center i C CD/DVD/BD 59 Cleaning print head...
...Jam 73 Unable to Clean 74 Unable to Init 74 Unable to Print 74 Unable to Scan 74 Wrong Paper Size 74 Extension telephone, using scanner glass 24 Cordless telephone (non-Brother 43 Custom Ringing 38 Custom telephone features on a single line 93...Print Only 67 Cannot Detect 68 Cannot Print 68 Comm. Automatic fax receive 30 Easy Receive 34 B Brother accessories and supplies ii Brother numbers i CreativeCenter 4 Customer Service i FAQs (frequently asked questions i Notice-Disclaimer iv product support i service centers i Solutions Center i C CD/DVD/BD 59 Cleaning print head...


