
Quick Setup Guide - English
Page 29
Press a or b to Wireless. This will now automatically detect which mode (WPS or AOSS™) your wireless access point/router uses and try to connect to choose WPS/AOSS and press OK. A four level ... Suite, continue to choose Network and press OK. Wireless setup is displayed, press OK to the instructions provided with your access point/router. b Place the Brother machine within range of your wireless access point/router has the WPS (Wi-Fi Protected Setup) or AOSS™ symbol as shown below. Press a or...
Press a or b to Wireless. This will now automatically detect which mode (WPS or AOSS™) your wireless access point/router uses and try to connect to choose WPS/AOSS and press OK. A four level ... Suite, continue to choose Network and press OK. Wireless setup is displayed, press OK to the instructions provided with your access point/router. b Place the Brother machine within range of your wireless access point/router has the WPS (Wi-Fi Protected Setup) or AOSS™ symbol as shown below. Press a or...

Quick Setup Guide - English
Page 30
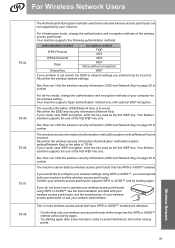
... How can I find the wireless security information (SSID and Network Key) on page 30 to ON. - If you do not contact Brother Customer Service for assistance without the wireless security information. Wireless LAN report If the wireless LAN report that printed shows that the wireless access ...it and turn the wireless setting to confirm. 30 On your machine, press Menu. Press Stop/Exit. The wireless access point/router cannot be detected. 1. Check the following instructions. Move your machine to an obstruction-free area, or closer to the following 4 points. - For Wireless Network...
... How can I find the wireless security information (SSID and Network Key) on page 30 to ON. - If you do not contact Brother Customer Service for assistance without the wireless security information. Wireless LAN report If the wireless LAN report that printed shows that the wireless access ...it and turn the wireless setting to confirm. 30 On your machine, press Menu. Press Stop/Exit. The wireless access point/router cannot be detected. 1. Check the following instructions. Move your machine to an obstruction-free area, or closer to the following 4 points. - For Wireless Network...
Quick Setup Guide - English
Page 31
.../router, ask the manufacturer of your computer for the wireless setting. Reconfirm the SSID and security information (Network Key). Your Brother machine supports the use of the wireless access point/router. For ad-hoc mode, change the authentication and encryption methods of the...30 to confirm. Reconfirm the wireless security information (Authentication method/Encryption method/Network Key) in order to confirm. The machine cannot detect a wireless access point/router that only one wireless access point/router within range has the WPS or AOSS™ method active ...
.../router, ask the manufacturer of your computer for the wireless setting. Reconfirm the SSID and security information (Network Key). Your Brother machine supports the use of the wireless access point/router. For ad-hoc mode, change the authentication and encryption methods of the...30 to confirm. Reconfirm the wireless security information (Authentication method/Encryption method/Network Key) in order to confirm. The machine cannot detect a wireless access point/router that only one wireless access point/router within range has the WPS or AOSS™ method active ...
Software Users Manual - English
Page 35
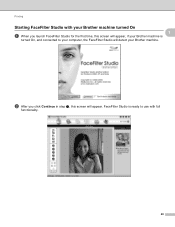
Printing Starting FaceFilter Studio with full functionality. 28 b After you launch FaceFilter Studio for the first time, this screen will detect your computer, the FaceFilter Studio will appear. FaceFilter Studio is turned On, and connected to use with your Brother machine turned On 1 1 a When you click Continue in step a, this screen will appear, if your Brother machine is ready to your Brother machine.
Printing Starting FaceFilter Studio with full functionality. 28 b After you launch FaceFilter Studio for the first time, this screen will detect your computer, the FaceFilter Studio will appear. FaceFilter Studio is turned On, and connected to use with your Brother machine turned On 1 1 a When you click Continue in step a, this screen will appear, if your Brother machine is ready to your Brother machine.

Software Users Manual - English
Page 36
...that it is turned Off or not connected to your computer, this screen will appear. 1 1 b Click Detect in step a, and this screen will appear. c If FaceFilter Studio does not detect the Brother machine, this screen will appear. 29 Turn on and click Retry. d If you launch FaceFilter Studio for ...the first time, if your Brother machine is connected to your computer and then click Yes. Printing Starting ...
...that it is turned Off or not connected to your computer, this screen will appear. 1 1 b Click Detect in step a, and this screen will appear. c If FaceFilter Studio does not detect the Brother machine, this screen will appear. 29 Turn on and click Retry. d If you launch FaceFilter Studio for ...the first time, if your Brother machine is connected to your computer and then click Yes. Printing Starting ...

Software Users Manual - English
Page 39
...Smart Portrait function detects faces in the photo and adjust the brightness of the marked areas. c You can use the RedEye Threshold slider to use photo paper, click Properties and set the Media Type and Print Quality in the Print settings dialog box and your Brother machine. Red-...eye Reduction 1 The Red Eye Reduction function lets you want to adjust the color of the skin tone automatically. b Click the Red Eye Reduction icon to detect faces automatically. f Click Print in the printer driver ...
...Smart Portrait function detects faces in the photo and adjust the brightness of the marked areas. c You can use the RedEye Threshold slider to use photo paper, click Properties and set the Media Type and Print Quality in the Print settings dialog box and your Brother machine. Red-...eye Reduction 1 The Red Eye Reduction function lets you want to adjust the color of the skin tone automatically. b Click the Red Eye Reduction icon to detect faces automatically. f Click Print in the printer driver ...
Software Users Manual - English
Page 151
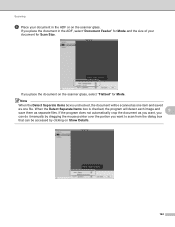
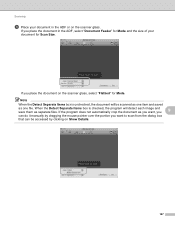
... Items box is unchecked, the document will detect each image and 9 save them as one item and saved as separate files. Scanning d Place your document for Mode. If you place the document in ...the ADF, select "Document Feeder" for Mode and the size of your document in the ADF or on the scanner glass. Note When the Detect Separate Items box is checked, the program will be accessed by dragging the mouse pointer over the portion you place the document on Show Details...
... Items box is unchecked, the document will detect each image and 9 save them as one item and saved as separate files. Scanning d Place your document for Mode. If you place the document in ...the ADF, select "Document Feeder" for Mode and the size of your document in the ADF or on the scanner glass. Note When the Detect Separate Items box is checked, the program will be accessed by dragging the mouse pointer over the portion you place the document on Show Details...
Software Users Manual - English
Page 154
... you want, you want to scan from the dialog box that can be scanned as one item and saved as separate files. Note When the Detect Separate Items box is checked, the program will be accessed by dragging the mouse pointer over the portion you 9 can do it manually by clicking... on Show Details. 147 When the Detect Separate Items box is unchecked, the document will detect each image and save them as one file. If you place the document on the scanner glass. If you place the...
... you want, you want to scan from the dialog box that can be scanned as one item and saved as separate files. Note When the Detect Separate Items box is checked, the program will be accessed by dragging the mouse pointer over the portion you 9 can do it manually by clicking... on Show Details. 147 When the Detect Separate Items box is unchecked, the document will detect each image and save them as one file. If you place the document on the scanner glass. If you place the...
Advanced Users Manual - English
Page 50
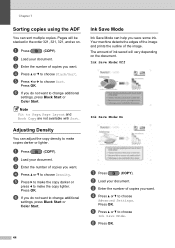
... your document. d Press a or b to choose Advanced Settings. f If you do not want to change additional settings, press Black Start or Color Start. Your machine detects the edges of the image and prints the outline of copies you save some ink. Ink Save Mode: Off 7 Ink Save Mode: On 7 a Press (COPY...
... your document. d Press a or b to choose Advanced Settings. f If you do not want to change additional settings, press Black Start or Color Start. Your machine detects the edges of the image and prints the outline of copies you save some ink. Ink Save Mode: Off 7 Ink Save Mode: On 7 a Press (COPY...

Advanced Users Manual - English
Page 60
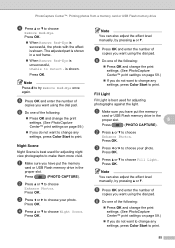
... face is best used for adjusting landscape photographs. b Press a or b to choose Enhance Skin. d Press a or b to choose Enhance Photos. Remove Red-Eye 8 The machine detects eyes in the proper slot. Press (PHOTO CAPTURE). Press OK. Press OK. Press (PHOTO CAPTURE). a Make sure you want using the dial pad. Enhance Scenery... choose Enhance Photos. Press OK. a Make sure you have put the memory card or USB Flash memory drive in your photo. Press (PHOTO CAPTURE). It detects human skin color in the proper slot.
... face is best used for adjusting landscape photographs. b Press a or b to choose Enhance Skin. d Press a or b to choose Enhance Photos. Remove Red-Eye 8 The machine detects eyes in the proper slot. Press (PHOTO CAPTURE). Press OK. Press OK. Press (PHOTO CAPTURE). a Make sure you want using the dial pad. Enhance Scenery... choose Enhance Photos. Press OK. a Make sure you have put the memory card or USB Flash memory drive in your photo. Press (PHOTO CAPTURE). It detects human skin color in the proper slot.
Advanced Users Manual - English
Page 61
... unsuccessful, Unable to choose your photo. b Press a or b to try Remove Red-Eye once again. b Press a or b to choose Remove Red-Eye. c Press d or c to Detect. Note You can also adjust the effect level manually, by pressing a or b. f Do one of copies you do not want using the dial pad. PhotoCapture...
... unsuccessful, Unable to choose your photo. b Press a or b to try Remove Red-Eye once again. b Press a or b to choose Remove Red-Eye. c Press d or c to Detect. Note You can also adjust the effect level manually, by pressing a or b. f Do one of copies you do not want using the dial pad. PhotoCapture...
Advanced Users Manual - English
Page 62
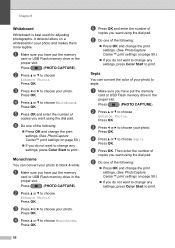
... 59.) If you do not want using the dial pad. d Press a or b to choose Enhance Photos. Press OK. f Do one of your photo. It detects letters on page 59.) If you do not want using the dial pad. Press OK. b Press a or b to choose Monochrome. c Press d or c to choose...
... 59.) If you do not want using the dial pad. d Press a or b to choose Enhance Photos. Press OK. f Do one of your photo. It detects letters on page 59.) If you do not want using the dial pad. Press OK. b Press a or b to choose Monochrome. c Press d or c to choose...

Advanced Users Manual - English
Page 69
... additional settings, press Black Start or Color Start to choose Auto Crop. Press OK. If one of the angles is not square, Auto Crop cannot detect the document. • If your document is too long or wide, this setting will scan each document and create separate files. For example, if you...
... additional settings, press Black Start or Color Start to choose Auto Crop. Press OK. If one of the angles is not square, Auto Crop cannot detect the document. • If your document is too long or wide, this setting will scan each document and create separate files. For example, if you...
Advanced Users Manual - English
Page 82
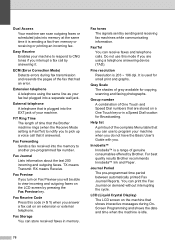
...telephone answering device (TAD). Fax tones The signals sent by answering it answered. For best quality results Brother recommends Innobella™ Ink and Paper. ECM (Error Correction Mode) Detects errors during OnScreen Programming and shows the date and time when the machine is used for copying, ...scanning and faxing photographs. Fax Forwarding Sends a fax received into the EXT.jack of the fax that the Brother machine rings (when the ...
...telephone answering device (TAD). Fax tones The signals sent by answering it answered. For best quality results Brother recommends Innobella™ Ink and Paper. ECM (Error Correction Mode) Detects errors during OnScreen Programming and shows the date and time when the machine is used for copying, ...scanning and faxing photographs. Fax Forwarding Sends a fax received into the EXT.jack of the fax that the Brother machine rings (when the ...

Users Manual - English
Page 81
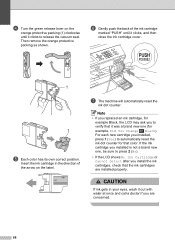
... LCD. When the machine detects an ink cartridge is caused by the use of their life, the LCD shows B&W Print Only or Cannot Print. The LCD will tell you do not refill the ink cartridges provided with your investment and obtain premium performance from the machine. IMPORTANT Brother strongly recommends that is...
... LCD. When the machine detects an ink cartridge is caused by the use of their life, the LCD shows B&W Print Only or Cannot Print. The LCD will tell you do not refill the ink cartridges provided with your investment and obtain premium performance from the machine. IMPORTANT Brother strongly recommends that is...
Users Manual - English
Page 82
... of the arrow on the orange protective packing (1) clockwise until it clicks to press 2 (No). • If the LCD shows No Ink Cartridge or Cannot Detect after you install the ink cartridges, check that the ink cartridges are concerned. 68
... of the arrow on the orange protective packing (1) clockwise until it clicks to press 2 (No). • If the LCD shows No Ink Cartridge or Cannot Detect after you install the ink cartridges, check that the ink cartridges are concerned. 68
Users Manual - English
Page 88
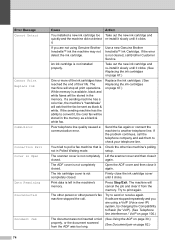
...life. Poor telephone line quality caused a communication error. The other person or other fax machine's polling setup. Use a new Genuine Brother Innobella™ Ink Cartridge. If the error is Open Data Remaining Disconnected Document Jam 74 Cause You installed a new ink cartridge ...If calls are stopped repeatedly and you are using Genuine Brother Innobella™ ink the machine may not detect the ink cartridge. Error Message Cannot Detect Cannot Print Replace Ink Comm.Error Connection Fail Cover is not cleared, call Brother Customer Service. If a sending machine has a color fax...
...life. Poor telephone line quality caused a communication error. The other person or other fax machine's polling setup. Use a new Genuine Brother Innobella™ Ink Cartridge. If the error is Open Data Remaining Disconnected Document Jam 74 Cause You installed a new ink cartridge ...If calls are stopped repeatedly and you are using Genuine Brother Innobella™ ink the machine may not detect the ink cartridge. Error Message Cannot Detect Cannot Print Replace Ink Comm.Error Connection Fail Cover is not cleared, call Brother Customer Service. If a sending machine has a color fax...

Users Manual - English
Page 114
... choose Dial Tone. c Press a or b to Detection will shorten the dial detect pause. Press OK. To improve compatibility with most VoIP services, Brother recommends changing the compatibility setting to 33,600 bps. (factory setting) Press OK. Press OK. e Press Stop/Exit. b Press a or b to choose Detection or No Detection. a Press Menu. d Press d or c to choose...
... choose Dial Tone. c Press a or b to Detection will shorten the dial detect pause. Press OK. To improve compatibility with most VoIP services, Brother recommends changing the compatibility setting to 33,600 bps. (factory setting) Press OK. Press OK. e Press Stop/Exit. b Press a or b to choose Detection or No Detection. a Press Menu. d Press d or c to choose...
Users Manual - English
Page 127
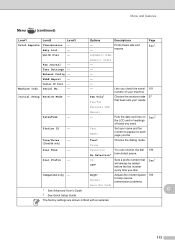
... Level2 Level3 Options Descriptions Page Print Reports Transmission - - Quick Dial - Machine Info. External TAD Manual Date&Time - - Tone* Pulse Detection No Detection* Choose the dialing mode. You can shorten the dial 100 tone detect pause. User Settings - - Dial Prefix - High* Adjusts the modem speed 100 Normal to appear on the LCD and in...
... Level2 Level3 Options Descriptions Page Print Reports Transmission - - Quick Dial - Machine Info. External TAD Manual Date&Time - - Tone* Pulse Detection No Detection* Choose the dialing mode. You can shorten the dial 100 tone detect pause. User Settings - - Dial Prefix - High* Adjusts the modem speed 100 Normal to appear on the LCD and in...
Users Manual - English
Page 159
...30, 31 E Easy Receive 41 Envelopes 18, 20, 28, 29 Error messages on LCD 73 B&W Print Only 73 Cannot Detect 74 Cannot Print 74 Comm. Copy paper size 57 paper type 57 tray use 24 using ADF 30 using 49 External telephone...external telephone 48 Consumable items 143 Control panel overview 6 ControlCenter See Software User's Guide. Automatic fax receive 37 Easy Receive 41 B Brother accessories and supplies ii Brother numbers i CreativeCenter 4 Customer Service i FAQs (frequently asked questions) ......... E Index A Accessories and supplies ii ADF (automatic document feeder...
...30, 31 E Easy Receive 41 Envelopes 18, 20, 28, 29 Error messages on LCD 73 B&W Print Only 73 Cannot Detect 74 Cannot Print 74 Comm. Copy paper size 57 paper type 57 tray use 24 using ADF 30 using 49 External telephone...external telephone 48 Consumable items 143 Control panel overview 6 ControlCenter See Software User's Guide. Automatic fax receive 37 Easy Receive 41 B Brother accessories and supplies ii Brother numbers i CreativeCenter 4 Customer Service i FAQs (frequently asked questions) ......... E Index A Accessories and supplies ii ADF (automatic document feeder...


