Quick Setup Guide - English
Page 3
.... d Fan the stack of the paper. Check that the paper side guides touch the edges of paper well to the paper with both hands. f Gently adjust the paper side guides to avoid paper jams and misfeeds. Make sure that the paper is flat in the tray and below the maximum paper mark a. 1 2 1 Note (For MFC-J6710DW) For information about tray #2 (the...
.... d Fan the stack of the paper. Check that the paper side guides touch the edges of paper well to the paper with both hands. f Gently adjust the paper side guides to avoid paper jams and misfeeds. Make sure that the paper is flat in the tray and below the maximum paper mark a. 1 2 1 Note (For MFC-J6710DW) For information about tray #2 (the...
Software Users Manual - English
Page 11
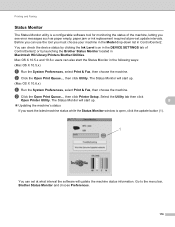
... Monitor icon and choose Help. Note For more devices, allowing you start up your PC, the Brother Status Monitor icon appears on the desktop of error messages such as paper empty, paper jam or ink replacement required. Monitoring the machine's status 1 Once you to get immediate notification of your PC. The Status Monitor can... occurred. Printing Status Monitor 1 1 The Status Monitor utility is also a link to access the troubleshooting web site. You can be displayed in Start/All Programs/Brother/MFC-XXXX on your computer. 4 Click the Troubleshooting button to the Genuine...
... Monitor icon and choose Help. Note For more devices, allowing you start up your PC, the Brother Status Monitor icon appears on the desktop of error messages such as paper empty, paper jam or ink replacement required. Monitoring the machine's status 1 Once you to get immediate notification of your PC. The Status Monitor can... occurred. Printing Status Monitor 1 1 The Status Monitor utility is also a link to access the troubleshooting web site. You can be displayed in Start/All Programs/Brother/MFC-XXXX on your computer. 4 Click the Troubleshooting button to the Genuine...

Software Users Manual - English
Page 29
Note Duplex 1 (Slower print speed) is not available for Ledger or A3 size paper. 1 1 22 Change Advanced Duplex Settings if you have problems with smudged duplex prints or paper jams. Normal Choose Normal to print at normal speed, using a normal amount of ink. Duplex 1 (Slower print speed) Choose Duplex 1 to print the...
Note Duplex 1 (Slower print speed) is not available for Ledger or A3 size paper. 1 1 22 Change Advanced Duplex Settings if you have problems with smudged duplex prints or paper jams. Normal Choose Normal to print at normal speed, using a normal amount of ink. Duplex 1 (Slower print speed) Choose Duplex 1 to print the...
Software Users Manual - English
Page 123
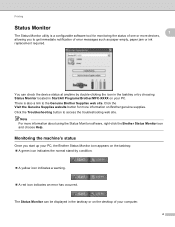
... want the latest machine status while the Status Monitor window is a configurable software tool for monitoring the status of ControlCenter2 or by launching the Brother Status Monitor located in the following ways: (Mac OS X 10.5.x) a Run the System Preferences, select Print & Fax, then choose the...Brother/Utilities. You can check the device status by clicking the Ink Level icon in the DEVICE SETTINGS tab of the machine, letting you must choose your machine in the Model drop-down list in ControlCenter2. Before you can use the tool you see error messages such as paper empty, paper jam...
... want the latest machine status while the Status Monitor window is a configurable software tool for monitoring the status of ControlCenter2 or by launching the Brother Status Monitor located in the following ways: (Mac OS X 10.5.x) a Run the System Preferences, select Print & Fax, then choose the...Brother/Utilities. You can check the device status by clicking the Ink Level icon in the DEVICE SETTINGS tab of the machine, letting you must choose your machine in the Model drop-down list in ControlCenter2. Before you can use the tool you see error messages such as paper empty, paper jam...

Software Users Manual - English
Page 133
Change Advanced Duplex Settings if you have problems with smudged duplex prints or paper jams. Normal Choose Normal to print at normal speed, using a normal amount of ink. Duplex 1 (Slower print speed) Choose Duplex 1 to ... one direction giving higher quality printouts, but using the duplex feature. Other Print Options 8 You can choose the Paper Thickness and Bi-Directional Printing settings. Paper Thickness You can choose Paper Thickness from Regular, Thick and Envelope. 8 Bi-Directional Printing When Bi-Directional Printing is not available...
Change Advanced Duplex Settings if you have problems with smudged duplex prints or paper jams. Normal Choose Normal to print at normal speed, using a normal amount of ink. Duplex 1 (Slower print speed) Choose Duplex 1 to ... one direction giving higher quality printouts, but using the duplex feature. Other Print Options 8 You can choose the Paper Thickness and Bi-Directional Printing settings. Paper Thickness You can choose Paper Thickness from Regular, Thick and Envelope. 8 Bi-Directional Printing When Bi-Directional Printing is not available...
Advanced Users Manual - English
Page 55
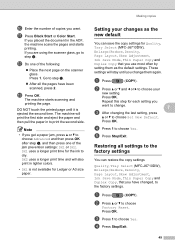
... NOT touch the printed page until you change . 7 c After changing the last setting, press a or b to dry. Note • If you get a paper jam, press a or b to change them as the default settings. b Press a or b to print the second side. Press OK. e Press Stop/Exit. Go... 1 to choose your changes as the new default 7 You can restore the copy settings Quality, Tray Select (MFC-J6710DW), Enlarge/Reduce, Density, Page Layout, Skew Adjustment, Ink Save Mode, Thin Paper Copy and Duplex Copy, that you placed the document in lighter colors. • DX1 is ejected the second ...
... NOT touch the printed page until you change . 7 c After changing the last setting, press a or b to dry. Note • If you get a paper jam, press a or b to change them as the default settings. b Press a or b to print the second side. Press OK. e Press Stop/Exit. Go... 1 to choose your changes as the new default 7 You can restore the copy settings Quality, Tray Select (MFC-J6710DW), Enlarge/Reduce, Density, Page Layout, Skew Adjustment, Ink Save Mode, Thin Paper Copy and Duplex Copy, that you placed the document in lighter colors. • DX1 is ejected the second ...
Users Manual - English
Page 12
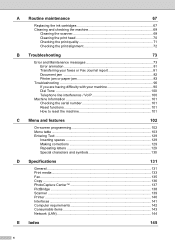
... Checking the print alignment 72 B Troubleshooting 73 Error and Maintenance messages 73 Error animation 81 Transferring your faxes or Fax Journal report 81 Document jam 82 Printer jam or paper jam 83 Troubleshooting 90 If you are having difficulty with your machine 90 Dial Tone ...100 Telephone line interference / VoIP 100 Machine Information 101...
... Checking the print alignment 72 B Troubleshooting 73 Error and Maintenance messages 73 Error animation 81 Transferring your faxes or Fax Journal report 81 Document jam 82 Printer jam or paper jam 83 Troubleshooting 90 If you are having difficulty with your machine 90 Dial Tone ...100 Telephone line interference / VoIP 100 Machine Information 101...
Users Manual - English
Page 26
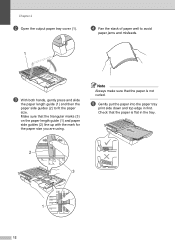
... in first. d Fan the stack of paper well to avoid paper jams and misfeeds. 1 c With both hands, gently press and slide the paper length guide (1) and then the paper side guides (2) to fit the paper size. Note Always make sure that the triangular marks (3) on the paper length guide (1) and paper side guides (2) line up with the mark...
... in first. d Fan the stack of paper well to avoid paper jams and misfeeds. 1 c With both hands, gently press and slide the paper length guide (1) and then the paper side guides (2) to fit the paper size. Note Always make sure that the triangular marks (3) on the paper length guide (1) and paper side guides (2) line up with the mark...
Users Manual - English
Page 27
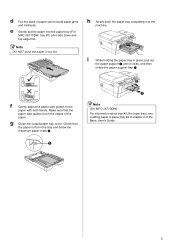
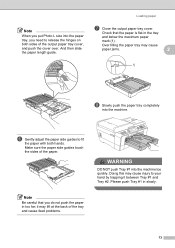
...hand by trapping it may cause paper jams. 2 1 h Slowly push the paper tray completely into the machine too quickly. Please push Tray #1 in the tray and below the maximum paper mark (1). it between Tray #1 and Tray #2. And then slide the paper length guide. Check that you ...need to fit the paper with both sides of the paper. WARNING DO NOT push Tray #1 into the machine. Loading paper g Close the output paper tray cover. f Gently adjust the paper side guides to release the hinges on...
...hand by trapping it may cause paper jams. 2 1 h Slowly push the paper tray completely into the machine too quickly. Please push Tray #1 in the tray and below the maximum paper mark (1). it between Tray #1 and Tray #2. And then slide the paper length guide. Check that you ...need to fit the paper with both sides of the paper. WARNING DO NOT push Tray #1 into the machine. Loading paper g Close the output paper tray cover. f Gently adjust the paper side guides to release the hinges on...

Users Manual - English
Page 29
...and below the maximum paper mark (1). Note Always make sure that the triangular marks (3) on the paper length guide (1) and paper side guides (2) line up with the marks for the paper size you are using. Over filling the paper tray may cause paper jams. 1 2 L... EXE LTR LGL B5JIS A4 LGR B4JIS 3 f Using both hands, gently press and slide the paper length guide (1) and then the paper side guides (2) to avoid paper jams...
...and below the maximum paper mark (1). Note Always make sure that the triangular marks (3) on the paper length guide (1) and paper side guides (2) line up with the marks for the paper size you are using. Over filling the paper tray may cause paper jams. 1 2 L... EXE LTR LGL B5JIS A4 LGR B4JIS 3 f Using both hands, gently press and slide the paper length guide (1) and then the paper side guides (2) to avoid paper jams...
Users Manual - English
Page 32
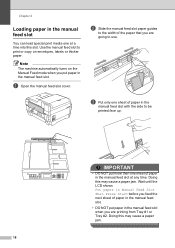
...slot cover. Note The machine automatically turns on envelopes, labels or thicker paper. Use the manual feed slot to use. Doing this may cause a paper jam. Doing this may cause a paper jam. 18 Wait until the LCD shows Put paper in Manual Feed Slot Then Press Start before you are printing from ...Tray #1 or Tray #2. Chapter 2 Loading paper in the manual feed slot 2 You can load special...
...slot cover. Note The machine automatically turns on envelopes, labels or thicker paper. Use the manual feed slot to use. Doing this may cause a paper jam. Doing this may cause a paper jam. 18 Wait until the LCD shows Put paper in Manual Feed Slot Then Press Start before you are printing from ...Tray #1 or Tray #2. Chapter 2 Loading paper in the manual feed slot 2 You can load special...
Users Manual - English
Page 37
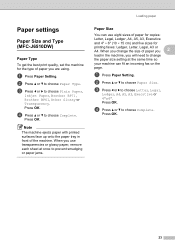
... prevent smudging or paper jams. Loading paper Paper Size 2 You can use transparencies or glossy paper, remove each sheet at the same time so your machine can fit an incoming fax on the page. c Press d or c to choose Paper Size. Press OK. c Press d or c to choose Complete. d Press a or b to choose Plain Paper, Inkjet Paper, Brother BP71, Brother BP61, Other...
... prevent smudging or paper jams. Loading paper Paper Size 2 You can use transparencies or glossy paper, remove each sheet at the same time so your machine can fit an incoming fax on the page. c Press d or c to choose Paper Size. Press OK. c Press d or c to choose Complete. d Press a or b to choose Plain Paper, Inkjet Paper, Brother BP71, Brother BP61, Other...
Users Manual - English
Page 38
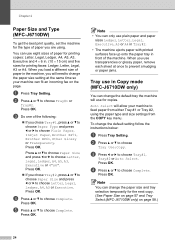
... the same time so your machine can fit an incoming fax on page 58.) 24 Auto Select will allow your machine to prevent smudging or paper jams. Tray use for copies. c Press d or c to change the default tray the machine will need to choose Tray#1, Tray#2 or Auto ... A3, Executive or 4"x6". d Press a or b to choose Plain Paper, Inkjet Paper, Brother BP71, Brother BP61, Other Glossy or Transparency. Press OK. Press OK. To change the paper size and tray selection temporarily for the next copy. (See Paper Size on page 57 and Tray Select (MFC-J6710DW only) on the page. You can change the...
... the same time so your machine can fit an incoming fax on page 58.) 24 Auto Select will allow your machine to prevent smudging or paper jams. Tray use for copies. c Press d or c to change the default tray the machine will need to choose Tray#1, Tray#2 or Auto ... A3, Executive or 4"x6". d Press a or b to choose Plain Paper, Inkjet Paper, Brother BP71, Brother BP61, Other Glossy or Transparency. Press OK. Press OK. To change the paper size and tray selection temporarily for the next copy. (See Paper Size on page 57 and Tray Select (MFC-J6710DW only) on the page. You can change the...

Users Manual - English
Page 40
... for the settings you print on inkjet paper (coated paper), transparencies and glossy paper, be completely dry and may not be sure to prevent smudging or paper jams. Avoid touching the printed surface of paper you print on transparencies. To get the best print quality, we suggest using Brother paper. (See the table below.) We recommend using...
... for the settings you print on inkjet paper (coated paper), transparencies and glossy paper, be completely dry and may not be sure to prevent smudging or paper jams. Avoid touching the printed surface of paper you print on transparencies. To get the best print quality, we suggest using Brother paper. (See the table below.) We recommend using...
Users Manual - English
Page 91
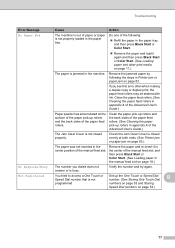
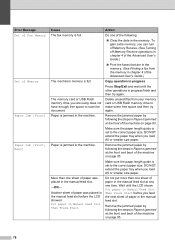
...in the center position of the following the steps in Printer jam or paper jam on the surface of the paper pick-up rollers and the back sides of the Advanced User's Guide.) Paper powder has accumulated on page 83. Remove the paper and re-insert it again and then press Black Start ...(See Storing One Touch Dial B programmed. Troubleshooting Error Message Cause Action No Paper Fed The machine is out of the Advanced User's Guide.) The Jam Clear Cover is not closed evenly at both ends. (See Printer jam or paper jam on page 18.) No Response/Busy The number you see this error often...
...in the center position of the following the steps in Printer jam or paper jam on the surface of the paper pick-up rollers and the back sides of the Advanced User's Guide.) Paper powder has accumulated on page 83. Remove the paper and re-insert it again and then press Black Start ...(See Storing One Touch Dial B programmed. Troubleshooting Error Message Cause Action No Paper Fed The machine is out of the Advanced User's Guide.) The Jam Clear Cover is not closed evenly at both ends. (See Printer jam or paper jam on page 18.) No Response/Busy The number you see this error often...
Users Manual - English
Page 92
...and wait until the LCD shows Put paper in Manual Feed Slot Then Press Start before the LCD showed Put paper in progress finish and then try again. Remove the jammed paper by following : Clear the data in chapter 4 of Memory Paper Jam [Front] Paper Jam [Front, Rear] Cause The fax memory... is full. To gain extra memory, you load A5 or smaller size paper. Make sure the paper length guide is set to scan ...
...and wait until the LCD shows Put paper in Manual Feed Slot Then Press Start before the LCD showed Put paper in progress finish and then try again. Remove the jammed paper by following : Clear the data in chapter 4 of Memory Paper Jam [Front] Paper Jam [Front, Rear] Cause The fax memory... is full. To gain extra memory, you load A5 or smaller size paper. Make sure the paper length guide is set to scan ...
Users Manual - English
Page 93
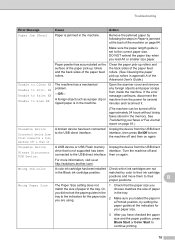
... page 81.) Unusable Device Disconnect device from the USB direct to the USB direct interface. Wrong Paper Size The Paper Size setting does not 1 Check that is jammed at http://solutions.brother.com/. A USB device or USB Flash memory Unplug the device from inside the machine. Turn ...the machine off and then on page 84. Remove the jammed paper by color to their ink cartridge positions and move ...
... page 81.) Unusable Device Disconnect device from the USB direct to the USB direct interface. Wrong Paper Size The Paper Size setting does not 1 Check that is jammed at http://solutions.brother.com/. A USB device or USB Flash memory Unplug the device from inside the machine. Turn ...the machine off and then on page 84. Remove the jammed paper by color to their ink cartridge positions and move ...
Users Manual - English
Page 97
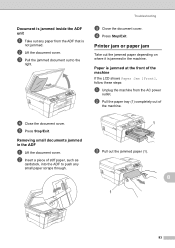
.... 1 e Press Stop/Exit. B 1 83 b Insert a piece of the machine. Printer jam or paper jam B Take out the jammed paper depending on where it is not jammed. Paper is jammed at the front of the machine B If the LCD shows Paper Jam [Front], follow these steps: a Unplug the machine from the ADF that is jammed in the ADF B a Lift the document cover.
.... 1 e Press Stop/Exit. B 1 83 b Insert a piece of the machine. Printer jam or paper jam B Take out the jammed paper depending on where it is not jammed. Paper is jammed at the front of the machine B If the LCD shows Paper Jam [Front], follow these steps: a Unplug the machine from the ADF that is jammed in the ADF B a Lift the document cover.
Users Manual - English
Page 98
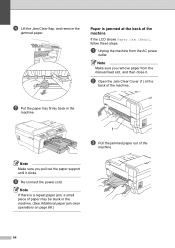
... until it . f Re-connect the power cord. Note If there is jammed at the back of the machine. Note Make sure you remove paper from the AC power outlet. Paper is a repeat paper jam, a small piece of the machine B If the LCD shows Paper Jam [Rear], follow these steps: a Unplug the machine from the manual feed slot...
... until it . f Re-connect the power cord. Note If there is jammed at the back of the machine. Note Make sure you remove paper from the AC power outlet. Paper is a repeat paper jam, a small piece of the machine B If the LCD shows Paper Jam [Rear], follow these steps: a Unplug the machine from the manual feed slot...
Users Manual - English
Page 99
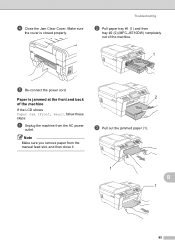
Paper is closed properly. Note Make sure you remove paper from the AC power outlet. d Close the Jam Clear Cover. Troubleshooting b Pull paper tray #1 (1) and then tray #2 (2) (MFC-J6710DW) completely out of the machine B If the LCD shows Paper Jam [Front, Rear], follow these steps: a Unplug the machine from the manual feed slot, and then close it. 2 c Pull out the jammed paper (1). 1 B 1 85 Make sure the cover is jammed at the front and back of the machine. 1 e Re-connect the power cord.
Paper is closed properly. Note Make sure you remove paper from the AC power outlet. d Close the Jam Clear Cover. Troubleshooting b Pull paper tray #1 (1) and then tray #2 (2) (MFC-J6710DW) completely out of the machine B If the LCD shows Paper Jam [Front, Rear], follow these steps: a Unplug the machine from the manual feed slot, and then close it. 2 c Pull out the jammed paper (1). 1 B 1 85 Make sure the cover is jammed at the front and back of the machine. 1 e Re-connect the power cord.


