
Quick Setup Guide - English
Page 12
... Registration Sheet (USA only) You can also register your Product Registration. 16 Manual Feed Slot You can load special print media into this slot. (Please note that only one sheet can be used at a time.) Use the manual feed slot to print or copy on the scanner glass. For details, see Loading... paper in the manual feed slot in chapter 2 of your product online using the On-Line Registration link from the installation CD-ROM or visit http://www.brother.com/registration/. b Put the sheet face up in Blue. Note You will receive ...
... Registration Sheet (USA only) You can also register your Product Registration. 16 Manual Feed Slot You can load special print media into this slot. (Please note that only one sheet can be used at a time.) Use the manual feed slot to print or copy on the scanner glass. For details, see Loading... paper in the manual feed slot in chapter 2 of your product online using the On-Line Registration link from the installation CD-ROM or visit http://www.brother.com/registration/. b Put the sheet face up in Blue. Note You will receive ...
Software Users Manual - English
Page 19
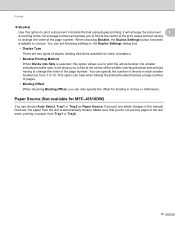
... checking Binding Offset, you to fold at the center of the smaller individual booklet sets without having to change the order of sheets in the manual feed slot, the paper from the slot is automatically chosen. Printing Booklet Use this option allows you to print the whole booklet into smaller individual... booklet sets, it will arrange the document 1 according to the correct page number and allows you can also specify the offset for MFC-J6510DW) 1 You can specify the number of the page number.
... checking Binding Offset, you to fold at the center of the smaller individual booklet sets without having to change the order of sheets in the manual feed slot, the paper from the slot is automatically chosen. Printing Booklet Use this option allows you to print the whole booklet into smaller individual... booklet sets, it will arrange the document 1 according to the correct page number and allows you can also specify the offset for MFC-J6510DW) 1 You can specify the number of the page number.
Software Users Manual - English
Page 130
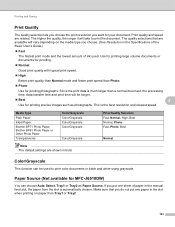
... in the Specifications of the Basic User's Guide.) Fast The fastest print mode and the lowest amount of paper in the manual feed slot, the paper from Tray1 or Tray2. 123 The quality selections that you do not put one sheet of ink used to print ...printing precise images such as Paper Source. Paper Source (Not available for MFC-J6510DW) 8 You can be longer. Best 8 Use for printing photographs. Media Type Plain Paper Inkjet Paper Brother BP71 Photo Paper, Brother BP61 Photo Paper or Other Photo Paper Transparencies Color/Grayscale Color/Grayscale Color/...
... in the Specifications of the Basic User's Guide.) Fast The fastest print mode and the lowest amount of paper in the manual feed slot, the paper from Tray1 or Tray2. 123 The quality selections that you do not put one sheet of ink used to print ...printing precise images such as Paper Source. Paper Source (Not available for MFC-J6510DW) 8 You can be longer. Best 8 Use for printing photographs. Media Type Plain Paper Inkjet Paper Brother BP71 Photo Paper, Brother BP61 Photo Paper or Other Photo Paper Transparencies Color/Grayscale Color/Grayscale Color/...

Users Manual - English
Page 9
... Network Glossary 2 Viewing Documentation 2 Accessing Brother Support (Windows 4 Accessing Brother Support (Macintosh 5 Control panel overview 6 LCD screen...9 Basic Operations 10 2 Loading paper 11 Loading paper and other print media 11 Loading paper in paper tray #1 11 Loading paper in paper tray #2 (MFC-J6710DW only 14 Loading paper in the manual feed slot 18 Loading envelopes and...
... Network Glossary 2 Viewing Documentation 2 Accessing Brother Support (Windows 4 Accessing Brother Support (Macintosh 5 Control panel overview 6 LCD screen...9 Basic Operations 10 2 Loading paper 11 Loading paper and other print media 11 Loading paper in paper tray #1 11 Loading paper in paper tray #2 (MFC-J6710DW only 14 Loading paper in the manual feed slot 18 Loading envelopes and...
Users Manual - English
Page 32
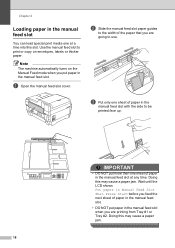
... a paper jam. 18 a Open the manual feed slot cover. Doing this slot. b Slide the manual feed slot paper guides to the width of paper in the manual feed slot. Wait until the LCD shows Put paper in Manual Feed Slot Then Press Start before you put paper in the manual feed slot 2 You can load special print media... one sheet of the paper that you are printing from Tray #1 or Tray #2. Use the manual feed slot to print or copy on the Manual Feed mode when you feed the next sheet of paper in the manual feed slot with the side to use. IMPORTANT • DO NOT put more than one sheet of...
... a paper jam. 18 a Open the manual feed slot cover. Doing this slot. b Slide the manual feed slot paper guides to the width of paper in the manual feed slot. Wait until the LCD shows Put paper in Manual Feed Slot Then Press Start before you put paper in the manual feed slot 2 You can load special print media... one sheet of the paper that you are printing from Tray #1 or Tray #2. Use the manual feed slot to print or copy on the Manual Feed mode when you feed the next sheet of paper in the manual feed slot with the side to use. IMPORTANT • DO NOT put more than one sheet of...

Users Manual - English
Page 33
...feel it again at the center position. Note • Make sure printing has finished before you close the manual feed slot. • When paper is placed in the manual feed slot, the machine always prints from the manual feed slot. • Paper inserted in a short distance. Place another page. Note When loading an envelope,...it grab the envelope. Wait until you to fold. • Place the paper in the center of the paper when you place in the manual feed slot, and then press Black Start or Color Start. Note • DO NOT press the paper guides too tightly against the paper. d ...
...feel it again at the center position. Note • Make sure printing has finished before you close the manual feed slot. • When paper is placed in the manual feed slot, the machine always prints from the manual feed slot. • Paper inserted in a short distance. Place another page. Note When loading an envelope,...it grab the envelope. Wait until you to fold. • Place the paper in the center of the paper when you place in the manual feed slot, and then press Black Start or Color Start. Note • DO NOT press the paper guides too tightly against the paper. d ...

Users Manual - English
Page 42
... - User Defined - User Defined - Yes - Yes - Postcard 2 5.8 7.9 in. (148 200 mm) - - (Double) Envelopes C5 Envelope 6.4 9 in . (89 127 mm) - - Yes Labels 1 - - 1 Manual Feed Slot only Photo Printer Capture Yes Yes Yes Yes Yes Yes Yes Yes - Yes - Yes - Yes - Yes - Yes - Chapter 2 Choosing the right print media 2 Paper...
... - User Defined - User Defined - Yes - Yes - Postcard 2 5.8 7.9 in. (148 200 mm) - - (Double) Envelopes C5 Envelope 6.4 9 in . (89 127 mm) - - Yes Labels 1 - - 1 Manual Feed Slot only Photo Printer Capture Yes Yes Yes Yes Yes Yes Yes Yes - Yes - Yes - Yes - Yes - Yes - Chapter 2 Choosing the right print media 2 Paper...

Users Manual - English
Page 43
... to 53 lb (Up to 200 g/m2) 20 to 25 lb (75 to 0.52 mm) - - 1 BP71 69 lb (260 g/m2) paper is especially designed for Brother inkjet machines. 29 Thickness 3 to 6 mil (0.08 to 0.15 mm) 3 to 6 mil (0.08 to 0.15 mm) 3 to 10 mil (0.08 to 0.25 mm) Up to... Labels No.10, DL, C5, Monarch, Y4), Photo, Photo L, Photo 2L, Index Card, Postcard 1, Postcard 2 1 Up to 250 sheets of the paper trays 2 Tray #1 Tray #2 (MFC-J6710DW only) Manual Feed Slot Paper size Paper types No.
... to 53 lb (Up to 200 g/m2) 20 to 25 lb (75 to 0.52 mm) - - 1 BP71 69 lb (260 g/m2) paper is especially designed for Brother inkjet machines. 29 Thickness 3 to 6 mil (0.08 to 0.15 mm) 3 to 6 mil (0.08 to 0.15 mm) 3 to 10 mil (0.08 to 0.25 mm) Up to... Labels No.10, DL, C5, Monarch, Y4), Photo, Photo L, Photo 2L, Index Card, Postcard 1, Postcard 2 1 Up to 250 sheets of the paper trays 2 Tray #1 Tray #2 (MFC-J6710DW only) Manual Feed Slot Paper size Paper types No.
Users Manual - English
Page 91
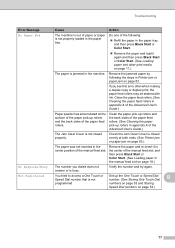
... Start or Color Start. (See Loading paper and other print media on page 83.) The paper was not inserted in the center position of the manual feed slot, and then press Black Start or Color Start. (See Loading paper in appendix A of the Advanced User's Guide.) Paper powder has accumulated on page... jam on the surface of the paper pick-up rollers and the back sides of paper or paper is not Set up rollers in the manual feed slot on page 54.) 77 Verify the number and try again. numbers on page 53 and Storing Speed Dial numbers on page 18.) No Response...
... Start or Color Start. (See Loading paper and other print media on page 83.) The paper was not inserted in the center position of the manual feed slot, and then press Black Start or Color Start. (See Loading paper in appendix A of the Advanced User's Guide.) Paper powder has accumulated on page... jam on the surface of the paper pick-up rollers and the back sides of paper or paper is not Set up rollers in the manual feed slot on page 54.) 77 Verify the number and try again. numbers on page 53 and Storing Speed Dial numbers on page 18.) No Response...
Users Manual - English
Page 92
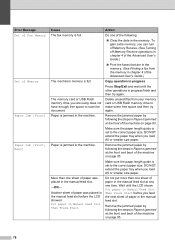
... paper. Do not put more than one of the following the steps in Paper is jammed at the front and back of paper in the manual feed slot at any one time. Remove the jammed paper by following the steps in Paper is set to scan the document. DO NOT extend the.... (See Printing a fax from your memory card or USB Flash memory drive to the correct paper size. Another sheet of paper was placed in the manual feed slot before you are in Paper is set to make some free space and then try again. Action Do one sheet of paper was placed...
... paper. Do not put more than one of the following the steps in Paper is jammed at the front and back of paper in the manual feed slot at any one time. Remove the jammed paper by following the steps in Paper is set to scan the document. DO NOT extend the.... (See Printing a fax from your memory card or USB Flash memory drive to the correct paper size. Another sheet of paper was placed in the manual feed slot before you are in Paper is set to make some free space and then try again. Action Do one sheet of paper was placed...
Users Manual - English
Page 98
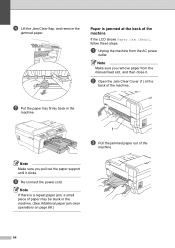
... If there is jammed at the back of the machine B If the LCD shows Paper Jam [Rear], follow these steps: a Unplug the machine from the manual feed slot, and then close it clicks. e Put the paper tray firmly back in the machine. (See Additional paper jam clear operations on page 88.) 84...
... If there is jammed at the back of the machine B If the LCD shows Paper Jam [Rear], follow these steps: a Unplug the machine from the manual feed slot, and then close it clicks. e Put the paper tray firmly back in the machine. (See Additional paper jam clear operations on page 88.) 84...
Users Manual - English
Page 99
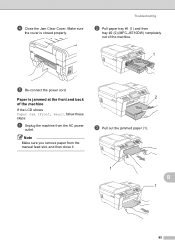
Troubleshooting b Pull paper tray #1 (1) and then tray #2 (2) (MFC-J6710DW) completely out of the machine B If the LCD shows Paper Jam [Front, Rear], follow these steps: a Unplug the machine from the manual feed slot, and then close it. 2 c Pull out the jammed paper (1). 1 B 1 85 d Close the Jam Clear Cover. Paper is closed properly. Make sure the cover is jammed at the front and back of the machine. 1 e Re-connect the power cord. Note Make sure you remove paper from the AC power outlet.
Troubleshooting b Pull paper tray #1 (1) and then tray #2 (2) (MFC-J6710DW) completely out of the machine B If the LCD shows Paper Jam [Front, Rear], follow these steps: a Unplug the machine from the manual feed slot, and then close it. 2 c Pull out the jammed paper (1). 1 B 1 85 d Close the Jam Clear Cover. Paper is closed properly. Make sure the cover is jammed at the front and back of the machine. 1 e Re-connect the power cord. Note Make sure you remove paper from the AC power outlet.
Users Manual - English
Page 102
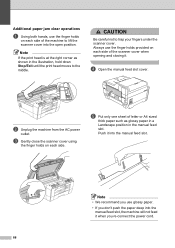
... you re-connect the power cord. 88 Always use the finger holds on each side of the machine to lift the scanner cover into the manual feed slot. e Put only one sheet of the scanner cover when opening and closing it. Note If the print head is at the right corner as... finger holds on each side of letter or A4 sized thick paper such as shown in the manual feed slot. Push it when you don't push the paper deep into the manual feed slot, the machine will not feed it into the open position. Additional paper jam clear operations B a Using both hands, use the finger...
... you re-connect the power cord. 88 Always use the finger holds on each side of the machine to lift the scanner cover into the manual feed slot. e Put only one sheet of the scanner cover when opening and closing it. Note If the print head is at the right corner as... finger holds on each side of letter or A4 sized thick paper such as shown in the manual feed slot. Push it when you don't push the paper deep into the manual feed slot, the machine will not feed it into the open position. Additional paper jam clear operations B a Using both hands, use the finger...

Users Manual - English
Page 103
Gently close the scanner cover using the finger holds on each side. Troubleshooting B 89 Make sure that a piece of the machine to lift the scanner cover into the open position. The paper you placed in the manual feed slot will be fed through the machine and ejected. g Using both hands, use the finger holds on each side of paper is not still jammed inside the machine. f Re-connect the power cord.
Gently close the scanner cover using the finger holds on each side. Troubleshooting B 89 Make sure that a piece of the machine to lift the scanner cover into the open position. The paper you placed in the manual feed slot will be fed through the machine and ejected. g Using both hands, use the finger holds on each side of paper is not still jammed inside the machine. f Re-connect the power cord.

Users Manual - English
Page 148
Paper Input (Continued) Paper Output Manual Feed Slot Paper Type: Plain Paper, Inkjet Paper (coated paper), Glossy Paper 1, Transparency 1 2, Envelopes and Labels Paper Size: Letter, Ledger, A3, Legal, Executive, A4, ...
Paper Input (Continued) Paper Output Manual Feed Slot Paper Type: Plain Paper, Inkjet Paper (coated paper), Glossy Paper 1, Transparency 1 2, Envelopes and Labels Paper Size: Letter, Ledger, A3, Legal, Executive, A4, ...
Users Manual - English
Page 160
... 41 F/T Ring Time, setting 40 Fax Preview 41, 42 from extension telephone 49 from PC See Software User's Guide. Maintenance, routine replacing ink cartridges 67 Manual dialing 51 receive 37 Manual feed slot 18 Mode, entering Copy 8 Fax 8 PhotoCapture 8 Scan 8 Multi-line connections (PBX 48 N Network Printing See Network User's Guide.
... 41 F/T Ring Time, setting 40 Fax Preview 41, 42 from extension telephone 49 from PC See Software User's Guide. Maintenance, routine replacing ink cartridges 67 Manual dialing 51 receive 37 Manual feed slot 18 Mode, entering Copy 8 Fax 8 PhotoCapture 8 Scan 8 Multi-line connections (PBX 48 N Network Printing See Network User's Guide.


