Software Users Manual - English
Page 13
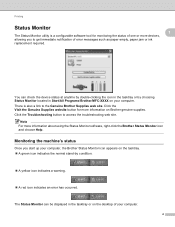
...Brother/MFC-XXXX on your computer. 4 There is a configurable software tool for more information on Brother genuine supplies. Click the Troubleshooting button to the Genuine Brother Supplies web site. Monitoring the machine's status 1 Once you to get immediate notification of error messages such as paper empty, paper jam... or ink replacement required. Click the Visit the Genuine Supplies website button for monitoring the status of one or more devices, allowing you start up your computer, the Brother Status Monitor icon appears on the...
...Brother/MFC-XXXX on your computer. 4 There is a configurable software tool for more information on Brother genuine supplies. Click the Troubleshooting button to the Genuine Brother Supplies web site. Monitoring the machine's status 1 Once you to get immediate notification of error messages such as paper empty, paper jam... or ink replacement required. Click the Visit the Genuine Supplies website button for monitoring the status of one or more devices, allowing you start up your computer, the Brother Status Monitor icon appears on the...

Software Users Manual - English
Page 33
Change Advanced Duplex Settings if you have problems with smudged duplex prints or paper jams. Normal Choose Normal to print at normal speed, using a normal amount of ink. Duplex 1 (Slower print speed) Choose Duplex 1 to print at a slower speed, using a normal amount of print media may need more drying time when using less ink. 1 1 24 Printing Advanced Duplex Settings Some types of ink. Duplex 2 (Slower print speed & less ink) Choose Duplex 2 to print the same speed as using Duplex 1, but using the duplex feature.
Change Advanced Duplex Settings if you have problems with smudged duplex prints or paper jams. Normal Choose Normal to print at normal speed, using a normal amount of ink. Duplex 1 (Slower print speed) Choose Duplex 1 to print at a slower speed, using a normal amount of print media may need more drying time when using less ink. 1 1 24 Printing Advanced Duplex Settings Some types of ink. Duplex 2 (Slower print speed & less ink) Choose Duplex 2 to print the same speed as using Duplex 1, but using the duplex feature.

Software Users Manual - English
Page 137
...device status by clicking the Ink Level icon in the DEVICE SETTINGS tab of the machine, letting you see error messages such as paper empty, paper jam or ink replacement required at what interval the software will update the machine status information. b Click the Utility. The Status Monitor ...will start up . You can use the tool you must choose your machine in the Model drop-down list in ControlCenter2. Go to the menu bar, Brother...
...device status by clicking the Ink Level icon in the DEVICE SETTINGS tab of the machine, letting you see error messages such as paper empty, paper jam or ink replacement required at what interval the software will update the machine status information. b Click the Utility. The Status Monitor ...will start up . You can use the tool you must choose your machine in the Model drop-down list in ControlCenter2. Go to the menu bar, Brother...
Software Users Manual - English
Page 142
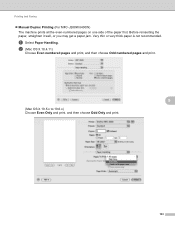
a Select Paper Handling. Before reinserting the paper, straighten it well, or you may get a paper jam. Very thin or very thick paper is not recommended. b (Mac OS X 10.4.11) Choose Even numbered pages and print, and then choose Odd numbered pages and print. 8 (Mac OS X 10.5.x to 10.6.x) Choose Even Only and print, and then choose Odd Only and print. 133 Printing and Faxing Manual Duplex Printing (For MFC-J280W/J430W) The machine prints all the even-numbered pages on one side of the paper first.
a Select Paper Handling. Before reinserting the paper, straighten it well, or you may get a paper jam. Very thin or very thick paper is not recommended. b (Mac OS X 10.4.11) Choose Even numbered pages and print, and then choose Odd numbered pages and print. 8 (Mac OS X 10.5.x to 10.6.x) Choose Even Only and print, and then choose Odd Only and print. 133 Printing and Faxing Manual Duplex Printing (For MFC-J280W/J430W) The machine prints all the even-numbered pages on one side of the paper first.
Software Users Manual - English
Page 148
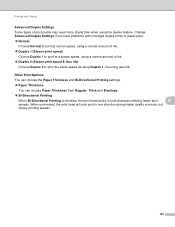
...head will only print in both directions offering faster print 8 speeds. Change Advanced Duplex Settings if you have problems with smudged duplex prints or paper jams. Normal Choose Normal to print at normal speed, using a normal amount of ink. Duplex 1 (Slower print speed...print the same speed as using the duplex feature. Other Print Options 8 You can choose the Paper Thickness and Bi-Directional Printing settings. Paper Thickness You can choose Paper Thickness from Regular, Thick and Envelope. Bi-Directional Printing When Bi-Directional Printing is...
...head will only print in both directions offering faster print 8 speeds. Change Advanced Duplex Settings if you have problems with smudged duplex prints or paper jams. Normal Choose Normal to print at normal speed, using a normal amount of ink. Duplex 1 (Slower print speed...print the same speed as using the duplex feature. Other Print Options 8 You can choose the Paper Thickness and Bi-Directional Printing settings. Paper Thickness You can choose Paper Thickness from Regular, Thick and Envelope. Bi-Directional Printing When Bi-Directional Printing is...

Advanced Users Manual - English
Page 50
... copy options you get a paper jam, press Advanced after step h, and then press one of the jam prevention settings: Duplex1 or Duplex2. e Press Yes. b Press Options. d After changing the last setting, press s or t to the factory settings, such as Quality, Enlarge/Reduce, Density, Page Layout and Duplex Copy (MFC-J625DW only). Note If you use...
... copy options you get a paper jam, press Advanced after step h, and then press one of the jam prevention settings: Duplex1 or Duplex2. e Press Yes. b Press Options. d After changing the last setting, press s or t to the factory settings, such as Quality, Enlarge/Reduce, Density, Page Layout and Duplex Copy (MFC-J625DW only). Note If you use...

Advanced Users Manual - English
Page 67
...with water. Note Do not use the machine again until the A rollers are dry may cause paper feed problems. a Unplug the machine from the AC power outlet. Pull the paper tray (1) completely out of the Paper Feed Rollers (1) with a soft lint-free cloth moistened with ink, it , and then close... the paper support. d Put the paper tray firmly back in the machine. Routine maintenance c Lift the Jam Clear Flap (2), and then clean the back side of the machine. After cleaning, wipe the rollers with a dry, soft ...
...with water. Note Do not use the machine again until the A rollers are dry may cause paper feed problems. a Unplug the machine from the AC power outlet. Pull the paper tray (1) completely out of the Paper Feed Rollers (1) with a soft lint-free cloth moistened with ink, it , and then close... the paper support. d Put the paper tray firmly back in the machine. Routine maintenance c Lift the Jam Clear Flap (2), and then clean the back side of the machine. After cleaning, wipe the rollers with a dry, soft ...

Advanced Users Manual - English
Page 68
... cleaning, wipe the pad with a dry, soft lint-free cloth to remove all moisture. 1 e Close the Jam Clear Cover. g Re-connect the power cord. 62 b Pull the paper tray completely out of paper in the machine. After cleaning, wipe the rollers with a dry, soft lint-free cloth to multi-feed the...machine. Note If the machine starts to remove all moisture. 1 c Open the Jam Clear Cover (1) at the back of the machine. 1 d Clean the Paper Pick-up rollers A a Unplug the machine from the AC power outlet. f Put the paper tray firmly back in the tray, clean the Base Pad (1) with a soft lint...
... cleaning, wipe the pad with a dry, soft lint-free cloth to remove all moisture. 1 e Close the Jam Clear Cover. g Re-connect the power cord. 62 b Pull the paper tray completely out of paper in the machine. After cleaning, wipe the rollers with a dry, soft lint-free cloth to multi-feed the...machine. Note If the machine starts to remove all moisture. 1 c Open the Jam Clear Cover (1) at the back of the machine. 1 d Clean the Paper Pick-up rollers A a Unplug the machine from the AC power outlet. f Put the paper tray firmly back in the tray, clean the Base Pad (1) with a soft lint...

Quick Setup Guide - English
Page 3
...a as you do not push the paper in the tray. IMPORTANT Be careful that the paper is not curled or wrinkled. Check that you slide out the front of the tray and cause paper feed problems. f Gently adjust the paper side guides to avoid paper jams and misfeeds. it clicks, and then... unfold the paper support flap b. i While holding the paper tray in place, pull out the paper support a until it may lift at the back of...
...a as you do not push the paper in the tray. IMPORTANT Be careful that the paper is not curled or wrinkled. Check that you slide out the front of the tray and cause paper feed problems. f Gently adjust the paper side guides to avoid paper jams and misfeeds. it clicks, and then... unfold the paper support flap b. i While holding the paper tray in place, pull out the paper support a until it may lift at the back of...


