
Network Users Manual - English
Page 16
d Choose Change the Firewall port settings to factory default uu page 38. • If you are using the Brother installer application found on -screen instructions for a wireless network 3 Click Install MFL-Pro Suite and click Yes if you can configure...LAN settings before you can manually add it by clicking the Advanced button. c Choose Wireless Network Connection, and then click Next. Your Brother machine supports the use a USB cable (Recommended) and click Next. screen instructions. and click Next. 3 f Choose Temporarily use of anti-spyware or antivirus applications, temporarily...
d Choose Change the Firewall port settings to factory default uu page 38. • If you are using the Brother installer application found on -screen instructions for a wireless network 3 Click Install MFL-Pro Suite and click Yes if you can configure...LAN settings before you can manually add it by clicking the Advanced button. c Choose Wireless Network Connection, and then click Next. Your Brother machine supports the use a USB cable (Recommended) and click Next. screen instructions. and click Next. 3 f Choose Temporarily use of anti-spyware or antivirus applications, temporarily...
Software Users Manual - English
Page 136
... right type of paper. Choosing the right type of their life. However, when the machine is important to a USB port on a keyboard or a non-powered USB hub. If a sending machine has a color fax to purchase a USB cable (type A/B) that is left in the printer memory by pressing the Stop/Exit key on paper, it...
... right type of paper. Choosing the right type of their life. However, when the machine is important to a USB port on a keyboard or a non-powered USB hub. If a sending machine has a color fax to purchase a USB cable (type A/B) that is left in the printer memory by pressing the Stop/Exit key on paper, it...
Quick Setup Guide - English
Page 15
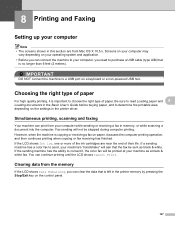
...IMPORTANT Make sure that the cable does not restrict the cover from closing, or an error may take a few seconds for all screens to the USB port marked with a symbol. It may occur. IMPORTANT DO NOT cancel any of the machine and gently close the scanner cover. The installation screens appear ...; and Windows® 7, when the Windows® Security screen appears, click the check box and click Install to your computer. c Carefully guide the USB cable into the cable channel and out the back of the machine to lift the scanner cover until it locks securely into the open position.
...IMPORTANT Make sure that the cable does not restrict the cover from closing, or an error may take a few seconds for all screens to the USB port marked with a symbol. It may occur. IMPORTANT DO NOT cancel any of the machine and gently close the scanner cover. The installation screens appear ...; and Windows® 7, when the Windows® Security screen appears, click the check box and click Install to your computer. c Carefully guide the USB cable into the cable channel and out the back of the machine to lift the scanner cover until it locks securely into the open position.

Quick Setup Guide - English
Page 17
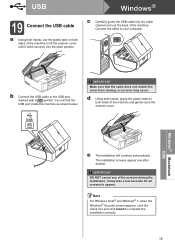
... Note For Mac OS X 10.4.0 to 10.4.10 users, upgrade to your Macintosh. USB 18 Connect the USB cable IMPORTANT • DO NOT connect the machine to a USB port on a keyboard or a non-powered USB hub. • Connect the machine directly to your Macintosh is connected to the power ... restrict the cover from closing, or an error may occur. USB Macintosh For USB interface users (Mac OS X 10.4.11, 10.5.x, 10.6.x) 17 Before you install b Connect the USB cable to the USB port marked with Administrator rights. You will find the USB port inside the machine as shown below.
... Note For Mac OS X 10.4.0 to 10.4.10 users, upgrade to your Macintosh. USB 18 Connect the USB cable IMPORTANT • DO NOT connect the machine to a USB port on a keyboard or a non-powered USB hub. • Connect the machine directly to your Macintosh is connected to the power ... restrict the cover from closing, or an error may occur. USB Macintosh For USB interface users (Mac OS X 10.4.11, 10.5.x, 10.6.x) 17 Before you install b Connect the USB cable to the USB port marked with Administrator rights. You will find the USB port inside the machine as shown below.

Quick Setup Guide - English
Page 22
...installer and a USB cable (Windows® only) You need to add the following network ports. For network scanning, add UDP port 54925. For network PC-Fax receiving, add UDP port 54926. If you accept the license agreements. and then click Next. 22 Note If the Brother screen does not...Vista® and Windows® 7, when the User Account Control screen appears, click Allow or Yes. e Choose Use your network connection, add UDP port 137 and 161. If the model name screen appears, choose your CD-ROM drive. d When this screen may appear. a Put the supplied installer ...
...installer and a USB cable (Windows® only) You need to add the following network ports. For network scanning, add UDP port 54925. For network PC-Fax receiving, add UDP port 54926. If you accept the license agreements. and then click Next. 22 Note If the Brother screen does not...Vista® and Windows® 7, when the User Account Control screen appears, click Allow or Yes. e Choose Use your network connection, add UDP port 137 and 161. If the model name screen appears, choose your CD-ROM drive. d When this screen may appear. a Put the supplied installer ...


