
Software Users Manual - English
Page 192
... to choose Set New Default. d After changing the last setting, press a or b to Media. b Press a or b to choose Scan to choose Factory Reset. Press OK. e Press Stop/Exit. 12 12 12 12 186 Press OK. c Press a or b to Media. Repeat this step for Scan to Media You... can set your new setting. f Press Stop/Exit. Factory reset a Press (SCAN). Press OK. d Press 1 or to choose Yes. c Press and choose your own default settings. Setting the new default a Press (...
... to choose Set New Default. d After changing the last setting, press a or b to Media. b Press a or b to choose Scan to choose Factory Reset. Press OK. e Press Stop/Exit. 12 12 12 12 186 Press OK. c Press a or b to Media. Repeat this step for Scan to Media You... can set your new setting. f Press Stop/Exit. Factory reset a Press (SCAN). Press OK. d Press 1 or to choose Yes. c Press and choose your own default settings. Setting the new default a Press (...
Network Users Manual - English
Page 40
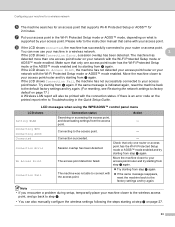
.... 3 If the LCD shows Connection Error, a session overlap has been detected. Move the machine closer to factory default on your access point/router and try again. (For resetting, see Restoring the network settings to your network with the connection status. Action - If the same message is...network with the access point. - The machine was not able to the factory settings and try starting from step d again. Try starting from step d again. If the same message reappears, reset the machine back to connect with the Wi-Fi Protected Setup mode or ...
.... 3 If the LCD shows Connection Error, a session overlap has been detected. Move the machine closer to factory default on your access point/router and try again. (For resetting, see Restoring the network settings to your network with the connection status. Action - If the same message is...network with the access point. - The machine was not able to the factory settings and try starting from step d again. Try starting from step d again. If the same message reappears, reset the machine back to connect with the Wi-Fi Protected Setup mode or ...
Network Users Manual - English
Page 42
...the printed page and then click Next. 4 Choose your network that you need to register it to your network in advance. For resetting, see Restoring the network settings to factory default on the printed report refer to Troubleshooting in the Quick Setup Guide. 35 A Wireless LAN report will also be printed with... follow the on the brand of access point/router. Note The setting page is different, depending on -screen instructions. 1 The Registrar is indicated again, reset the machine back to the default factory settings and try again. If the same message is normally the access point/router.
...the printed page and then click Next. 4 Choose your network that you need to register it to your network in advance. For resetting, see Restoring the network settings to factory default on the printed report refer to Troubleshooting in the Quick Setup Guide. 35 A Wireless LAN report will also be printed with... follow the on the brand of access point/router. Note The setting page is different, depending on -screen instructions. 1 The Registrar is indicated again, reset the machine back to the default factory settings and try again. If the same message is normally the access point/router.

Network Users Manual - English
Page 59
...; mode enabled. Action - The access point detection failed. If the same message is indicated again, reset the machine back to the default factory settings and try again. (For resetting, see Restoring the network settings to your access point/router and try starting from step f again. ...Session overlap has been detected. Check that only one access point/router on page 77.) LCD messages when using the Brother installer ...
...; mode enabled. Action - The access point detection failed. If the same message is indicated again, reset the machine back to the default factory settings and try again. (For resetting, see Restoring the network settings to your access point/router and try starting from step f again. ...Session overlap has been detected. Check that only one access point/router on page 77.) LCD messages when using the Brother installer ...
Network Users Manual - English
Page 84
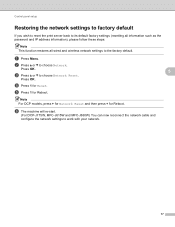
... network settings to choose Network Reset. Note For DCP models, press + for Network Reset and then press + for Reboot. e Press 1 for Reboot. Press OK. 5 c Press a or b to the factory default. b Press a or b to work with your network. 77 a Press Menu. f The machine will re-start. (For DCP-J715W, MFC-J615W and MFC-J630W) You can now...
... network settings to choose Network Reset. Note For DCP models, press + for Network Reset and then press + for Reboot. e Press 1 for Reboot. Press OK. 5 c Press a or b to the factory default. b Press a or b to work with your network. 77 a Press Menu. f The machine will re-start. (For DCP-J715W, MFC-J615W and MFC-J630W) You can now...
Network Users Manual - English
Page 110
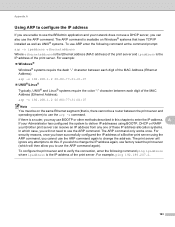
...Using ARP to configure the IP address A If you are unable to use the BRAdmin application and your Brother print server can also use the ARP command. The print server will ignore any one of the MAC ...ARP command is available on the same Ethernet segment (that have successfully configured the IP address of a Brother print server using BOOTP, DHCP or RARP your network does not use the ARP command again). arp -s...print server and operating system) to change the IP address again, use factory reset the print server (which case, you will then allow you may use the arp -s command.
...Using ARP to configure the IP address A If you are unable to use the BRAdmin application and your Brother print server can also use the ARP command. The print server will ignore any one of the MAC ...ARP command is available on the same Ethernet segment (that have successfully configured the IP address of a Brother print server using BOOTP, DHCP or RARP your network does not use the ARP command again). arp -s...print server and operating system) to change the IP address again, use factory reset the print server (which case, you will then allow you may use the arp -s command.
Network Users Manual - English
Page 116
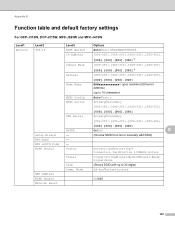
... table and default factory settings B For DCP-J315W, DCP-J515W, MFC-J265W and MFC-J415W B Level1 Network Level2 TCP/IP Level3 BOOT Method IP Address Subnet Mask Gateway Node Name WINS Config WINS Server DNS Server Setup Wizard WPS/AOSS WPS w/PIN Code WLAN Status MAC Address WLAN Enable Network Reset APIPA - - - Status Signal...
... table and default factory settings B For DCP-J315W, DCP-J515W, MFC-J265W and MFC-J415W B Level1 Network Level2 TCP/IP Level3 BOOT Method IP Address Subnet Mask Gateway Node Name WINS Config WINS Server DNS Server Setup Wizard WPS/AOSS WPS w/PIN Code WLAN Status MAC Address WLAN Enable Network Reset APIPA - - - Status Signal...

Network Users Manual - English
Page 118
.... DNS Server [000].[000].[000].[000] Primary/Secondary [000-255].[000-255]. [000-255].[000-255]. APIPA Setup Wizard - Mode MAC Address Network I/F Network Reset The factory settings are shown in bold. [000].[000].[000].[000] On/Off (Choose SSID from list or manually add SSID) Active(11b)/Active(11g)/ Connection...
.... DNS Server [000].[000].[000].[000] Primary/Secondary [000-255].[000-255]. [000-255].[000-255]. APIPA Setup Wizard - Mode MAC Address Network I/F Network Reset The factory settings are shown in bold. [000].[000].[000].[000] On/Off (Choose SSID from list or manually add SSID) Active(11b)/Active(11g)/ Connection...

Quick Setup Guide - English
Page 39
... up and insert letters. Press OK. g The machine will restart, re-connect cables once this is not operating, then disconnect all network settings of the internal Print/Scan server to factory default, please follow the steps below. Re-enter the correct character. a Make sure the machine is complete. e Press 1 to choose Network...
... up and insert letters. Press OK. g The machine will restart, re-connect cables once this is not operating, then disconnect all network settings of the internal Print/Scan server to factory default, please follow the steps below. Re-enter the correct character. a Make sure the machine is complete. e Press 1 to choose Network...

Advanced Users Manual - English
Page 5
... Density 38 Ink Save Mode 38 Book Copy ...39 Watermark Copy 40 Setting your changes as the new default 41 Restoring all settings to the factory settings 41 8 PhotoCapture Center®: Printing photos from a memory card or USB Flash memory drive 42 PhotoCapture Center® operations 42 Memory cards, USB Flash..., Contrast and Color 51 Cropping ...52 Borderless printing 52 Print Date...52 Setting your changes as the new default 52 Restoring all settings to the factory settings 53 Scan to a memory card or USB Flash memory drive 53 Auto Crop ...53 How to set a new default 54 How to...
... Density 38 Ink Save Mode 38 Book Copy ...39 Watermark Copy 40 Setting your changes as the new default 41 Restoring all settings to the factory settings 41 8 PhotoCapture Center®: Printing photos from a memory card or USB Flash memory drive 42 PhotoCapture Center® operations 42 Memory cards, USB Flash..., Contrast and Color 51 Cropping ...52 Borderless printing 52 Print Date...52 Setting your changes as the new default 52 Restoring all settings to the factory settings 53 Scan to a memory card or USB Flash memory drive 53 Auto Crop ...53 How to set a new default 54 How to...

Advanced Users Manual - English
Page 9
... to choose Auto Daylight. Press OK. b Press a or b to choose Sleep Mode. e Press Stop/Exit. c Press a or b to choose General Setup. Make sure you will reset itself forward one hour in the Spring and backward one hour in the Date&Time setting. Press OK. General setup Sleep Mode 1 You can set... how long the machine must 1 be idle (from 1 to choose General Setup. c Press a or b to change automatically for daylight saving time. e Press Stop/Exit. 3 The factory setting is carried out on Automatic Daylight Saving Time as follows.
... to choose Auto Daylight. Press OK. b Press a or b to choose Sleep Mode. e Press Stop/Exit. c Press a or b to choose General Setup. Make sure you will reset itself forward one hour in the Spring and backward one hour in the Date&Time setting. Press OK. General setup Sleep Mode 1 You can set... how long the machine must 1 be idle (from 1 to choose General Setup. c Press a or b to change automatically for daylight saving time. e Press Stop/Exit. 3 The factory setting is carried out on Automatic Daylight Saving Time as follows.

Advanced Users Manual - English
Page 15
... Fax Resolution, Contrast, Real Time TX, and Glass ScanSize, that you want . Press OK. e Press Stop/Exit. d Press 1 to choose Factory Reset. Good for small print and transmits a little slower than Standard resolution. d Press Stop/Exit. 9 b Press a or b to choose Yes. b Press a ...or b to the factory settings. a Press (FAX). Restoring fax settings to the factory settings 3 You can save the fax settings for each setting you have changed, to choose Fax Resolution. If you choose S.Fine...
... Fax Resolution, Contrast, Real Time TX, and Glass ScanSize, that you want . Press OK. e Press Stop/Exit. d Press 1 to choose Factory Reset. Good for small print and transmits a little slower than Standard resolution. d Press Stop/Exit. 9 b Press a or b to choose Yes. b Press a ...or b to the factory settings. a Press (FAX). Restoring fax settings to the factory settings 3 You can save the fax settings for each setting you have changed, to choose Fax Resolution. If you choose S.Fine...

Advanced Users Manual - English
Page 47
... change the Transparency of copies you want . c After changing the last setting, press a or b to choose Current Setting. d Press 1 to choose Factory Reset. e Press Stop/Exit. Restoring all settings to the factory settings 7 You can save the copy settings for each setting you change any additional settings, press Black Start or Color Start...
... change the Transparency of copies you want . c After changing the last setting, press a or b to choose Current Setting. d Press 1 to choose Factory Reset. e Press Stop/Exit. Restoring all settings to the factory settings 7 You can save the copy settings for each setting you change any additional settings, press Black Start or Color Start...
Advanced Users Manual - English
Page 59
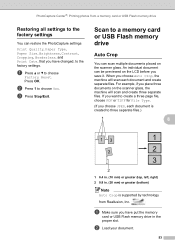
... or USB Flash memory drive in . (20 mm) or greater (bottom) Note Auto Crop is created to choose Yes. Scan to the factory settings. An individual document can scan multiple documents placed on the scanner glass, the machine will scan each document is supported by technology from Reallusion... three page file, choose PDF or TIFF for File Type. (If you choose JPEG, each document and create separate files. a Press a or b to choose Factory Reset. For example, if you save it. b Load your document. 53 c Press Stop/Exit. When you have changed, to a memory card or USB Flash memory ...
... or USB Flash memory drive in . (20 mm) or greater (bottom) Note Auto Crop is created to choose Yes. Scan to the factory settings. An individual document can scan multiple documents placed on the scanner glass, the machine will scan each document is supported by technology from Reallusion... three page file, choose PDF or TIFF for File Type. (If you choose JPEG, each document and create separate files. a Press a or b to choose Factory Reset. For example, if you save it. b Load your document. 53 c Press Stop/Exit. When you have changed, to a memory card or USB Flash memory ...

Advanced Users Manual - English
Page 60
... stored on them again. How to set a new default 8 You can restore all four corners with right angles of 90 degrees. How to reset to the factory settings 8 You can save the data. Press OK. Note • Auto Crop is available for up to a maximum of 16 documents depending ... away from each document data. i Press d or c to start scanning. Press OK. c Press a or b to Media. d Press a or b to choose Scan to choose Factory Reset. h The number of the scanner glass as the default settings. j Press OK to choose Yes. Press OK and 1 to save the Scan to choose On...
... stored on them again. How to set a new default 8 You can restore all four corners with right angles of 90 degrees. How to reset to the factory settings 8 You can save the data. Press OK. Note • Auto Crop is available for up to a maximum of 16 documents depending ... away from each document data. i Press d or c to start scanning. Press OK. c Press a or b to Media. d Press a or b to choose Scan to choose Factory Reset. h The number of the scanner glass as the default settings. j Press OK to choose Yes. Press OK and 1 to save the Scan to choose On...

Basic Users Manual - English
Page 58
... Mode Stack/Sort Page Layout Book Copy Watermark Copy Set New Default Factory Reset Note • If you will need to choose Plain Paper, Inkjet Paper, Brother BP71, Brother BP61, Other Glossy or Transparency. a Press (COPY). f If you do not want to choose Paper Type. Press OK. Chapter...
... Mode Stack/Sort Page Layout Book Copy Watermark Copy Set New Default Factory Reset Note • If you will need to choose Plain Paper, Inkjet Paper, Brother BP71, Brother BP61, Other Glossy or Transparency. a Press (COPY). f If you do not want to choose Paper Type. Press OK. Chapter...

Basic Users Manual - English
Page 104
Level1 Real Time TX Level2 - Glass ScanSize - Factory Reset - - - 1 See Advanced User's Guide. The factory settings are having difficulty sending faxes overseas, set this to the factory settings. 25 See 1. 90 Descriptions You can save your fax settings. If you are shown in Bold with a document to be retrieved by another fax ...
Level1 Real Time TX Level2 - Glass ScanSize - Factory Reset - - - 1 See Advanced User's Guide. The factory settings are having difficulty sending faxes overseas, set this to the factory settings. 25 See 1. 90 Descriptions You can save your fax settings. If you are shown in Bold with a document to be retrieved by another fax ...
Basic Users Manual - English
Page 105
or a color document into your scan settings as the default settings. Set New Default - - Factory Reset - - Scan to Image - - - You can scan a black & white See 1. TIFF - You can save your computer. You can scan a black & white See 1. C Scan... on the scanner glass to an editable text file. B/W 200x100 File Type - PageManager from http://nj.newsoft.com.tw/download/brother/PM7Installer_BR_multilang.dmg The factory settings are shown in Quality setting) PDF* JPEG (If you have your Color 600 document. B/W 200 (If you chose ...
or a color document into your scan settings as the default settings. Set New Default - - Factory Reset - - Scan to Image - - - You can scan a black & white See 1. TIFF - You can save your computer. You can scan a black & white See 1. C Scan... on the scanner glass to an editable text file. B/W 200x100 File Type - PageManager from http://nj.newsoft.com.tw/download/brother/PM7Installer_BR_multilang.dmg The factory settings are shown in Quality setting) PDF* JPEG (If you have your Color 600 document. B/W 200 (If you chose ...

Basic Users Manual - English
Page 107
... Mode - - Off(1 in the following table.) You can choose to the factory settings. 1 See Advanced User's Guide. Off* - - Exit - - Level3 - The factory settings are shown in 1 (L) Book Copy On On(Preview) - C 93 Options Menu and features Descriptions Adjusts the density of copies. Factory Reset - - - Level1 Density Level2 - You can make N in 1 or 2 in 1 (P) Poster...
... Mode - - Off(1 in the following table.) You can choose to the factory settings. 1 See Advanced User's Guide. Off* - - Exit - - Level3 - The factory settings are shown in 1 (L) Book Copy On On(Preview) - C 93 Options Menu and features Descriptions Adjusts the density of copies. Factory Reset - - - Level1 Density Level2 - You can make N in 1 or 2 in 1 (P) Poster...

Basic Users Manual - English
Page 112
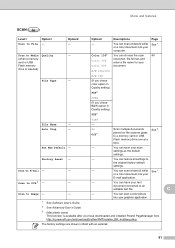
... the total amount of the image. You can restore all the settings to fit the edges of the white areas. Factory Reset - - - 1 See Advanced User's Guide. The factory settings are shown in the image. You can save your photo. Crops the image around the margin to print whole images...print settings. Option1 True2Life (Does not appear when Enhance Photos is chosen.) Off* Set New Default - - - Expands the printable area to factory settings. 98 Enhances the detail of color in Bold with an asterisk. Turn this feature off if you want to fit the paper size or...
... the total amount of the image. You can restore all the settings to fit the edges of the white areas. Factory Reset - - - 1 See Advanced User's Guide. The factory settings are shown in the image. You can save your photo. Crops the image around the margin to print whole images...print settings. Option1 True2Life (Does not appear when Enhance Photos is chosen.) Off* Set New Default - - - Expands the printable area to factory settings. 98 Enhances the detail of color in Bold with an asterisk. Turn this feature off if you want to fit the paper size or...


