
Quick Setup Guide - English
Page 4
... Tray Support 11 Multi-purpose tray (MP tray) CD-ROMs For Windows® For Macintosh® Quick Setup Guide User's Guide Belt Unit (pre-installed) AC Power Cord Telephone line Cord Insertion Sheet and Plastic Accessory Order Form and bag for repacking Test Sheet (USA ...only) Toner cartridges (Black, Cyan, Magenta and Yellow) Drum Unit (pre-installed) Waste Toner Box (preinstalled) The interface cable is no longer than 6 feet (2 meters). Getting Started 1 Carton components 1 Carton...
... Tray Support 11 Multi-purpose tray (MP tray) CD-ROMs For Windows® For Macintosh® Quick Setup Guide User's Guide Belt Unit (pre-installed) AC Power Cord Telephone line Cord Insertion Sheet and Plastic Accessory Order Form and bag for repacking Test Sheet (USA ...only) Toner cartridges (Black, Cyan, Magenta and Yellow) Drum Unit (pre-installed) Waste Toner Box (preinstalled) The interface cable is no longer than 6 feet (2 meters). Getting Started 1 Carton components 1 Carton...
Quick Setup Guide - English
Page 51
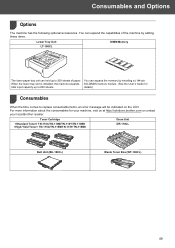
...machine by installing a (144-pin When the lower tray unit is installed, the machine expands SO-DIMM) memory module. (See the User's Guide for your machine, visit us at http://solutions.brother.com or contact your local Brother reseller. Consumables and Options 1 Options 1 The machine has... the following optional accessories. Toner Cartridge TN-110C/TN-110M/TN-110Y/TN-110BK TN-115C/TN-115M/TN-115Y/TN-115BK Drum Unit DR-110CL Belt Unit (BU-100CL) Waste...
...machine by installing a (144-pin When the lower tray unit is installed, the machine expands SO-DIMM) memory module. (See the User's Guide for your machine, visit us at http://solutions.brother.com or contact your local Brother reseller. Consumables and Options 1 Options 1 The machine has... the following optional accessories. Toner Cartridge TN-110C/TN-110M/TN-110Y/TN-110BK TN-115C/TN-115M/TN-115Y/TN-115BK Drum Unit DR-110CL Belt Unit (BU-100CL) Waste...
Users Manual - English
Page 5
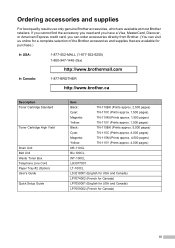
... Discover, or American Express credit card, you can order accessories directly from Brother. (You can visit us online for Canada) iii Ordering accessories and supplies For best quality results use only genuine Brother accessories, which are available for purchase.) In USA: 1-877-552-MALL ...(1-877-552-6255) 1-800-947-1445 (fax) http://www.brothermall.com In Canada: 1-877-BROTHER http://www.brother.ca Description Toner Cartridge Standard Toner Cartridge High Yield Drum Unit Belt Unit Waste Toner Box Telephone Line Cord Paper Tray #2 (Option) User's Guide Quick Setup Guide Item Black...
... Discover, or American Express credit card, you can order accessories directly from Brother. (You can visit us online for Canada) iii Ordering accessories and supplies For best quality results use only genuine Brother accessories, which are available for purchase.) In USA: 1-877-552-MALL ...(1-877-552-6255) 1-800-947-1445 (fax) http://www.brothermall.com In Canada: 1-877-BROTHER http://www.brother.ca Description Toner Cartridge Standard Toner Cartridge High Yield Drum Unit Belt Unit Waste Toner Box Telephone Line Cord Paper Tray #2 (Option) User's Guide Quick Setup Guide Item Black...
Users Manual - English
Page 7
... not limited to damage resulting from use of non Brother®-brand parts and Consumable and Accessory Items); 4 Consumable and Accessory Items that expired in accordance with a copy of your purchase you are not limited to Toner Cartridges, Drum Unit, Belt Unit, and Waste Toner Box. „ Except as ...Paper Feeding Kit, Fuser and Laser Units. What is the length of the Warranty Periods: „ Machines: one year from the original...
... not limited to damage resulting from use of non Brother®-brand parts and Consumable and Accessory Items); 4 Consumable and Accessory Items that expired in accordance with a copy of your purchase you are not limited to Toner Cartridges, Drum Unit, Belt Unit, and Waste Toner Box. „ Except as ...Paper Feeding Kit, Fuser and Laser Units. What is the length of the Warranty Periods: „ Machines: one year from the original...
Users Manual - English
Page 15
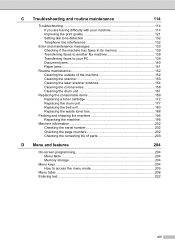
... 152 Cleaning the scanner 153 Cleaning the laser scanner windows 154 Cleaning the corona wires 158 Cleaning the drum unit 161 Replacing the consumable items 169 Replacing a toner cartridge 172 Replacing the drum unit 177 Replacing the belt unit 183 Replacing the waste toner box 188 Packing and shipping the machine 194 Repacking the machine 195...
... 152 Cleaning the scanner 153 Cleaning the laser scanner windows 154 Cleaning the corona wires 158 Cleaning the drum unit 161 Replacing the consumable items 169 Replacing a toner cartridge 172 Replacing the drum unit 177 Replacing the belt unit 183 Replacing the waste toner box 188 Packing and shipping the machine 194 Repacking the machine 195...

Users Manual - English
Page 140
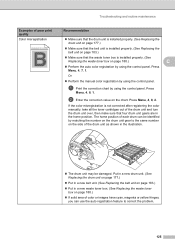
...installed properly. (See Replacing a toner cartridge on page 177.) „ The drum unit may not be damaged. Put in a new drum unit. (See Replacing the drum unit on page 177.) „ Put in a new belt unit. (See Replacing the belt unit on page 183.) „ Clean the corona wires of your monitor. „...Toner life end message on page 172.) „ Make sure that the drum unit is installed properly. (See Replacing the drum unit on page 177.) „ Make sure that the belt unit is installed properly. (See Replacing the belt unit on the CD-ROM.) „ Adjust the color by using the ...
...installed properly. (See Replacing a toner cartridge on page 177.) „ The drum unit may not be damaged. Put in a new drum unit. (See Replacing the drum unit on page 177.) „ Put in a new belt unit. (See Replacing the belt unit on page 183.) „ Clean the corona wires of your monitor. „...Toner life end message on page 172.) „ Make sure that the drum unit is installed properly. (See Replacing the drum unit on page 177.) „ Make sure that the belt unit is installed properly. (See Replacing the belt unit on the CD-ROM.) „ Adjust the color by using the ...
Users Manual - English
Page 141
... be damaged. a Print the correction chart by using the control panel. Press Menu, 4, 8, 2. Put in a new drum unit. (See Replacing the drum unit on page 177.) „ Put in a new belt unit. (See Replacing the belt unit on page 183.) „ Put in a new waste toner box. (See Replacing the waste toner box on the side of color...
... be damaged. a Print the correction chart by using the control panel. Press Menu, 4, 8, 2. Put in a new drum unit. (See Replacing the drum unit on page 177.) „ Put in a new belt unit. (See Replacing the belt unit on page 183.) „ Put in a new waste toner box. (See Replacing the waste toner box on the side of color...
Users Manual - English
Page 149
... page 183.) Use the drum unit until you have a print quality problem; Belt Unit Change Parts Drum The drum unit is time to choose Drum. Replace the belt unit. (See Replacing the belt unit on page 188.) „ If the problem continues, call Brother Customer Service. then replace the drum unit with direct print or PictBridge. Call Brother Customer Service to reset the drum unit counter. Press Black...
... page 183.) Use the drum unit until you have a print quality problem; Belt Unit Change Parts Drum The drum unit is time to choose Drum. Replace the belt unit. (See Replacing the belt unit on page 188.) „ If the problem continues, call Brother Customer Service. then replace the drum unit with direct print or PictBridge. Call Brother Customer Service to reset the drum unit counter. Press Black...
Users Manual - English
Page 151
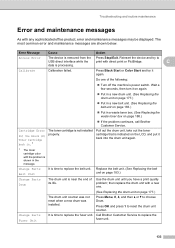
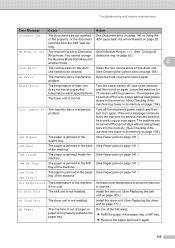
...problem. C Drum Error The corona wires on page 141.) tray of the machine. The machine can be cleaned. Jam Inside The paper is set to Distinctive Set Distinctive Ring to operate. to Off. (See Turning off , wait a few seconds, and then turn it again. No Belt Unit The belt unit is too... hot. Do one of fuser unit does not rise at a specified temperature within specified time. You cannot change distinctive ring on again. Turn the power switch...
...problem. C Drum Error The corona wires on page 141.) tray of the machine. The machine can be cleaned. Jam Inside The paper is set to Distinctive Set Distinctive Ring to operate. to Off. (See Turning off , wait a few seconds, and then turn it again. No Belt Unit The belt unit is too... hot. Do one of fuser unit does not rise at a specified temperature within specified time. You cannot change distinctive ring on again. Turn the power switch...
Users Manual - English
Page 153
... in the Software User's Guide on the CD-ROM.) „ Put in a new belt unit. (See Replacing the belt unit on the USB flash memory drive or the file you try again. Turn off for scanning... the file name of paper for up and printing is shown in a new drum unit. (See Replacing the drum unit on page 177.) „ Replace the empty toner cartridge with a new one...132; If one . (See Replacing a toner cartridge on again. „ If the problem continues, call Brother Customer Service. duplex scanning. (See Scan on page 139.) Document is locked. Toner Life End Replace Black(K) ...
... in the Software User's Guide on the CD-ROM.) „ Put in a new belt unit. (See Replacing the belt unit on the USB flash memory drive or the file you try again. Turn off for scanning... the file name of paper for up and printing is shown in a new drum unit. (See Replacing the drum unit on page 177.) „ Replace the empty toner cartridge with a new one...132; If one . (See Replacing a toner cartridge on again. „ If the problem continues, call Brother Customer Service. duplex scanning. (See Scan on page 139.) Document is locked. Toner Life End Replace Black(K) ...
Users Manual - English
Page 187
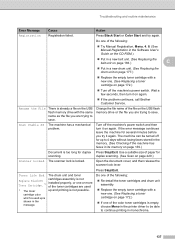
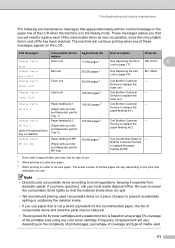
...normal message on page 177. LCD messages Change Parts Drum Consumable item to Approximate life replace How to local regulations, keeping it separate from domestic waste. BU-100CL Change Parts Fuser Unit Fuser unit 80,000 pages 3 Call Brother Customer - Change Parts PF Kit MP Paper feeding...PF Kit 1 Paper feeding kit 1 (Paper pick-up roller and Separator pad for Tray 1) 100,000 pages 3 Call Brother Customer - Change Parts Belt Unit Belt unit 50,000 pages 2 See Replacing the belt unit on Letter or A4 size paper. These messages advise you will vary depending on the LCD.
...normal message on page 177. LCD messages Change Parts Drum Consumable item to Approximate life replace How to local regulations, keeping it separate from domestic waste. BU-100CL Change Parts Fuser Unit Fuser unit 80,000 pages 3 Call Brother Customer - Change Parts PF Kit MP Paper feeding...PF Kit 1 Paper feeding kit 1 (Paper pick-up roller and Separator pad for Tray 1) 100,000 pages 3 Call Brother Customer - Change Parts Belt Unit Belt unit 50,000 pages 2 See Replacing the belt unit on Letter or A4 size paper. These messages advise you will vary depending on the LCD.

Users Manual - English
Page 199
... the parts name which needs to be reset the counter. 84.Reset Menu Drum Select ab or OK k Press a or b to reset the drum unit counter. m Press Stop/Exit. Replacing the belt unit C Order Number: BU-100CL Change Parts Belt Unit message C When the belt unit runs out, the following message appears on the LCD. When you see this...
... the parts name which needs to be reset the counter. 84.Reset Menu Drum Select ab or OK k Press a or b to reset the drum unit counter. m Press Stop/Exit. Replacing the belt unit C Order Number: BU-100CL Change Parts Belt Unit message C When the belt unit runs out, the following message appears on the LCD. When you see this...
Users Manual - English
Page 201
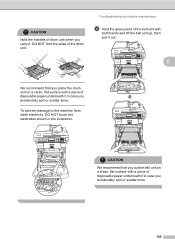
... CAUTION We recommend that you accidentally spill or scatter toner. C We recommend that you put the belt unit on a clean, flat surface with a piece of the belt unit with a piece of drum unit when you carry it out. To prevent damage to the machine from static electricity, DO NOT touch... the electrodes shown in case you place the drum unit on a clean, flat surface with both hands and lift the belt unit up, then pull it . Troubleshooting and routine maintenance d Hold the green parts of disposable paper underneath ...
... CAUTION We recommend that you accidentally spill or scatter toner. C We recommend that you put the belt unit on a clean, flat surface with a piece of the belt unit with a piece of drum unit when you carry it out. To prevent damage to the machine from static electricity, DO NOT touch... the electrodes shown in case you place the drum unit on a clean, flat surface with both hands and lift the belt unit up, then pull it . Troubleshooting and routine maintenance d Hold the green parts of disposable paper underneath ...

Users Manual - English
Page 202
Push down the gray lock lever (1). g Put the drum unit back in the machine as follows. 1 Make sure that the gray lock lever (1) is in the up position and put the drum unit in the machine. Push down on the green area of the belt unit to the g mark on the belt unit to lock it in place. 1 1 186 Match the h mark on the machine. f Put the new belt unit in the machine. e Unpack the new belt unit, and remove the protective cover and paper.
Push down the gray lock lever (1). g Put the drum unit back in the machine as follows. 1 Make sure that the gray lock lever (1) is in the up position and put the drum unit in the machine. Push down on the green area of the belt unit to the g mark on the belt unit to lock it in place. 1 1 186 Match the h mark on the machine. f Put the new belt unit in the machine. e Unpack the new belt unit, and remove the protective cover and paper.

Users Manual - English
Page 203
C 2 1 h Close the front cover of the machine. 2 1 Troubleshooting and routine maintenance 2 Push the drum unit in until it stops. When you replace the belt unit with a new one, you put the drum unit in the machine, match the green guides (1) of the drum unit handle to reset the belt unit counter by completing the following steps: i Turn on both sides of the machine. Note When you need to the green arrows (2) on the machine's power switch. 187
C 2 1 h Close the front cover of the machine. 2 1 Troubleshooting and routine maintenance 2 Push the drum unit in until it stops. When you replace the belt unit with a new one, you put the drum unit in the machine, match the green guides (1) of the drum unit handle to reset the belt unit counter by completing the following steps: i Turn on both sides of the machine. Note When you need to the green arrows (2) on the machine's power switch. 187

Users Manual - English
Page 208
Push down the gray lock lever (1). 1 1 192 h Put the drum unit back in the machine as follows. 1 Make sure that the gray lock lever (1) is in the up position and put the drum unit in the machine. Push down on the green area of the belt unit to the g mark on the belt unit to lock it in place. Match the h mark on the machine. g Put the belt unit back in the machine.
Push down the gray lock lever (1). 1 1 192 h Put the drum unit back in the machine as follows. 1 Make sure that the gray lock lever (1) is in the up position and put the drum unit in the machine. Push down on the green area of the belt unit to the g mark on the belt unit to lock it in place. Match the h mark on the machine. g Put the belt unit back in the machine.

Users Manual - English
Page 211
... AC power outlet. b Lift the document cover. Make sure that the toner cartridge originally came in (4 pieces of each) 4 Orange packing material for locking the drum unit and the belt unit (4 pieces) 5 A piece of paper (Letter or A4) to lock the scanner. Push the C scanner lock lever down to protect the...
... AC power outlet. b Lift the document cover. Make sure that the toner cartridge originally came in (4 pieces of each) 4 Orange packing material for locking the drum unit and the belt unit (4 pieces) 5 A piece of paper (Letter or A4) to lock the scanner. Push the C scanner lock lever down to protect the...
Users Manual - English
Page 213
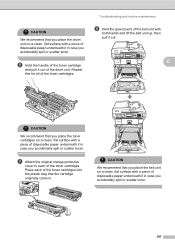
...Place each of the toner cartridges into the plastic bag that you place the belt unit on a clean, flat surface with both hands and lift the belt unit up, then pull it out. CAUTION We recommend that you place the drum unit on a clean, flat surface with a piece of disposable paper underneath it... Hold the green parts of the belt unit with a piece of disposable paper underneath it out of the toner cartridges. CAUTION We recommend that the cartridge originally came in case you accidentally spill or scatter toner. 197 Repeat this for all of the drum unit. f Hold the handle of the ...
...Place each of the toner cartridges into the plastic bag that you place the belt unit on a clean, flat surface with both hands and lift the belt unit up, then pull it out. CAUTION We recommend that you place the drum unit on a clean, flat surface with a piece of disposable paper underneath it... Hold the green parts of the belt unit with a piece of disposable paper underneath it out of the toner cartridges. CAUTION We recommend that the cartridge originally came in case you accidentally spill or scatter toner. 197 Repeat this for all of the drum unit. f Hold the handle of the ...
Users Manual - English
Page 219
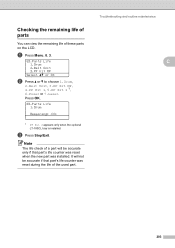
...: XX% 1 PF Kit 2 appears only when the optional LT-100CL tray is installed. a Press Menu, 8, 3. 83.Parts Life 1.Drum 2.Belt Unit 3.PF Kit MP Select ab or OK b Press a or b to choose 1.Drum, 2.Belt Unit, 3.PF Kit MP, 4.PF Kit 1, 5.PF Kit 2 1, 6.Fuser or 7.Laser. Checking the remaining life of parts C You can view the remaining...
...: XX% 1 PF Kit 2 appears only when the optional LT-100CL tray is installed. a Press Menu, 8, 3. 83.Parts Life 1.Drum 2.Belt Unit 3.PF Kit MP Select ab or OK b Press a or b to choose 1.Drum, 2.Belt Unit, 3.PF Kit MP, 4.PF Kit 1, 5.PF Kit 2 1, 6.Fuser or 7.Laser. Checking the remaining life of parts C You can view the remaining...
Users Manual - English
Page 237
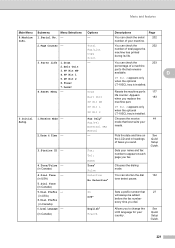
...Guide. 221 Total Fax/List Copy Print You can check the 202 number of total pages the machine has printed during its life. 3.Parts Life 1.Drum - 2.Belt Unit 3.PF Kit MP 4.PF Kit 1 5.PF Kit 2 6.Fuser 7.Laser You can check the 203 percentage of a machine part's life that best ...suits your country. Drum Belt Unit PF Kit MP Resets the machine part's 177 life counter. Appears when you send. Manual 2.Date & Time - - PF Kit 1 PF Kit 2 PF Kit...
...Guide. 221 Total Fax/List Copy Print You can check the 202 number of total pages the machine has printed during its life. 3.Parts Life 1.Drum - 2.Belt Unit 3.PF Kit MP 4.PF Kit 1 5.PF Kit 2 6.Fuser 7.Laser You can check the 203 percentage of a machine part's life that best ...suits your country. Drum Belt Unit PF Kit MP Resets the machine part's 177 life counter. Appears when you send. Manual 2.Date & Time - - PF Kit 1 PF Kit 2 PF Kit...


