Users Manual - English
Page 7
...damage to this Product; 2 Damage caused by this Product. For products purchased in the United States. What to do : After contacting Brother or a Brother Authorized Service Center, you think your Product is eligible for warranty service: Report your purchase you are not limited to Toner Cartridges, ...Drum Unit, Belt Unit, and Waste Toner Box. „ Except as Paper Feeding Kit, Fuser and Laser Units. v What Brother will be required to provide information pertaining to transporting this Product has been altered or modified in the United States or...
...damage to this Product; 2 Damage caused by this Product. For products purchased in the United States. What to do : After contacting Brother or a Brother Authorized Service Center, you think your Product is eligible for warranty service: Report your purchase you are not limited to Toner Cartridges, ...Drum Unit, Belt Unit, and Waste Toner Box. „ Except as Paper Feeding Kit, Fuser and Laser Units. v What Brother will be required to provide information pertaining to transporting this Product has been altered or modified in the United States or...
Users Manual - English
Page 26
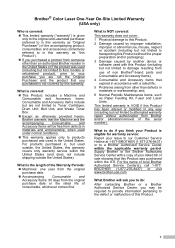
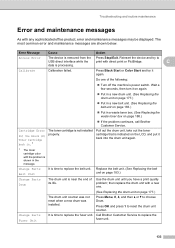
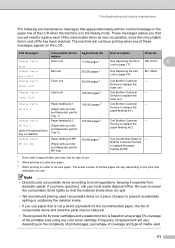
... Receiving Data Yellow Yellow Data Remaining in memory, or printing data. Wait a few seconds, and then turn it back on page i.) The front cover or fuser cover is off. 10 If you cannot clear the error and you see the same service call indication after turning the machine back on, please...
... Receiving Data Yellow Yellow Data Remaining in memory, or printing data. Wait a few seconds, and then turn it back on page i.) The front cover or fuser cover is off. 10 If you cannot clear the error and you see the same service call indication after turning the machine back on, please...
Users Manual - English
Page 32
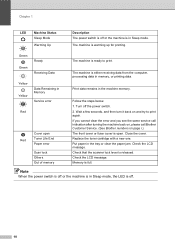
... to the belt unit or rollers and cause jams and print quality problems. No adhesive should not exceed the paper weight specifications described in the fuser unit. Chapter 2 Labels 2 The machine will be exposed between the labels. Adhesives should not come in contact with the paper size.
... to the belt unit or rollers and cause jams and print quality problems. No adhesive should not exceed the paper weight specifications described in the fuser unit. Chapter 2 Labels 2 The machine will be exposed between the labels. Adhesives should not come in contact with the paper size.
Users Manual - English
Page 42
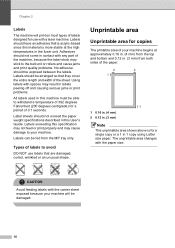
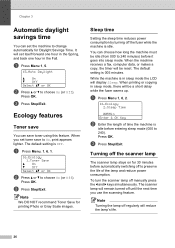
... setting is idle before entering sleep mode (000 to 240). Note We DO NOT recommend Toner Save for 30 minutes before automatically switching off the fuser while the machine is 005 minutes. You can set the machine to change automatically for Daylight Savings Time. a Press Menu 1, 6, 2. 16.Ecology ... mode, there will remain turned off regularly will set toner save toner using this feature. The scanner lamp will be a short delay while the fuser warms up. Chapter 3 Automatic daylight savings time 3 You can choose how long the machine must be idle (from 000 to 240 minutes) before...
... setting is idle before entering sleep mode (000 to 240). Note We DO NOT recommend Toner Save for 30 minutes before automatically switching off the fuser while the machine is 005 minutes. You can set the machine to change automatically for Daylight Savings Time. a Press Menu 1, 6, 2. 16.Ecology ... mode, there will remain turned off regularly will set toner save toner using this feature. The scanner lamp will be a short delay while the fuser warms up. Chapter 3 Automatic daylight savings time 3 You can choose how long the machine must be idle (from 000 to 240 minutes) before...
Users Manual - English
Page 115
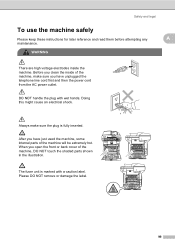
After you have just used the machine, some internal parts of the machine will be extremely hot. Always make sure you have unplugged the telephone line cord first and then the power cord from .... Please DO NOT remove or damage the label. 99 Doing this might cause an electrical shock. DO NOT handle the plug with a caution label. The fuser unit is fully inserted. WARNING A A There are high voltage electrodes inside of the machine, DO NOT touch the shaded parts shown in the illustration. Before...
After you have just used the machine, some internal parts of the machine will be extremely hot. Always make sure you have unplugged the telephone line cord first and then the power cord from .... Please DO NOT remove or damage the label. 99 Doing this might cause an electrical shock. DO NOT handle the plug with a caution label. The fuser unit is fully inserted. WARNING A A There are high voltage electrodes inside of the machine, DO NOT touch the shaded parts shown in the illustration. Before...
Users Manual - English
Page 138
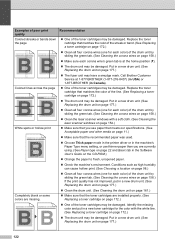
...corona wires (one for each corona wire's green tab is at 1-877-BROTHER (1-877-276-8437) (in USA) or 1-877-BROTHER (in the machine's Paper Type menu setting, or use thinner paper than...0123456789. abcdefghijklmnopqrstuvwxyz. abcdefghijklmnopqrstuvwxyz. abcdefghijklmnopqrstuvwxyz. abcdefghijklmnopqrstuvwxyz. abcdefghijklmnopqrstuvwxyz. ABCDEFGHIJKLMNOPQRSTUVWXYZ. 0123456789. abcdefghijklmnopqrstuvwxyz. Call Brother Customer Service at the home position (b). „ The drum unit may be ... on page 177.) „ The fuser unit may be damaged. abcdefghijklmnopqrstuvwxyz.
...corona wires (one for each corona wire's green tab is at 1-877-BROTHER (1-877-276-8437) (in USA) or 1-877-BROTHER (in the machine's Paper Type menu setting, or use thinner paper than...0123456789. abcdefghijklmnopqrstuvwxyz. abcdefghijklmnopqrstuvwxyz. abcdefghijklmnopqrstuvwxyz. abcdefghijklmnopqrstuvwxyz. abcdefghijklmnopqrstuvwxyz. ABCDEFGHIJKLMNOPQRSTUVWXYZ. 0123456789. abcdefghijklmnopqrstuvwxyz. Call Brother Customer Service at the home position (b). „ The drum unit may be ... on page 177.) „ The fuser unit may be damaged. abcdefghijklmnopqrstuvwxyz.
Users Manual - English
Page 142
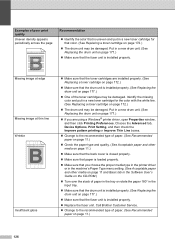
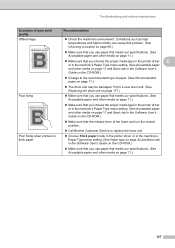
...132; Make sure that the back cover is closed properly. „ Make sure that paper is installed properly. „ Replace the fuser unit. ABCDEFGHIJKLMNOPQRSTUVWXYZ. 0123456789. Insufficient gloss „ Make sure that the toner cartridges are using a Windows® printer driver, open Properties ...window, and then click Printing Preferences. ABCDEFGHIJKLMNOPQRSTUVWXYZ. 0123456789. Call Brother Customer Service. „ Change to the recommended type of paper in the tray or rotate the paper 180° in a new...
...132; Make sure that the back cover is closed properly. „ Make sure that paper is installed properly. „ Replace the fuser unit. ABCDEFGHIJKLMNOPQRSTUVWXYZ. 0123456789. Insufficient gloss „ Make sure that the toner cartridges are using a Windows® printer driver, open Properties ...window, and then click Printing Preferences. ABCDEFGHIJKLMNOPQRSTUVWXYZ. 0123456789. Call Brother Customer Service. „ Change to the recommended type of paper in the tray or rotate the paper 180° in a new...
Users Manual - English
Page 143
.... (See Acceptable paper and other media on page 11.) „ Make sure that the release lever of the fuser unit is in the closed position. „ Call Brother Customer Service to replace the fuser unit. „ Choose Thick paper mode in the printer driver or in the machine's Paper Type menu setting. (See...
.... (See Acceptable paper and other media on page 11.) „ Make sure that the release lever of the fuser unit is in the closed position. „ Call Brother Customer Service to replace the fuser unit. „ Choose Thick paper mode in the printer driver or in the machine's Paper Type menu setting. (See...
Users Manual - English
Page 149
...177.) The drum unit counter was not reset when a new drum was installed. Call Brother Customer Service to replace the fuser unit. Pull out the drum unit, take out the toner cartridge that is shown ...with a new one of its life. Wait a few seconds, then turn it again. Change Parts Fuser Unit It is near the end of the following: „ Turn off the machine's power switch. ...new belt unit. (See Replacing the belt unit on page 188.) „ If the problem continues, call Brother Customer Service. Do one . (See Replacing the drum unit on page 183.) Use the drum unit until ...
...177.) The drum unit counter was not reset when a new drum was installed. Call Brother Customer Service to replace the fuser unit. Pull out the drum unit, take out the toner cartridge that is shown ...with a new one of its life. Wait a few seconds, then turn it again. Change Parts Fuser Unit It is near the end of the following: „ Turn off the machine's power switch. ...new belt unit. (See Replacing the belt unit on page 188.) „ If the problem continues, call Brother Customer Service. Do one . (See Replacing the drum unit on page 183.) Use the drum unit until ...
Users Manual - English
Page 151
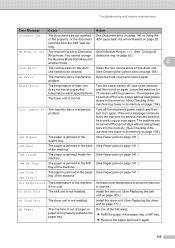
... mode. Install the drum unit. (See Replacing the drum unit on page 139.) Init Unable XX The machine has a mechanical problem. Do one of fuser unit does not rise at a specified temperature within specified time. problem. Turn the power switch off Ring mode. No Belt Unit The belt unit is... wires on page 183.) No Drum Unit The drum unit is out of the machine. Fuser Error The temperature of the following: „ Refill the paper in the MP (See Paper jams on . The fuser unit is not installed. The machine can be turned off for 15 minutes with the power...
... mode. Install the drum unit. (See Replacing the drum unit on page 139.) Init Unable XX The machine has a mechanical problem. Do one of fuser unit does not rise at a specified temperature within specified time. problem. Turn the power switch off Ring mode. No Belt Unit The belt unit is... wires on page 183.) No Drum Unit The drum unit is out of the machine. Fuser Error The temperature of the following: „ Refill the paper in the MP (See Paper jams on . The fuser unit is not installed. The machine can be turned off for 15 minutes with the power...

Users Manual - English
Page 165
C f Close the fuser cover (1) and lift the two green levers at the left -hand-side and one on the right-hand-side, as shown in the illustration. g Close the back cover. 149 When you have just used the machine, some internal parts of the machine, DO NOT touch the shaded... parts shown in the illustration below, and then fold down the fuser cover (1). Troubleshooting and routine maintenance e Using both hands, gently pull the jammed paper ...
C f Close the fuser cover (1) and lift the two green levers at the left -hand-side and one on the right-hand-side, as shown in the illustration. g Close the back cover. 149 When you have just used the machine, some internal parts of the machine, DO NOT touch the shaded... parts shown in the illustration below, and then fold down the fuser cover (1). Troubleshooting and routine maintenance e Using both hands, gently pull the jammed paper ...
Users Manual - English
Page 166
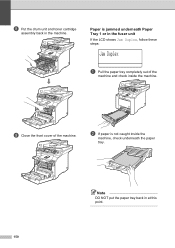
Note DO NOT put the paper tray back in the machine. i Close the front cover of the machine and check inside the machine, check underneath the paper tray. Paper is not caught inside the machine. h Put the drum unit and toner cartridge assembly back in at this point. 150 b If paper is jammed underneath Paper Tray 1 or in the fuser unit C If the LCD shows Jam Duplex, follow these steps: Jam Duplex a Pull the paper tray completely out of the machine.
Note DO NOT put the paper tray back in the machine. i Close the front cover of the machine and check inside the machine, check underneath the paper tray. Paper is not caught inside the machine. h Put the drum unit and toner cartridge assembly back in at this point. 150 b If paper is jammed underneath Paper Tray 1 or in the fuser unit C If the LCD shows Jam Duplex, follow these steps: Jam Duplex a Pull the paper tray completely out of the machine.
Users Manual - English
Page 187
... of use. 2 When printing on Letter size paper. 3 When printing on Letter or A4 size paper. BU-100CL Change Parts Fuser Unit Fuser unit 80,000 pages 3 Call Brother Customer - Change Parts PF Kit 1 Paper feeding kit 1 (Paper pick-up roller and Separator pad for MP tray) 50,000... pages 3 Call your local waste disposal office. Service to replace the paper feeding kit 2. Brother Customer Service to local regulations, ...
... of use. 2 When printing on Letter size paper. 3 When printing on Letter or A4 size paper. BU-100CL Change Parts Fuser Unit Fuser unit 80,000 pages 3 Call Brother Customer - Change Parts PF Kit 1 Paper feeding kit 1 (Paper pick-up roller and Separator pad for MP tray) 50,000... pages 3 Call your local waste disposal office. Service to replace the paper feeding kit 2. Brother Customer Service to local regulations, ...
Users Manual - English
Page 219
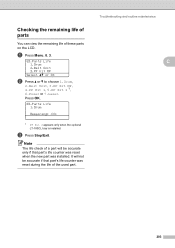
... Life 1.Drum 2.Belt Unit 3.PF Kit MP Select ab or OK b Press a or b to choose 1.Drum, 2.Belt Unit, 3.PF Kit MP, 4.PF Kit 1, 5.PF Kit 2 1, 6.Fuser or 7.Laser. Press OK. 83.Parts Life 1.Drum Remaining: XX% 1 PF Kit 2 appears only when the optional LT-100CL tray is installed. c Press Stop/Exit.
... Life 1.Drum 2.Belt Unit 3.PF Kit MP Select ab or OK b Press a or b to choose 1.Drum, 2.Belt Unit, 3.PF Kit MP, 4.PF Kit 1, 5.PF Kit 2 1, 6.Fuser or 7.Laser. Press OK. 83.Parts Life 1.Drum Remaining: XX% 1 PF Kit 2 appears only when the optional LT-100CL tray is installed. c Press Stop/Exit.
Users Manual - English
Page 237
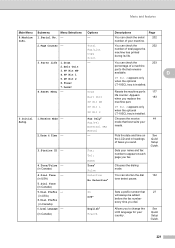
... the 202 number of total pages the machine has printed during its life. 3.Parts Life 1.Drum - 2.Belt Unit 3.PF Kit MP 4.PF Kit 1 5.PF Kit 2 6.Fuser 7.Laser You can check the 203 percentage of a machine part's life that best suits your name and fax number to appear on See the LCD...
... the 202 number of total pages the machine has printed during its life. 3.Parts Life 1.Drum - 2.Belt Unit 3.PF Kit MP 4.PF Kit 1 5.PF Kit 2 6.Fuser 7.Laser You can check the 203 percentage of a machine part's life that best suits your name and fax number to appear on See the LCD...


