
Advanced Users Manual - English
Page 5
...53 A Routine maintenance 55 Cleaning and checking the machine 55 Cleaning the outside of the machine 55 Cleaning the scanner 56 Cleaning the laser scanner windows 57 Cleaning the corona wires 61 Cleaning the drum unit 65 Cleaning the paper pick-up rollers 71 Calibration ...72 Auto... Registration 73 Manual Registration 73 Frequency (Color Correction 74 Checking the Page Counters 74 Checking the remaining life of parts 74 Replacing periodic maintenance parts 75 Packing and shipping the ...
...53 A Routine maintenance 55 Cleaning and checking the machine 55 Cleaning the outside of the machine 55 Cleaning the scanner 56 Cleaning the laser scanner windows 57 Cleaning the corona wires 61 Cleaning the drum unit 65 Cleaning the paper pick-up rollers 71 Calibration ...72 Auto... Registration 73 Manual Registration 73 Frequency (Color Correction 74 Checking the Page Counters 74 Checking the remaining life of parts 74 Replacing periodic maintenance parts 75 Packing and shipping the ...
Advanced Users Manual - English
Page 80
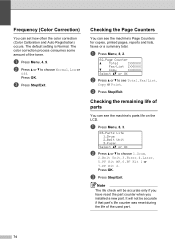
.... 74 Press OK. b Press a or b to choose 1.Drum, 2.Belt Unit, 3.Fuser, 4.Laser, 5.PF Kit MP, 6.PF Kit 1 or 7.PF Kit 2. Checking the Page Counters A You can set how often the color correction (Color Calibration and Auto Registration) occurs. a Press Menu, 8, 3. 83.Parts Life 1.Drum 2.Belt Unit ... Select ab or OK b Press a or b to choose Normal, Low or Off. Press OK. c Press Stop/Exit. c Press Stop/Exit. Frequency (Color Correction) A You can see the machine's Page Counters for copies, printed pages, reports and lists, faxes or a summary total. The default setting is Normal...
.... 74 Press OK. b Press a or b to choose 1.Drum, 2.Belt Unit, 3.Fuser, 4.Laser, 5.PF Kit MP, 6.PF Kit 1 or 7.PF Kit 2. Checking the Page Counters A You can set how often the color correction (Color Calibration and Auto Registration) occurs. a Press Menu, 8, 3. 83.Parts Life 1.Drum 2.Belt Unit ... Select ab or OK b Press a or b to choose Normal, Low or Off. Press OK. c Press Stop/Exit. c Press Stop/Exit. Frequency (Color Correction) A You can see the machine's Page Counters for copies, printed pages, reports and lists, faxes or a summary total. The default setting is Normal...
Users Manual - English
Page 28
...only warranty service within the U.S. This limited warranty is VOID if this Product has been altered or modified in the United States. Supply Brother or the Brother Authorized Service Center with a rated life; 5 Problems arising from other than defects in the United States or if the product was .... v What is NOT covered: This warranty does not cover: 1 Physical damage to this Product; 2 Damage caused by this warranty. Brother® Color Laser One-Year On-Site Limited Warranty (USA only) Who is covered: This limited warranty ("warranty") is given only to the original...
...only warranty service within the U.S. This limited warranty is VOID if this Product has been altered or modified in the United States. Supply Brother or the Brother Authorized Service Center with a rated life; 5 Problems arising from other than defects in the United States or if the product was .... v What is NOT covered: This warranty does not cover: 1 Physical damage to this Product; 2 Damage caused by this warranty. Brother® Color Laser One-Year On-Site Limited Warranty (USA only) Who is covered: This limited warranty ("warranty") is given only to the original...

Users Manual - English
Page 29
...not be liable for any equipment, media, programs or data related to the use of the Brother representative. © 2010 Brother International Corporation vi Limitations: Brother is not responsible for damage to or loss of any direct, indirect, incidental or consequential ... WHETHER EXPRESSED BY AFFIRMATION, PROMISE, DESCRIPTION, DRAWING, MODEL OR SAMPLE. Brother® Color Laser One-Year On-Site Limited Warranty (USA only) What Brother will ask you to do: After contacting Brother or a Brother Authorized Service Center, you may be required to provide information pertaining to ...
...not be liable for any equipment, media, programs or data related to the use of the Brother representative. © 2010 Brother International Corporation vi Limitations: Brother is not responsible for damage to or loss of any direct, indirect, incidental or consequential ... WHETHER EXPRESSED BY AFFIRMATION, PROMISE, DESCRIPTION, DRAWING, MODEL OR SAMPLE. Brother® Color Laser One-Year On-Site Limited Warranty (USA only) What Brother will ask you to do: After contacting Brother or a Brother Authorized Service Center, you may be required to provide information pertaining to ...
Users Manual - English
Page 158
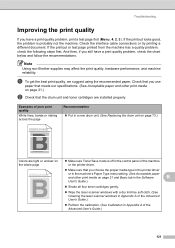
...quality problem, check the following steps first. abcdefghijklmnopqrstuvwxyz. abcdefghijklmnopqrstuvwxyz. abcdefghijklmnopqrstuvwxyz. Colors are installed properly. abcdefghijklmnopqrstuvwxyz. ABCDEFGHIJKLMNOPQRSTUVWXYZ. 0123456789. Troubleshooting Improving the print ..., check the chart below and follow the recommendations. Note Using non-Brother supplies may affect the print quality, hardware performance, and machine reliability....toner cartridges gently. Wipe the laser scanner windows with a dry lint-free soft cloth. (See Cleaning the laser scanner windows in Appendix A of the ...
...quality problem, check the following steps first. abcdefghijklmnopqrstuvwxyz. abcdefghijklmnopqrstuvwxyz. abcdefghijklmnopqrstuvwxyz. Colors are installed properly. abcdefghijklmnopqrstuvwxyz. ABCDEFGHIJKLMNOPQRSTUVWXYZ. 0123456789. Troubleshooting Improving the print ..., check the chart below and follow the recommendations. Note Using non-Brother supplies may affect the print quality, hardware performance, and machine reliability....toner cartridges gently. Wipe the laser scanner windows with a dry lint-free soft cloth. (See Cleaning the laser scanner windows in Appendix A of the ...

Users Manual - English
Page 159
.... abcdefghijklmnopqrstuvwxyz. abcdefghijklmnopqrstuvwxyz. abcdefghijklmnopqrstuvwxyz. ABCDEFGHIJKLMNOPQRSTUVWXYZ. 0123456789. Recommendation Wipe the laser scanner windows with a dry lint-free soft cloth. (See Cleaning the laser scanner windows in Appendix A of the Advanced User's Guide.) ...drum unit. (See Replacing the drum unit on page 62.) To identify the color of the toner cartridge, visit us at http://solutions.brother.com/ to view our FAQs and troubleshooting tips. abcdefghijklmnopqrstuvwxyz. ABCDEFGHIJKLMNOPQRSTUVWXYZ. 0123456789. ...
.... abcdefghijklmnopqrstuvwxyz. abcdefghijklmnopqrstuvwxyz. abcdefghijklmnopqrstuvwxyz. ABCDEFGHIJKLMNOPQRSTUVWXYZ. 0123456789. Recommendation Wipe the laser scanner windows with a dry lint-free soft cloth. (See Cleaning the laser scanner windows in Appendix A of the Advanced User's Guide.) ...drum unit. (See Replacing the drum unit on page 62.) To identify the color of the toner cartridge, visit us at http://solutions.brother.com/ to view our FAQs and troubleshooting tips. abcdefghijklmnopqrstuvwxyz. ABCDEFGHIJKLMNOPQRSTUVWXYZ. 0123456789. ...

Users Manual - English
Page 219
...53 A Routine maintenance 55 Cleaning and checking the machine 55 Cleaning the outside of the machine 55 Cleaning the scanner 56 Cleaning the laser scanner windows 57 Cleaning the corona wires 61 Cleaning the drum unit 65 Cleaning the paper pick-up rollers 71 Calibration ...72 Auto... Registration 73 Manual Registration 73 Frequency (Color Correction 74 Checking the Page Counters 74 Checking the remaining life of parts 74 Replacing periodic maintenance parts 75 Packing and shipping the ...
...53 A Routine maintenance 55 Cleaning and checking the machine 55 Cleaning the outside of the machine 55 Cleaning the scanner 56 Cleaning the laser scanner windows 57 Cleaning the corona wires 61 Cleaning the drum unit 65 Cleaning the paper pick-up rollers 71 Calibration ...72 Auto... Registration 73 Manual Registration 73 Frequency (Color Correction 74 Checking the Page Counters 74 Checking the remaining life of parts 74 Replacing periodic maintenance parts 75 Packing and shipping the ...

Users Manual - English
Page 294
The default setting is Normal. c Press Stop/Exit. Press OK. The color correction process consumes some amount of the used part. 74 a Press Menu, 8, 2. 82.Page Counter a Total :XXXXXX Fax/List :XXXXXX b Copy :XXXXXX Select ab or ... Select ab or OK b Press a or b to choose Normal, Low or Off. Press OK. c Press Stop/Exit. b Press a or b to choose 1.Drum, 2.Belt Unit, 3.Fuser, 4.Laser, 5.PF Kit MP, 6.PF Kit 1 or 7.PF Kit 2. c Press Stop/Exit. Frequency (Color Correction) A You can set how often the color correction (Color Calibration and Auto Registration) occurs.
The default setting is Normal. c Press Stop/Exit. Press OK. The color correction process consumes some amount of the used part. 74 a Press Menu, 8, 2. 82.Page Counter a Total :XXXXXX Fax/List :XXXXXX b Copy :XXXXXX Select ab or ... Select ab or OK b Press a or b to choose Normal, Low or Off. Press OK. c Press Stop/Exit. b Press a or b to choose 1.Drum, 2.Belt Unit, 3.Fuser, 4.Laser, 5.PF Kit MP, 6.PF Kit 1 or 7.PF Kit 2. c Press Stop/Exit. Frequency (Color Correction) A You can set how often the color correction (Color Calibration and Auto Registration) occurs.


