
Users Manual - English
Page 80
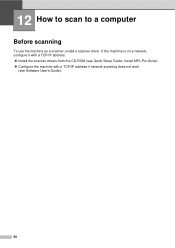
If the machine is on a network, configure it with a TCP/IP address. Install the scanner drivers from the CD-ROM (see Quick Setup Guide: Install MFL-Pro Suite). Configure the machine with a TCP/IP address if network scanning does not work (see Software User's Guide). 66 12 How to scan to a computer 12 Before scanning 12 To use the machine as a scanner, install a scanner driver.
If the machine is on a network, configure it with a TCP/IP address. Install the scanner drivers from the CD-ROM (see Quick Setup Guide: Install MFL-Pro Suite). Configure the machine with a TCP/IP address if network scanning does not work (see Software User's Guide). 66 12 How to scan to a computer 12 Before scanning 12 To use the machine as a scanner, install a scanner driver.
Users Manual - English
Page 158
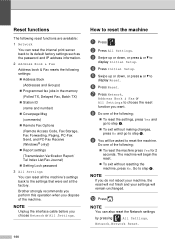
... reset functions are available: 1 Network You can reset the internal print server back to its default factory settings such as the password and IP address information. 2 Address Book & Fax Address book & Fax resets the following settings: Address Book (Addresses and Groups) Programmed fax jobs in the memory ...reset the Network settings by pressing , All Settings, Network, Network Reset. 144 Go to reset the machine B a Press . Brother strongly recommends you perform this operation when you do not reboot your machine, the reset will not finish and your settings will be...
... reset functions are available: 1 Network You can reset the internal print server back to its default factory settings such as the password and IP address information. 2 Address Book & Fax Address book & Fax resets the following settings: Address Book (Addresses and Groups) Programmed fax jobs in the memory ...reset the Network settings by pressing , All Settings, Network, Network Reset. 144 Go to reset the machine B a Press . Brother strongly recommends you perform this operation when you do not reboot your machine, the reset will not finish and your settings will be...

Users Manual - English
Page 169
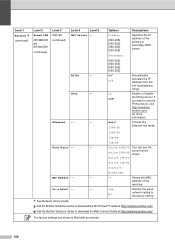
...255]. [000-255]. [000-255] Specifies the IP address of attempts the machine will try to obtain an IP address when the Boot Method is set to download the Wi-Fi Direct™ Guide at http://solutions.brother.com/. Configuration Auto* Static Chooses the WINS configuration ... an asterisk. 155 Settings and features tables Level 1 Network Level 2 Wired LAN (MFC-9330CDW and MFC-9340CDW) Level 3 TCP/IP Level 4 Level 5 Boot Method - Visit the Brother Solutions Center to any setting except Static. IP Address - [000-255]. [000-255]. [000-255]. [000-255] Enter the...
...255]. [000-255]. [000-255] Specifies the IP address of attempts the machine will try to obtain an IP address when the Boot Method is set to download the Wi-Fi Direct™ Guide at http://solutions.brother.com/. Configuration Auto* Static Chooses the WINS configuration ... an asterisk. 155 Settings and features tables Level 1 Network Level 2 Wired LAN (MFC-9330CDW and MFC-9340CDW) Level 3 TCP/IP Level 4 Level 5 Boot Method - Visit the Brother Solutions Center to any setting except Static. IP Address - [000-255]. [000-255]. [000-255]. [000-255] Enter the...
Users Manual - English
Page 170
...-255] On* Off On Off* Automatically allocates the IP address from the link-local address range. brother.com/ for more information. Yes No Shows the MAC address of the primary or secondary DNS server. Visit the Brother Solutions Center to use the IPv6 protocol, visit http://... Network (continued) Level 2 Wired LAN (MFC-9330CDW and MFC-9340CDW) (continued) Level 3 TCP/IP (continued) Level 4 Level 5 DNS Server - Enable or Disable the IPv6 protocol. If you want to download the Web Connect Guide at http://solutions.brother.com/. The factory settings are shown in Bold...
...-255] On* Off On Off* Automatically allocates the IP address from the link-local address range. brother.com/ for more information. Yes No Shows the MAC address of the primary or secondary DNS server. Visit the Brother Solutions Center to use the IPv6 protocol, visit http://... Network (continued) Level 2 Wired LAN (MFC-9330CDW and MFC-9340CDW) (continued) Level 3 TCP/IP (continued) Level 4 Level 5 DNS Server - Enable or Disable the IPv6 protocol. If you want to download the Web Connect Guide at http://solutions.brother.com/. The factory settings are shown in Bold...

Users Manual - English
Page 171
... are shown in Bold with an asterisk. 157 TCP/IP Boot Method - IP Address - [000-255]. [000-255]. [000-255]. [000-255] Enter the IP address. Settings and features tables Level 1 Network (continued) Level 2 Wired LAN (MFC-9330CDW and MFC-9340CDW) (continued) WLAN Level 3 Level 4 Wired Enable ...- Tries) 3* [00000-32767] Specifies the number of attempts the machine will try to obtain an IP address when the Boot Method is set to download the Web Connect Guide at http://solutions.brother.com/. ...
... are shown in Bold with an asterisk. 157 TCP/IP Boot Method - IP Address - [000-255]. [000-255]. [000-255]. [000-255] Enter the IP address. Settings and features tables Level 1 Network (continued) Level 2 Wired LAN (MFC-9330CDW and MFC-9340CDW) (continued) WLAN Level 3 Level 4 Wired Enable ...- Tries) 3* [00000-32767] Specifies the number of attempts the machine will try to obtain an IP address when the Boot Method is set to download the Web Connect Guide at http://solutions.brother.com/. ...

Users Manual - English
Page 172
...APIPA - IPv6 - You can easily configure your internal print server. You can configure your wireless network settings using the one-button push method. Visit the Brother Solutions Center to download the Web Connect Guide at http://solutions.brother.com/. WPS/AOSS - - [000-255]....Direct™ Guide at http://solutions.brother.com/. brother.com/ for more information. Level 1 Network (continued) Level 2 WLAN (continued) Level 3 TCP/IP (continued) Level 4 Level 5 WINS Server - Automatically allocates the IP address from the link-local address range. See Network User's Guide....
...APIPA - IPv6 - You can easily configure your internal print server. You can configure your wireless network settings using the one-button push method. Visit the Brother Solutions Center to download the Web Connect Guide at http://solutions.brother.com/. WPS/AOSS - - [000-255]....Direct™ Guide at http://solutions.brother.com/. brother.com/ for more information. Level 1 Network (continued) Level 2 WLAN (continued) Level 3 TCP/IP (continued) Level 4 Level 5 WINS Server - Automatically allocates the IP address from the link-local address range. See Network User's Guide....

Users Manual - English
Page 174
... Strong Medium Weak You can see the current Wi-Fi Direct™ network signal strength. IP Address - - Visit the Brother Solutions Center to download the Web Connect Guide at http://solutions.brother.com/. Sets your machine acts as the Group Owner. Level 1 Network (continued) Level ...2 Level 3 Wi-Fi Direct PIN Code Level 4 - (continued) Level 5 - You can see the current IP Address of your Wi-Fi Direct™ network...
... Strong Medium Weak You can see the current Wi-Fi Direct™ network signal strength. IP Address - - Visit the Brother Solutions Center to download the Web Connect Guide at http://solutions.brother.com/. Sets your machine acts as the Group Owner. Level 1 Network (continued) Level ...2 Level 3 Wi-Fi Direct PIN Code Level 4 - (continued) Level 5 - You can see the current IP Address of your Wi-Fi Direct™ network...

Users Manual - English
Page 175
...download the Web Connect Guide at http://solutions.brother.com/. Visit the Brother Solutions Center to download the Wi-Fi Direct™ Guide at http://solutions.brother.com/. SMTP Server Name (Up to 64 characters) Enter the mail address (up 60 characters). IP Address [000-255]. [000-255]. [000-...Wi-Fi Direct™ connection. The factory settings are shown in Bold with an asterisk. 161 E-mail/IFAX Mail Address - (Available after IFAX is downloaded) Setup Server SMTP - - IP Address [000-255]. [000-255]. [000-255]. [000-255] SMTP Port 25* [1-65535] Enter the SMTP port...
...download the Web Connect Guide at http://solutions.brother.com/. Visit the Brother Solutions Center to download the Wi-Fi Direct™ Guide at http://solutions.brother.com/. SMTP Server Name (Up to 64 characters) Enter the mail address (up 60 characters). IP Address [000-255]. [000-255]. [000-...Wi-Fi Direct™ connection. The factory settings are shown in Bold with an asterisk. 161 E-mail/IFAX Mail Address - (Available after IFAX is downloaded) Setup Server SMTP - - IP Address [000-255]. [000-255]. [000-255]. [000-255] SMTP Port 25* [1-65535] Enter the SMTP port...
Advanced Users Manual - English
Page 16
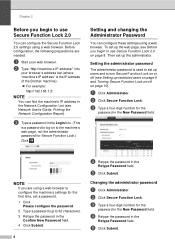
...Click Administrator. NOTE If you are needed. b Click Secure Function Lock. c Type a password in the Login box. (This is the IP address of the Brother machine). For example: v192.168.1.2/ NOTE You can configure these settings using a web browser to log on page 10). e ...Click Submit. a Start your browser's address bar (where "machine's IP address" is a password to configure the machine's settings for Secure Function Lock.) ...
...Click Administrator. NOTE If you are needed. b Click Secure Function Lock. c Type a password in the Login box. (This is the IP address of the Brother machine). For example: v192.168.1.2/ NOTE You can configure these settings using a web browser to log on page 10). e ...Click Submit. a Start your browser's address bar (where "machine's IP address" is a password to configure the machine's settings for Secure Function Lock.) ...
Quick Setup Guide - English
Page 17
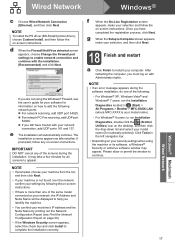
...during the software installation, do one after another. For Windows® 8 users: to appear. If you have trouble with your machine's IP address and the Node Name by following network ports: For network scanning, add UDP port 54925. For network PC-Fax ...will be displayed to help you still have completed the registration process, click Next. Click Tools in (Start) > All Programs > Brother > MFC-XXXX LAN (where MFC-XXXX is Complete screen appears, make your selection, and then click Next. 18 Finish and restart a Click Finish to continue. 17...
...during the software installation, do one after another. For Windows® 8 users: to appear. If you have trouble with your machine's IP address and the Node Name by following network ports: For network scanning, add UDP port 54925. For network PC-Fax ...will be displayed to help you still have completed the registration process, click Next. Click Tools in (Start) > All Programs > Brother > MFC-XXXX LAN (where MFC-XXXX is Complete screen appears, make your selection, and then click Next. 18 Finish and restart a Click Finish to continue. 17...

Quick Setup Guide - English
Page 20
...organize photos and documents using Presto! PageManager. g Choose your machine from the list, click Add, and then click Next. (OS X v10.8.x) Select MFC-XXXX CUPS driver from the Print Using (Use) pop-up menu. You can find your model name). Go to 15 characters long). 2) Click Next... Software User's Guide). Go to " name screen appears, follow the on each computer. Go to Brother ControlCenter2. The installation of the same model connected on your network, the IP Address will appear on the machine's Touchscreen when you want to use your Macintosh (up menu (where XXXX...
...organize photos and documents using Presto! PageManager. g Choose your machine from the list, click Add, and then click Next. (OS X v10.8.x) Select MFC-XXXX CUPS driver from the Print Using (Use) pop-up menu. You can find your model name). Go to 15 characters long). 2) Click Next... Software User's Guide). Go to " name screen appears, follow the on each computer. Go to Brother ControlCenter2. The installation of the same model connected on your network, the IP Address will appear on the machine's Touchscreen when you want to use your Macintosh (up menu (where XXXX...

Quick Setup Guide - English
Page 26
... Next. A four-level indicator at the top right of your machine's Touchscreen will remain unchanged if you click Cancel. • To manually enter the IP address settings of your machine. For Wireless Network Users k Confirm the wireless network settings, and then click Next. For Windows® Users: Now go to ... For Macintosh Users: Now go to step 20. NOTE • The settings will show the wireless signal strength of your machine, click Change IP Address and enter the necessary IP address settings for your network. • If the wireless setup failure screen appears, click Retry.
... Next. A four-level indicator at the top right of your machine's Touchscreen will remain unchanged if you click Cancel. • To manually enter the IP address settings of your machine. For Wireless Network Users k Confirm the wireless network settings, and then click Next. For Windows® Users: Now go to ... For Macintosh Users: Now go to step 20. NOTE • The settings will show the wireless signal strength of your machine, click Change IP Address and enter the necessary IP address settings for your network. • If the wireless setup failure screen appears, click Retry.
Quick Setup Guide - English
Page 37
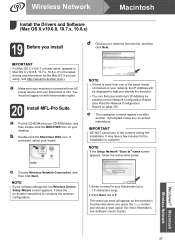
...click Next. NOTE If the Setup Network "Scan to" name screen appears, follow any of the same model connected on your network, the IP Address will appear on page 39). Windows® Macintosh Wireless Network 37 Wireless Network Macintosh Install the Drivers and Software (Mac OS X v10.6.8, 10...complete the wireless configuration. 1) Enter a name for the Mac OS X you install d Choose your CD-ROM drive, and then double-click the BROTHER icon on -screen instructions. If prompted, select your wireless settings fail, the Wireless Device Setup Wizard screen appears. Go to Mac OS X v10...
...click Next. NOTE If the Setup Network "Scan to" name screen appears, follow any of the same model connected on your network, the IP Address will appear on page 39). Windows® Macintosh Wireless Network 37 Wireless Network Macintosh Install the Drivers and Software (Mac OS X v10.6.8, 10...complete the wireless configuration. 1) Enter a name for the Mac OS X you install d Choose your CD-ROM drive, and then double-click the BROTHER icon on -screen instructions. If prompted, select your wireless settings fail, the Wireless Device Setup Wizard screen appears. Go to Mac OS X v10...
Quick Setup Guide - English
Page 39
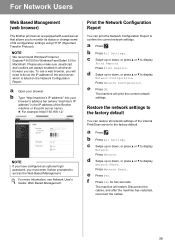
To use . Print the Network Configuration Report You can restore all network settings of the internal Print/Scan server to display Print Reports. b Press All Settings. Press Network Configuration. e Press OK. a Press . c Swipe up or down , or press a ...NOTE We recommend Windows® Internet Explorer® 8.0/9.0 for Windows® and Safari 5.0 for two seconds. a Open your browser's address bar (where "machine's IP address" is the IP address of the Brother machine or the print server name). For example: http://192.168.1.2/ NOTE If you have configured an optional login password,...
To use . Print the Network Configuration Report You can restore all network settings of the internal Print/Scan server to display Print Reports. b Press All Settings. Press Network Configuration. e Press OK. a Press . c Swipe up or down , or press a ...NOTE We recommend Windows® Internet Explorer® 8.0/9.0 for Windows® and Safari 5.0 for two seconds. a Open your browser's address bar (where "machine's IP address" is the IP address of the Brother machine or the print server name). For example: http://192.168.1.2/ NOTE If you have configured an optional login password,...

Network Users Manual - English
Page 3
...IP address, Subnet mask and Gateway 5 Using the control panel...5 Using the BRAdmin Light utility ...5 Other Management Utilities ...8 Web Based Management (web browser 8 BRAdmin Professional 3 utility (Windows 8 BRPrint Auditor (Windows®)...9 3 Configuring your machine for a wireless network (For DCP-9020CDW, MFC-9130CW, MFC-9330CDW and MFC-9340CDW......34 4 Control panel setup 36 Network menu...36 TCP/IP ...36 Ethernet (wired network only)...39 Wired Status (For DCP-9020CDN, DCP-9020CDW, MFC-9140CDN, MFC-9330CDW and MFC-9340CDW)...39 Setup Wizard (wireless network only 39 WPS (Wi-...
...IP address, Subnet mask and Gateway 5 Using the control panel...5 Using the BRAdmin Light utility ...5 Other Management Utilities ...8 Web Based Management (web browser 8 BRAdmin Professional 3 utility (Windows 8 BRPrint Auditor (Windows®)...9 3 Configuring your machine for a wireless network (For DCP-9020CDW, MFC-9130CW, MFC-9330CDW and MFC-9340CDW......34 4 Control panel setup 36 Network menu...36 TCP/IP ...36 Ethernet (wired network only)...39 Wired Status (For DCP-9020CDN, DCP-9020CDW, MFC-9140CDN, MFC-9330CDW and MFC-9340CDW)...39 Setup Wizard (wireless network only 39 WPS (Wi-...

Network Users Manual - English
Page 5
... 9 Types of network connections and protocols 114 Types of network connections ...114 Wired network connection example 114 Protocols...116 TCP/IP protocols and functions ...116 10 Configuring your machine for a network 120 IP addresses, subnet masks and gateways 120 IP address ...120 Subnet mask...121 Gateway (and router)...121 IEEE 802.1x Authentication ...122 iv
... 9 Types of network connections and protocols 114 Types of network connections ...114 Wired network connection example 114 Protocols...116 TCP/IP protocols and functions ...116 10 Configuring your machine for a network 120 IP addresses, subnet masks and gateways 120 IP address ...120 Subnet mask...121 Gateway (and router)...121 IEEE 802.1x Authentication ...122 iv

Network Users Manual - English
Page 6
11 Wireless network terms and concepts (For DCP-9020CDW, MFC-9130CW, MFC-9330CDW and MFC-9340CDW) 124 Specifying your network...124 SSID (Service Set Identifier) and channels 124 Security terms...124 Authentication and encryption ...124 Authentication and... the IP address (for advanced users and administrators 138 Using DHCP to configure the IP address 138 Using RARP to configure the IP address 139 Using BOOTP to configure the IP address 140 Using APIPA to configure the IP address 140 Using ARP to configure the IP address 141 Using the TELNET console to configure the IP address 142 ...
11 Wireless network terms and concepts (For DCP-9020CDW, MFC-9130CW, MFC-9330CDW and MFC-9340CDW) 124 Specifying your network...124 SSID (Service Set Identifier) and channels 124 Security terms...124 Authentication and encryption ...124 Authentication and... the IP address (for advanced users and administrators 138 Using DHCP to configure the IP address 138 Using RARP to configure the IP address 139 Using BOOTP to configure the IP address 140 Using APIPA to configure the IP address 140 Using ARP to configure the IP address 141 Using the TELNET console to configure the IP address 142 ...

Network Users Manual - English
Page 11
.... If the language screen appears, choose your machine's network settings (IP address, Subnet mask and Gateway) 2 2 The machine's network settings can download Brother's latest BRAdmin Light utility from http://solutions.brother.com/. 5 d The CD-ROM main menu will appear automatically. ...utility is ON. e Click BRAdmin Light and follow the on your machine for Brother products in a TCP/IP environment, view the status and configure basic network settings, such as IP address. Click Custom Installation, and then Network Utilities. Installing BRAdmin Light for details. ...
.... If the language screen appears, choose your machine's network settings (IP address, Subnet mask and Gateway) 2 2 The machine's network settings can download Brother's latest BRAdmin Light utility from http://solutions.brother.com/. 5 d The CD-ROM main menu will appear automatically. ...utility is ON. e Click BRAdmin Light and follow the on your machine for Brother products in a TCP/IP environment, view the status and configure basic network settings, such as IP address. Click Custom Installation, and then Network Utilities. Installing BRAdmin Light for details. ...
Network Users Manual - English
Page 12
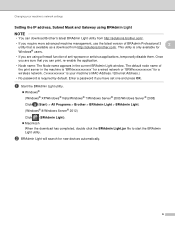
...network. ("xxxxxxxxxxxx" is your machine's network settings Setting the IP address, Subnet Mask and Gateway using a firewall function of BRAdmin Professional 3 2 utility that is "BRNxxxxxxxxxxxx" for a wired network or "BRWxxxxxxxxxxxx" for new devices automatically. 6 Changing your machine's MAC Address / Ethernet Address.) • No password is required by default. The ...-enable the application. • Node name: The Node name appears in the machine is available as a download from http://solutions.brother.com/. • If you have set one and press OK. Once you can download...
...network. ("xxxxxxxxxxxx" is your machine's network settings Setting the IP address, Subnet Mask and Gateway using a firewall function of BRAdmin Professional 3 2 utility that is "BRNxxxxxxxxxxxx" for a wired network or "BRWxxxxxxxxxxxx" for new devices automatically. 6 Changing your machine's MAC Address / Ethernet Address.) • No password is required by default. The ...-enable the application. • Node name: The Node name appears in the machine is available as a download from http://solutions.brother.com/. • If you have set one and press OK. Once you can download...

Network Users Manual - English
Page 13
Changing your machine. Enter the IP Address, Subnet Mask and Gateway (if needed) for your machine's network settings c Double-click the unconfigured device. You can find the Node Name and MAC Address from the control panel. (See Chapter 4: Control panel setup.) d Choose STATIC from Boot Method. Windows®... in the device list. 7 Windows® Macintosh e Click OK. f With the correctly programmed IP address, you do not use a DHCP/BOOTP/RARP server), the device will see the Brother machine in the BRAdmin Light utility screen. • You can also find the Node Name and ...
Changing your machine. Enter the IP Address, Subnet Mask and Gateway (if needed) for your machine's network settings c Double-click the unconfigured device. You can find the Node Name and MAC Address from the control panel. (See Chapter 4: Control panel setup.) d Choose STATIC from Boot Method. Windows®... in the device list. 7 Windows® Macintosh e Click OK. f With the correctly programmed IP address, you do not use a DHCP/BOOTP/RARP server), the device will see the Brother machine in the BRAdmin Light utility screen. • You can also find the Node Name and ...


