
Users Manual - English
Page 11
... 59 Copy preset settings 59 Copy Options 60 10 Printing data from a USB Flash memory drive or digital camera supporting mass storage (For MFC-9330CDW and MFC-9340CDW) 61 Creating a PRN file for direct printing 61 Printing data directly from the USB Flash memory drive or digital camera supporting mass storage... to scan a document as a PDF file using the Touchscreen 69 A Routine maintenance 71 Replacing the consumable items 71 Replacing the toner cartridges 75 Cleaning the corona wires 82 Replacing the drum units 85 Replacing the belt unit 91 Replacing the waste toner box 95 ix
... 59 Copy preset settings 59 Copy Options 60 10 Printing data from a USB Flash memory drive or digital camera supporting mass storage (For MFC-9330CDW and MFC-9340CDW) 61 Creating a PRN file for direct printing 61 Printing data directly from the USB Flash memory drive or digital camera supporting mass storage... to scan a document as a PDF file using the Touchscreen 69 A Routine maintenance 71 Replacing the consumable items 71 Replacing the toner cartridges 75 Cleaning the corona wires 82 Replacing the drum units 85 Replacing the belt unit 91 Replacing the waste toner box 95 ix
Users Manual - English
Page 87
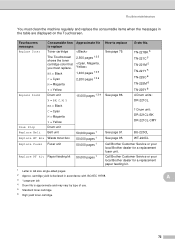
...Drum unit Replace Belt Belt unit 50,000 pages 1 Replace WT Box Waste toner box 50,000 pages 1 Replace Fuser Fuser unit 50,000 pages 1 Replace PF kit Paper feeding kit 50,000 pages 1 How to replace Replace Toner Toner cartridge The Touchscreen shows the toner cartridge color that you must clean...-225C 6 TN-225M 6 TN-225Y 6 4 Drum units: DR-221CL 1 Drum unit: DR-221CL-BK DR-221CL-CMY See page 91. WT-220CL Call Brother Customer Service or your local Brother dealer for a replacement fuser unit. A 3 1 page per job 4 Drum life is declared in the table are displayed on...
...Drum unit Replace Belt Belt unit 50,000 pages 1 Replace WT Box Waste toner box 50,000 pages 1 Replace Fuser Fuser unit 50,000 pages 1 Replace PF kit Paper feeding kit 50,000 pages 1 How to replace Replace Toner Toner cartridge The Touchscreen shows the toner cartridge color that you must clean...-225C 6 TN-225M 6 TN-225Y 6 4 Drum units: DR-221CL 1 Drum unit: DR-221CL-BK DR-221CL-CMY See page 91. WT-220CL Call Brother Customer Service or your local Brother dealer for a replacement fuser unit. A 3 1 page per job 4 Drum life is declared in the table are displayed on...
Users Manual - English
Page 91
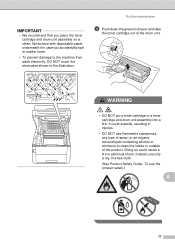
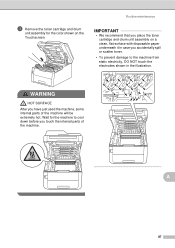
Routine maintenance d Push down the green lock lever and take the toner cartridge out of the drum unit. WARNING • DO NOT put a toner cartridge or a toner cartridge and drum unit assembly into a fire. It could cause a fire or electrical shock. Doing so could explode, resulting in the illustration. ... injuries. • DO NOT use the product safely.) A 77 IMPORTANT • We recommend that you place the toner cartridge and drum unit assembly on a clean, flat surface with disposable paper underneath it in case you accidentally spill or scatter toner. • To prevent damage to...
Routine maintenance d Push down the green lock lever and take the toner cartridge out of the drum unit. WARNING • DO NOT put a toner cartridge or a toner cartridge and drum unit assembly into a fire. It could cause a fire or electrical shock. Doing so could explode, resulting in the illustration. ... injuries. • DO NOT use the product safely.) A 77 IMPORTANT • We recommend that you place the toner cartridge and drum unit assembly on a clean, flat surface with disposable paper underneath it in case you accidentally spill or scatter toner. • To prevent damage to...

Users Manual - English
Page 92
...disposal office. • We recommend that toner powder does not spill out of the cartridge. • Visit http://www.brother.com/original/ index.html for instructions on a clean, flat, level, stable surface with cold water. • To avoid print quality problems, DO NOT touch the shaded parts... shown in case you choose not to return your used consumable according to the Brother collection program. If you accidentally spill ...
...disposal office. • We recommend that toner powder does not spill out of the cartridge. • Visit http://www.brother.com/original/ index.html for instructions on a clean, flat, level, stable surface with cold water. • To avoid print quality problems, DO NOT touch the shaded parts... shown in case you choose not to return your used consumable according to the Brother collection program. If you accidentally spill ...
Users Manual - English
Page 94
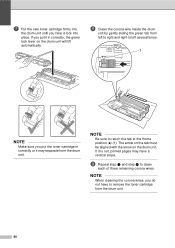
... until you put the toner cartridge in correctly, the green lock lever on the drum unit. NOTE Be sure to return the tab to clean each of three remaining corona wires. If you hear it lock into place. If it may have to left to right and right to remove ...the toner cartridge from the drum unit. i Repeat step c and step h to the Home position (a) (1). h Clean the corona wire inside the drum unit by gently sliding the green tab from left several times. 1 NOTE Make sure you put it in...
... until you put the toner cartridge in correctly, the green lock lever on the drum unit. NOTE Be sure to return the tab to clean each of three remaining corona wires. If you hear it lock into place. If it may have to left to right and right to remove ...the toner cartridge from the drum unit. i Repeat step c and step h to the Home position (a) (1). h Clean the corona wire inside the drum unit by gently sliding the green tab from left several times. 1 NOTE Make sure you put it in...
Users Manual - English
Page 96
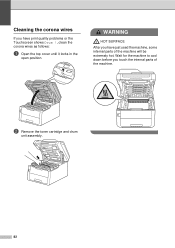
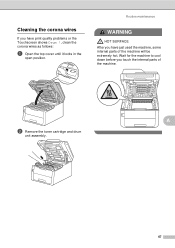
Cleaning the corona wires A If you touch the internal parts of the machine will be extremely hot. b Remove the toner cartridge and drum unit assembly. 82 Wait for the machine to cool down before you have just used the machine, some internal parts of the machine. WARNING HOT SURFACE After you have print quality problems or the Touchscreen shows Drum !, clean the corona wires as follows: a Open the top cover until it locks in the open position.
Cleaning the corona wires A If you touch the internal parts of the machine will be extremely hot. b Remove the toner cartridge and drum unit assembly. 82 Wait for the machine to cool down before you have just used the machine, some internal parts of the machine. WARNING HOT SURFACE After you have print quality problems or the Touchscreen shows Drum !, clean the corona wires as follows: a Open the top cover until it locks in the open position.
Users Manual - English
Page 97
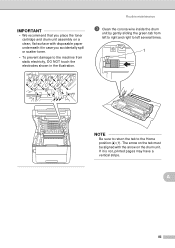
...and right to left several times. 1 NOTE Be sure to return the tab to the Home position (a) (1). A 83 Routine maintenance c Clean the corona wire inside the drum unit by gently sliding the green tab from static electricity, DO NOT touch the electrodes shown in case you place the toner cartridge... and drum unit assembly on a clean, flat surface with the arrow on the tab must be aligned with disposable paper underneath it is not, printed pages may have a...
...and right to left several times. 1 NOTE Be sure to return the tab to the Home position (a) (1). A 83 Routine maintenance c Clean the corona wire inside the drum unit by gently sliding the green tab from static electricity, DO NOT touch the electrodes shown in case you place the toner cartridge... and drum unit assembly on a clean, flat surface with the arrow on the tab must be aligned with disposable paper underneath it is not, printed pages may have a...
Users Manual - English
Page 98
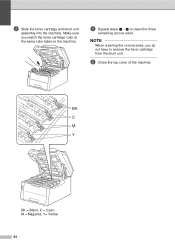
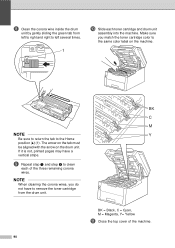
d Slide the toner cartridge and drum unit assembly into the machine. d to the same color label on the machine. Make sure you do not have to remove the toner cartridge from the drum unit. e Repeat steps b - NOTE When cleaning the corona wires, you match the toner cartridge color to clean the three remaining corona wires. f Close the top cover of the machine. BK C M Y BK = Black, C = Cyan, M = Magenta, Y= Yellow 84
d Slide the toner cartridge and drum unit assembly into the machine. d to the same color label on the machine. Make sure you do not have to remove the toner cartridge from the drum unit. e Repeat steps b - NOTE When cleaning the corona wires, you match the toner cartridge color to clean the three remaining corona wires. f Close the top cover of the machine. BK C M Y BK = Black, C = Cyan, M = Magenta, Y= Yellow 84
Users Manual - English
Page 99
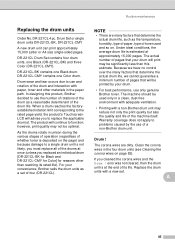
...; In designing this estimate. The machine should be printed by the use only genuine Brother toner. Drum ! Routine maintenance Replacing the drum units A Order No. Clean the corona wires in a clean, dust-free environment with adequate ventilation. • Printing with a non-Brother drum unit may not be significantly less than reaching its life. A 85 DR-221CL-BK...
...; In designing this estimate. The machine should be printed by the use only genuine Brother toner. Drum ! Routine maintenance Replacing the drum units A Order No. Clean the corona wires in a clean, dust-free environment with adequate ventilation. • Printing with a non-Brother drum unit may not be significantly less than reaching its life. A 85 DR-221CL-BK...
Users Manual - English
Page 100
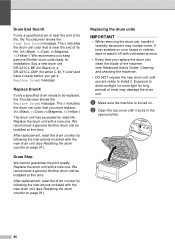
...near the end of the machine (see Advanced User's Guide: Cleaning and checking the machine). • DO NOT unpack the new drum unit until it may damage the drum unit. The X indicates the drum unit color that you keep genuine Brother drum units ready for either C, M, Y color) and have it... wash it ready before you replace the drum unit, clean the inside of its life, the Touchscreen shows the Drum End SoonX message. We recommend a genuine Brother drum unit be installed at once. • Every time you get a Replace DrumX message. Buy a new drum unit DR-221CL-BK (for Black) or...
...near the end of the machine (see Advanced User's Guide: Cleaning and checking the machine). • DO NOT unpack the new drum unit until it may damage the drum unit. The X indicates the drum unit color that you keep genuine Brother drum units ready for either C, M, Y color) and have it... wash it ready before you replace the drum unit, clean the inside of its life, the Touchscreen shows the Drum End SoonX message. We recommend a genuine Brother drum unit be installed at once. • Every time you get a Replace DrumX message. Buy a new drum unit DR-221CL-BK (for Black) or...
Users Manual - English
Page 101
... have just used the machine, some internal parts of the machine. Wait for the color shown on a clean, flat surface with disposable paper underneath it in the illustration. Routine maintenance IMPORTANT • We recommend that you place the toner cartridge and drum unit assembly on the Touchscreen. A... the toner cartridge and drum unit assembly for the machine to the machine from static electricity, DO NOT touch the electrodes shown in case you accidentally spill or scatter toner. • To prevent damage to cool down before you touch the internal parts of the machine will...
... have just used the machine, some internal parts of the machine. Wait for the color shown on a clean, flat surface with disposable paper underneath it in the illustration. Routine maintenance IMPORTANT • We recommend that you place the toner cartridge and drum unit assembly on the Touchscreen. A... the toner cartridge and drum unit assembly for the machine to the machine from static electricity, DO NOT touch the electrodes shown in case you accidentally spill or scatter toner. • To prevent damage to cool down before you touch the internal parts of the machine will...

Users Manual - English
Page 102
...wash it in the illustrations. It could cause a fire or electrical shock. WARNING • DO NOT put a toner cartridge or a toner cartridge and drum unit assembly into a fire. Instead, use only a dry, lint-free cloth. (See Product Safety Guide: To use flammable substances, any type of ...spray, or an organic solvent/liquid containing alcohol or ammonia to clean the inside or outside of the drum unit. IMPORTANT • Handle the toner cartridge carefully. d Push down the green lock lever and take the toner cartridge ...
...wash it in the illustrations. It could cause a fire or electrical shock. WARNING • DO NOT put a toner cartridge or a toner cartridge and drum unit assembly into a fire. Instead, use only a dry, lint-free cloth. (See Product Safety Guide: To use flammable substances, any type of ...spray, or an organic solvent/liquid containing alcohol or ammonia to clean the inside or outside of the drum unit. IMPORTANT • Handle the toner cartridge carefully. d Push down the green lock lever and take the toner cartridge ...
Users Manual - English
Page 104
... assembly into the machine. BK C M NOTE Y Be sure to return the tab to the same color label on the drum unit. NOTE When cleaning the corona wires, you match the toner cartridge color to the Home position (a) (1). BK = Black, C = Cyan, M = Magenta, Y= Yellow k Close the top cover of the three... from left several times. 1 j Slide each of the machine. 90 The arrow on the tab must be aligned with the arrow on the machine. h Clean the corona wire inside the drum unit by gently sliding the green tab from the drum unit. Make sure you do not have a vertical stripe.
... assembly into the machine. BK C M NOTE Y Be sure to return the tab to the same color label on the drum unit. NOTE When cleaning the corona wires, you match the toner cartridge color to the Home position (a) (1). BK = Black, C = Cyan, M = Magenta, Y= Yellow k Close the top cover of the three... from left several times. 1 j Slide each of the machine. 90 The arrow on the tab must be aligned with the arrow on the machine. h Clean the corona wire inside the drum unit by gently sliding the green tab from the drum unit. Make sure you do not have a vertical stripe.

Users Manual - English
Page 106
.... IMPORTANT • We recommend that you place the toner cartridge and drum unit assemblies on a clean, flat surface with disposable paper underneath them in case you accidentally spill or scatter toner. • To prevent damage to cool down before you have just used the machine, some internal parts of the toner cartridge and...
.... IMPORTANT • We recommend that you place the toner cartridge and drum unit assemblies on a clean, flat surface with disposable paper underneath them in case you accidentally spill or scatter toner. • To prevent damage to cool down before you have just used the machine, some internal parts of the toner cartridge and...

Users Manual - English
Page 110
d Hold the green handle of the belt unit and lift the belt unit up, and then pull it out. IMPORTANT To avoid print quality problems, DO NOT touch the shaded parts shown in the illustration. IMPORTANT • We recommend that you place the toner cartridge and drum unit assemblies on a clean, flat surface with disposable paper underneath them in case you accidentally spill or scatter toner. • To prevent damage to the machine from static electricity, DO NOT touch the electrodes shown in the illustrations. 96
d Hold the green handle of the belt unit and lift the belt unit up, and then pull it out. IMPORTANT To avoid print quality problems, DO NOT touch the shaded parts shown in the illustration. IMPORTANT • We recommend that you place the toner cartridge and drum unit assemblies on a clean, flat surface with disposable paper underneath them in case you accidentally spill or scatter toner. • To prevent damage to the machine from static electricity, DO NOT touch the electrodes shown in the illustrations. 96
Users Manual - English
Page 118
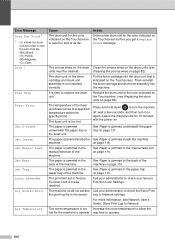
... page 114. See Paper is jammed in the paper tray on page 114. Call your administrator to operate. Drum ! The corona wires on the drum Clean the corona wires on the drum units (see Network User's Guide: Store Print Log to Network The room temperature is jammed underneath the paper... tray or the fuser unit. See Paper is too hot. Error Message Drum End SoonX 1 1 (X) shows the drum unit color that ...
... page 114. See Paper is jammed in the paper tray on page 114. Call your administrator to operate. Drum ! The corona wires on the drum Clean the corona wires on the drum units (see Network User's Guide: Store Print Log to Network The room temperature is jammed underneath the paper... tray or the fuser unit. See Paper is too hot. Error Message Drum End SoonX 1 1 (X) shows the drum unit color that ...
Users Manual - English
Page 133
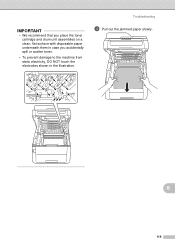
B 119 Troubleshooting d Pull out the jammed paper slowly. IMPORTANT • We recommend that you place the toner cartridge and drum unit assemblies on a clean, flat surface with disposable paper underneath them in case you accidentally spill or scatter toner. • To prevent damage to the machine from static electricity, DO NOT touch the electrodes shown in the illustration.
B 119 Troubleshooting d Pull out the jammed paper slowly. IMPORTANT • We recommend that you place the toner cartridge and drum unit assemblies on a clean, flat surface with disposable paper underneath them in case you accidentally spill or scatter toner. • To prevent damage to the machine from static electricity, DO NOT touch the electrodes shown in the illustration.

Users Manual - English
Page 139
... Size on the telephone line. Check for a dial tone. Send a manual fax by a poor telephone connection. Your application must be dirty. Clean the corona wires on the drum units (see Cleaning the corona wires on Auto Reduction (see Quick Setup Guide). Then lift the external telephone's handset and listen for a dial tone. Suggestions...
... Size on the telephone line. Check for a dial tone. Send a manual fax by a poor telephone connection. Your application must be dirty. Clean the corona wires on the drum units (see Cleaning the corona wires on Auto Reduction (see Quick Setup Guide). Then lift the external telephone's handset and listen for a dial tone. Suggestions...
Users Manual - English
Page 148
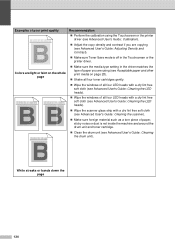
...a torn piece of paper, sticky notes or dust is not inside the machine and around the drum unit and toner cartridge. Clean the drum unit (see Advanced User's Guide: Adjusting Density and Contrast). Make sure Toner Save mode... ABCDEFGHIJKLMNOPQRSTUVWXYZ. 0123456789. Examples of paper you are copying (see Advanced User's Guide: Cleaning the drum unit). abcdefghijklmnopqrstuvwxyz. ABCDEFGHIJKLMNOPQRSTUVWXYZ. 0123456789. abcdefghijklmnopqrstuvwxyz. ABCDEFGHIJKLMNOPQRSTUVWXYZ. 0123456789. abcdefghijklmnopqrstuvwxyz. abcdefghijklmnopqrstuvwxyz. abcdefghijklmnopqrstuvwxyz. ...
...a torn piece of paper, sticky notes or dust is not inside the machine and around the drum unit and toner cartridge. Clean the drum unit (see Advanced User's Guide: Adjusting Density and Contrast). Make sure Toner Save mode... ABCDEFGHIJKLMNOPQRSTUVWXYZ. 0123456789. Examples of paper you are copying (see Advanced User's Guide: Cleaning the drum unit). abcdefghijklmnopqrstuvwxyz. ABCDEFGHIJKLMNOPQRSTUVWXYZ. 0123456789. abcdefghijklmnopqrstuvwxyz. ABCDEFGHIJKLMNOPQRSTUVWXYZ. 0123456789. abcdefghijklmnopqrstuvwxyz. abcdefghijklmnopqrstuvwxyz. abcdefghijklmnopqrstuvwxyz. ...
Advanced Users Manual - English
Page 75
A b Remove the toner cartridge and drum unit assembly. 67 Cleaning the corona wires A If you touch the internal parts of the machine will be extremely hot. Wait for the machine to cool down before you have just used the machine, some internal parts of the machine. Routine maintenance WARNING HOT SURFACE After you have print quality problems or the Touchscreen shows Drum !, clean the corona wires as follows: a Open the top cover until it locks in the open position.
A b Remove the toner cartridge and drum unit assembly. 67 Cleaning the corona wires A If you touch the internal parts of the machine will be extremely hot. Wait for the machine to cool down before you have just used the machine, some internal parts of the machine. Routine maintenance WARNING HOT SURFACE After you have print quality problems or the Touchscreen shows Drum !, clean the corona wires as follows: a Open the top cover until it locks in the open position.


