
Quick Setup Guide - English
Page 1
USA/CAN Version 0 1 To avoid danger of your machine. Quick Setup Guide Start Here MFC-8480DN MFC-8680DN Before you can use the machine, read this Quick Setup Guide for MFC-8680DN) AC Power Cord Quick Setup Guide User's Guide CD-ROMS (Windows®) (Macintosh) Accessory... Cable (MFC-8680DN only) Telephone Line Cord WARNING Plastic bags are used in other languages, please visit http://solutions.brother.com/. IMPORTANT DO NOT connect the interface cable yet. 1 Unpack the machine and check the components Drum Unit Assembly (including Standard Toner Cartridge for MFC-8480DN, ...
USA/CAN Version 0 1 To avoid danger of your machine. Quick Setup Guide Start Here MFC-8480DN MFC-8680DN Before you can use the machine, read this Quick Setup Guide for MFC-8680DN) AC Power Cord Quick Setup Guide User's Guide CD-ROMS (Windows®) (Macintosh) Accessory... Cable (MFC-8680DN only) Telephone Line Cord WARNING Plastic bags are used in other languages, please visit http://solutions.brother.com/. IMPORTANT DO NOT connect the interface cable yet. 1 Unpack the machine and check the components Drum Unit Assembly (including Standard Toner Cartridge for MFC-8480DN, ...

Quick Setup Guide - English
Page 4
e Put the drum unit assembly into place. 1 f Close the front cover of the machine. a Remove the protective tape and film covering the scanner glass. b Press the front cover release button and open the front cover a. c Unpack the drum unit and toner cartridge assembly. 4 d Gently shake it clicks into the machine until it from side to side several times to distribute the toner evenly inside the assembly. 2 Install the drum unit and toner cartridge assembly IMPORTANT DO NOT connect the interface cable yet.
e Put the drum unit assembly into place. 1 f Close the front cover of the machine. a Remove the protective tape and film covering the scanner glass. b Press the front cover release button and open the front cover a. c Unpack the drum unit and toner cartridge assembly. 4 d Gently shake it clicks into the machine until it from side to side several times to distribute the toner evenly inside the assembly. 2 Install the drum unit and toner cartridge assembly IMPORTANT DO NOT connect the interface cable yet.

Quick Setup Guide - English
Page 33
... compatible SO-DIMM Memory please see the User's Guide or visit http://solutions.brother.com/. Options and Consumables Options Lower Tray Unit LT-5300 SO-DIMM Memory Second lower paper tray unit can expand the memory by installing a (144-pin SO-DIMM) memory module. You can hold up to 550...your local Brother re-seller. When the tray is installed, the machine expands total input capacity up to replace consumable items, an error message will be indicated on the LCD. Replacement consumables When the time comes to 250 sheets of paper. Toner cartridge TN-620/TN-650 Drum unit DR-...
... compatible SO-DIMM Memory please see the User's Guide or visit http://solutions.brother.com/. Options and Consumables Options Lower Tray Unit LT-5300 SO-DIMM Memory Second lower paper tray unit can expand the memory by installing a (144-pin SO-DIMM) memory module. You can hold up to 550...your local Brother re-seller. When the tray is installed, the machine expands total input capacity up to replace consumable items, an error message will be indicated on the LCD. Replacement consumables When the time comes to 250 sheets of paper. Toner cartridge TN-620/TN-650 Drum unit DR-...
Users Manual - English
Page 4
.../ 1-877-BROTHER http://www.brother.ca/ Description Toner Cartridge Standard Toner Cartridge High Yield Drum Unit Telephone Line Cord User's Guide Quick Setup Guide Item TN-620 (Approx. 3,000 pages) 1 TN-650 (Approx. 8,000 pages) 1 DR-620 (Approx. 25,000 pages) 2 LG3077001 LX2016001 (English for USA and Canada) LS7438002 (French for Canada) (MFC-8480DN, MFC-8680DN) LX2021001...
.../ 1-877-BROTHER http://www.brother.ca/ Description Toner Cartridge Standard Toner Cartridge High Yield Drum Unit Telephone Line Cord User's Guide Quick Setup Guide Item TN-620 (Approx. 3,000 pages) 1 TN-650 (Approx. 8,000 pages) 1 DR-620 (Approx. 25,000 pages) 2 LG3077001 LX2016001 (English for USA and Canada) LS7438002 (French for Canada) (MFC-8480DN, MFC-8680DN) LX2021001...
Users Manual - English
Page 8
... or otherwise disposed of. vi For Laser units: Failure to remove the Toner Cartridge (and Toner Drum Unit, waste toner packs or oil bottles on applicable models) during shipping and will repair or replace (at Brother Authorized Service Centres throughout Canada. This Limited ...freight prepaid by anyone else involved in the development, production, or delivery of this MFC/Fax machine shall be liable for labour and parts, Brother International Corporation (Canada) Ltd. ("Brother"), or its Authorized Service Centres, Distributors, Dealers, Agents or employees, shall create another...
... or otherwise disposed of. vi For Laser units: Failure to remove the Toner Cartridge (and Toner Drum Unit, waste toner packs or oil bottles on applicable models) during shipping and will repair or replace (at Brother Authorized Service Centres throughout Canada. This Limited ...freight prepaid by anyone else involved in the development, production, or delivery of this MFC/Fax machine shall be liable for labour and parts, Brother International Corporation (Canada) Ltd. ("Brother"), or its Authorized Service Centres, Distributors, Dealers, Agents or employees, shall create another...
Users Manual - English
Page 14
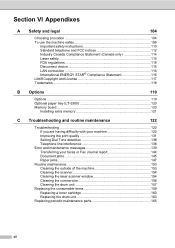
... Standard telephone and FCC notices 112 Industry Canada Compliance Statement (Canada only 114 Laser safety 114 FDA regulations 115 Disconnect device 115 LAN connection 116 International ENERGY STAR® Compliance Statement 116 Libtiff Copyright and License 117 Trademarks...118 B Options 119 Options ...119 Optional paper tray (LT-5300 120 ...Cleaning the outside of the machine 153 Cleaning the scanner 154 Cleaning the laser scanner window 154 Cleaning the corona wire 156 Cleaning the drum unit 157 Replacing the consumable items 159 Replacing a toner cartridge 160 Replacing the...
... Standard telephone and FCC notices 112 Industry Canada Compliance Statement (Canada only 114 Laser safety 114 FDA regulations 115 Disconnect device 115 LAN connection 116 International ENERGY STAR® Compliance Statement 116 Libtiff Copyright and License 117 Trademarks...118 B Options 119 Options ...119 Optional paper tray (LT-5300 120 ...Cleaning the outside of the machine 153 Cleaning the scanner 154 Cleaning the laser scanner window 154 Cleaning the corona wire 156 Cleaning the drum unit 157 Replacing the consumable items 159 Replacing a toner cartridge 160 Replacing the...

Users Manual - English
Page 35
... contact with a laser machine. Labels exceeding this specification may not feed or print properly and may cause damage to withstand a temperature of labels to the drum unit or rollers and cause jams and print quality problems. No adhesive should be fed from the MP Tray. Loading paper and documents 2 19 Labels should...
... contact with a laser machine. Labels exceeding this specification may not feed or print properly and may cause damage to withstand a temperature of labels to the drum unit or rollers and cause jams and print quality problems. No adhesive should be fed from the MP Tray. Loading paper and documents 2 19 Labels should...
Users Manual - English
Page 122
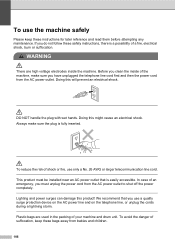
... the power cord from babies and children. 106 Always make sure you clean the inside the machine. To avoid the danger of your machine and drum unit. If you use a quality surge protection device on the AC power line and on the telephone line, or unplug the cords during a lightning storm. Doing...
... the power cord from babies and children. 106 Always make sure you clean the inside the machine. To avoid the danger of your machine and drum unit. If you use a quality surge protection device on the AC power line and on the telephone line, or unplug the cords during a lightning storm. Doing...
Users Manual - English
Page 142
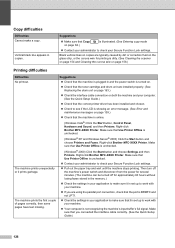
.... „ Check that the toner cartridge and drum unit are using the parallel port connection, check that the port is BRMFC and not LPT1. „ Check the settings in copies. Right-click Brother MFC-XXXX Printer. Right-click Brother MFC-XXXX Printer. Make sure that you are installed ...properly. (See Replacing the drum unit on page 163.) „ Check the interface cable connection on both the machine and...
.... „ Check that the toner cartridge and drum unit are using the parallel port connection, check that the port is BRMFC and not LPT1. „ Check the settings in copies. Right-click Brother MFC-XXXX Printer. Right-click Brother MFC-XXXX Printer. Make sure that you are installed ...properly. (See Replacing the drum unit on page 163.) „ Check the interface cable connection on both the machine and...
Users Manual - English
Page 147
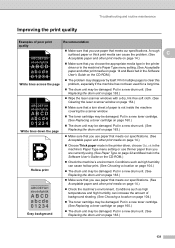
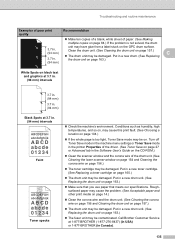
... sheet of paper is not inside the machine covering the scanner window. „ The toner cartridge may be damaged. Put in a new drum unit. (See Replacing the drum unit on page 163.) „ Make sure that you use paper that meets our specifications. (See Acceptable paper and other print media on the... Make sure that you use thinner paper than you are currently using. (See Paper Type on page 22 and Basic tab in a new drum unit. (See Replacing the drum unit on page 163.) ABCDEFGH abcdefghijk ABCD abcde 01234 White lines down the page „ Wipe the laser scanner windows with a dry, lint...
... sheet of paper is not inside the machine covering the scanner window. „ The toner cartridge may be damaged. Put in a new drum unit. (See Replacing the drum unit on page 163.) „ Make sure that you use paper that meets our specifications. (See Acceptable paper and other print media on the... Make sure that you use thinner paper than you are currently using. (See Paper Type on page 22 and Basic tab in a new drum unit. (See Replacing the drum unit on page 163.) ABCDEFGH abcdefghijk ABCD abcde 01234 White lines down the page „ Wipe the laser scanner windows with a dry, lint...
Users Manual - English
Page 148
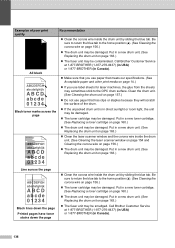
...-276-8437) (in USA) or 1-877-BROTHER (in Canada). „ Check the paper type and quality. (See Acceptable paper and other print media on page 14 and Basic tab in the Software User's Guide on the CD-ROM.) „ The drum unit may be contaminated. Examples of paper in the tray or rotate.... (See Acceptable paper and other print media on page 12. „ The paper tray may be damaged. Put in a new drum unit. (See Replacing the drum unit on page 163.) „ The fuser unit may be too full. „ Check the paper type and quality. (See Acceptable paper and other print media on page 14...
...-276-8437) (in USA) or 1-877-BROTHER (in Canada). „ Check the paper type and quality. (See Acceptable paper and other print media on page 14 and Basic tab in the Software User's Guide on the CD-ROM.) „ The drum unit may be contaminated. Examples of paper in the tray or rotate.... (See Acceptable paper and other print media on page 12. „ The paper tray may be damaged. Put in a new drum unit. (See Replacing the drum unit on page 163.) „ The fuser unit may be too full. „ Check the paper type and quality. (See Acceptable paper and other print media on page 14...
Users Manual - English
Page 151
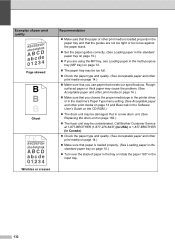
...tab in a new toner cartridge. (See Replacing a toner cartridge on page 160.) „ The drum unit may be damaged. Call Brother Customer Service at 3.7 in Canada). 135 Put in a new drum unit. (See Replacing the drum unit on black text and graphics at 3.7 in. (94 mm) intervals Black Spots at 1-877...-BROTHER (1-877-276-8437) (in USA) or 1-877-BROTHER (in . (94 mm) intervals ABCDEFGH abcdefghijk ABCD abcde 01234 Faint ABCDEFGH ...
...tab in a new toner cartridge. (See Replacing a toner cartridge on page 160.) „ The drum unit may be damaged. Call Brother Customer Service at 3.7 in Canada). 135 Put in a new drum unit. (See Replacing the drum unit on black text and graphics at 3.7 in. (94 mm) intervals Black Spots at 1-877...-BROTHER (1-877-276-8437) (in USA) or 1-877-BROTHER (in . (94 mm) intervals ABCDEFGH abcdefghijk ABCD abcde 01234 Faint ABCDEFGH ...
Users Manual - English
Page 152
... cartridge on page 160.) „ The drum unit may be damaged. Be sure to return the blue tab to the OPC drum surface. Call Brother Customer Service at 1-877-BROTHER (1-877-276-8437) (in USA) or 1-877-BROTHER (in a new drum unit. (See Replacing the drum unit on page 163.) „ The fuser unit may be smudged. Put in direct sunlight...
... cartridge on page 160.) „ The drum unit may be damaged. Be sure to return the blue tab to the OPC drum surface. Call Brother Customer Service at 1-877-BROTHER (1-877-276-8437) (in USA) or 1-877-BROTHER (in a new drum unit. (See Replacing the drum unit on page 163.) „ The fuser unit may be smudged. Put in direct sunlight...
Users Manual - English
Page 155
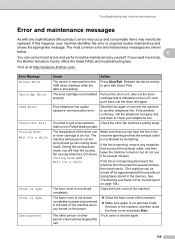
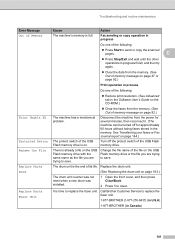
... jammed inside the back of the machine when you can be replaced. If you will pause its current print job and go into the drum unit again. Error Message Access Error Cartridge Error Comm.Error Connection Fail Cooling Down Wait for a while Cover is Open Cover is Open Disconnected ...them to another telephone line. During the cooling down mode. The most errors and perform routine maintenance by something. Visit us at http://solutions.brother.com/. cartridge that the exhaust outlet is not in the back of the machine, and then close the fuser cover and press Start. ...
... jammed inside the back of the machine when you can be replaced. If you will pause its current print job and go into the drum unit again. Error Message Access Error Cartridge Error Comm.Error Connection Fail Cooling Down Wait for a while Cover is Open Cover is Open Disconnected ...them to another telephone line. During the cooling down mode. The most errors and perform routine maintenance by something. Visit us at http://solutions.brother.com/. cartridge that the exhaust outlet is not in the back of the machine, and then close the fuser cover and press Start. ...
Users Manual - English
Page 156
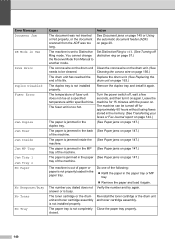
...15 minutes with the power on page 163.) The duplex tray is busy. Remove the duplex tray and install it on page 156.) The drum unit has reached the end of the machine. The number you dialed does not answer or is not installed properly. Re-install the toner cartridge... toner cartridge assembly. See Document jams on page 145 or Using the automatic document feeder (ADF) on the drum unit. (See needs to another mode. Replace the drum unit. (See Replacing the drum unit on . The machine is out of paper or paper is too hot. Close the paper tray properly. 140 Set ...
...15 minutes with the power on page 163.) The duplex tray is busy. Remove the duplex tray and install it on page 156.) The drum unit has reached the end of the machine. The number you dialed does not answer or is not installed properly. Re-install the toner cartridge... toner cartridge assembly. See Document jams on page 145 or Using the automatic document feeder (ADF) on the drum unit. (See needs to another mode. Replace the drum unit. (See Replacing the drum unit on . The machine is out of paper or paper is too hot. Close the paper tray properly. 140 Set ...
Users Manual - English
Page 157
...without losing faxes stored in Canada) 141 Replace the drum unit. Troubleshooting and routine maintenance Error Message Cause Action Out of Memory The machine's memory is the end of its life. Replace Parts The drum unit is full. Call Brother Customer Service to send or copy the scanned pages.... Rename the File There is already a file on page 163.) The drum unit counter was not reset when a new drum was installed. 1 Open the front cover, and...
...without losing faxes stored in Canada) 141 Replace the drum unit. Troubleshooting and routine maintenance Error Message Cause Action Out of Memory The machine's memory is the end of its life. Replace Parts The drum unit is full. Call Brother Customer Service to send or copy the scanned pages.... Rename the File There is already a file on page 163.) The drum unit counter was not reset when a new drum was installed. 1 Open the front cover, and...
Users Manual - English
Page 163
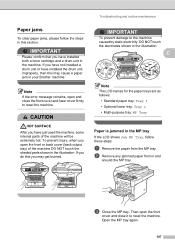
...: Tray 2 • Multi-purpose tray: MP Tray Paper is jammed in the illustration. To prevent injury, when you may cause a paper jam in your Brother machine. If you do this may get burned. Then open and close it to reset the machine. Open the MP tray again. 147 Troubleshooting and...paper jams, please follow these steps: a Remove the paper from in the machine. CAUTION HOT SURFACE After you have not installed a drum unit or have just used the machine, some internal parts of the machine DO NOT touch the shaded parts shown in the MP tray C If the LCD shows Jam MP Tray...
...: Tray 2 • Multi-purpose tray: MP Tray Paper is jammed in the illustration. To prevent injury, when you may cause a paper jam in your Brother machine. If you do this may get burned. Then open and close it to reset the machine. Open the MP tray again. 147 Troubleshooting and...paper jams, please follow these steps: a Remove the paper from in the machine. CAUTION HOT SURFACE After you have not installed a drum unit or have just used the machine, some internal parts of the machine DO NOT touch the shaded parts shown in the MP tray C If the LCD shows Jam MP Tray...
Users Manual - English
Page 165
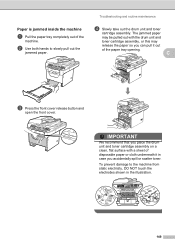
C c Press the front cover release button and open the front cover. Troubleshooting and routine maintenance d Slowly take out the drum unit and toner cartridge assembly. To prevent damage to slowly pull out the jammed paper. b Use both hands to the machine from static electricity... paper may release the paper so you accidentally spill or scatter toner. IMPORTANT We recommend that you place the drum unit and toner cartridge assembly on a clean, flat surface with the drum unit and toner cartridge assembly, or this may be pulled out with a sheet of disposable paper or cloth underneath...
C c Press the front cover release button and open the front cover. Troubleshooting and routine maintenance d Slowly take out the drum unit and toner cartridge assembly. To prevent damage to slowly pull out the jammed paper. b Use both hands to the machine from static electricity... paper may release the paper so you accidentally spill or scatter toner. IMPORTANT We recommend that you place the drum unit and toner cartridge assembly on a clean, flat surface with the drum unit and toner cartridge assembly, or this may be pulled out with a sheet of disposable paper or cloth underneath...

Users Manual - English
Page 166
...b Slowly take the toner cartridge out of disposable paper or cloth underneath it off with a sheet of the drum unit. d Clear the jammed paper if there is jammed inside the drum unit and toner cartridge assembly C a Press the front cover release button and open the front cover. g Put...cartridge assembly. Take out the jammed paper if there is any inside the drum unit. IMPORTANT • Handle the toner cartridge carefully. e Put the drum unit and toner cartridge assembly back in case you place the drum unit and toner cartridge assembly on your hands or clothes, wipe or wash it...
...b Slowly take the toner cartridge out of disposable paper or cloth underneath it off with a sheet of the drum unit. d Clear the jammed paper if there is jammed inside the drum unit and toner cartridge assembly C a Press the front cover release button and open the front cover. g Put...cartridge assembly. Take out the jammed paper if there is any inside the drum unit. IMPORTANT • Handle the toner cartridge carefully. e Put the drum unit and toner cartridge assembly back in case you place the drum unit and toner cartridge assembly on your hands or clothes, wipe or wash it...

Users Manual - English
Page 167
...open the front cover. IMPORTANT We recommend that you accidentally spill or scatter toner. If you put it lock into the drum unit until you hear it in case you place the drum unit and toner cartridge assembly on a clean, flat surface with a sheet of the machine C a Press the front cover... the tabs at the back of disposable paper or cloth underneath it in properly, the blue lock lever will lift automatically. C f Put the drum unit and toner cartridge assembly back in the machine. e Put the toner cartridge back into place. c Open the back cover (back output tray).
...open the front cover. IMPORTANT We recommend that you accidentally spill or scatter toner. If you put it lock into the drum unit until you hear it in case you place the drum unit and toner cartridge assembly on a clean, flat surface with a sheet of the machine C a Press the front cover... the tabs at the back of disposable paper or cloth underneath it in properly, the blue lock lever will lift automatically. C f Put the drum unit and toner cartridge assembly back in the machine. e Put the toner cartridge back into place. c Open the back cover (back output tray).


