Users Manual - English
Page 9
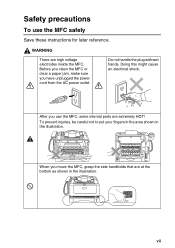
Before you clean the MFC or clear a paper jam, make sure you move the MFC, grasp the side handholds that are at the bottom as shown in the illustration. Doing this might cause an electrical shock. After you use the MFC safely Save these instructions for later reference. vii WARNING ...There are extremely HOT! Do not handle the plug with wet hands. Safety precautions To use the MFC, some internal parts are high voltage electrodes inside the MFC. To prevent injuries, be careful not to put your fingers in the area shown in the illustration. When...
Before you clean the MFC or clear a paper jam, make sure you move the MFC, grasp the side handholds that are at the bottom as shown in the illustration. Doing this might cause an electrical shock. After you use the MFC safely Save these instructions for later reference. vii WARNING ...There are extremely HOT! Do not handle the plug with wet hands. Safety precautions To use the MFC, some internal parts are high voltage electrodes inside the MFC. To prevent injuries, be careful not to put your fingers in the area shown in the illustration. When...
Users Manual - English
Page 19
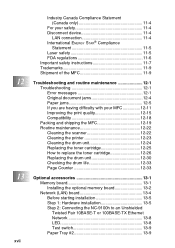
... safety 11-4 Disconnect device 11-4 LAN connection 11-4 International ENERGY STAR® Compliance Statement 11-5 Laser safety 11-5 FDA regulations 11-6 Important safety instructions 11-7 Trademarks 11-9 Shipment of the MFC 11-9 Troubleshooting and routine maintenance 12-1 Troubleshooting 12-1 Error messages 12-1 Original document jams 12-4 Paper jams 12-5 If you are having difficulty with your...
... safety 11-4 Disconnect device 11-4 LAN connection 11-4 International ENERGY STAR® Compliance Statement 11-5 Laser safety 11-5 FDA regulations 11-6 Important safety instructions 11-7 Trademarks 11-9 Shipment of the MFC 11-9 Troubleshooting and routine maintenance 12-1 Troubleshooting 12-1 Error messages 12-1 Original document jams 12-4 Paper jams 12-5 If you are having difficulty with your...

Users Manual - English
Page 28
...full. (See Error messages on page 12-1.) Check the LCD message. (See Troubleshooting on , please call Brother Customer Service at: 1-800-284-4329 (in USA) or 1-877-BROTHER (in the tray or clear the paper jam. The cover is off the power switch. 2. Turn off . Close the cover. (See Error messages ...on page 12-1.) Replace the toner cartridge with a new one. (See Replacing the toner cartridge on and try to print again. LCD Red MFC status Service error...
...full. (See Error messages on page 12-1.) Check the LCD message. (See Troubleshooting on , please call Brother Customer Service at: 1-800-284-4329 (in USA) or 1-877-BROTHER (in the tray or clear the paper jam. The cover is off the power switch. 2. Turn off . Close the cover. (See Error messages ...on page 12-1.) Replace the toner cartridge with a new one. (See Replacing the toner cartridge on and try to print again. LCD Red MFC status Service error...
Users Manual - English
Page 40
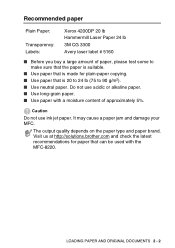
... cause a paper jam and damage your MFC. LOADING PAPER AND ORIGINAL DOCUMENTS 2 - 2 Do not use ink jet paper. Caution Do not use acidic or alkaline paper. ■ Use long-grain paper. ■ Use paper with the MFC-8220. The output quality depends on the paper type and paper brand. Visit us at http://solutions.brother.com and check the latest recommendations for paper that...
... cause a paper jam and damage your MFC. LOADING PAPER AND ORIGINAL DOCUMENTS 2 - 2 Do not use ink jet paper. Caution Do not use acidic or alkaline paper. ■ Use long-grain paper. ■ Use paper with the MFC-8220. The output quality depends on the paper type and paper brand. Visit us at http://solutions.brother.com and check the latest recommendations for paper that...
Users Manual - English
Page 43
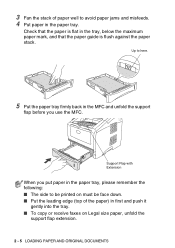
...Legal size paper, unfold the support flap extension. 2 - 5 LOADING PAPER AND ORIGINAL DOCUMENTS Up to avoid paper jams and misfeeds. 4 Put paper in the paper tray. Check that the paper is flat in the MFC and unfold the support flap before you use the MFC. Support Flap with Extension When you put paper in the paper tray, ...please remember the following: ■ The side to be printed on must be face down. ■ Put the leading edge (top of paper well to here. 5 Put the paper tray firmly back in ...
...Legal size paper, unfold the support flap extension. 2 - 5 LOADING PAPER AND ORIGINAL DOCUMENTS Up to avoid paper jams and misfeeds. 4 Put paper in the paper tray. Check that the paper is flat in the MFC and unfold the support flap before you use the MFC. Support Flap with Extension When you put paper in the paper tray, ...please remember the following: ■ The side to be printed on must be face down. ■ Put the leading edge (top of paper well to here. 5 Put the paper tray firmly back in ...
Users Manual - English
Page 44
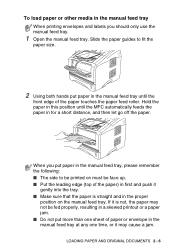
...remember the following: ■ The side to fit the paper size. 2 Using both hands put more than one sheet of paper or envelope in the manual feed tray at any one time, or it gently into the tray. ■ Make sure that the paper is straight and in the proper position on the manual...be fed properly, resulting in a skewed printout or a paper jam. ■ Do not put paper in the manual feed tray until the MFC automatically feeds the paper in first and push it may cause a jam. Hold the paper in this position until the front edge of the paper) in for a short distance, and then let go ...
...remember the following: ■ The side to fit the paper size. 2 Using both hands put more than one sheet of paper or envelope in the manual feed tray at any one time, or it gently into the tray. ■ Make sure that the paper is straight and in the proper position on the manual...be fed properly, resulting in a skewed printout or a paper jam. ■ Do not put paper in the manual feed tray until the MFC automatically feeds the paper in first and push it may cause a jam. Hold the paper in this position until the front edge of the paper) in for a short distance, and then let go ...

Users Manual - English
Page 149
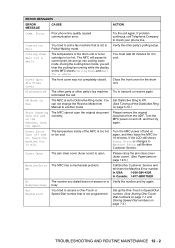
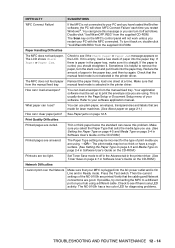
...document scanned from within that country. Check Paper #2 Check Paper Size When you see this error, the paper in the paper tray. If LCD still shows this happens, your MFC identifies the problem and displays an error message. See Original document jams on page 4-6.) 12 - 1 TROUBLESHOOTING ... drum unit with new one . Calls must call the Brother fax back system (USA only). Press 1 to reset. 12 Troubleshooting and routine maintenance Troubleshooting IMPORTANT For technical help , call the country where you bought the MFC. Load the appropriate size paper or change the default...
...document scanned from within that country. Check Paper #2 Check Paper Size When you see this error, the paper in the paper tray. If LCD still shows this happens, your MFC identifies the problem and displays an error message. See Original document jams on page 4-6.) 12 - 1 TROUBLESHOOTING ... drum unit with new one . Calls must call the Brother fax back system (USA only). Press 1 to reset. 12 Troubleshooting and routine maintenance Troubleshooting IMPORTANT For technical help , call the country where you bought the MFC. Load the appropriate size paper or change the default...
Users Manual - English
Page 150
...jam clear cover (fuser cover). (See Paper jams on the machine, then try again. Not Registered You tried to access a One-Touch or Speed-Dial number that is not in Use The MFC is too hot. Connection Fail You tried to transmit or receive again. If problem continues, call Telephone Company to Machine Error, call Brother...is too hot or too cool. Polled Waiting mode. Leave the machine for a while The temperature of the MFC is not programmed. In USA: 1-800-284-4329 In Canada: 1-877-BROTHER No The number you will hear the cooling fan running while the display on the...
...jam clear cover (fuser cover). (See Paper jams on the machine, then try again. Not Registered You tried to access a One-Touch or Speed-Dial number that is not in Use The MFC is too hot. Connection Fail You tried to transmit or receive again. If problem continues, call Telephone Company to Machine Error, call Brother...is too hot or too cool. Polled Waiting mode. Leave the machine for a while The temperature of the MFC is not programmed. In USA: 1-800-284-4329 In Canada: 1-877-BROTHER No The number you will hear the cooling fan running while the display on the...
Users Manual - English
Page 151
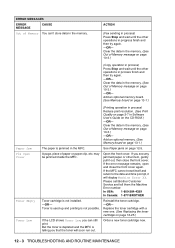
... the toner will display Machine Error XX. Clear the data in progress finish and then try again. -OR- Replace the toner cartridge with a new one. (See Replacing the toner cartridge on page 12-5. A page, piece of Memory message on page 10-3.) -OR- Open the front cover. Toner...(See Out of Memory message on page 2-7 in the MFC. Please call Brother Customer Service and tell them the Machine Error number: In USA: 1-800-284-4329 In Canada: 1-877-BROTHER Toner cartridge is jammed in Software User's Guide on page 13-1.) The paper is not installed. -OR- If the error message remains...
... the toner will display Machine Error XX. Clear the data in progress finish and then try again. -OR- Replace the toner cartridge with a new one. (See Replacing the toner cartridge on page 12-5. A page, piece of Memory message on page 10-3.) -OR- Open the front cover. Toner...(See Out of Memory message on page 2-7 in the MFC. Please call Brother Customer Service and tell them the Machine Error number: In USA: 1-800-284-4329 In Canada: 1-877-BROTHER Toner cartridge is jammed in Software User's Guide on page 13-1.) The paper is not installed. -OR- If the error message remains...
Users Manual - English
Page 153
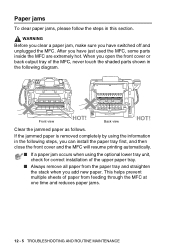
... lower tray unit, check for correct installation of the upper paper tray. ■ Always remove all paper from the paper tray and straighten the stack when you open the front cover or back output tray of paper from feeding through the MFC at one time and reduces paper jams. 12 - 5 TROUBLESHOOTING AND ROUTINE MAINTENANCE Back view HOT! If...
... lower tray unit, check for correct installation of the upper paper tray. ■ Always remove all paper from the paper tray and straighten the stack when you open the front cover or back output tray of paper from feeding through the MFC at one time and reduces paper jams. 12 - 5 TROUBLESHOOTING AND ROUTINE MAINTENANCE Back view HOT! If...

Users Manual - English
Page 154
TROUBLESHOOTING AND ROUTINE MAINTENANCE 12 - 6 1 Pull the paper tray completely out of the MFC. 2 Pull the jammed paper up and out of the MFC. 3 Press the cover release button and then open the front cover.
TROUBLESHOOTING AND ROUTINE MAINTENANCE 12 - 6 1 Pull the paper tray completely out of the MFC. 2 Pull the jammed paper up and out of the MFC. 3 Press the cover release button and then open the front cover.
Users Manual - English
Page 155
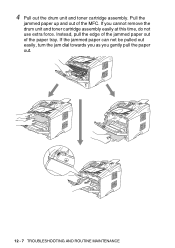
Pull the jammed paper up and out of the paper tray. If you gently pull the paper out. 12 - 7 TROUBLESHOOTING AND ROUTINE MAINTENANCE Instead, pull the edge of the jammed paper out of the MFC. 4 Pull out the drum unit and toner cartridge assembly. If the jammed paper can not be pulled out easily, turn the jam dial towards you as you cannot remove the drum unit and toner cartridge assembly easily at this time, do not use extra force.
Pull the jammed paper up and out of the paper tray. If you gently pull the paper out. 12 - 7 TROUBLESHOOTING AND ROUTINE MAINTENANCE Instead, pull the edge of the jammed paper out of the MFC. 4 Pull out the drum unit and toner cartridge assembly. If the jammed paper can not be pulled out easily, turn the jam dial towards you as you cannot remove the drum unit and toner cartridge assembly easily at this time, do not use extra force.
Users Manual - English
Page 156
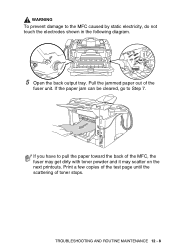
Pull the jammed paper out of toner stops. WARNING To prevent damage to Step 7. Print a few copies of the test page until the scattering of the fuser unit. If the paper jam can be cleared, go to the MFC caused by static electricity, do not touch the electrodes shown in the following diagram. 5 Open the back output tray. TROUBLESHOOTING AND ROUTINE MAINTENANCE 12 - 8 If you have to pull the paper toward the back of the MFC, the fuser may get dirty with toner powder and it may scatter on the next printouts.
Pull the jammed paper out of toner stops. WARNING To prevent damage to Step 7. Print a few copies of the test page until the scattering of the fuser unit. If the paper jam can be cleared, go to the MFC caused by static electricity, do not touch the electrodes shown in the following diagram. 5 Open the back output tray. TROUBLESHOOTING AND ROUTINE MAINTENANCE 12 - 8 If you have to pull the paper toward the back of the MFC, the fuser may get dirty with toner powder and it may scatter on the next printouts.

Users Manual - English
Page 157
HOT! Back view 6 Open the jam clear cover (fuser cover). Close the back output tray. 12 - 9 TROUBLESHOOTING AND ROUTINE MAINTENANCE Jam Clear Cover (Fuser Cover) Back Output Tray 7 Close the jam clear cover (fuser cover). WARNING After you touch the internal parts of the MFC. Pull the jammed paper out of the MFC are extremely HOT! Wait for the MFC to cool down before you have just used the MFC, some internal parts of the fuser unit.
HOT! Back view 6 Open the jam clear cover (fuser cover). Close the back output tray. 12 - 9 TROUBLESHOOTING AND ROUTINE MAINTENANCE Jam Clear Cover (Fuser Cover) Back Output Tray 7 Close the jam clear cover (fuser cover). WARNING After you touch the internal parts of the MFC. Pull the jammed paper out of the MFC are extremely HOT! Wait for the MFC to cool down before you have just used the MFC, some internal parts of the fuser unit.
Users Manual - English
Page 162
...Brother software, the PC will not work unless you restart Windows®. The NC-9100h has a two color LED for laser machines. (See About paper on the CD-ROM.) Printed pages are curled. Press the Test switch. The MFC does not feed paper Reinsert the paper firmly, load one sheet at a time. What paper... can ignore this problem. See Paper jams on the LCD. The Scan key...
...Brother software, the PC will not work unless you restart Windows®. The NC-9100h has a two color LED for laser machines. (See About paper on the CD-ROM.) Printed pages are curled. Press the Test switch. The MFC does not feed paper Reinsert the paper firmly, load one sheet at a time. What paper... can ignore this problem. See Paper jams on the LCD. The Scan key...

Quick Setup Guide - English
Page 8
... use the machine. Up to fit the paper size. Paper Guide Release Lever 5 Put the paper tray firmly back in the slots on supported paper specifications, see "About paper" in Chapter 2 of paper well to avoid paper jams and misfeeds. 4 Put paper in the tray and below the maximum paper mark. 2 While pressing the paper guide release lever, slide the adjusters...
... use the machine. Up to fit the paper size. Paper Guide Release Lever 5 Put the paper tray firmly back in the slots on supported paper specifications, see "About paper" in Chapter 2 of paper well to avoid paper jams and misfeeds. 4 Put paper in the tray and below the maximum paper mark. 2 While pressing the paper guide release lever, slide the adjusters...
Software Users Manual - English
Page 9
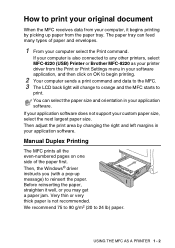
...very thick paper is also connected to any other printers, select MFC-8220 (USB) Printer or Brother MFC-8220 as your printer driver from the paper tray. If your computer is not recommended. We recommend 75 to 90 g/m2 (20 to reinsert the paper. Manual Duplex Printing The MFC prints ...click on one side of paper and envelopes. 1 From your custom paper size, select the next largest paper size. USING THE MFC AS A PRINTER 1 - 2 The paper tray can select the paper size and orientation in your application software. Then, the Windows® driver instructs you may get a paper jam. How...
...very thick paper is also connected to any other printers, select MFC-8220 (USB) Printer or Brother MFC-8220 as your printer driver from the paper tray. If your computer is not recommended. We recommend 75 to 90 g/m2 (20 to reinsert the paper. Manual Duplex Printing The MFC prints ...click on one side of paper and envelopes. 1 From your custom paper size, select the next largest paper size. USING THE MFC AS A PRINTER 1 - 2 The paper tray can select the paper size and orientation in your application software. Then, the Windows® driver instructs you may get a paper jam. How...

Software Users Manual - English
Page 11
... the front edge of paper as in Step 3. USING THE MFC AS A PRINTER 1 - 4 If it is not, the paper may not be fed properly, resulting in a skewed printout or a paper jam. ■ Do not put more than one piece of paper in the manual feed tray at any one time, or it may cause a jam. 4 Send the print... data to fit the paper size. 3 Using ...
... the front edge of paper as in Step 3. USING THE MFC AS A PRINTER 1 - 4 If it is not, the paper may not be fed properly, resulting in a skewed printout or a paper jam. ■ Do not put more than one piece of paper in the manual feed tray at any one time, or it may cause a jam. 4 Send the print... data to fit the paper size. 3 Using ...
Software Users Manual - English
Page 12
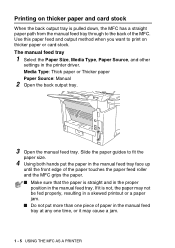
... to the back of the MFC. If it may not be fed properly, resulting in a skewed printout or a paper jam. ■ Do not put the paper in the manual feed tray face up until the front edge of paper in the manual feed tray at any one time, or it is straight and ... to fit the paper size. 4 Using both hands put more than one piece of the paper touches the paper feed roller and the MFC grips the paper. ■ Make sure that the paper is not, the paper may cause a jam. 1 - 5 USING THE MFC AS A PRINTER The manual feed tray 1 Select the Paper Size, Media Type, Paper Source, and other...
... to the back of the MFC. If it may not be fed properly, resulting in a skewed printout or a paper jam. ■ Do not put the paper in the manual feed tray face up until the front edge of paper in the manual feed tray at any one time, or it is straight and ... to fit the paper size. 4 Using both hands put more than one piece of the paper touches the paper feed roller and the MFC grips the paper. ■ Make sure that the paper is not, the paper may cause a jam. 1 - 5 USING THE MFC AS A PRINTER The manual feed tray 1 Select the Paper Size, Media Type, Paper Source, and other...

Software Users Manual - English
Page 13
USING THE MFC AS A PRINTER 1 - 6 Caution Remove each page that you want to print. 7 When you have finished the print job, close the back output tray. Stacking the sheets may cause a paper jam or the paper to the MFC. 6 After the printed page comes out of the MFC, put in the next sheet of paper as in Step 4. 5 Send the print data to curl. Repeat for each sheet immediately after printing.
USING THE MFC AS A PRINTER 1 - 6 Caution Remove each page that you want to print. 7 When you have finished the print job, close the back output tray. Stacking the sheets may cause a paper jam or the paper to the MFC. 6 After the printed page comes out of the MFC, put in the next sheet of paper as in Step 4. 5 Send the print data to curl. Repeat for each sheet immediately after printing.


