Network Users Manual - English
Page 39
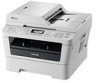
How to operate Fax to the fax server. 5 5 34 Press OK. j Press OK. k Press Stop/Exit. b Enter the fax number. c The machine will send the message over a TCP/IP network to Server a Place the document in the ADF or on the scanner glass. Control panel setup h Press a or b to a total of 40 characters. i Enter the suffix using up to choose Suffix. Note You can enter the prefix and suffix address using the dial pad.
How to operate Fax to the fax server. 5 5 34 Press OK. j Press OK. k Press Stop/Exit. b Enter the fax number. c The machine will send the message over a TCP/IP network to Server a Place the document in the ADF or on the scanner glass. Control panel setup h Press a or b to a total of 40 characters. i Enter the suffix using up to choose Suffix. Note You can enter the prefix and suffix address using the dial pad.
Network Users Manual - English
Page 67
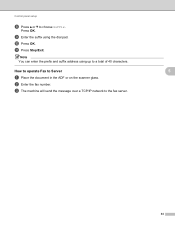
...to E-mail. 7 Press OK. Note Scan to E-mail (E-mail Server) requires SMTP/POP3 mail server support. (See Sending an E-mail with user authentication on the scanner glass. Press OK. Note If you choose Secure PDF, the machine will ask you don't have to change the quality, press a or b to choose Enter... Address. Internet fax (For MFC-7460DN, MFC-7860DN and MFC-7860DW: available as the scan profile. 62 If you can choose PDF or TIFF for Black and White and PDF or JPEG for color.
...to E-mail. 7 Press OK. Note Scan to E-mail (E-mail Server) requires SMTP/POP3 mail server support. (See Sending an E-mail with user authentication on the scanner glass. Press OK. Note If you choose Secure PDF, the machine will ask you don't have to change the quality, press a or b to choose Enter... Address. Internet fax (For MFC-7460DN, MFC-7860DN and MFC-7860DW: available as the scan profile. 62 If you can choose PDF or TIFF for Black and White and PDF or JPEG for color.
Network Users Manual - English
Page 68
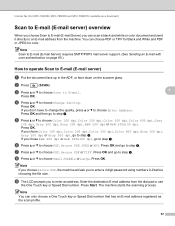
... Touch or Speed Dial. (Internet Fax addresses are not available for use.) a Put the document face up in the ADF, or face down on the scanner glass. Only One Touch or Speed Dials with the One Touch or Speed Dial will be used for the quality and the file type. Internet... fax (For MFC-7460DN, MFC-7860DN and MFC-7860DW: available as a download) Using One Touch or Speed Dial number 7 You can store the scan resolution (scan profile) for each E-mail address...
... Touch or Speed Dial. (Internet Fax addresses are not available for use.) a Put the document face up in the ADF, or face down on the scanner glass. Only One Touch or Speed Dials with the One Touch or Speed Dial will be used for the quality and the file type. Internet... fax (For MFC-7460DN, MFC-7860DN and MFC-7860DW: available as a download) Using One Touch or Speed Dial number 7 You can store the scan resolution (scan profile) for each E-mail address...

Quick Setup Guide - English
Page 2
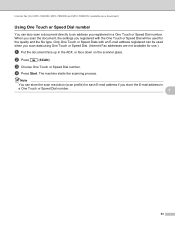
For how to use a USB 2.0 cable (Type A/B) that are under the scanner. Network cable Use a straight-through Category5 (or greater) twisted-pair cable for the interface you want to repack the machine, see Packing and shipping the ...
For how to use a USB 2.0 cable (Type A/B) that are under the scanner. Network cable Use a straight-through Category5 (or greater) twisted-pair cable for the interface you want to repack the machine, see Packing and shipping the ...
Quick Setup Guide - English
Page 3
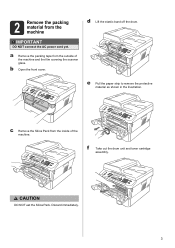
c Remove the Silica Pack from the outside of the machine. a Remove the packing tape from the inside of the machine and the film covering the scanner glass. Discard immediately. 3 b Open the front cover. f Take out the drum unit and toner cartridge assembly. e Pull the paper strip to remove the protective material as shown in the illustration. 2 Remove the packing material from the machine IMPORTANT DO NOT connect the AC power cord yet. d Lift the elastic band off the drum. CCAAUUTTIOINON DO NOT eat the Silica Pack.
c Remove the Silica Pack from the outside of the machine. a Remove the packing tape from the inside of the machine and the film covering the scanner glass. Discard immediately. 3 b Open the front cover. f Take out the drum unit and toner cartridge assembly. e Pull the paper strip to remove the protective material as shown in the illustration. 2 Remove the packing material from the machine IMPORTANT DO NOT connect the AC power cord yet. d Lift the elastic band off the drum. CCAAUUTTIOINON DO NOT eat the Silica Pack.

Quick Setup Guide - English
Page 12
.... 12 It will receive a confirmation fax of your product online using the On-Line Registration link from the installation CD-ROM or visit http://www.brother.com/registration/. a Press Menu, 0, 2, 2. d Enter the toll-free fax number: 1-877-268-9575. b Put the sheet face up in Blue. Note You will reset itself.... b Press a or b to change automatically for daylight savings time. c Make sure (FAX) is illuminated in the ADF (Automatic Document Feeder) or face down on the scanner glass.
.... 12 It will receive a confirmation fax of your product online using the On-Line Registration link from the installation CD-ROM or visit http://www.brother.com/registration/. a Press Menu, 0, 2, 2. d Enter the toll-free fax number: 1-877-268-9575. b Put the sheet face up in Blue. Note You will reset itself.... b Press a or b to change automatically for daylight savings time. c Make sure (FAX) is illuminated in the ADF (Automatic Document Feeder) or face down on the scanner glass.
Software Users Manual - English
Page 3
... tab ...27 Editing a print profile ...28 Support ...29 Tray Settings...31 Status Monitor...33 Features in the BR-Script 3 printer driver (For MFC-7860DW) (PostScript® 3™ language emulation 34 Printing Preferences ...34 Advanced options ...36 Ports tab ...38 Status Monitor...39 Monitoring the machine's...Vista®/Windows® 7 48 WIA compliant ...48 Scanning a document into the PC ...48 Pre-Scanning and cropping a portion using the scanner glass 50 Scanning a document using the WIA driver (Windows Photo Gallery and Windows Fax and Scan 53 Scanning a document into the PC ...53...
... tab ...27 Editing a print profile ...28 Support ...29 Tray Settings...31 Status Monitor...33 Features in the BR-Script 3 printer driver (For MFC-7860DW) (PostScript® 3™ language emulation 34 Printing Preferences ...34 Advanced options ...36 Ports tab ...38 Status Monitor...39 Monitoring the machine's...Vista®/Windows® 7 48 WIA compliant ...48 Scanning a document into the PC ...48 Pre-Scanning and cropping a portion using the scanner glass 50 Scanning a document using the WIA driver (Windows Photo Gallery and Windows Fax and Scan 53 Scanning a document into the PC ...53...
Software Users Manual - English
Page 6
...driver (Macintosh 121 Duplex printing...122 Guidelines for printing on both sides of the paper 122 Automatic duplex printing (Not available for MFC-7360N 122 Manual duplex printing ...122 Simultaneous scanning, printing and faxing 123 Choosing page setup options ...123 Choosing printing options ...125 Cover... 150 Scanning a document using the TWAIN driver 150 Scanning an image into your Macintosh 151 Pre-Scanning an image ...151 Settings in the Scanner window ...152 Scanning a document using the ICA driver (Mac OS X 10.6.x 156 Using Image Capture...156 Scanning directly from the "Print...
...driver (Macintosh 121 Duplex printing...122 Guidelines for printing on both sides of the paper 122 Automatic duplex printing (Not available for MFC-7360N 122 Manual duplex printing ...122 Simultaneous scanning, printing and faxing 123 Choosing page setup options ...123 Choosing printing options ...125 Cover... 150 Scanning a document using the TWAIN driver 150 Scanning an image into your Macintosh 151 Pre-Scanning an image ...151 Settings in the Scanner window ...152 Scanning a document using the ICA driver (Mac OS X 10.6.x 156 Using Image Capture...156 Scanning directly from the "Print...
Software Users Manual - English
Page 49
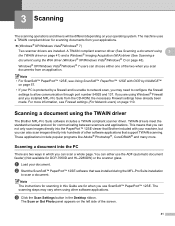
... in which you are installed. 3 Scanning 3 The scanning operations and drivers will be different depending on your document. A TWAIN compliant scanner driver (See Scanning a document using 3 the TWAIN driver on page 41) and a Windows® Imaging Acquisition (WIA) driver (...See Scanning a document using the TWAIN driver 3 The Brother MFL-Pro Suite software includes a TWAIN compliant scanner driver. Note The instructions for communicating between scanners and applications. The Scan or Get Photo panel appears on page 48).
... in which you are installed. 3 Scanning 3 The scanning operations and drivers will be different depending on your document. A TWAIN compliant scanner driver (See Scanning a document using 3 the TWAIN driver on page 41) and a Windows® Imaging Acquisition (WIA) driver (...See Scanning a document using the TWAIN driver 3 The Brother MFL-Pro Suite software includes a TWAIN compliant scanner driver. Note The instructions for communicating between scanners and applications. The Scan or Get Photo panel appears on page 48).
Software Users Manual - English
Page 50
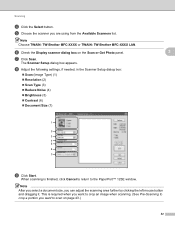
Note Choose TWAIN: TW-Brother MFC-XXXX or TWAIN: TW-Brother MFC-XXXX LAN. h Adjust the following settings, if needed, in the Scanner Setup dialog box: Scan (Image Type) (1) Resolution (2) Scan Type (3) Reduce Noise (4) Brightness (5) Contrast (6) Document ...to scan on the Scan or Get Photo panel. 3 g Click Scan. Scanning d Click the Select button. The Scanner Setup dialog box appears. f Check the Display scanner dialog box on page 43.) 42 When scanning is required when you want to crop an image when scanning. (See ...
Note Choose TWAIN: TW-Brother MFC-XXXX or TWAIN: TW-Brother MFC-XXXX LAN. h Adjust the following settings, if needed, in the Scanner Setup dialog box: Scan (Image Type) (1) Resolution (2) Scan Type (3) Reduce Noise (4) Brightness (5) Contrast (6) Document ...to scan on the Scan or Get Photo panel. 3 g Click Scan. Scanning d Click the Select button. The Scanner Setup dialog box appears. f Check the Display scanner dialog box on page 43.) 42 When scanning is required when you want to crop an image when scanning. (See ...

Software Users Manual - English
Page 51
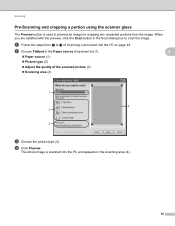
... 3 You can preview your image and crop unwanted portions before scanning by using the PreScan button. c Click PreScan. a Follow the steps from a to g of the Scanner Setup dialog box. 1 43 The whole image is scanned into the PC on page 41. 3 b Choose the settings for Scan (Image Type), Resolution, Scan Type... a portion you are satisfied with the preview, click the Start button in the Scanning Area (1) of Scanning a document into the PC and appears in the Scanner Setup dialog box to scan the image.
... 3 You can preview your image and crop unwanted portions before scanning by using the PreScan button. c Click PreScan. a Follow the steps from a to g of the Scanner Setup dialog box. 1 43 The whole image is scanned into the PC on page 41. 3 b Choose the settings for Scan (Image Type), Resolution, Scan Type... a portion you are satisfied with the preview, click the Start button in the Scanning Area (1) of Scanning a document into the PC and appears in the Scanner Setup dialog box to scan the image.
Software Users Manual - English
Page 52
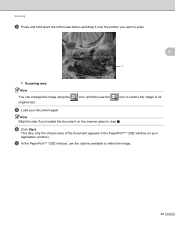
This time only the chosen area of the document appears in step a. f Click Start. icon, and then use the options available to refine the image. 44 Scanning d Press and hold down the left mouse button and drag it over the portion you loaded the document on the scanner glass in the PaperPort™ 12SE window (or your document again. g In the PaperPort™ 12SE window, use the icon to restore the image to scan. 3 1 1 Scanning area Note You can enlarge the image using the original size. Note Skip this step if you want to its e Load your application window).
This time only the chosen area of the document appears in step a. f Click Start. icon, and then use the options available to refine the image. 44 Scanning d Press and hold down the left mouse button and drag it over the portion you loaded the document on the scanner glass in the PaperPort™ 12SE window (or your document again. g In the PaperPort™ 12SE window, use the icon to restore the image to scan. 3 1 1 Scanning area Note You can enlarge the image using the original size. Note Skip this step if you want to its e Load your application window).

Software Users Manual - English
Page 53
... for scanning photo images. 300 x 300 dpi Web Use for attaching the scanned image to give the appearance of gray. 45 Scanning Settings in the Scanner Setup dialog box 3 Scan (Image Type) 3 Choose the output image type from the Resolution drop-down list. This mode is a method for each default setting...
... for scanning photo images. 300 x 300 dpi Web Use for attaching the scanned image to give the appearance of gray. 45 Scanning Settings in the Scanner Setup dialog box 3 Scan (Image Type) 3 Choose the output image type from the Resolution drop-down list. This mode is a method for each default setting...

Software Users Manual - English
Page 55
... x 60 mm) To scan business cards, choose the Business Card size, and then place the business card face down at the top left of the scanner glass, as indicated by the document guidelines on the screen. • Width: shows the width of scanning area. • Height: shows the height of scanning...
... x 60 mm) To scan business cards, choose the Business Card size, and then place the business card face down at the top left of the scanner glass, as indicated by the document guidelines on the screen. • Width: shows the width of scanning area. • Height: shows the height of scanning...
Software Users Manual - English
Page 56
... Suite installation to use the ADF (automatic document feeder) (Not available for DCP-7060D and HL-2280DW) or the scanner glass. Note Choose WIA: Brother MFC-XXXX or WIA: Brother MFC-XXXX LAN. g Click Scan. h Adjust the following settings, if needed, in the Desktop ribbon. Note The instructions... for scanning in which you can scan a whole page. f Check the Display scanner dialog box on the left side of a page ...
... Suite installation to use the ADF (automatic document feeder) (Not available for DCP-7060D and HL-2280DW) or the scanner glass. Note Choose WIA: Brother MFC-XXXX or WIA: Brother MFC-XXXX LAN. g Click Scan. h Adjust the following settings, if needed, in the Desktop ribbon. Note The instructions... for scanning in which you can scan a whole page. f Check the Display scanner dialog box on the left side of a page ...

Software Users Manual - English
Page 57
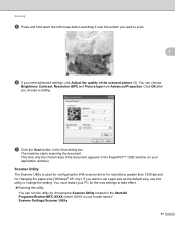
... Click OK after you need advanced settings, click Adjust the quality of the scanned picture (3). j Choose the picture type (2). Note • The scanner resolution can choose Brightness, Contrast, Resolution (DPI) and Picture type from Advanced Properties. You can be set as high as 1200 dpi. •... For resolutions greater than 1200 dpi, use the Scanner Utility. (See Scanner Utility on page 51.) m Click the Scan button in the Scan dialog box. Scanning Page size (4) 1 3 2 3 4 i ...
... Click OK after you need advanced settings, click Adjust the quality of the scanned picture (3). j Choose the picture type (2). Note • The scanner resolution can choose Brightness, Contrast, Resolution (DPI) and Picture type from Advanced Properties. You can be set as high as 1200 dpi. •... For resolutions greater than 1200 dpi, use the Scanner Utility. (See Scanner Utility on page 51.) m Click the Scan button in the Scan dialog box. Scanning Page size (4) 1 3 2 3 4 i ...
Software Users Manual - English
Page 58
... cropping any unwanted portions from a to g of the scanned picture (3) Scanning area (4) 1 4 2 3 c Choose the picture type (2). Scanning Pre-Scanning and cropping a portion using the scanner glass 3 The Preview button is scanned into the PC on page 48. When you are satisfied with the preview, click the Scan button in the...
... cropping any unwanted portions from a to g of the scanned picture (3) Scanning area (4) 1 4 2 3 c Choose the picture type (2). Scanning Pre-Scanning and cropping a portion using the scanner glass 3 The Preview button is scanned into the PC on page 48. When you are satisfied with the preview, click the Scan button in the...
Software Users Manual - English
Page 59
...machine starts scanning the document. If you choose a setting. g Click the Scan button in the Start/All Programs/Brother/MFC-XXXX (where XXXX is used for configuring the WIA scanner driver for resolutions greater than 1200 dpi and for the new settings to scan. 3 f If you need advanced ... in the PaperPort™ 12SE window (or your PC for changing the paper size (Windows® XP only). Scanner Utility 3 The Scanner Utility is your model name)/ Scanner Settings/Scanner Utility. 51 Click OK after you want to take effect. Running the utility You can choose Brightness, ...
...machine starts scanning the document. If you choose a setting. g Click the Scan button in the Start/All Programs/Brother/MFC-XXXX (where XXXX is used for configuring the WIA scanner driver for resolutions greater than 1200 dpi and for the new settings to scan. 3 f If you need advanced ... in the PaperPort™ 12SE window (or your PC for changing the paper size (Windows® XP only). Scanner Utility 3 The Scanner Utility is your model name)/ Scanner Settings/Scanner Utility. 51 Click OK after you want to take effect. Running the utility You can choose Brightness, ...
Software Users Manual - English
Page 61
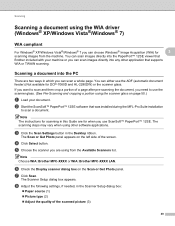
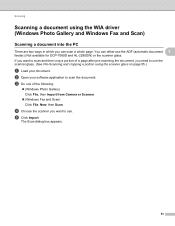
... the document, you need to scan and then crop a portion of the following: (Windows Photo Gallery) Click File, then Import from Camera or Scanner. (Windows Fax and Scan) Click File, New, then Scan. The Scan dialog box appears. 53 e Click Import. b Open your document.... If you want to scan the document. You can scan a whole page. d Choose the scanner you can either use the scanner glass. (See Pre-Scanning and cropping a portion using the WIA driver (Windows Photo Gallery and Windows Fax and Scan) 3 Scanning a document...
... the document, you need to scan and then crop a portion of the following: (Windows Photo Gallery) Click File, then Import from Camera or Scanner. (Windows Fax and Scan) Click File, New, then Scan. The Scan dialog box appears. 53 e Click Import. b Open your document.... If you want to scan the document. You can scan a whole page. d Choose the scanner you can either use the scanner glass. (See Pre-Scanning and cropping a portion using the WIA driver (Windows Photo Gallery and Windows Fax and Scan) 3 Scanning a document...

Software Users Manual - English
Page 62
The machine starts scanning the document. 54 Scanning f Adjust the following settings, if needed, in the Scanner dialog box. Profile (1) Source (2) Paper size (3) Color format (4) File type (5) 3 Resolution (DPI) (6) Brightness (7) Contrast (8) 1 2 3 4 5 6 7 8 g Click the Scan button in the Scan dialog box.
The machine starts scanning the document. 54 Scanning f Adjust the following settings, if needed, in the Scanner dialog box. Profile (1) Source (2) Paper size (3) Color format (4) File type (5) 3 Resolution (DPI) (6) Brightness (7) Contrast (8) 1 2 3 4 5 6 7 8 g Click the Scan button in the Scan dialog box.


