Software & Network Users Manual - English
Page 10
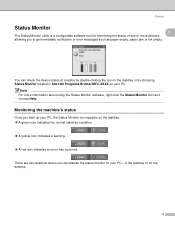
... device status at anytime by double-clicking the icon in Start/All Programs/Brother/MFC-XXXX on your PC, the Status Monitor icon appears on the desktop. ...You can display the status monitor on your PC-in the tasktray or on the tasktray. „ A green icon indicates the normal stand-by choosing Status Monitor located in the tasktray or by condition. „ ...icon indicates an error has occurred. Monitoring the machine's status 1 Once you to get immediate notification of one or more information about using the Status Monitor software, right-click the Status Monitor icon and choose Help...
... device status at anytime by double-clicking the icon in Start/All Programs/Brother/MFC-XXXX on your PC, the Status Monitor icon appears on the desktop. ...You can display the status monitor on your PC-in the tasktray or on the tasktray. „ A green icon indicates the normal stand-by choosing Status Monitor located in the tasktray or by condition. „ ...icon indicates an error has occurred. Monitoring the machine's status 1 Once you to get immediate notification of one or more information about using the Status Monitor software, right-click the Status Monitor icon and choose Help...
Software & Network Users Manual - English
Page 15
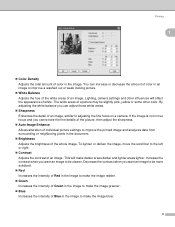
...want an image to be more subdued. „ Red Increases the intensity of Red in the image to make the image redder. „ Green Increases the intensity of Green in the image to make the image greener. „ Blue Increases the intensity of Blue in the document. „ Brightness Adjusts the ... analyzes data from surrounding or neighboring pixels in the image to make darker areas darker and lighter areas lighter. This will effect the appearance of color in the image. The white areas of an image. Increase the contrast when you can increase or decrease the amount of white. Decrease the ...
...want an image to be more subdued. „ Red Increases the intensity of Red in the image to make the image redder. „ Green Increases the intensity of Green in the image to make the image greener. „ Blue Increases the intensity of Blue in the document. „ Brightness Adjusts the ... analyzes data from surrounding or neighboring pixels in the image to make darker areas darker and lighter areas lighter. This will effect the appearance of color in the image. The white areas of an image. Increase the contrast when you can increase or decrease the amount of white. Decrease the ...
Users Manual - English
Page 54
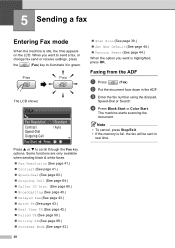
...Resolution Contrast Speed-Dial Outgoing Call Standard Auto Fax Start Press Press a or b to illuminate it in the ADF. b Put the document face down in green. The machine starts scanning the document. Note • To cancel, press Stop/Exit. • If the memory is highlighted, press OK. Faxing from ... „ Factory Reset (See page 44.) When the option you want is full, the fax will be sent in real time. d Press Black Start or Color Start. 5 Sending a fax 5 Entering Fax mode 5 When the machine is idle, the time appears on the LCD. c Enter the fax number using the...
...Resolution Contrast Speed-Dial Outgoing Call Standard Auto Fax Start Press Press a or b to illuminate it in the ADF. b Put the document face down in green. The machine starts scanning the document. Note • To cancel, press Stop/Exit. • If the memory is highlighted, press OK. Faxing from ... „ Factory Reset (See page 44.) When the option you want is full, the fax will be sent in real time. d Press Black Start or Color Start. 5 Sending a fax 5 Entering Fax mode 5 When the machine is idle, the time appears on the LCD. c Enter the fax number using the...

Users Manual - English
Page 75
... of your message. (This allows your machine time to the next available phone line in a preset order. You may contain four wires (black, red, green, yellow). The two phone numbers can , you must rerecord the OGM to 20 seconds. If it can work best on a dedicated line. 7 Two-...fax call cannot roll away. Do not put the machine on any of automatic transmissions before they are busy. Your machine will be plugged into one jack (RJ14). Telephone Services and External devices Recording outgoing message (OGM) on an external TAD 7 Timing is important in recording this pause, but...
... of your message. (This allows your machine time to the next available phone line in a preset order. You may contain four wires (black, red, green, yellow). The two phone numbers can , you must rerecord the OGM to 20 seconds. If it can work best on a dedicated line. 7 Two-...fax call cannot roll away. Do not put the machine on any of automatic transmissions before they are busy. Your machine will be plugged into one jack (RJ14). Telephone Services and External devices Recording outgoing message (OGM) on an external TAD 7 Timing is important in recording this pause, but...
Users Manual - English
Page 108
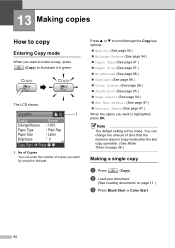
... in Copy mode after the last copy operation. (See Mode Timer on page 11.) c Press Black Start or Color Start. 92 You can enter the number of time that the machine stays in green. Note The default setting is highlighted, press OK. The LCD shows: COPY 01 1 Quality Enlarge/Reduce Paper Type... page 94.) „ Paper Type (See page 97.) „ Paper Size (See page 97.) „ Brightness (See page 96.) „ Contrast (See page 96.) „ Color Adjust (See page 96.) „ Stack/Sort (See page 95.) „ Page Layout (See page 94.) „ Set New Default (See page 97.) „ Factory...
... in Copy mode after the last copy operation. (See Mode Timer on page 11.) c Press Black Start or Color Start. 92 You can enter the number of time that the machine stays in green. Note The default setting is highlighted, press OK. The LCD shows: COPY 01 1 Quality Enlarge/Reduce Paper Type... page 94.) „ Paper Type (See page 97.) „ Paper Size (See page 97.) „ Brightness (See page 96.) „ Contrast (See page 96.) „ Color Adjust (See page 96.) „ Stack/Sort (See page 95.) „ Page Layout (See page 94.) „ Set New Default (See page 97.) „ Factory...

Users Manual - English
Page 112
...color saturation, go to step e. „ If you do not want . d Press a or b to decrease the color saturation. f Press c to increase the color saturation, or press d to choose Color... Color Saturation 13 a Press (Copy). Press OK. „ If you do not want to change additional settings, press Black Start or Color Start...OK. Press OK. Chapter 13 Adjusting Brightness, Contrast and Color 13 Brightness 13 You can adjust the copy contrast to ..., press Black Start or Color Start. a Press (Copy). b Load your document. d Press a or b to choose Red, Green or Blue. Press OK....
...color saturation, go to step e. „ If you do not want . d Press a or b to decrease the color saturation. f Press c to increase the color saturation, or press d to choose Color... Color Saturation 13 a Press (Copy). Press OK. „ If you do not want to change additional settings, press Black Start or Color Start...OK. Press OK. Chapter 13 Adjusting Brightness, Contrast and Color 13 Brightness 13 You can adjust the copy contrast to ..., press Black Start or Color Start. a Press (Copy). b Load your document. d Press a or b to choose Red, Green or Blue. Press OK....

Users Manual - English
Page 118
The machine can only read one media card at a time so do not put the media card in the proper slot. b Press a or b to the previous level. Note Instead of the following: „ Press OK and change any settings, press Color Start to choose your data or damage the card. Note...photo. Press (PhotoCapture). f After you want to change the print setting. (See page 105.) „ If you can preview your photos, you do one card in green and display the PhotoCapture options on page 103.) d Press a to the card (the PhotoCapture key is displayed on page 104. When the option you...
The machine can only read one media card at a time so do not put the media card in the proper slot. b Press a or b to the previous level. Note Instead of the following: „ Press OK and change any settings, press Color Start to choose your data or damage the card. Note...photo. Press (PhotoCapture). f After you want to change the print setting. (See page 105.) „ If you can preview your photos, you do one card in green and display the PhotoCapture options on page 103.) d Press a to the card (the PhotoCapture key is displayed on page 104. When the option you...

Users Manual - English
Page 125
... documents will appear on the LCD. (See Scanning for details about the other menu options.) How to scan to Card selection will be stored in green. Color documents may be named 07010605.PDF. b Load your machine. Press OK. 109 The LCD shows: SCAN Scan to E-mail Scan to Image Scan... to OCR Scan to File Scan to Card Select & Press OK Press a or b to choose Scan to Card. Quality 150 dpi Color 300 dpi Color 600 dpi Color 200x100 dpi B/W 200 dpi B/W Selectable File Format JPEG / PDF JPEG / PDF JPEG / PDF TIFF / PDF TIFF / PDF a Insert a CompactFlash®, Memory...
... documents will appear on the LCD. (See Scanning for details about the other menu options.) How to scan to Card selection will be stored in green. Color documents may be named 07010605.PDF. b Load your machine. Press OK. 109 The LCD shows: SCAN Scan to E-mail Scan to Image Scan... to OCR Scan to File Scan to Card Select & Press OK Press a or b to choose Scan to Card. Quality 150 dpi Color 300 dpi Color 600 dpi Color 200x100 dpi B/W 200 dpi B/W Selectable File Format JPEG / PDF JPEG / PDF JPEG / PDF TIFF / PDF TIFF / PDF a Insert a CompactFlash®, Memory...
Users Manual - English
Page 187
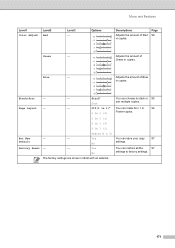
Page 96 Green - -1 -2 Adjusts the amount of +2 Green in copies. +1 Blue - -1 -2 Adjusts the amount of Red in Bold with an asterisk. 171 No Factory Reset - - Yes You can save your copy 97 Default ... 1 or 94 2 in 1 (P) Poster copies. 2 in 1 (L) 4 in 1 (P) 4 in copies. +1 -1 -2 Stack/Sort - - Page Layout - - No The factory settings are shown in copies. Menu and Features Level1 Color Adjust Level2 Red Level3 -
Page 96 Green - -1 -2 Adjusts the amount of +2 Green in copies. +1 Blue - -1 -2 Adjusts the amount of Red in Bold with an asterisk. 171 No Factory Reset - - Yes You can save your copy 97 Default ... 1 or 94 2 in 1 (P) Poster copies. 2 in 1 (L) 4 in 1 (P) 4 in copies. +1 -1 -2 Stack/Sort - - Page Layout - - No The factory settings are shown in copies. Menu and Features Level1 Color Adjust Level2 Red Level3 -

Quick Setup Guide - English
Page 16
.... The built-in the Product Registration and Test Sheet (USA only) 1 Fill out the Product Registration and Test Sheet. For details, see Message Center (MFC-665CW and MFC-845CW only) in Chapter 9 of the User's Guide. 2 Activate Message Center mode. See Outgoing Message (OGM) in Chapter 9 of the User's Guide...Message Center answers voice calls. Press . STEP1 Setting Up the Machine 14 Setting up the Message Center You must record an outgoing message in Green. 4 Enter the toll-free fax number: 1-877-268-9575. 5 Press Black Start. 14 If the call is on, it overrides your...
.... The built-in the Product Registration and Test Sheet (USA only) 1 Fill out the Product Registration and Test Sheet. For details, see Message Center (MFC-665CW and MFC-845CW only) in Chapter 9 of the User's Guide. 2 Activate Message Center mode. See Outgoing Message (OGM) in Chapter 9 of the User's Guide...Message Center answers voice calls. Press . STEP1 Setting Up the Machine 14 Setting up the Message Center You must record an outgoing message in Green. 4 Enter the toll-free fax number: 1-877-268-9575. 5 Press Black Start. 14 If the call is on, it overrides your...


