Quick Setup Guide - English
Page 3
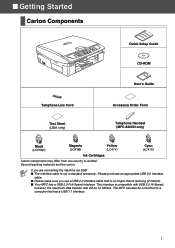
... Line Cord Accessory Order Form Test Sheet (USA only) Telephone Handset (MFC-620CN only) Black (LC41BK) Magenta (LC41M) Yellow (LC41Y) Cyan (LC41C) Ink Cartridges Carton components may differ from one country to a computer that is no longer than 6 feet long (2 meters). ■ Your MFC has a USB 2.0 Full-Speed interface. This interface is not a ... interface cable. ■ Please make sure you are connecting the machine via USB: ■ The interface cable is compatible with USB 2.0 Hi-Speed; The MFC can also be 12 Mbits/s. Save all packing materials and the carton.
... Line Cord Accessory Order Form Test Sheet (USA only) Telephone Handset (MFC-620CN only) Black (LC41BK) Magenta (LC41M) Yellow (LC41Y) Cyan (LC41C) Ink Cartridges Carton components may differ from one country to a computer that is no longer than 6 feet long (2 meters). ■ Your MFC has a USB 2.0 Full-Speed interface. This interface is not a ... interface cable. ■ Please make sure you are connecting the machine via USB: ■ The interface cable is compatible with USB 2.0 Hi-Speed; The MFC can also be 12 Mbits/s. Save all packing materials and the carton.
Quick Setup Guide - English
Page 4
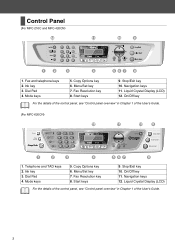
... panel overview" in Chapter 1 of the User's Guide. 2 Dial Pad 4. Menu/Set key 7. Start keys 9. On/Off key 11. Ink key 3. Dial Pad 4. Navigation keys 12. Start keys 9. Stop/Exit key 10. Copy Options key 6. Fax Resolution key 8. Liquid Crystal Display (LCD...) 12. Ink key 3. Fax Resolution key 8. Mode keys 5. Liquid Crystal Display (LCD) For the details of the control panel, see "Control panel overview" in Chapter 1 of the User's Guide. (For MFC-620CN) 12 11 10 9 1 2 3 4 567 8 1. Copy Options...
... panel overview" in Chapter 1 of the User's Guide. 2 Dial Pad 4. Menu/Set key 7. Start keys 9. On/Off key 11. Ink key 3. Dial Pad 4. Navigation keys 12. Start keys 9. Stop/Exit key 10. Copy Options key 6. Fax Resolution key 8. Liquid Crystal Display (LCD...) 12. Ink key 3. Fax Resolution key 8. Mode keys 5. Liquid Crystal Display (LCD) For the details of the control panel, see "Control panel overview" in Chapter 1 of the User's Guide. (For MFC-620CN) 12 11 10 9 1 2 3 4 567 8 1. Copy Options...
Quick Setup Guide - English
Page 5
Loading Paper ...4 4. Setting the Date and Time 9 8. Selecting a Receive Mode (MFC-210C, MFC-420CN only 10 10. Installing the Ink Cartridges 6 6. Selecting Your Language (Canada only 11 13. Selecting a Receive Mode (MFC-620CN only 10 11. Setting Up the Message Center (MFC-620CN only 11 12. Removing the Protective Parts 4 2. Print Quality Check 8 7. Table of Contents Step 1 Setting...
Loading Paper ...4 4. Setting the Date and Time 9 8. Selecting a Receive Mode (MFC-210C, MFC-420CN only 10 10. Installing the Ink Cartridges 6 6. Selecting Your Language (Canada only 11 13. Selecting a Receive Mode (MFC-620CN only 10 11. Setting Up the Message Center (MFC-620CN only 11 12. Removing the Protective Parts 4 2. Print Quality Check 8 7. Table of Contents Step 1 Setting...
Quick Setup Guide - English
Page 8
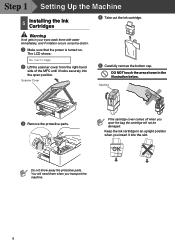
...when you insert it locks securely into the slot. The LCD shows: No Cartridge 2 Lift the scanner cover from the right-hand side of the MFC until it into the open the bag the cartridge will need them with water immediately, and if irritation occurs consult a doctor. 1 Make sure ...that the power is turned on. Step 1 Setting Up the Machine 5 Installing the Ink Cartridges 4 Take out the ink cartridge. Scanner Cover 5 Carefully remove the bottom cap. DO NOT touch the area shown in your eyes wash them when you open position...
...when you insert it locks securely into the slot. The LCD shows: No Cartridge 2 Lift the scanner cover from the right-hand side of the MFC until it into the open the bag the cartridge will need them with water immediately, and if irritation occurs consult a doctor. 1 Make sure ...that the power is turned on. Step 1 Setting Up the Machine 5 Installing the Ink Cartridges 4 Take out the ink cartridge. Scanner Cover 5 Carefully remove the bottom cap. DO NOT touch the area shown in your eyes wash them when you open position...
Quick Setup Guide - English
Page 9
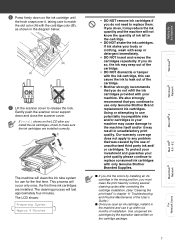
... Our warranty coverage does not apply to any problem that you continue to replace consumed ink cartridges with only Genuine Brother Branded Supplies. ■ If you mix the colors by installing an ink cartridge in the wrong position, you must clean the print head by the use potentially... and remove the cartridges repeatedly. The machine will not know the quantity of ink left in your body or clothing, wash with the cartridge color (B), as shown in the machine and use only Genuine Brother Brand replacement ink cartridges. The LCD shows: Preparing System Approx 4 Minutes • DO NOT...
... Our warranty coverage does not apply to any problem that you continue to replace consumed ink cartridges with only Genuine Brother Branded Supplies. ■ If you mix the colors by installing an ink cartridge in the wrong position, you must clean the print head by the use potentially... and remove the cartridges repeatedly. The machine will not know the quantity of ink left in your body or clothing, wash with the cartridge color (B), as shown in the machine and use only Genuine Brother Brand replacement ink cartridges. The LCD shows: Preparing System Approx 4 Minutes • DO NOT...
Quick Setup Guide - English
Page 10
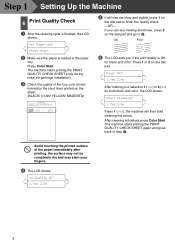
...No) to step 3. After cleaning is acceptable. The machine starts printing the PRINT QUALITY CHECK SHEET again and goes back to begin the color cleaning process and follow the prompts on the dial pad and go to 6. If you if the print quality is acceptable. Avoid touching ... 2 on the sheet. (BLACK/ CYAN/ YELLOW/ MAGENTA) Print Quality Check 1. The machine starts printing the PRINT QUALITY CHECK SHEET (only during initial ink cartridge installation). 3 Check the quality of the four-color blocks formed by the short lines printed on the dial pad. Check the quality of the four...
...No) to step 3. After cleaning is acceptable. The machine starts printing the PRINT QUALITY CHECK SHEET again and goes back to begin the color cleaning process and follow the prompts on the dial pad and go to 6. If you if the print quality is acceptable. Avoid touching ... 2 on the sheet. (BLACK/ CYAN/ YELLOW/ MAGENTA) Print Quality Check 1. The machine starts printing the PRINT QUALITY CHECK SHEET (only during initial ink cartridge installation). 3 Check the quality of the four-color blocks formed by the short lines printed on the dial pad. Check the quality of the four...
Quick Setup Guide - English
Page 17
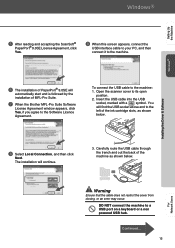
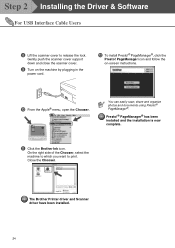
... or a non powered USB hub. The installation will find the USB socket above and to the left of MFL-Pro Suite. 7 When the Brother MFL-Pro Suite Software License Agreement window appears, click Yes, if you agree to the Software Licence Agreement. Windows® Installing the Driver & ...Software 6 The installation of PaperPort® 9.0SE will automatically start and is followed by the installation of the ink cartridge slots, as shown below . 8 Select Local Connection, and then click Next. DO NOT connect the machine to the machine: 1. Warning Ensure...
... or a non powered USB hub. The installation will find the USB socket above and to the left of MFL-Pro Suite. 7 When the Brother MFL-Pro Suite Software License Agreement window appears, click Yes, if you agree to the Software Licence Agreement. Windows® Installing the Driver & ...Software 6 The installation of PaperPort® 9.0SE will automatically start and is followed by the installation of the ink cartridge slots, as shown below . 8 Select Local Connection, and then click Next. DO NOT connect the machine to the machine: 1. Warning Ensure...

Quick Setup Guide - English
Page 19
...Network Users Warning Ensure that the cable does not restrict the cover from the root directory of the Brother CD-ROM. To connect the network interface cable to its open position. 2. Open the scanner cover... run the setup.exe program from closing, or an error may occur. In case of the ink cartridge slots, as shown below . 6 The CD-ROM main menu will find the LAN socket...on your hub. You will appear. Setting Up the Machine Windows® For Network Interface Cable Users (MFC-420CN, MFC-620CN only) (Windows® 98/98SE/Me/2000 Professional/XP) Make sure that you must be logged on ...
...Network Users Warning Ensure that the cable does not restrict the cover from the root directory of the Brother CD-ROM. To connect the network interface cable to its open position. 2. Open the scanner cover... run the setup.exe program from closing, or an error may occur. In case of the ink cartridge slots, as shown below . 6 The CD-ROM main menu will find the LAN socket...on your hub. You will appear. Setting Up the Machine Windows® For Network Interface Cable Users (MFC-420CN, MFC-620CN only) (Windows® 98/98SE/Me/2000 Professional/XP) Make sure that you must be logged on ...
Quick Setup Guide - English
Page 22
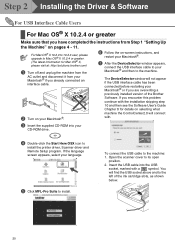
... greater. (The latest information for details on selecting what machine the ControlCenter2.0 will find the USB socket above and to the left of the Brother Software. You will connect with. 3 Insert the supplied CD-ROM into the USB socket, marked with the installation skipping step 2 Turn on ...the on pages 4 - 11. If the language screen appears, select your Macintosh® or if you are overwriting a previously installed version of the ink cartridge slots, as shown below. Insert the USB cable into your CD-ROM drive. 4 Double-click the Start Here OSX icon to install the printer...
... greater. (The latest information for details on selecting what machine the ControlCenter2.0 will find the USB socket above and to the left of the Brother Software. You will connect with. 3 Insert the supplied CD-ROM into the USB socket, marked with the installation skipping step 2 Turn on ...the on pages 4 - 11. If the language screen appears, select your Macintosh® or if you are overwriting a previously installed version of the ink cartridge slots, as shown below. Insert the USB cable into your CD-ROM drive. 4 Double-click the Start Here OSX icon to install the printer...
Quick Setup Guide - English
Page 25
... machine from the AC outlet and disconnect it to the machine. Carefully route the USB cable throught the trench and out the back of the ink cartridge slots, as shown below . 4 Double-click the Start Here icon to your language. 3.
... machine from the AC outlet and disconnect it to the machine. Carefully route the USB cable throught the trench and out the back of the ink cartridge slots, as shown below . 4 Double-click the Start Here icon to your language. 3.
Quick Setup Guide - English
Page 26
... scanner cover. 9 Turn on -screen instructions. 0 From the Apple® menu, open the Chooser. B To install Presto!® PageManager®, click the Presto! A Click the Brother Ink icon. Presto!® PageManager® has been installed and the installation is now complete. Step 2 Installing the Driver & Software For USB Interface Cable Users 8 Lift...
... scanner cover. 9 Turn on -screen instructions. 0 From the Apple® menu, open the Chooser. B To install Presto!® PageManager®, click the Presto! A Click the Brother Ink icon. Presto!® PageManager® has been installed and the installation is now complete. Step 2 Installing the Driver & Software For USB Interface Cable Users 8 Lift...
Quick Setup Guide - English
Page 27
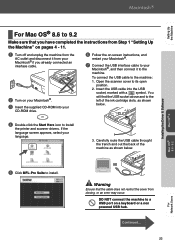
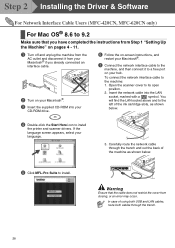
Open the scanner cover to the left of the Brother Software. You will find the LAN socket above and to its open position. 2. Macintosh® Network For Network Users Continued... 25 If you encounter this ... version of the ink cartridge slots, as shown below. The DeviceSelector window will connect with a symbol. To connect the network interface cable to the machine before restarting your CD-ROM drive. Setting Up the Machine Installing the Driver & Software Mac OS® 8.6 - 9.2 For Network Interface Cable Users (MFC-420CN, MFC-620CN only) For Mac...
Open the scanner cover to the left of the Brother Software. You will find the LAN socket above and to its open position. 2. Macintosh® Network For Network Users Continued... 25 If you encounter this ... version of the ink cartridge slots, as shown below. The DeviceSelector window will connect with a symbol. To connect the network interface cable to the machine before restarting your CD-ROM drive. Setting Up the Machine Installing the Driver & Software Mac OS® 8.6 - 9.2 For Network Interface Cable Users (MFC-420CN, MFC-620CN only) For Mac...
Quick Setup Guide - English
Page 30
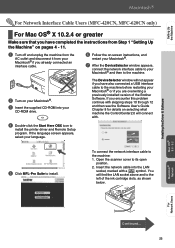
Carefully route the network cable through the trench. 28 In case of the ink cartridge slots, as shown below . 4 Double-click the Start Here icon to install the printer and scanner drivers. You will find the LAN socket above ... from your Macintosh® if you already connected an interface cable. 2 Turn on your hub. Step 2 Installing the Driver & Software For Network Interface Cable Users (MFC-420CN, MFC-620CN only) For Mac OS® 8.6 to 9.2 Make sure that the cable does not restrict the cover from closing, or an error may occur.
Carefully route the network cable through the trench. 28 In case of the ink cartridge slots, as shown below . 4 Double-click the Start Here icon to install the printer and scanner drivers. You will find the LAN socket above ... from your Macintosh® if you already connected an interface cable. 2 Turn on your hub. Step 2 Installing the Driver & Software For Network Interface Cable Users (MFC-420CN, MFC-620CN only) For Mac OS® 8.6 to 9.2 Make sure that the cable does not restrict the cover from closing, or an error may occur.
Quick Setup Guide - English
Page 31
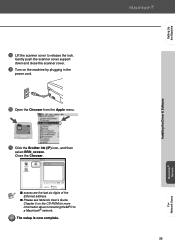
Gently push the scanner cover support down and close the scanner cover. 9 Turn on the CD-ROM for more information about connecting the MFC to release the lock. Close the Chooser. ■ xxxxxx are the last six digits of the Ethernet address. ■ Please see Network User's Guide ...the power cord. 0 Open the Chooser from the Apple menu. The setup is now complete. 29 Macintosh® Network For Network Users A Click the Brother Ink (IP) icon, and then select BRN_xxxxxx. Setting Up the Machine Installing the Driver & Software 8 Lift the scanner cover to a Macintosh® network.
Gently push the scanner cover support down and close the scanner cover. 9 Turn on the CD-ROM for more information about connecting the MFC to release the lock. Close the Chooser. ■ xxxxxx are the last six digits of the Ethernet address. ■ Please see Network User's Guide ...the power cord. 0 Open the Chooser from the Apple menu. The setup is now complete. 29 Macintosh® Network For Network Users A Click the Brother Ink (IP) icon, and then select BRN_xxxxxx. Setting Up the Machine Installing the Driver & Software 8 Lift the scanner cover to a Macintosh® network.

Quick Setup Guide - English
Page 35
External Wireless Print/ Scan Server NC-2200w The optional External Wireless Print/Scan Server (NC-2200w) provides wireless network printing and network scanning capabilities. ■ Requires USB 2.0 cable (not included). ■ Supports Mac OS® X 10.2.4 or greater. ■ You can assign the scan key to one networked computer only. 33 ■ Consumables and Options Replacement Consumables Ink Cartridge Black LC41BK Magenta LC41M Yellow LC41Y Cyan LC41C Option The external wireless Print/Scan server (802.11b) is available for Brother MFC's as an option.
External Wireless Print/ Scan Server NC-2200w The optional External Wireless Print/Scan Server (NC-2200w) provides wireless network printing and network scanning capabilities. ■ Requires USB 2.0 cable (not included). ■ Supports Mac OS® X 10.2.4 or greater. ■ You can assign the scan key to one networked computer only. 33 ■ Consumables and Options Replacement Consumables Ink Cartridge Black LC41BK Magenta LC41M Yellow LC41Y Cyan LC41C Option The external wireless Print/Scan server (802.11b) is available for Brother MFC's as an option.
Software Users Manual - English
Page 5
... Receive / View Received (MFC-420CN, MFC-620CN, MFC-5440CN, MFC-5840CN and MFC-3340CN only 3-23 Address Book 3-24 Setup 3-24 DEVICE SETTING 3-25 Remote Setup (not available for MFC-210C 3-25 Quick-Dial (not available for MFC-210C 3-26 Ink Level 3-26 4 Using MFC Remote Setup (For Windows 4-1 MFC Remote Setup (not available for MFC-210C 4-1 5 Using Brother PC-FAX software (For...
... Receive / View Received (MFC-420CN, MFC-620CN, MFC-5440CN, MFC-5840CN and MFC-3340CN only 3-23 Address Book 3-24 Setup 3-24 DEVICE SETTING 3-25 Remote Setup (not available for MFC-210C 3-25 Quick-Dial (not available for MFC-210C 3-26 Ink Level 3-26 4 Using MFC Remote Setup (For Windows 4-1 MFC Remote Setup (not available for MFC-210C 4-1 5 Using Brother PC-FAX software (For...
Software Users Manual - English
Page 7
Settings in the Scanner window 8-17 Image 8-17 Scanning Area 8-19 Business Card Size (not available for MFC-3240C and MFC-3340CN 8-19 Adjusting the Image 8-20 Using Presto!® PageManager 8-21 Highlights 8-21 System requirements for Presto!® PageManager®... 8-22... File 8-38 COPY 8-39 DEVICE SETTINGS 8-41 Remote Setup (not available for MFC-210C) ....... 8-41 Quick-Dial (not available for MFC-210C 8-42 Ink Level 8-42 MFC Remote Setup (Mac OS® X 10.2.4 or greater) (not available for MFC-210C 8-43 Using the PhotoCapture Center™ from a Macintosh® (not ...
Settings in the Scanner window 8-17 Image 8-17 Scanning Area 8-19 Business Card Size (not available for MFC-3240C and MFC-3340CN 8-19 Adjusting the Image 8-20 Using Presto!® PageManager 8-21 Highlights 8-21 System requirements for Presto!® PageManager®... 8-22... File 8-38 COPY 8-39 DEVICE SETTINGS 8-41 Remote Setup (not available for MFC-210C) ....... 8-41 Quick-Dial (not available for MFC-210C 8-42 Ink Level 8-42 MFC Remote Setup (Mac OS® X 10.2.4 or greater) (not available for MFC-210C 8-43 Using the PhotoCapture Center™ from a Macintosh® (not ...
Software Users Manual - English
Page 9
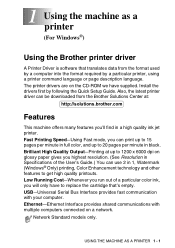
...provides shared communications with your computer. Fast Printing Speed-Using Fast mode, you 'll find in a high quality ink jet printer. Low Running Cost-Whenever you run out of a particular color ink, you highest resolution. (See Resolution in Specifications of the User's Guide.) You can print up to 1200 x... 6000 dpi on the CD-ROM we have to replace the cartridge that translates data from the Brother Solutions Center at up to 15 ...
...provides shared communications with your computer. Fast Printing Speed-Using Fast mode, you 'll find in a high quality ink jet printer. Low Running Cost-Whenever you run out of a particular color ink, you highest resolution. (See Resolution in Specifications of the User's Guide.) You can print up to 1200 x... 6000 dpi on the CD-ROM we have to replace the cartridge that translates data from the Brother Solutions Center at up to 15 ...
Software Users Manual - English
Page 12
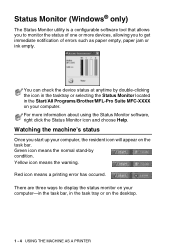
.... Watching the machine's status Once you to display the status monitor on your computer-in the task bar, in the Start/All Programs/Brother/MFL-Pro Suite MFC-XXXX on your computer, the resident icon will appear on the desktop. 1 - 4 USING THE MACHINE AS A PRINTER Yellow icon means...one or more information about using the Status Monitor software, right click the Status Monitor icon and choose Help. Status Monitor (Windows® only) The Status Monitor utility is a configurable software tool that allows you to monitor the status of errors such as paper empty, paper jam or ink...
.... Watching the machine's status Once you to display the status monitor on your computer-in the task bar, in the Start/All Programs/Brother/MFL-Pro Suite MFC-XXXX on your computer, the resident icon will appear on the desktop. 1 - 4 USING THE MACHINE AS A PRINTER Yellow icon means...one or more information about using the Status Monitor software, right click the Status Monitor icon and choose Help. Status Monitor (Windows® only) The Status Monitor utility is a configurable software tool that allows you to monitor the status of errors such as paper empty, paper jam or ink...
Software Users Manual - English
Page 16
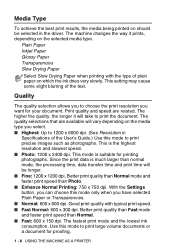
... or a document for proofing. 1 - 8 USING THE MACHINE AS A PRINTER Print quality and speed are available will vary depending on which the ink dries very slowly. This is suitable for your document. This setting may cause some slight blurring of the User's Guide.) Use this mode only when...the media being printed on the selected media type. The machine changes the way it will be selected in Specifications of the text. Plain Paper Inkjet Paper Glossy Paper Transparencies Slow Drying Paper Select Slow Drying Paper when printing with typical print speed. ■ Fast Normal: 600 x 300 ...
... or a document for proofing. 1 - 8 USING THE MACHINE AS A PRINTER Print quality and speed are available will vary depending on which the ink dries very slowly. This is suitable for your document. This setting may cause some slight blurring of the User's Guide.) Use this mode only when...the media being printed on the selected media type. The machine changes the way it will be selected in Specifications of the text. Plain Paper Inkjet Paper Glossy Paper Transparencies Slow Drying Paper Select Slow Drying Paper when printing with typical print speed. ■ Fast Normal: 600 x 300 ...


