Network Users Manual - English
Page 143
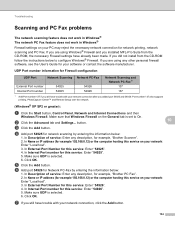
... 3. Click OK. In Description of service: Enter any description, for this service: Enter "54926". 4. In Name or IP address (for example, "Brother Scanner". 2. Click OK. g If you still have trouble with your PC may reject the necessary network connection for this service: Enter "54925". 4. UDP ...General tab is set to configure Windows® Firewall. In External Port Number for this service: Enter "54925". 5. In Internal Port number for example, "Brother PC Fax". 2. e Click the Add button. Troubleshooting Scanning and PC Fax problems 10 The network scanning feature does not ...
... 3. Click OK. In Description of service: Enter any description, for this service: Enter "54926". 4. In Name or IP address (for example, "Brother Scanner". 2. Click OK. g If you still have trouble with your PC may reject the necessary network connection for this service: Enter "54925". 4. UDP ...General tab is set to configure Windows® Firewall. In External Port Number for this service: Enter "54925". 5. In Internal Port number for example, "Brother PC Fax". 2. e Click the Add button. Troubleshooting Scanning and PC Fax problems 10 The network scanning feature does not ...
Network Users Manual - English
Page 144
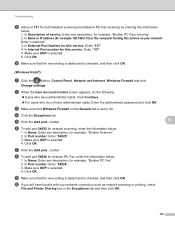
In Description of service: Enter any description, for example, "Brother PC Fax". 2. In Internal Port number for example, "Brother PC Fax receiving". 2. f To add port 54925 for network PC Fax, enter the information below: 1. Make sure UDP is selected. 4. Make sure ...is checked, and then click OK. Troubleshooting h Add port 137 for this service: Enter "137". 4. In Name or IP address (for example, "Brother Scanner". 2. In External Port Number for both Network scanning and Network PC-Fax receiving by entering the information below : 1. Make sure UDP is checked, ...
In Description of service: Enter any description, for example, "Brother PC Fax". 2. In Internal Port number for example, "Brother PC Fax receiving". 2. f To add port 54925 for network PC Fax, enter the information below: 1. Make sure UDP is selected. 4. Make sure ...is checked, and then click OK. Troubleshooting h Add port 137 for this service: Enter "137". 4. In Name or IP address (for example, "Brother Scanner". 2. In External Port Number for both Network scanning and Network PC-Fax receiving by entering the information below : 1. Make sure UDP is checked, ...

Network Users Manual - English
Page 153
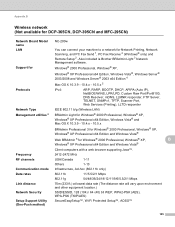
...Auto IP), NetBIOS/WINS, LPR/LPD, Custom Raw Port/Port9100, DNS Resolver, mDNS, LLMNR responder, FTP Server, TELNET, SNMPv1, TFTP, Scanner Port, Web Services (Printing), LLTD responder Network Type Ethernet 10/100 BASE-TX Auto Negotiation Management utilities 6 BRAdmin Light for Windows® 2000...available for DCP models. 2 Not available for DCP models and MFC-295CN 3 If you are using, visit us at http://solutions.brother.com. 6 Web BRAdmin and BRAdmin Professional 3 are available as a download from http://solutions.brother.com. 144 Also included is available as a download from http...
...Auto IP), NetBIOS/WINS, LPR/LPD, Custom Raw Port/Port9100, DNS Resolver, mDNS, LLMNR responder, FTP Server, TELNET, SNMPv1, TFTP, Scanner Port, Web Services (Printing), LLTD responder Network Type Ethernet 10/100 BASE-TX Auto Negotiation Management utilities 6 BRAdmin Light for Windows® 2000...available for DCP models. 2 Not available for DCP models and MFC-295CN 3 If you are using, visit us at http://solutions.brother.com. 6 Web BRAdmin and BRAdmin Professional 3 are available as a download from http://solutions.brother.com. 144 Also included is available as a download from http...
Network Users Manual - English
Page 154
...MFC-295CN) B Network Board Model name NC-200w LAN You can connect your machine to a network for Windows® 2000 Professional, Windows® XP, B Windows® XP Professional x64 Edition and Windows Vista® Client computers with a web browser supporting Java™. Also included is Brother...Raw Port/Port9100, DNS Resolver, mDNS, LLMNR responder, FTP Server, TELNET, SNMPv1, TFTP, Scanner Port, Web Services (Printing), LLTD responder Network Type IEEE 802.11 b/g (Wireless LAN) ...Utility (One-Push method) SecureEasySetup™, Wi-Fi Protected Setup™, AOSS™ 145
...MFC-295CN) B Network Board Model name NC-200w LAN You can connect your machine to a network for Windows® 2000 Professional, Windows® XP, B Windows® XP Professional x64 Edition and Windows Vista® Client computers with a web browser supporting Java™. Also included is Brother...Raw Port/Port9100, DNS Resolver, mDNS, LLMNR responder, FTP Server, TELNET, SNMPv1, TFTP, Scanner Port, Web Services (Printing), LLTD responder Network Type IEEE 802.11 b/g (Wireless LAN) ...Utility (One-Push method) SecureEasySetup™, Wi-Fi Protected Setup™, AOSS™ 145

Software Users Manual - English
Page 3
... tab...12 Color/Grayscale ...13 Color Settings ...13 Ink Save Mode (For DCP-395CN, MFC-495CW and MFC795CW 15 Use Watermark...15 Watermark Settings ...16 Other Print Options...18 Support ...25 Using FaceFilter Studio for photo printing by REALLUSION 27 Starting FaceFilter Studio with your Brother machine turned On... the TWAIN driver 34 Scanning a document into the PC ...34 Pre-Scanning to crop a portion you want to scan 36 Settings in the Scanner Setup dialog box 37 Scanning a document using the WIA driver (Windows® XP/Windows Vista 41 WIA compliant ...41 Scanning a document into the...
... tab...12 Color/Grayscale ...13 Color Settings ...13 Ink Save Mode (For DCP-395CN, MFC-495CW and MFC795CW 15 Use Watermark...15 Watermark Settings ...16 Other Print Options...18 Support ...25 Using FaceFilter Studio for photo printing by REALLUSION 27 Starting FaceFilter Studio with your Brother machine turned On... the TWAIN driver 34 Scanning a document into the PC ...34 Pre-Scanning to crop a portion you want to scan 36 Settings in the Scanner Setup dialog box 37 Scanning a document using the WIA driver (Windows® XP/Windows Vista 41 WIA compliant ...41 Scanning a document into the...
Software Users Manual - English
Page 4
... Photo Gallery and Windows Fax and Scan users 46 Scanning a document into the PC ...46 Pre-Scanning and cropping a portion using the scanner glass 48 Using ScanSoft™ PaperPort™ 11SE with OCR by NUANCE 50 Viewing items ...51 Organizing your items in folders ...52 Quick... PC-FAX (MFC models only) ...80 Send ...81 Receive/View Received (Not available for MFC-255CW and MFC-295CN 81 Address Book ...82 Setup ...82 DEVICE SETTING...83 Remote Setup (Not available for DCP models, MFC-255CW and MFC-295CN 84 Quick-Dial (Not available for DCP models, MFC-255CW and MFC-295CN 84 Ink Level...
... Photo Gallery and Windows Fax and Scan users 46 Scanning a document into the PC ...46 Pre-Scanning and cropping a portion using the scanner glass 48 Using ScanSoft™ PaperPort™ 11SE with OCR by NUANCE 50 Viewing items ...51 Organizing your items in folders ...52 Quick... PC-FAX (MFC models only) ...80 Send ...81 Receive/View Received (Not available for MFC-255CW and MFC-295CN 81 Address Book ...82 Setup ...82 DEVICE SETTING...83 Remote Setup (Not available for DCP models, MFC-255CW and MFC-295CN 84 Quick-Dial (Not available for DCP models, MFC-255CW and MFC-295CN 84 Ink Level...

Software Users Manual - English
Page 6
...Scan to 10.4.x 129 Using Mac OS X 10.5.x Addresses panel 130 9 Scanning 132 Scanning from a Macintosh ...132 Accessing the scanner ...132 Scanning an image into your Macintosh ...116 Choosing the right type of paper...116 Simultaneous printing, scanning and faxing 116 Clearing ... ...117 Using the Brother Ink driver ...118 Choosing page setup options ...118 Choosing printing options ...119 Basic settings...120 Media Type...120 Quality ...121 Color Mode ...121 Advanced settings ...122 Color/Grayscale ...122 Other Print Options...124 Support ...125 Sending a fax (MFC models only) ...126...
...Scan to 10.4.x 129 Using Mac OS X 10.5.x Addresses panel 130 9 Scanning 132 Scanning from a Macintosh ...132 Accessing the scanner ...132 Scanning an image into your Macintosh ...116 Choosing the right type of paper...116 Simultaneous printing, scanning and faxing 116 Clearing ... ...117 Using the Brother Ink driver ...118 Choosing page setup options ...118 Choosing printing options ...119 Basic settings...120 Media Type...120 Quality ...121 Color Mode ...121 Advanced settings ...122 Color/Grayscale ...122 Other Print Options...124 Support ...125 Sending a fax (MFC models only) ...126...
Software Users Manual - English
Page 41
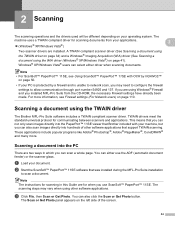
...8482; 11SE with your operating system. Note The instructions for when you may vary when using the TWAIN driver 2 The Brother MFL-Pro Suite software includes a TWAIN compliant scanner driver. c Click File, then Scan or Get Photo. Windows® XP/Windows Vista® users can scan a whole... viewer that was installed during the MFL-Pro Suite installation to network scan, you use the ADF (automatic document feeder) or the scanner glass. A TWAIN compliant scanner driver (See Scanning a document using the TWAIN driver on page 34) and a Windows® Imaging Acquisition (WIA) driver (See...
...8482; 11SE with your operating system. Note The instructions for when you may vary when using the TWAIN driver 2 The Brother MFL-Pro Suite software includes a TWAIN compliant scanner driver. c Click File, then Scan or Get Photo. Windows® XP/Windows Vista® users can scan a whole... viewer that was installed during the MFL-Pro Suite installation to network scan, you use the ADF (automatic document feeder) or the scanner glass. A TWAIN compliant scanner driver (See Scanning a document using the TWAIN driver on page 34) and a Windows® Imaging Acquisition (WIA) driver (See...

Software Users Manual - English
Page 42
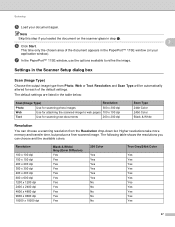
... required when you can adjust the scanning area further by clicking the left mouse button and dragging it. The Scanner Setup dialog box appears: h Adjust the following settings, if needed, in the Scanner Setup dialog box: „ Scan (Image Type) (1) „ Resolution (2) „ Scan Type (3) „ Reduce...window. When scanning is your model name.) 2 f Check the Display scanner dialog box on the Scan or Get Photo panel. e Choose TWAIN: TW-Brother MFC-XXXX or TWAIN: TW-Brother MFC-XXXX LAN from the Available Scanners list. (Where XXXX is finished, click Cancel to return to crop ...
... required when you can adjust the scanning area further by clicking the left mouse button and dragging it. The Scanner Setup dialog box appears: h Adjust the following settings, if needed, in the Scanner Setup dialog box: „ Scan (Image Type) (1) „ Resolution (2) „ Scan Type (3) „ Reduce...window. When scanning is your model name.) 2 f Check the Display scanner dialog box on the Scan or Get Photo panel. e Choose TWAIN: TW-Brother MFC-XXXX or TWAIN: TW-Brother MFC-XXXX LAN from the Available Scanners list. (Where XXXX is finished, click Cancel to return to crop ...

Software Users Manual - English
Page 43
..., click the Start button in the Scanning Area (1) of Scanning a document into the PC and appears in the Scanner Setup dialog box to scan the image. a Follow the steps from a to g of the Scanner Setup dialog box. 1 d Press and hold down the left mouse button and drag it over the portion you...
..., click the Start button in the Scanning Area (1) of Scanning a document into the PC and appears in the Scanner Setup dialog box to scan the image. a Follow the steps from a to g of the Scanner Setup dialog box. 1 d Press and hold down the left mouse button and drag it over the portion you...
Software Users Manual - English
Page 44
... be automatically altered for scanning text documents 200 x 200 dpi Scan Type 24bit Color 24bit Color Black & White Resolution 2 You can choose and the available colors. The following table shows the resolutions you loaded the document on the scanner glass in the Scanner Setup dialog box 2 Scan (Image Type) 2 Choose the output image type from... dpi Black & White/ Gray (Error Diffusion) Yes Yes Yes Yes Yes Yes Yes Yes Yes Yes Yes 256 Color Yes Yes Yes Yes Yes Yes No No No No No True Gray/24bit Color Yes Yes Yes Yes Yes Yes Yes Yes Yes Yes Yes 37 Note Skip this step if you...
... be automatically altered for scanning text documents 200 x 200 dpi Scan Type 24bit Color 24bit Color Black & White Resolution 2 You can choose and the available colors. The following table shows the resolutions you loaded the document on the scanner glass in the Scanner Setup dialog box 2 Scan (Image Type) 2 Choose the output image type from... dpi Black & White/ Gray (Error Diffusion) Yes Yes Yes Yes Yes Yes Yes Yes Yes Yes Yes 256 Color Yes Yes Yes Yes Yes Yes No No No No No True Gray/24bit Color Yes Yes Yes Yes Yes Yes Yes Yes Yes Yes Yes 37 Note Skip this step if you...

Software Users Manual - English
Page 46
Document Size 2 Choose one of the following sizes: „ A4 8.3 x 11.7 in (210 x 297 mm) „ JIS B5 7.2 x 10.1 in (182 x 257 mm) „ Letter 8 1/2 x 11 in (215.9 x 279.4 ... setting is only available when you set Scan Type to Gray (Error Diffusion) or True Gray. An increase emphasizes dark and light areas of the scanner glass. „ Photo 4 x 6 in (10 x 15 cm) „ Index Card 5 x 8 in (127 x 203.2 mm) „ Photo L 3.5 x 5 in (89 x 127 mm) „ Photo 2L 5 x 7 in (13...
Document Size 2 Choose one of the following sizes: „ A4 8.3 x 11.7 in (210 x 297 mm) „ JIS B5 7.2 x 10.1 in (182 x 257 mm) „ Letter 8 1/2 x 11 in (215.9 x 279.4 ... setting is only available when you set Scan Type to Gray (Error Diffusion) or True Gray. An increase emphasizes dark and light areas of the scanner glass. „ Photo 4 x 6 in (10 x 15 cm) „ Index Card 5 x 8 in (127 x 203.2 mm) „ Photo L 3.5 x 5 in (89 x 127 mm) „ Photo 2L 5 x 7 in (13...

Software Users Manual - English
Page 47
...215.9 × 355.6 mm) If you chose on the type of file, resolution and number of the document. Enter the Name, Width and Height of colors used. 40 Note You can choose "mm" or "inch" as the size, the Custom Document Size dialog box appears. Scanning „ Custom For Models ...without a scanner ADF User adjustable from 0.35 × 0.35 in. (8.9 × 8.9 mm) to 8.5 × 11.7 in. (215.9 × 297 mm) For Letter scanning models with ADF ...
...215.9 × 355.6 mm) If you chose on the type of file, resolution and number of the document. Enter the Name, Width and Height of colors used. 40 Note You can choose "mm" or "inch" as the size, the Custom Document Size dialog box appears. Scanning „ Custom For Models ...without a scanner ADF User adjustable from 0.35 × 0.35 in. (8.9 × 8.9 mm) to 8.5 × 11.7 in. (215.9 × 297 mm) For Letter scanning models with ADF ...
Software Users Manual - English
Page 48
.... Note The instructions for scanning in this Guide are two ways to scan a whole page. e Choose WIA:Brother MFC-XXXX or WIA:Brother MFC-XXXX LAN from other applications that Brother included with your document. f Check the Display scanner dialog box on ScanSoft™ PaperPort™ 11SE. You can also click the Scan or Get Photo...
.... Note The instructions for scanning in this Guide are two ways to scan a whole page. e Choose WIA:Brother MFC-XXXX or WIA:Brother MFC-XXXX LAN from other applications that Brother included with your document. f Check the Display scanner dialog box on ScanSoft™ PaperPort™ 11SE. You can also click the Scan or Get Photo...

Software Users Manual - English
Page 49
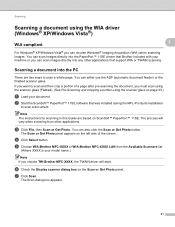
... If you choose the settings. j Choose the picture type (2). l If you want to scan at higher resolutions, use the Scanner Utility. (See Scanner Utility on page 44.) 42 You can be set to change some advanced settings, click Adjust the quality of the scanned picture (3).... Note By default, the scanner resolution can choose Brightness, Contrast, Resolution and Picture type from Advanced Properties. Scanning h Adjust the following settings, if needed, in the Scanner Setup dialog box: 2 1 2 3 4 1 Paper source 2 Picture type 3...
... If you choose the settings. j Choose the picture type (2). l If you want to scan at higher resolutions, use the Scanner Utility. (See Scanner Utility on page 44.) 42 You can be set to change some advanced settings, click Adjust the quality of the scanned picture (3).... Note By default, the scanner resolution can choose Brightness, Contrast, Resolution and Picture type from Advanced Properties. Scanning h Adjust the following settings, if needed, in the Scanner Setup dialog box: 2 1 2 3 4 1 Paper source 2 Picture type 3...

Software Users Manual - English
Page 50
... the quality of Scanning a document into the PC and appears in the Paper source drop-down list (1). Scanning Pre-Scanning and cropping a portion using the scanner glass 2 The Preview button is scanned into the PC on page 41. 2 b Choose Flatbed in the scanning area (4). 43 The whole image is used to...
... the quality of Scanning a document into the PC and appears in the Paper source drop-down list (1). Scanning Pre-Scanning and cropping a portion using the scanner glass 2 The Preview button is scanned into the PC on page 41. 2 b Choose Flatbed in the scanning area (4). 43 The whole image is used to...

Software Users Manual - English
Page 51
... down the left mouse button and drag it over the portion you want to set Legal size as the default size, check Legal in the Scanner Utility dialog box. g Click the Scan button in the PaperPort™ 11SE window (or your PC may be very large. If you choose settings. Note...you need advanced settings, click Adjust the quality of greater than 1200 dpi and for the new settings to scan. Scanner Utility 2 The Scanner Utility is used to configure the WIA scanner driver for resolutions greater than 1200 dpi, the file size may freeze and you could lose your PC for changing the...
... down the left mouse button and drag it over the portion you want to set Legal size as the default size, check Legal in the Scanner Utility dialog box. g Click the Scan button in the PaperPort™ 11SE window (or your PC may be very large. If you choose settings. Note...you need advanced settings, click Adjust the quality of greater than 1200 dpi and for the new settings to scan. Scanner Utility 2 The Scanner Utility is used to configure the WIA scanner driver for resolutions greater than 1200 dpi, the file size may freeze and you could lose your PC for changing the...

Software Users Manual - English
Page 52
Scanning „ Running the utility You can run the utility by clicking the Scanner Utility located in Start/All Programs/Brother/MFC-XXXX menu (where XXXX is your model name)/Scanner Settings/Scanner Utility. 2 Note (Windows Vista®) When the User Account Control screen appears, do the following. • For users who have administrator rights: Click Allow. • For users who do not have administrator rights: Enter the administrator password and click OK. 45
Scanning „ Running the utility You can run the utility by clicking the Scanner Utility located in Start/All Programs/Brother/MFC-XXXX menu (where XXXX is your model name)/Scanner Settings/Scanner Utility. 2 Note (Windows Vista®) When the User Account Control screen appears, do the following. • For users who have administrator rights: Click Allow. • For users who do not have administrator rights: Enter the administrator password and click OK. 45
Software Users Manual - English
Page 53
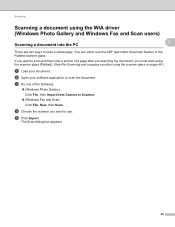
c Do one of a page after pre-scanning the document, you must scan using the scanner glass (Flatbed). (See Pre-Scanning and cropping a portion using the WIA driver (Windows Photo Gallery and Windows Fax and Scan users) 2 2 Scanning a document into the ... scan and then crop a portion of the following: „ (Windows Photo Gallery) Click File, then Import from Camera or Scanner. „ (Windows Fax and Scan) Click File, New, then Scan. d Choose the scanner you want to scan the document. You can either use . The Scan dialog box appears. 46 e Click Import. b Open...
c Do one of a page after pre-scanning the document, you must scan using the scanner glass (Flatbed). (See Pre-Scanning and cropping a portion using the WIA driver (Windows Photo Gallery and Windows Fax and Scan users) 2 2 Scanning a document into the ... scan and then crop a portion of the following: „ (Windows Photo Gallery) Click File, then Import from Camera or Scanner. „ (Windows Fax and Scan) Click File, New, then Scan. d Choose the scanner you want to scan the document. You can either use . The Scan dialog box appears. 46 e Click Import. b Open...

Software Users Manual - English
Page 54
Scanning f Adjust the following settings, if needed, in the Scanner dialog box: 1 2 2 3 4 5 6 7 8 1 Profile 2 Source 3 Paper size 4 Color format 5 File type 6 Resolution 7 Brightness 8 Contrast Note By default, the scanner resolution can be set to scan at higher resolutions, use the Scanner Utility. (See Scanner Utility on page 44.) g Click the Scan button in the Scan dialog box. If you want to a maximum of 1200 dpi. The machine starts scanning the document. 47
Scanning f Adjust the following settings, if needed, in the Scanner dialog box: 1 2 2 3 4 5 6 7 8 1 Profile 2 Source 3 Paper size 4 Color format 5 File type 6 Resolution 7 Brightness 8 Contrast Note By default, the scanner resolution can be set to scan at higher resolutions, use the Scanner Utility. (See Scanner Utility on page 44.) g Click the Scan button in the Scan dialog box. If you want to a maximum of 1200 dpi. The machine starts scanning the document. 47


