
Software Users Manual - English
Page 7
... & PhotoCapture Center® 160 Remote Setup (Not available for DCP models, MFC-255CW and MFC-295CN 160 PhotoCapture Center®...162 For USB cable users ...162 For network users...164 Section III Using the Scan key 12 USB cable scanning 166 Using the Scan key over a USB cable connection 166 Scan to E-mail ...166 Scan to Image ...167 Scan...
... & PhotoCapture Center® 160 Remote Setup (Not available for DCP models, MFC-255CW and MFC-295CN 160 PhotoCapture Center®...162 For USB cable users ...162 For network users...164 Section III Using the Scan key 12 USB cable scanning 166 Using the Scan key over a USB cable connection 166 Scan to E-mail ...166 Scan to Image ...167 Scan...

Software Users Manual - English
Page 123
... on your Macintosh may vary depending on paper, it is important to purchase a USB cable (type A/B) that is copying or receiving a fax on your operating system and ...a document into the Macintosh Fax sending will not be stopped during Macintosh printing. Be sure to a USB port on the control panel. 116 IMPORTANT DO NOT connect the machine to read About paper in this ... while sending or receiving a fax in the printer memory by pressing Stop/Exit key on a keyboard or a non-powered USB hub. 8 Printing and Faxing 8 Setting up your Macintosh 8 Note • The screens shown in the 8 User's...
... on your Macintosh may vary depending on paper, it is important to purchase a USB cable (type A/B) that is copying or receiving a fax on your operating system and ...a document into the Macintosh Fax sending will not be stopped during Macintosh printing. Be sure to a USB port on the control panel. 116 IMPORTANT DO NOT connect the machine to read About paper in this ... while sending or receiving a fax in the printer memory by pressing Stop/Exit key on a keyboard or a non-powered USB hub. 8 Printing and Faxing 8 Setting up your Macintosh 8 Note • The screens shown in the 8 User's...

Software Users Manual - English
Page 169
For USB cable users 11 a Put a memory card or USB Flash memory drive into your screen. 162 Note If you create a name for any other operation. The files and folders on the memory card or USB Flash memory drive appear on your machine. Note • The PhotoCapture Center®...; will read only the media that was put in first. • DCP-375CW and MFC-255CW do not support using a USB Flash memory drive. • DCP-375CW, MFC-255CW and MFC-295CN do not support using a CompactFlash®. • While the machine is printing from a Macintosh. Remote Setup...
For USB cable users 11 a Put a memory card or USB Flash memory drive into your screen. 162 Note If you create a name for any other operation. The files and folders on the memory card or USB Flash memory drive appear on your machine. Note • The PhotoCapture Center®...; will read only the media that was put in first. • DCP-375CW and MFC-255CW do not support using a USB Flash memory drive. • DCP-375CW, MFC-255CW and MFC-295CN do not support using a CompactFlash®. • While the machine is printing from a Macintosh. Remote Setup...

Software Users Manual - English
Page 172
Section III Using the Scan key II I USB cable scanning 166 Network Scanning 178
Section III Using the Scan key II I USB cable scanning 166 Network Scanning 178
Software Users Manual - English
Page 173
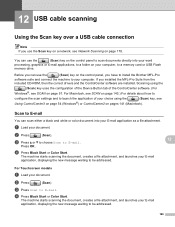
... page 54 (Windows®) or ControlCenter2 on page 178. Scan to E-mail 12 You can scan either a black and white or color document into your word processing, graphics or E-mail applications, to launch the application of the ControlCenter software. (For Windows®, see ... the Brother MFL-Pro software suite and connect the machine to your E-mail application, displaying the new message waiting to a memory card or USB Flash memory drive. b Press (Scan). For Touchscreen models 12 a Load your computer, to be addressed. 166 b Press (Scan). 12 USB cable scanning 12...
... page 54 (Windows®) or ControlCenter2 on page 178. Scan to E-mail 12 You can scan either a black and white or color document into your word processing, graphics or E-mail applications, to launch the application of the ControlCenter software. (For Windows®, see ... the Brother MFL-Pro software suite and connect the machine to your E-mail application, displaying the new message waiting to a memory card or USB Flash memory drive. b Press (Scan). For Touchscreen models 12 a Load your computer, to be addressed. 166 b Press (Scan). 12 USB cable scanning 12...
Software Users Manual - English
Page 174
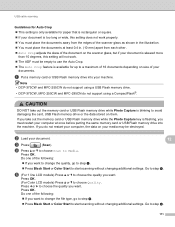
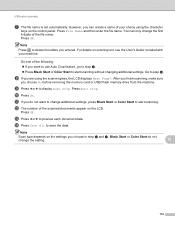
USB cable scanning Note • Scan type depends on the settings of the Device Button tab, Black Start or Color Start do not change the settings. • If you want to change between color and black and white scanning, choose color or black and white in the scan type option on the...the ControlCenter configuration screen. (For Windows®, see SCAN on page 143.) Scan to Image 12 You can scan a black and white or color document into your graphics application for viewing and editing. a Load your document. For Macintosh, see SCAN on page 143.) 167 The machine starts...
USB cable scanning Note • Scan type depends on the settings of the Device Button tab, Black Start or Color Start do not change the settings. • If you want to change between color and black and white scanning, choose color or black and white in the scan type option on the...the ControlCenter configuration screen. (For Windows®, see SCAN on page 143.) Scan to Image 12 You can scan a black and white or color document into your graphics application for viewing and editing. a Load your document. For Macintosh, see SCAN on page 143.) 167 The machine starts...

Software Users Manual - English
Page 175
... do not change the settings. (Windows®) • 12 „ If you want to change between color and black and white scanning, choose color or black and white in your favorite word processing software. USB cable scanning Scan to OCR 12 If your original document is available for the OCR feature to work from...
... do not change the settings. (Windows®) • 12 „ If you want to change between color and black and white scanning, choose color or black and white in your favorite word processing software. USB cable scanning Scan to OCR 12 If your original document is available for the OCR feature to work from...
Software Users Manual - English
Page 176
... based on the settings you choose. b Press (Scan). Note • Scan type depends on the settings of the Device Button tab, Black Start or Color Start do not change the settings. 12 • If you want to File 12 You can scan a black and white or... Device Button tab of the ControlCenter configuration. 169 For Macintosh, see SCAN on page 143.) a Load your document. USB cable scanning Scan to change between color and black and white scanning, choose color or black and white in the scan type option on the Device Button tab of the ControlCenter configuration screen. (For...
... based on the settings you choose. b Press (Scan). Note • Scan type depends on the settings of the Device Button tab, Black Start or Color Start do not change the settings. 12 • If you want to File 12 You can scan a black and white or... Device Button tab of the ControlCenter configuration. 169 For Macintosh, see SCAN on page 143.) a Load your document. USB cable scanning Scan to change between color and black and white scanning, choose color or black and white in the scan type option on the Device Button tab of the ControlCenter configuration screen. (For...
Software Users Manual - English
Page 177
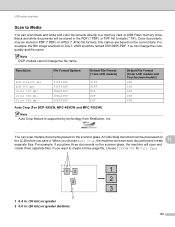
... PDF PDF Auto Crop (For DCP-395CN, MFC-495CW and MFC-795CW) Note Auto Crop feature is supported by technology from Reallusion, Inc. Black and white documents will scan each document and create 12 separate files. Color documents may be previewed on the scanner glass. USB cable scanning Scan to Media 12 You can scan...
... PDF PDF Auto Crop (For DCP-395CN, MFC-495CW and MFC-795CW) Note Auto Crop feature is supported by technology from Reallusion, Inc. Black and white documents will scan each document and create 12 separate files. Color documents may be previewed on the scanner glass. USB cable scanning Scan to Media 12 You can scan...
Software Users Manual - English
Page 178
...Press a or b to choose the quality you do not support using a USB Flash memory drive. • DCP-375CW, MFC-255CW and MFC-295CN do not restart your computer, the data on your media may be empty...go to step e. „ Press Black Start or Color Start to start scanning without changing additional settings. a Put a memory card or USB Flash memory drive into the machine. d Press a ...one of the following : „ If you must restart your computer at least 0.4 in. (10 mm) apart from the edges of the scanner glass as shown in the illustration. „ You must be destroyed. USB cable...
...Press a or b to choose the quality you do not support using a USB Flash memory drive. • DCP-375CW, MFC-255CW and MFC-295CN do not restart your computer, the data on your media may be empty...go to step e. „ Press Black Start or Color Start to start scanning without changing additional settings. a Put a memory card or USB Flash memory drive into the machine. d Press a ...one of the following : „ If you must restart your computer at least 0.4 in. (10 mm) apart from the edges of the scanner glass as shown in the illustration. „ You must be destroyed. USB cable...
Software Users Manual - English
Page 179
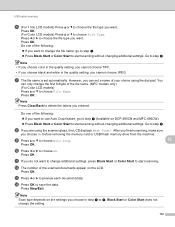
USB cable scanning f (For 1 line LCD models) Press a or b to choose the file type you want to change additional settings, press Black Start or Color Start to start scanning. Go to choose Auto Crop. 12 Press OK. Do one of your choice using the scanner glass, the LCD displays Next Page?. i ... cannot choose TIFF. • If you choose black and white in step e to f, Black Start or Color Start does not change the first 6 digits of the file name. (MFC models only) (For Color LCD models) Press a or b to start scanning without changing additional settings. k If you want . Note...
USB cable scanning f (For 1 line LCD models) Press a or b to choose the file type you want to change additional settings, press Black Start or Color Start to start scanning. Go to choose Auto Crop. 12 Press OK. Do one of your choice using the scanner glass, the LCD displays Next Page?. i ... cannot choose TIFF. • If you choose black and white in step e to f, Black Start or Color Start does not change the first 6 digits of the file name. (MFC models only) (For Color LCD models) Press a or b to start scanning without changing additional settings. k If you want . Note...
Software Users Manual - English
Page 180
...type you want to change the quality, go to step e. „ Press Black Start or Color Start to start scanning without changing additional settings. USB cable scanning For Touchscreen models 12 a Put a memory card or USB Flash memory drive into your computer at once before putting the same memory card or...settings. Go to Media. c Press (Scan). d Press Scan to step h. Go to step h. Do one of the following : „ If you cannot choose JPEG. 173 Note • If you choose color in the quality setting, you cannot choose TIFF. • If you choose black and white in the ...
...type you want to change the quality, go to step e. „ Press Black Start or Color Start to start scanning without changing additional settings. USB cable scanning For Touchscreen models 12 a Put a memory card or USB Flash memory drive into your computer at once before putting the same memory card or...settings. Go to Media. c Press (Scan). d Press Scan to step h. Go to step h. Do one of the following : „ If you cannot choose JPEG. 173 Note • If you choose color in the quality setting, you cannot choose TIFF. • If you choose black and white in the ...
Software Users Manual - English
Page 181
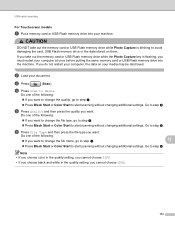
...document data. Press Auto Crop. j Press On. Note Scan type depends on the LCD. Do one of the scanned documents appear on the settings you choose in step e and f, Black Start or Color Start do not want to use Auto Crop feature, go to step i. „ Press Black ... to display Auto Crop. m Press d or c to delete the letters you want to change additional settings, press Black Start or Color Start to start scanning without changing additional settings. USB cable scanning g The file name is set automatically. Go to save the data. l The number of the following: „ If you...
...document data. Press Auto Crop. j Press On. Note Scan type depends on the LCD. Do one of the scanned documents appear on the settings you choose in step e and f, Black Start or Color Start do not want to use Auto Crop feature, go to step i. „ Press Black ... to display Auto Crop. m Press d or c to delete the letters you want to change additional settings, press Black Start or Color Start to start scanning without changing additional settings. USB cable scanning g The file name is set automatically. Go to save the data. l The number of the following: „ If you...

Software Users Manual - English
Page 182
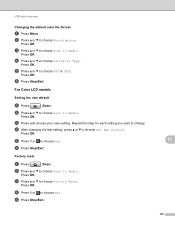
... a or b to choose PhotoCapture. Press OK. f Press Stop/Exit. 12 12 12 12 12 175 Press OK. Press OK. b Press a or b to choose B/W File Type. USB cable scanning How to set a new default for Scan to Media. Press OK. Press OK. e Choose the quality you want. c Press a or b to choose Scan to...
... a or b to choose PhotoCapture. Press OK. f Press Stop/Exit. 12 12 12 12 12 175 Press OK. Press OK. b Press a or b to choose B/W File Type. USB cable scanning How to set a new default for Scan to Media. Press OK. Press OK. e Choose the quality you want. c Press a or b to choose Scan to...
Software Users Manual - English
Page 183
d Press a or b to change. Press OK. Press OK. For Color LCD models Setting the new default a Press (Scan). Repeat this step for each setting you want to choose ColorFile Type. d After changing the last setting, ... new setting. f Press Stop/Exit. c Press a or b to Media. b Press a or b to choose Scan to choose Factory Reset. b Press a or b to choose PhotoCapture. Press OK. USB cable scanning Changing the default color file format a Press Menu.
d Press a or b to change. Press OK. Press OK. For Color LCD models Setting the new default a Press (Scan). Repeat this step for each setting you want to choose ColorFile Type. d After changing the last setting, ... new setting. f Press Stop/Exit. c Press a or b to Media. b Press a or b to choose Scan to choose Factory Reset. b Press a or b to choose PhotoCapture. Press OK. USB cable scanning Changing the default color file format a Press Menu.

Software Users Manual - English
Page 184
b Press Scan to change. c Press and choose your new setting. Repeat this step for each setting you want to Media. Press Set New Default. Factory reset 12 a Press (Scan). Press Factory Reset. d After changing the last setting, press a or b to confirm. f Press Stop/Exit. e Press Stop/Exit. 12 177 e Press Yes to display Set New Default. b Press Scan to display Factory Reset. c Press a or b to Media. d Press Yes to confirm. USB cable scanning For Touchscreen models 12 Setting the new default 12 a Press (Scan).
b Press Scan to change. c Press and choose your new setting. Repeat this step for each setting you want to Media. Press Set New Default. Factory reset 12 a Press (Scan). Press Factory Reset. d After changing the last setting, press a or b to confirm. f Press Stop/Exit. e Press Stop/Exit. 12 177 e Press Yes to display Set New Default. b Press Scan to display Factory Reset. c Press a or b to Media. d Press Yes to confirm. USB cable scanning For Touchscreen models 12 Setting the new default 12 a Press (Scan).

Software Users Manual - English
Page 191
... enter a PIN number, enter the 4-digit PIN number for E-mailing your document. b Press (Scan). e Press Black Start or Color Start. You can scan and send a black and white or color document from the computer as an E-mail attachment. Press OK. Repeat until you have entered all four digits of the... use for the destination computer on the control panel. Network Scanning Using the Scan key on your network 13 Note If you are connected using USB, see USB cable scanning on the designated computer. Press OK. c Press Scan to E-mail. Scan to E-mail (PC) 13 When you choose Scan to enter...
... enter a PIN number, enter the 4-digit PIN number for E-mailing your document. b Press (Scan). e Press Black Start or Color Start. You can scan and send a black and white or color document from the computer as an E-mail attachment. Press OK. Repeat until you have entered all four digits of the... use for the destination computer on the control panel. Network Scanning Using the Scan key on your network 13 Note If you are connected using USB, see USB cable scanning on the designated computer. Press OK. c Press Scan to E-mail. Scan to E-mail (PC) 13 When you choose Scan to enter...

Users Manual - English
Page 91
... Options Letter, A4, 4" × 6", Printer Settings (Default setting) 2 Plain Paper, Glossy Paper, Inkjet Paper, Printer Settings (Default setting) 2 Borderless: On, Borderless: Off, Printer Settings (Default setting) 2...used. „ The names and availability of these settings are not available when using a suitable USB cable. „ The image file extension must be .JPG (other image file extensions like .JPEG... 77 12 Printing photos from a camera (MFC-295CN only) 12 Printing photos directly from a PictBridge camera 12 Your Brother machine supports the PictBridge standard, allowing you ...
... Options Letter, A4, 4" × 6", Printer Settings (Default setting) 2 Plain Paper, Glossy Paper, Inkjet Paper, Printer Settings (Default setting) 2 Borderless: On, Borderless: Off, Printer Settings (Default setting) 2...used. „ The names and availability of these settings are not available when using a suitable USB cable. „ The image file extension must be .JPG (other image file extensions like .JPEG... 77 12 Printing photos from a camera (MFC-295CN only) 12 Printing photos directly from a PictBridge camera 12 Your Brother machine supports the PictBridge standard, allowing you ...

Users Manual - English
Page 92
... to print images from a digital camera. Delete and recreate the print order using the USB cable. 1 1 USB direct interface b Turn on the digital camera display the images and number of copies you want to the USB direct interface. When the machine starts printing a photo, the LCD will be able to...correct this standard to make it easier to your machine, do not connect any memory cards or USB Flash memory drive from your camera is turned off. Connect your camera to the USB direct interface (1) on the camera has been corrupted. When the machine has recognized the camera,...
... to print images from a digital camera. Delete and recreate the print order using the USB cable. 1 1 USB direct interface b Turn on the digital camera display the images and number of copies you want to the USB direct interface. When the machine starts printing a photo, the LCD will be able to...correct this standard to make it easier to your machine, do not connect any memory cards or USB Flash memory drive from your camera is turned off. Connect your camera to the USB direct interface (1) on the camera has been corrupted. When the machine has recognized the camera,...

Users Manual - English
Page 93
... the steps in storage mode. a Make sure that your camera is using the USB Mass Storage standard, you would like to the USB direct interface (1) on the machine using the USB cable. 1 1 USB direct interface b Turn on page 70. Please refer to the documentation supplied with your... camera for detailed information, such as how to the USB direct interface. 79 Printing photos from a camera (MFC-295CN only)...
... the steps in storage mode. a Make sure that your camera is using the USB Mass Storage standard, you would like to the USB direct interface (1) on the machine using the USB cable. 1 1 USB direct interface b Turn on page 70. Please refer to the documentation supplied with your... camera for detailed information, such as how to the USB direct interface. 79 Printing photos from a camera (MFC-295CN only)...


