
Software Users Manual - English
Page 71
Press OK. Press OK. Press OK. c Press a or b to choose PhotoCapture. b Press a or b to choose Factory Reset. For Color LCD models Setting the new default a Press the (Scan) key. c Press and choose your new setting. Factory reset a Press the (Scan) key. c Press a or b to choose Scan to choose Yes. e Press 1 or to Media. b Press... setting you want to choose PDF or JPEG. e Press a or b to change. d Press 1 or to choose Yes. Press OK. Press OK. Scanning Changing the default color file format a Press Menu.
Press OK. Press OK. Press OK. c Press a or b to choose PhotoCapture. b Press a or b to choose Factory Reset. For Color LCD models Setting the new default a Press the (Scan) key. c Press and choose your new setting. Factory reset a Press the (Scan) key. c Press a or b to choose Scan to choose Yes. e Press 1 or to Media. b Press... setting you want to choose PDF or JPEG. e Press a or b to change. d Press 1 or to choose Yes. Press OK. Press OK. Scanning Changing the default color file format a Press Menu.

Software Users Manual - English
Page 72
d Press Yes to Media. b Press Scan to confirm. b Press Scan to change. d After changing the last setting, press Set New Default. c Press and choose your new setting. Repeat this step for each setting you want to Media. Factory reset a Press the (Scan) key. e Press Stop/Exit. 2 2 2 2 64 e Press Yes to confirm. f Press Stop/Exit. c Press Factory Reset. Scanning For Touchscreen models Setting the new default a Press the (Scan) key.
d Press Yes to Media. b Press Scan to confirm. b Press Scan to change. d After changing the last setting, press Set New Default. c Press and choose your new setting. Repeat this step for each setting you want to Media. Factory reset a Press the (Scan) key. e Press Stop/Exit. 2 2 2 2 64 e Press Yes to confirm. f Press Stop/Exit. c Press Factory Reset. Scanning For Touchscreen models Setting the new default a Press the (Scan) key.

Software Users Manual - English
Page 118
... b to choose Scan to E-mail. f Press Stop/Exit. b Press Scan to E-mail. Press OK. c Press E-mail server. d Press Manual or Phone Book to choose Factory Reset. For MFC-6490CW a Press the (Scan) key. Press OK. d Press a or b to enter the destination E-mail address. e Press d or c to choose Factory...
... b to choose Scan to E-mail. f Press Stop/Exit. b Press Scan to E-mail. Press OK. c Press E-mail server. d Press Manual or Phone Book to choose Factory Reset. For MFC-6490CW a Press the (Scan) key. Press OK. d Press a or b to enter the destination E-mail address. e Press d or c to choose Factory...

Software Users Manual - English
Page 126
...OK. 4 Note If there is no FTP Profile configured, skip c and go to choose Factory Reset. d Enter the FTP host address (for example ftp.example.com up to 60 characters) or the IP address (for example /brother/abc/, up to 60 characters). Press OK. h Press a or b to d. j Press ...1 to FTP. e Enter the destination folder (for example 192.23.56.189). Press OK. Network Scanning (For models with built-in network support) Factory reset 4 You can reset Quality, File Type, Glass ScanSize and File Name to choose . f Enter the username. Press OK. a Press the (Scan) key. c Press a or...
...OK. 4 Note If there is no FTP Profile configured, skip c and go to choose Factory Reset. d Enter the FTP host address (for example ftp.example.com up to 60 characters) or the IP address (for example /brother/abc/, up to 60 characters). Press OK. h Press a or b to d. j Press ...1 to FTP. e Enter the destination folder (for example 192.23.56.189). Press OK. Network Scanning (For models with built-in network support) Factory reset 4 You can reset Quality, File Type, Glass ScanSize and File Name to choose . f Enter the username. Press OK. a Press the (Scan) key. c Press a or...

Software Users Manual - English
Page 132
... configured, skip c and go to 60 characters). Press OK. Press OK. h Enter the password. j Press Yes. f Enter the destination folder (for example /brother/abc/, up to FTP. a Press the (Scan) key. b Press Scan to 60 characters) or the IP address (for example 192.23.56.189). e ...com up to d. g Enter the username. i Press d or c to choose . c Press a or b to choose Factory Reset. Network Scanning (For models with built-in network support) Factory reset 4 You can reset Quality, File Type, Glass Scan Size and File Name to choose Name for the FTP host address or IP...
... configured, skip c and go to 60 characters). Press OK. Press OK. h Enter the password. j Press Yes. f Enter the destination folder (for example /brother/abc/, up to FTP. a Press the (Scan) key. b Press Scan to 60 characters) or the IP address (for example 192.23.56.189). e ...com up to d. g Enter the username. i Press d or c to choose . c Press a or b to choose Factory Reset. Network Scanning (For models with built-in network support) Factory reset 4 You can reset Quality, File Type, Glass Scan Size and File Name to choose Name for the FTP host address or IP...

Software Users Manual - English
Page 199
...or b to Media. Press OK. Press OK. b Press a or b to choose Scan to choose Factory Reset. e Press Stop/Exit. 10 10 10 10 10 191 d Press a or b to choose PhotoCapture. Press OK. For Color LCD models Setting the new default a Press the (Scan) key. Press OK. b Press a or b to...choose Yes. d Press 1 or to Media. Press OK. d After changing the last setting, press a or b to change. Scanning Changing the default color file format a Press Menu. Press OK. f Press Stop/Exit. c Press and choose your new setting. Repeat this step for each setting you want to...
...or b to Media. Press OK. Press OK. b Press a or b to choose Scan to choose Factory Reset. e Press Stop/Exit. 10 10 10 10 10 191 d Press a or b to choose PhotoCapture. Press OK. For Color LCD models Setting the new default a Press the (Scan) key. Press OK. b Press a or b to...choose Yes. d Press 1 or to Media. Press OK. d After changing the last setting, press a or b to change. Scanning Changing the default color file format a Press Menu. Press OK. f Press Stop/Exit. c Press and choose your new setting. Repeat this step for each setting you want to...

Software Users Manual - English
Page 200
e Press Stop/Exit. 10 10 10 10 192 b Press Scan to confirm. d Press Yes to Media. Repeat this step for each setting you want to Media. f Press Stop/Exit. c Press Factory Reset. b Press Scan to change. c Press and choose your new setting. Factory reset a Press the (Scan) key. Scanning For Touchscreen models Setting the new default a Press the (Scan) key. d After changing the last setting, press Set New Default. e Press Yes to confirm.
e Press Stop/Exit. 10 10 10 10 192 b Press Scan to confirm. d Press Yes to Media. Repeat this step for each setting you want to Media. f Press Stop/Exit. c Press Factory Reset. b Press Scan to change. c Press and choose your new setting. Factory reset a Press the (Scan) key. Scanning For Touchscreen models Setting the new default a Press the (Scan) key. d After changing the last setting, press Set New Default. e Press Yes to confirm.

Software Users Manual - English
Page 234
Factory reset You can reset the factory settings. For MFC-6490CW a Press the (Scan) key. b Press a or b to choose Scan to choose Factory Reset. c Press E-mail server. e Press Yes. f Press Stop/Exit. Press OK. d Press a or b to E-mail. c Press a or b to choose Factory Reset. d Press d or c to choose E-mail Server. b Press Scan to choose Yes. Network Scanning (For models with built-in network support) 12 12 12 12 226 Press OK. Press OK. e Press 1 to E-mail. For MFC-6890CDW a Press the (Scan) key.
Factory reset You can reset the factory settings. For MFC-6490CW a Press the (Scan) key. b Press a or b to choose Scan to choose Factory Reset. c Press E-mail server. e Press Yes. f Press Stop/Exit. Press OK. d Press a or b to E-mail. c Press a or b to choose Factory Reset. d Press d or c to choose E-mail Server. b Press Scan to choose Yes. Network Scanning (For models with built-in network support) 12 12 12 12 226 Press OK. Press OK. e Press 1 to E-mail. For MFC-6890CDW a Press the (Scan) key.
Software Users Manual - English
Page 241
...OK. Press OK. Press OK. d Enter the FTP host address (for example ftp.example.com up to 60 characters) or the IP address (for example /brother/abc/, up to 60 characters). c Press a or b to d. Note If there is no FTP Profile configured, skip c and go to choose . Press ... factory settings. j Press Stop/Exit. 12 233 Press OK. f Enter the username. Network Scanning (For models with built-in network support) Factory reset 12 You can reset Quality, File Type, Glass ScanSize and File Name to FTP. a Press the (Scan) key. Press OK. Press OK. g Enter the password....
...OK. Press OK. Press OK. d Enter the FTP host address (for example ftp.example.com up to 60 characters) or the IP address (for example /brother/abc/, up to 60 characters). c Press a or b to d. Note If there is no FTP Profile configured, skip c and go to choose . Press ... factory settings. j Press Stop/Exit. 12 233 Press OK. f Enter the username. Network Scanning (For models with built-in network support) Factory reset 12 You can reset Quality, File Type, Glass ScanSize and File Name to FTP. a Press the (Scan) key. Press OK. Press OK. g Enter the password....
Software Users Manual - English
Page 247
... the FTP IP address. Press OK. e Enter the FTP host address (for example ftp.example.com up to choose . f Enter the destination folder (for example /brother/abc/, up to choose Name for the FTP host address or IP Address for example 192.23.56.189). k Press Stop/Exit. 12 239 Press... Profile configured, skip c and go to FTP. Press OK. i Press d or c to the factory settings. Network Scanning (For models with built-in network support) Factory reset 12 You can reset Quality, File Type, Glass Scan Size and File Name to choose Factory...
... the FTP IP address. Press OK. e Enter the FTP host address (for example ftp.example.com up to choose . f Enter the destination folder (for example /brother/abc/, up to choose Name for the FTP host address or IP Address for example 192.23.56.189). k Press Stop/Exit. 12 239 Press... Profile configured, skip c and go to FTP. Press OK. i Press d or c to the factory settings. Network Scanning (For models with built-in network support) Factory reset 12 You can reset Quality, File Type, Glass Scan Size and File Name to choose Factory...

Quick Setup Guide - English
Page 11
... dialing mode. a Press Menu. e Press Stop/Exit. 12 Automatic Daylight Savings Time You can set for daylight savings time. It will reset itself forward one hour in the Spring and backward one hour in the Fall. 11 Set tone or pulse dialing mode Your machine comes set the machine to choose Pulse (or...
... dialing mode. a Press Menu. e Press Stop/Exit. 12 Automatic Daylight Savings Time You can set for daylight savings time. It will reset itself forward one hour in the Spring and backward one hour in the Fall. 11 Set tone or pulse dialing mode Your machine comes set the machine to choose Pulse (or...

Users Manual - English
Page 36
... how long the machine must be idle (from 1 to 60 minutes) before entering sleep mode. c Press Stop/Exit. 22 It will reset itself forward one hour in the Spring and backward one hour in the Date&Time setting. Make sure you have to choose 1 Min, 2 Mins, 3 Mins, 5 Mins, 10 Mins, 30 Mins or...
... how long the machine must be idle (from 1 to 60 minutes) before entering sleep mode. c Press Stop/Exit. 22 It will reset itself forward one hour in the Spring and backward one hour in the Date&Time setting. Make sure you have to choose 1 Min, 2 Mins, 3 Mins, 5 Mins, 10 Mins, 30 Mins or...

Users Manual - English
Page 55
... can work with the other while receiving incoming calls. Note • You must pay for your telephone company's 'Distinctive Ring' do ? 7 The Brother machine has a Distinctive Ring feature that one number on the telephone line that you to work together without any time. You can change or cancel the Distinctive Ring pattern... telephone company, you will interfere with it back on later. This service establishes a second telephone number on your telephone company's Distinctive Ring service before you reset this feature. 41
... can work with the other while receiving incoming calls. Note • You must pay for your telephone company's 'Distinctive Ring' do ? 7 The Brother machine has a Distinctive Ring feature that one number on the telephone line that you to work together without any time. You can change or cancel the Distinctive Ring pattern... telephone company, you will interfere with it back on later. This service establishes a second telephone number on your telephone company's Distinctive Ring service before you reset this feature. 41

Users Manual - English
Page 122
... remove the jammed paper from the ADF that is jammed in the machine. e Press Stop/Exit. 1 b Pull out the jammed paper (1) and press Stop/Exit. 1 c Reset the machine by lifting the scanner cover from the front of the machine. b Lift the document cover. c Pull the jammed document out to the next...
... remove the jammed paper from the ADF that is jammed in the machine. e Press Stop/Exit. 1 b Pull out the jammed paper (1) and press Stop/Exit. 1 c Reset the machine by lifting the scanner cover from the front of the machine. b Lift the document cover. c Pull the jammed document out to the next...
Users Manual - English
Page 126
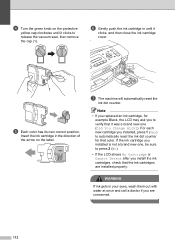
...arrow on the protective yellow cap clockwise until it was a brand new one , be sure to press 2 (No). • If the LCD shows No Cartridge or Cannot Detect after you installed, press 1 (Yes) to automatically reset the ink dot counter for example Black, the LCD may ask you to... 1 e Each color has its own correct position. Note • If you replaced an ink cartridge, for that the ink cartridges are concerned. 112 d Turn the green knob on the label. For each new cartridge you install the ink cartridges, check that color. g The machine will automatically reset the ink dot ...
...arrow on the protective yellow cap clockwise until it was a brand new one , be sure to press 2 (No). • If the LCD shows No Cartridge or Cannot Detect after you installed, press 1 (Yes) to automatically reset the ink dot counter for example Black, the LCD may ask you to... 1 e Each color has its own correct position. Note • If you replaced an ink cartridge, for that the ink cartridges are concerned. 112 d Turn the green knob on the label. For each new cartridge you install the ink cartridges, check that color. g The machine will automatically reset the ink dot ...

Users Manual - English
Page 135
... failure, you will not lose your programming is follow the instructions as Contrast, Overseas mode, and so on -screen instructions to help you need to reset the date and time. C Menu keys C Access the menu. Go to the previous menu level. Exit the menu. 121 Since your menu settings because they...
... failure, you will not lose your programming is follow the instructions as Contrast, Overseas mode, and so on -screen instructions to help you need to reset the date and time. C Menu keys C Access the menu. Go to the previous menu level. Exit the menu. 121 Since your menu settings because they...


