
Software & Network Users Manual - English
Page 8
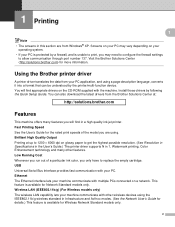
...Specifications in the User's Guide.) The printer driver supports N in 1, Watermark printing, Color Enhancement technology and many features you will find in a high quality ink jet printer. Using the Brother printer driver 1 A printer driver translates the data from Windows® XP. Fast ... the User's Guide for more information. Visit the Brother Solutions Center (http://solutions.brother.com) for the rated print speeds of a particular ink color, you may vary depending on glossy paper to allow communication through port number 137. Install those drivers by a firewall, and ...
...Specifications in the User's Guide.) The printer driver supports N in 1, Watermark printing, Color Enhancement technology and many features you will find in a high quality ink jet printer. Using the Brother printer driver 1 A printer driver translates the data from Windows® XP. Fast ... the User's Guide for more information. Visit the Brother Solutions Center (http://solutions.brother.com) for the rated print speeds of a particular ink color, you may vary depending on glossy paper to allow communication through port number 137. Install those drivers by a firewall, and ...
Software & Network Users Manual - English
Page 12
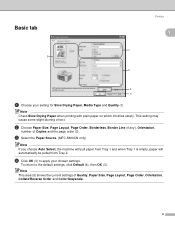
... paper on which ink dries slowly. d Click OK (3) to the default settings, click Default (4), then OK (3). c Select the Paper Source. (MFC-5860CN only) Note If you choose Auto Select, the machine will pull paper from Tray 1 and when Tray 1 is empty, paper will automatically be... (1). Basic tab 5 Printing 1 1 1 2 4 3 a Choose your chosen settings. b Choose Paper Size, Page Layout, Page Order, Borderless, Border Line (if any), Orientation, number of text. Note This area (5) shows the current settings of Quality, Paper Size, Page Layout, Page Order, Orientation, Collate/Reverse Order and...
... paper on which ink dries slowly. d Click OK (3) to the default settings, click Default (4), then OK (3). c Select the Paper Source. (MFC-5860CN only) Note If you choose Auto Select, the machine will pull paper from Tray 1 and when Tray 1 is empty, paper will automatically be... (1). Basic tab 5 Printing 1 1 1 2 4 3 a Choose your chosen settings. b Choose Paper Size, Page Layout, Page Order, Borderless, Border Line (if any), Orientation, number of text. Note This area (5) shows the current settings of Quality, Paper Size, Page Layout, Page Order, Orientation, Collate/Reverse Order and...

Software & Network Users Manual - English
Page 18
Paper Source (MFC-5860CN only) 1 The Paper Source selection sets the paper tray from Tray 2 if both trays are using paper that will be printed (1 to 999). 1 1 Collate 1 With Collate checked, one complete copy of your document in Tray 2. • Tray 2 does not support Borderless printing. 12 Note • ... and size. When Tray 1 is printed. If Collate is unchecked, then each page will be printed and then reprinted according to the number of copies chosen before the next page of the document is empty, Auto Select allows the machine take paper from which the machine will ...
Paper Source (MFC-5860CN only) 1 The Paper Source selection sets the paper tray from Tray 2 if both trays are using paper that will be printed (1 to 999). 1 1 Collate 1 With Collate checked, one complete copy of your document in Tray 2. • Tray 2 does not support Borderless printing. 12 Note • ... and size. When Tray 1 is printed. If Collate is unchecked, then each page will be printed and then reprinted according to the number of copies chosen before the next page of the document is empty, Auto Select allows the machine take paper from which the machine will ...
Software & Network Users Manual - English
Page 28
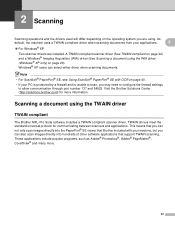
... 40. • If your PC is protected by a firewall and is unable to allow communication through port number 137 and 54925. Visit the Brother Solutions Center (http://solutions.brother.com) for communicating between scanners and applications. Windows® XP users can also scan images directly into the ...support TWAIN scanning. This means that you can not only scan images directly into hundreds of other software applications that Brother included with your applications. 2 „ For Windows® XP Two scanner drivers are using the TWAIN driver 2 TWAIN compliant 2 The...
... 40. • If your PC is protected by a firewall and is unable to allow communication through port number 137 and 54925. Visit the Brother Solutions Center (http://solutions.brother.com) for communicating between scanners and applications. Windows® XP users can also scan images directly into the ...support TWAIN scanning. This means that you can not only scan images directly into hundreds of other software applications that Brother included with your applications. 2 „ For Windows® XP Two scanner drivers are using the TWAIN driver 2 TWAIN compliant 2 The...
Software & Network Users Manual - English
Page 34
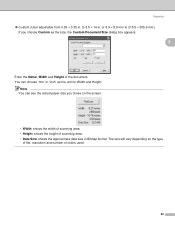
... scanning area. • Height: shows the height of the document. to 215.9 × 355.6 mm.) If you chose on the type of file, resolution and number of colors used. 28
... scanning area. • Height: shows the height of the document. to 215.9 × 355.6 mm.) If you chose on the type of file, resolution and number of colors used. 28
Software & Network Users Manual - English
Page 50
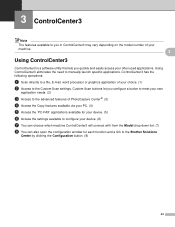
... drop-down list. (7) h You can also open the configuration window for each function and a link to you in ControlCenter3 may vary depending on the model number of your often used applications. 3 ControlCenter3 3 Note The features available to the Brother Solutions Center by clicking the Configuration button. (8) 44
... drop-down list. (7) h You can also open the configuration window for each function and a link to you in ControlCenter3 may vary depending on the model number of your often used applications. 3 ControlCenter3 3 Note The features available to the Brother Solutions Center by clicking the Configuration button. (8) 44
Software & Network Users Manual - English
Page 73
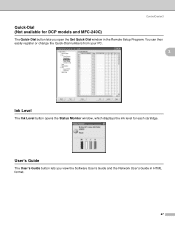
You can then easily register or change the Quick-Dial numbers from your PC. 3 Ink Level 3 The Ink Level button opens the Status Monitor window, which displays the ink level for DCP models and MFC-240C) 3 The Quick-Dial button lets you view the Software User's Guide and the Network User's Guide in the Remote Setup Program. User's Guide 3 The User's Guide button lets you open the Set Quick-Dial window in HTML format. 67 ControlCenter3 Quick-Dial (Not available for each cartridge.
You can then easily register or change the Quick-Dial numbers from your PC. 3 Ink Level 3 The Ink Level button opens the Status Monitor window, which displays the ink level for DCP models and MFC-240C) 3 The Quick-Dial button lets you view the Software User's Guide and the Network User's Guide in the Remote Setup Program. User's Guide 3 The User's Guide button lets you open the Set Quick-Dial window in HTML format. 67 ControlCenter3 Quick-Dial (Not available for each cartridge.
Software & Network Users Manual - English
Page 74
You can be shown on the network. Visit the Brother Solutions Center (http://solutions.brother.com) for up to one machine on a network. If you installed the machine following the instructions for a network user in the Network User's Guide) or by a firewall and is a multiple ... ScanSoft® PaperPort® SE on up to 2 Users. Before using the BRAdmin Professional software. To buy the Brother NL-5 pack which is unable to scan, you want to allow communication through port number 137 and 54925. If you may need to configure the firewall settings to use the machine as a network...
You can be shown on the network. Visit the Brother Solutions Center (http://solutions.brother.com) for up to one machine on a network. If you installed the machine following the instructions for a network user in the Network User's Guide) or by a firewall and is a multiple ... ScanSoft® PaperPort® SE on up to 2 Users. Before using the BRAdmin Professional software. To buy the Brother NL-5 pack which is unable to scan, you want to allow communication through port number 137 and 54925. If you may need to configure the firewall settings to use the machine as a network...

Software & Network Users Manual - English
Page 76
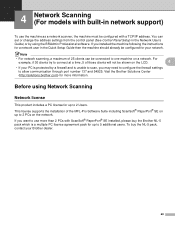
... and sent to the machine. (See Using the Scan key on page 71.) 70 e If you want to avoid receiving unwanted documents, enter a 4-digit PIN number in the Pin number and Retype Pin number field. Network Scanning (For models with built-in network support) Specify your machine by a PIN... number, the LCD prompts you to enter the PIN number before the document can enter any name that you like. To send data to a PC protected by name 4 1 Enter the machine node name in Node ...
... and sent to the machine. (See Using the Scan key on page 71.) 70 e If you want to avoid receiving unwanted documents, enter a 4-digit PIN number in the Pin number and Retype Pin number field. Network Scanning (For models with built-in network support) Specify your machine by a PIN... number, the LCD prompts you to enter the PIN number before the document can enter any name that you like. To send data to a PC protected by name 4 1 Enter the machine node name in Node ...

Software & Network Users Manual - English
Page 77
... scanned and sent directly to use for the destination PC on the control panel. e Press Black Start or Color Start. c Press a or b to choose Scan to enter a PIN number, enter the 4-digit PIN number for E-mailing your document. If the LCD prompts you to E-mail. b Press the (Scan) key. Press... OK. The machine starts the scanning process. 71 You can scan and send a black and white or color document from the PC as ...
... scanned and sent directly to use for the destination PC on the control panel. e Press Black Start or Color Start. c Press a or b to choose Scan to enter a PIN number, enter the 4-digit PIN number for E-mailing your document. If the LCD prompts you to E-mail. b Press the (Scan) key. Press... OK. The machine starts the scanning process. 71 You can scan and send a black and white or color document from the PC as ...

Software & Network Users Manual - English
Page 78
... your network. Press OK. b Press the (Scan) key. c Press a or b to choose Scan to enter a PIN number, enter the 4-digit PIN number for the destination PC on the control panel. Press OK. e Press Black Start or Color Start. Network Scanning (For models with OCR software and convert your document into text that can...
... your network. Press OK. b Press the (Scan) key. c Press a or b to choose Scan to enter a PIN number, enter the 4-digit PIN number for the destination PC on the control panel. Press OK. e Press Black Start or Color Start. Network Scanning (For models with OCR software and convert your document into text that can...
Software & Network Users Manual - English
Page 79
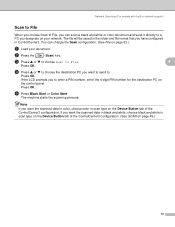
... Press a or b to choose Scan to enter a PIN number, enter the 4-digit PIN number for the destination PC on the control panel. If the LCD prompts you designate on your document. Note If you want the scanned data in color, choose color in scan type on the Device Button tab of the ControlCenter3 ...black and white in scan type on the Device Button tab of the ControlCenter3 configuration. b Press the (Scan) key. e Press Black Start or Color Start. Network Scanning (For models with built-in network support) Scan to File 4 When you choose Scan to File, you can change the Scan ...
... Press a or b to choose Scan to enter a PIN number, enter the 4-digit PIN number for the destination PC on the control panel. If the LCD prompts you designate on your document. Note If you want the scanned data in color, choose color in scan type on the Device Button tab of the ControlCenter3 ...black and white in scan type on the Device Button tab of the ControlCenter3 configuration. b Press the (Scan) key. e Press Black Start or Color Start. Network Scanning (For models with built-in network support) Scan to File 4 When you choose Scan to File, you can change the Scan ...
Software & Network Users Manual - English
Page 81
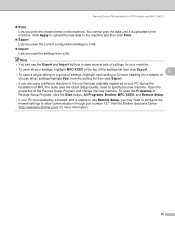
... using a different machine to the one that was originally registered to your PC is protected by a firewall, and is uploaded to allow communication through port number 137. You cannot print the data... save the current configuration settings to specify the new machine. Remote Setup (Not available for DCP models and MFC-240C) „ Print Lets you may need to a file. „ Import Lets you save a single ... the Properties of Remote Setup Program, click the Start button, All Programs, Brother, MFC-XXXX, and Remote Setup. • If your PC during the installation of the Remote Setup Program...
... using a different machine to the one that was originally registered to your PC is protected by a firewall, and is uploaded to allow communication through port number 137. You cannot print the data... save the current configuration settings to specify the new machine. Remote Setup (Not available for DCP models and MFC-240C) „ Print Lets you may need to a file. „ Import Lets you save a single ... the Properties of Remote Setup Program, click the Start button, All Programs, Brother, MFC-XXXX, and Remote Setup. • If your PC during the installation of the Remote Setup Program...

Software & Network Users Manual - English
Page 82
6 Brother PC-FAX Software (MFC models only) 6 Note If you are using Windows® XP or Windows® 2000 Professional, you must log on your PC as a PC-FAX. You ... to use your PC-FAX Address Book or simply enter the destination address or fax number into the user interface. For the latest information and updates on the Brother PC-FAX feature, visit http://solutions.brother.com. The Brother PC-FAX feature lets you use PC-FAX send, you have to allow communication through...
6 Brother PC-FAX Software (MFC models only) 6 Note If you are using Windows® XP or Windows® 2000 Professional, you must log on your PC as a PC-FAX. You ... to use your PC-FAX Address Book or simply enter the destination address or fax number into the user interface. For the latest information and updates on the Brother PC-FAX feature, visit http://solutions.brother.com. The Brother PC-FAX feature lets you use PC-FAX send, you have to allow communication through...
Software & Network Users Manual - English
Page 84
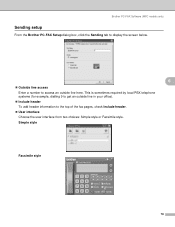
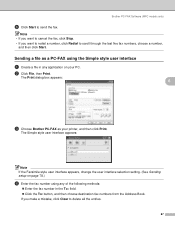
Simple style 6 6 Facsimile style 6 78 This is sometimes required by local PBX telephone systems (for example, dialling 9 to get an outside line in your office). „ Include header To add header information to access an outside line here. Brother PC-FAX Software (MFC models only) Sending setup 6 From the Brother PC-FAX Setup dialog box, click the Sending tab to display the screen below. „ Outside line access Enter a number to the top of the fax pages, check Include header. „ User interface Choose the user interface from two choices: Simple style or Facsimile style.
Simple style 6 6 Facsimile style 6 78 This is sometimes required by local PBX telephone systems (for example, dialling 9 to get an outside line in your office). „ Include header To add header information to access an outside line here. Brother PC-FAX Software (MFC models only) Sending setup 6 From the Brother PC-FAX Setup dialog box, click the Sending tab to display the screen below. „ Outside line access Enter a number to the top of the fax pages, check Include header. „ User interface Choose the user interface from two choices: Simple style or Facsimile style.
Software & Network Users Manual - English
Page 85
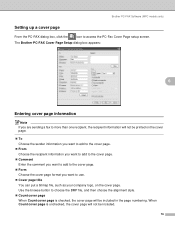
... file, such as your company logo, on the cover page. When Count cover page is checked, the cover page will not be included. 79 The Brother PC-FAX Cover Page Setup dialog box appears: 6 Entering cover page information 6 Note If you are sending a fax to access the PC-Fax Cover Page... setup screen. Brother PC-FAX Software (MFC models only) Setting up a cover page 6 From the PC-FAX dialog box, click the icon to more than one recipient, the recipient information will not be included in the page...
... file, such as your company logo, on the cover page. When Count cover page is checked, the cover page will not be included. 79 The Brother PC-FAX Cover Page Setup dialog box appears: 6 Entering cover page information 6 Note If you are sending a fax to access the PC-Fax Cover Page... setup screen. Brother PC-FAX Software (MFC models only) Setting up a cover page 6 From the PC-FAX dialog box, click the icon to more than one recipient, the recipient information will not be included in the page...
Software & Network Users Manual - English
Page 92
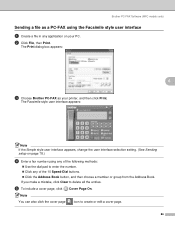
... Print dialog box appears: 6 c Choose Brother PC-FAX as a PC-FAX using the Facsimile style user interface 6 a Create a file in any application on page 78.) d Enter a fax number using any of the following methods: „ Use the dial pad to enter the number. „ Click any of the 10 ...Speed-Dial buttons. „ Click the Address Book button, and then choose a member or group from the Address Book. e To include a cover page, click Cover Page On. If you make a mistake, click Clear to create or edit a cover page. 86 Brother PC-FAX Software (MFC...
... Print dialog box appears: 6 c Choose Brother PC-FAX as a PC-FAX using the Facsimile style user interface 6 a Create a file in any application on page 78.) d Enter a fax number using any of the following methods: „ Use the dial pad to enter the number. „ Click any of the 10 ...Speed-Dial buttons. „ Click the Address Book button, and then choose a member or group from the Address Book. e To include a cover page, click Cover Page On. If you make a mistake, click Clear to create or edit a cover page. 86 Brother PC-FAX Software (MFC...
Software & Network Users Manual - English
Page 93
Brother PC-FAX Software (MFC models only) f Click Start to delete all the entries. 87 If you want to redial a number, click Redial to scroll through the last five fax numbers, choose a number, and then click Start. The Print dialog box appears: 6 6 c Choose Brother PC-FAX as a PC-FAX using any application on page 78.) d Enter the...
Brother PC-FAX Software (MFC models only) f Click Start to delete all the entries. 87 If you want to redial a number, click Redial to scroll through the last five fax numbers, choose a number, and then click Start. The Print dialog box appears: 6 6 c Choose Brother PC-FAX as a PC-FAX using any application on page 78.) d Enter the...
Software & Network Users Manual - English
Page 95
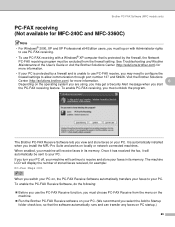
... may need to configure the firewall settings to allow communication through port number 137 and 54926. The machine LCD will continue to receive and store your PC. Brother PC-FAX Software (MFC models only) PC-FAX receiving (Not available for MFC-240C and MFC-3360C) 6 Note • For Windows® 2000, XP and XP Professional x64...
... may need to configure the firewall settings to allow communication through port number 137 and 54926. The machine LCD will continue to receive and store your PC. Brother PC-FAX Software (MFC models only) PC-FAX receiving (Not available for MFC-240C and MFC-3360C) 6 Note • For Windows® 2000, XP and XP Professional x64...

Software & Network Users Manual - English
Page 111
Printing and Faxing e Enter a fax number in the dialog box. 8 105 Note If you want to send a fax to send the fax. The destination fax numbers will be listed in the Input Fax Number box, and then click Print to more than one number, click Add after entering the first fax number.
Printing and Faxing e Enter a fax number in the dialog box. 8 105 Note If you want to send a fax to send the fax. The destination fax numbers will be listed in the Input Fax Number box, and then click Print to more than one number, click Add after entering the first fax number.


