Users Manual - English
Page 6
...the product was purchased within the applicable warranty period, Brother or its Authorized Service Center will be required to Brother or an Authorized Service Center within the U.S. What is the length of the Warranty Periods: • Machines: one year from the original purchase date. • ...-284-4329 for Fax, MFC and DCP and 1-800-276-7746 for loss or damage to transporting this Product in the United States. You are responsible for parts or labor. Supply Brother or the Brother Authorized Service Center with a rated life; What Brother will ask you first reported...
...the product was purchased within the applicable warranty period, Brother or its Authorized Service Center will be required to Brother or an Authorized Service Center within the U.S. What is the length of the Warranty Periods: • Machines: one year from the original purchase date. • ...-284-4329 for Fax, MFC and DCP and 1-800-276-7746 for loss or damage to transporting this Product in the United States. You are responsible for parts or labor. Supply Brother or the Brother Authorized Service Center with a rated life; What Brother will ask you first reported...
Users Manual - English
Page 8
... this limited warranty of 1 year from the date of purchase for labour and parts, Brother International Corporation (Canada) Ltd. ("Brother"), or its Authorized Service Centers, Distributors, Dealers, Agents or employees, shall create another warranty or modify this warranty. Operation of the MFC/Facsimile machine in excess of the specifications or with your User's Guide for...
... this limited warranty of 1 year from the date of purchase for labour and parts, Brother International Corporation (Canada) Ltd. ("Brother"), or its Authorized Service Centers, Distributors, Dealers, Agents or employees, shall create another warranty or modify this warranty. Operation of the MFC/Facsimile machine in excess of the specifications or with your User's Guide for...

Users Manual - English
Page 109
.... Press Menu/Set. 3 Press Stop/Exit. Printing time will be slightly slower. 1 For MFC-210C, press Menu/Set, 4, 6. The default setting is too long or wide to fit the available space on your selected layout, part of the paper. For MFC-420CN, press Menu/Set, 4, 7. 2 Press ▲ or ▼ to select Off (or On...
.... Press Menu/Set. 3 Press Stop/Exit. Printing time will be slightly slower. 1 For MFC-210C, press Menu/Set, 4, 6. The default setting is too long or wide to fit the available space on your selected layout, part of the paper. For MFC-420CN, press Menu/Set, 4, 7. 2 Press ▲ or ▼ to select Off (or On...

Users Manual - English
Page 114
...Part 15 of the FCC Rules. This equipment has been tested and found to comply with the limits for the MFC to radio communications. A grounded plug should be determined by one...into an outlet on , the user is no guarantee that the products Product Name: MFC-210C, MFC-420CN comply with the instructions, may cause undesired operation. These limits are applied to the... Federal Communications Commission (FCC) Declaration of Conformity (USA only) Responsible Party: Brother International Corporation 100 Somerset Corporate Boulevard Bridgewater, NJ 08807-0911 USA TEL: (908) 704-1700...
...Part 15 of the FCC Rules. This equipment has been tested and found to comply with the limits for the MFC to radio communications. A grounded plug should be determined by one...into an outlet on , the user is no guarantee that the products Product Name: MFC-210C, MFC-420CN comply with the instructions, may cause undesired operation. These limits are applied to the... Federal Communications Commission (FCC) Declaration of Conformity (USA only) Responsible Party: Brother International Corporation 100 Somerset Corporate Boulevard Bridgewater, NJ 08807-0911 USA TEL: (908) 704-1700...
Users Manual - English
Page 117
...that the total of all servicing to dangerous voltage points and other risks and may touch dangerous voltage points or short out parts resulting in front of the MFC that the total ampere ratings on the products plugged into the AC power outlet does not exceed 15 amperes (USA only)....of fire or electric shock. Never spill liquid of any kind into this product yourself because opening or removing covers may expose you to a Brother Authorized Service Center. Also, make sure that will block received faxes. Refer all products plugged into the extension cord do not exceed the ...
...that the total of all servicing to dangerous voltage points and other risks and may touch dangerous voltage points or short out parts resulting in front of the MFC that the total ampere ratings on the products plugged into the AC power outlet does not exceed 15 amperes (USA only)....of fire or electric shock. Never spill liquid of any kind into this product yourself because opening or removing covers may expose you to a Brother Authorized Service Center. Also, make sure that will block received faxes. Refer all products plugged into the extension cord do not exceed the ...
Users Manual - English
Page 138
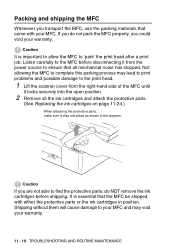
... Remove all mechanical noise has stopped. It is important to allow the MFC to find the protective parts, do not pack the MFC properly, you could void your warranty. 11 - 19 TROUBLESHOOTING AND ROUTINE MAINTENANCE Not allowing the MFC to the print head. 1 Lift the scanner cover from the power ...source to ensure that came with either the protective parts or the ink cartridges in the diagram. Shipping without them will cause damage to your MFC and may lead to print problems and possible damage to complete this parking process may void...
... Remove all mechanical noise has stopped. It is important to allow the MFC to find the protective parts, do not pack the MFC properly, you could void your warranty. 11 - 19 TROUBLESHOOTING AND ROUTINE MAINTENANCE Not allowing the MFC to the print head. 1 Lift the scanner cover from the power ...source to ensure that came with either the protective parts or the ink cartridges in the diagram. Shipping without them will cause damage to your MFC and may lead to print problems and possible damage to complete this parking process may void...
Users Manual - English
Page 140
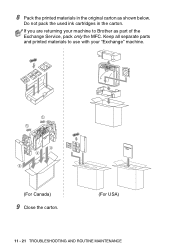
Do not pack the used ink cartridges in the original carton as part of the Exchange Service, pack only the MFC. If you are returning your "Exchange" machine. (For Canada) 9 Close the carton. (For USA) 11 - 21 TROUBLESHOOTING AND ROUTINE MAINTENANCE Keep all separate parts and printed materials to use with your machine to Brother as shown below. 8 Pack the printed materials in the carton.
Do not pack the used ink cartridges in the original carton as part of the Exchange Service, pack only the MFC. If you are returning your "Exchange" machine. (For Canada) 9 Close the carton. (For USA) 11 - 21 TROUBLESHOOTING AND ROUTINE MAINTENANCE Keep all separate parts and printed materials to use with your machine to Brother as shown below. 8 Pack the printed materials in the carton.
Quick Setup Guide - English
Page 5
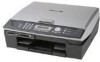
...Me/2000 Professional/XP 14 For Network Interface Cable Users (MFC-420CN, MFC-620CN only) ■ For Windows® 98/98SE/...For Mac OS® 8.6 to 9.2 23 For Network Interface Cable Users (MFC-420CN, MFC-620CN only).... 25 ■ For Mac OS® X 10.2.4 or greater ...OS® 8.6 to 9.2 28 ■ For Network Users (MFC-420CN, MFC-620CN only) Network User's Guide Chapter Map 30 Restoring the Network...Cord 5 5. Selecting a Receive Mode (MFC-620CN only 10 11. Print Quality Check 8 7. Setting the Date and Time 9 8. Removing the Protective Parts 4 2. Setting Your Station ID 9...
...Me/2000 Professional/XP 14 For Network Interface Cable Users (MFC-420CN, MFC-620CN only) ■ For Windows® 98/98SE/...For Mac OS® 8.6 to 9.2 23 For Network Interface Cable Users (MFC-420CN, MFC-620CN only).... 25 ■ For Mac OS® X 10.2.4 or greater ...OS® 8.6 to 9.2 28 ■ For Network Users (MFC-420CN, MFC-620CN only) Network User's Guide Chapter Map 30 Restoring the Network...Cord 5 5. Selecting a Receive Mode (MFC-620CN only 10 11. Print Quality Check 8 7. Setting the Date and Time 9 8. Removing the Protective Parts 4 2. Setting Your Station ID 9...
Quick Setup Guide - English
Page 6
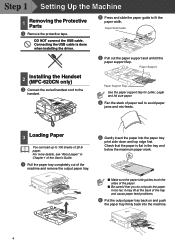
... that the paper is done when installing the driver. 2 Press and slide the paper guide to fit the paper width. Paper Support 2 Installing the Handset (MFC-620CN only) 1 Connect the curled handset cord to 100 sheets of the tray and cause paper feed problems. 6 Put the output paper tray back on... well to avoid paper jams and mis-feeds. 3 Loading Paper You can load up to the handset. Step 1 Setting Up the Machine 1 Removing the Protective Parts 1 Remove the protective tape. DO NOT connect the USB cable. it may lift at the back of 20 lb paper. Paper Side Guide 3 Pull out...
... that the paper is done when installing the driver. 2 Press and slide the paper guide to fit the paper width. Paper Support 2 Installing the Handset (MFC-620CN only) 1 Connect the curled handset cord to 100 sheets of the tray and cause paper feed problems. 6 Put the output paper tray back on... well to avoid paper jams and mis-feeds. 3 Loading Paper You can load up to the handset. Step 1 Setting Up the Machine 1 Removing the Protective Parts 1 Remove the protective tape. DO NOT connect the USB cable. it may lift at the back of 20 lb paper. Paper Side Guide 3 Pull out...
Quick Setup Guide - English
Page 8
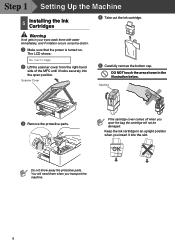
... Warning If ink gets in the illustration below. The LCD shows: No Cartridge 2 Lift the scanner cover from the right-hand side of the MFC until it into the open the bag the cartridge will need them with water immediately, and if irritation occurs consult a doctor. 1 Make sure ... on. Scanner Cover 5 Carefully remove the bottom cap. Keep the ink cartridge in an upright position when you open position. Opening 3 Remove the protective parts. You will not be damaged. Step 1 Setting Up the Machine 5 Installing the Ink Cartridges 4 Take out the ink cartridge. DO NOT touch the ...
... Warning If ink gets in the illustration below. The LCD shows: No Cartridge 2 Lift the scanner cover from the right-hand side of the MFC until it into the open the bag the cartridge will need them with water immediately, and if irritation occurs consult a doctor. 1 Make sure ... on. Scanner Cover 5 Carefully remove the bottom cap. Keep the ink cartridge in an upright position when you open position. Opening 3 Remove the protective parts. You will not be damaged. Step 1 Setting Up the Machine 5 Installing the Ink Cartridges 4 Take out the ink cartridge. DO NOT touch the ...


