Users Manual - English and Spanish
Page 1
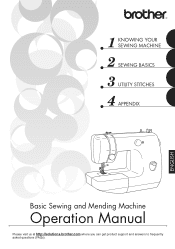
KNOWING YOUR SEWING MACHINE SEWING BASICS UTILITY STITCHES APPENDIX Basic Sewing and Mending Machine Operation Manual Please visit us at http://solutions.brother.com where you can get product support and answers to frequently asked questions (FAQs). ENGLISH
KNOWING YOUR SEWING MACHINE SEWING BASICS UTILITY STITCHES APPENDIX Basic Sewing and Mending Machine Operation Manual Please visit us at http://solutions.brother.com where you can get product support and answers to frequently asked questions (FAQs). ENGLISH
Users Manual - English and Spanish
Page 2
...machine to be left unattended when plugged in this machine where aerosol (spray) products are being administered. 8. Keep the ventilation openings of the sewing machine and foot controller free from the electrical outlet when removing covers, lubricating, or when making any of electric shock: 1. To unplug,...and pull, not the cord. 10. Keep fingers away from outlet. 9. To disconnect, turn the main switch to break. 14. Switch the sewing machine to break. 12. To reduce the risk of lint, dust and loose cloth. 5. Use only accessories recommended by pulling on the cord....
...machine to be left unattended when plugged in this machine where aerosol (spray) products are being administered. 8. Keep the ventilation openings of the sewing machine and foot controller free from the electrical outlet when removing covers, lubricating, or when making any of electric shock: 1. To unplug,...and pull, not the cord. 10. Keep fingers away from outlet. 9. To disconnect, turn the main switch to break. 14. Switch the sewing machine to break. 12. To reduce the risk of lint, dust and loose cloth. 5. Use only accessories recommended by pulling on the cord....
Users Manual - English and Spanish
Page 3
... or installing any other hot objects. 2. FOR USERS IN AUSTRALIA AND NEW ZEALAND This sewing machine is not suitable for the plug supplied with this product are subject to keep your local authorized Brother dealer. Do not touch the handwheel, thread take- Plug the machine directly into the ...any assemblies, the presser feet, needle, or other moving parts. 2. For additional product information and updates, visit our web site at www.brother.com The contents of this machine, avoid direct sunlight and high humidity locations. Remember to turn off the power switch and unplug the cord ...
... or installing any other hot objects. 2. FOR USERS IN AUSTRALIA AND NEW ZEALAND This sewing machine is not suitable for the plug supplied with this product are subject to keep your local authorized Brother dealer. Do not touch the handwheel, thread take- Plug the machine directly into the ...any assemblies, the presser feet, needle, or other moving parts. 2. For additional product information and updates, visit our web site at www.brother.com The contents of this machine, avoid direct sunlight and high humidity locations. Remember to turn off the power switch and unplug the cord ...
Users Manual - English and Spanish
Page 4
... The main parts ...5 Needle and presser foot section ...6 Flat bed attachment ...6 ACCESSORIES ...7 OPTIONAL ACCESSORIES 7 USING YOUR SEWING MACHINE 8 Power supply precautions ...8 Power supply ...8 Foot controller ...9 Steadying the machine ...9 THREADING THE MACHINE 10 Winding ... SEWING BASICS 21 SEWING ...21 General sewing procedure ...21 Selecting stitching ...22 Starting to sew ...23 Sewing in reverse ...23 Thread tension ...24 USEFUL SEWING TIPS ...25 Trial sewing ...25 Changing the sewing direction ...25 Sewing curves ...25 Sewing thick fabrics ...25 Sewing thin fabrics ...26 Sewing...
... The main parts ...5 Needle and presser foot section ...6 Flat bed attachment ...6 ACCESSORIES ...7 OPTIONAL ACCESSORIES 7 USING YOUR SEWING MACHINE 8 Power supply precautions ...8 Power supply ...8 Foot controller ...9 Steadying the machine ...9 THREADING THE MACHINE 10 Winding ... SEWING BASICS 21 SEWING ...21 General sewing procedure ...21 Selecting stitching ...22 Starting to sew ...23 Sewing in reverse ...23 Thread tension ...24 USEFUL SEWING TIPS ...25 Trial sewing ...25 Changing the sewing direction ...25 Sewing curves ...25 Sewing thick fabrics ...25 Sewing thin fabrics ...26 Sewing...
Users Manual - English and Spanish
Page 5
APPENDIX ...39 MAINTENANCE ...39 Oiling ...39 Changing the bulb ...39 Cleaning the machine surface ...40 Cleaning the shuttle race ...40 Cleaning the feed dogs ...41 Bobbin case tension adjustment ...42 TROUBLESHOOTING ...43 INDEX ...46 4 BUTTONHOLE SEWING 31 Making the buttonhole ...31 Adjusting buitching stitching ...32 Button sewing ...33 ZIPPER INSERTION ...34 APPLIQUÉ, MONOGRAMMING AND EMBROIDERING 35 Appliqués ...35 Monogramming and embroidering ...35 DECORATIVE STITCHING 37 Gathering ...37 Shell tuck stitching ...37 Elastic stitching ...38 4.
APPENDIX ...39 MAINTENANCE ...39 Oiling ...39 Changing the bulb ...39 Cleaning the machine surface ...40 Cleaning the shuttle race ...40 Cleaning the feed dogs ...41 Bobbin case tension adjustment ...42 TROUBLESHOOTING ...43 INDEX ...46 4 BUTTONHOLE SEWING 31 Making the buttonhole ...31 Adjusting buitching stitching ...32 Button sewing ...33 ZIPPER INSERTION ...34 APPLIQUÉ, MONOGRAMMING AND EMBROIDERING 35 Appliqués ...35 Monogramming and embroidering ...35 DECORATIVE STITCHING 37 Gathering ...37 Shell tuck stitching ...37 Elastic stitching ...38 4.
Users Manual - English and Spanish
Page 6
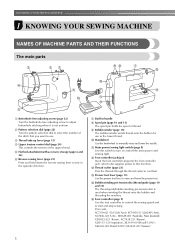
..., which also supplies power to this switch to use as the lower thread. p Foot controller (page 9) Use the foot controller to control the sewing speed and to manually raise and lower the needle. c Thread take-up lever (page 13) d Upper tension control dial (page 24) This...) 5 b Pattern selection dial (page 22) Turn the pattern selection dial to select the number of the upper thread. KNOWING YOUR SEWING MACHINE 1 KNOWING YOUR SEWING MACHINE NAMES OF MACHINE PARTS AND THEIR FUNCTIONS The main parts a Buttonhole fine-adjusting screw (page 32) Turn the buttonhole fine-adjusting ...
..., which also supplies power to this switch to use as the lower thread. p Foot controller (page 9) Use the foot controller to control the sewing speed and to manually raise and lower the needle. c Thread take-up lever (page 13) d Upper tension control dial (page 24) This...) 5 b Pattern selection dial (page 22) Turn the pattern selection dial to select the number of the upper thread. KNOWING YOUR SEWING MACHINE 1 KNOWING YOUR SEWING MACHINE NAMES OF MACHINE PARTS AND THEIR FUNCTIONS The main parts a Buttonhole fine-adjusting screw (page 32) Turn the buttonhole fine-adjusting ...

Users Manual - English and Spanish
Page 7
... 1 a toward you, and then pull the flat bed attachment out to hold the needle in place. Attach the appropriate presser foot for sewing straight seams. f Shuttle hook g Shuttle cover Open the shuttle cover to hold the presser foot holder assembly in place. If the accessories ...attachment. e Needle plate The needle plate is installed onto the presser foot holder assembly. d Feed dogs The feed dogs feed the fabric in the sewing direction. Needle and presser foot section Flat bed attachment The accessories are not in a bag, they may fall out, and be lost or damaged...
... 1 a toward you, and then pull the flat bed attachment out to hold the needle in place. Attach the appropriate presser foot for sewing straight seams. f Shuttle hook g Shuttle cover Open the shuttle cover to hold the presser foot holder assembly in place. If the accessories ...attachment. e Needle plate The needle plate is installed onto the presser foot holder assembly. d Feed dogs The feed dogs feed the fabric in the sewing direction. Needle and presser foot section Flat bed attachment The accessories are not in a bag, they may fall out, and be lost or damaged...
Users Manual - English and Spanish
Page 8
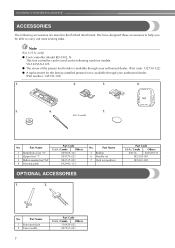
KNOWING YOUR SEWING MACHINE ACCESSORIES The following machine models: VX-1435/LX-3125. ● The screw of the presser foot holder is available through your authorized dealer. (Part code: 132730-122) ● A replacement...122) 1. 2. 3. 4. 5. 6. 7. 90/14 needle No. Part Name 5 Bobbin 6 Needle set 7 Oval screwdriver OPTIONAL ACCESSORIES 1. 2. Part Name 1 Buttonhole foot "A" 2 Zipper foot "I" 3 Button sewing foot "M" 4 Darning plate Part Code U.S.A. / Canada Others X59369-321 X59370-021 XE2137-001 XA3442-121 No. Part Name 1 Extra spool pin 2 Twin needle 7 Part Code...
KNOWING YOUR SEWING MACHINE ACCESSORIES The following machine models: VX-1435/LX-3125. ● The screw of the presser foot holder is available through your authorized dealer. (Part code: 132730-122) ● A replacement...122) 1. 2. 3. 4. 5. 6. 7. 90/14 needle No. Part Name 5 Bobbin 6 Needle set 7 Oval screwdriver OPTIONAL ACCESSORIES 1. 2. Part Name 1 Buttonhole foot "A" 2 Zipper foot "I" 3 Button sewing foot "M" 4 Darning plate Part Code U.S.A. / Canada Others X59369-321 X59370-021 XE2137-001 XA3442-121 No. Part Name 1 Extra spool pin 2 Twin needle 7 Part Code...
Users Manual - English and Spanish
Page 9
... may damage the cord and cause fire or electric shock. Fire or electric shock may result in fire, electric shock, or damage to "I". USING YOUR SEWING MACHINE Power supply precautions 1 Be sure to heat. Do not place heavy objects on . Do not subject the cord to observe the following circumstances: •... the main power first. Using other power sources may result. ● Do not touch the plug with many other appliances plugged in to them. X The sewing lamp comes on when the machine is not to be used for the power source.
... may damage the cord and cause fire or electric shock. Fire or electric shock may result in fire, electric shock, or damage to "I". USING YOUR SEWING MACHINE Power supply precautions 1 Be sure to heat. Do not place heavy objects on . Do not subject the cord to observe the following circumstances: •... the main power first. Using other power sources may result. ● Do not touch the plug with many other appliances plugged in to them. X The sewing lamp comes on when the machine is not to be used for the power source.
Users Manual - English and Spanish
Page 10
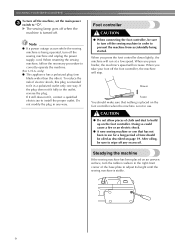
...has not been in order to "{". Doing so could cause a fire or an electric shock. ● A new sewing machine or one that nothing is placed on the foot controller when the machine is not in a polarized outlet only ...controller CAUTION ● When connecting the foot controller, be sure to wipe off the sewing machine in use for a long period of cloth and dust to fit in use. Steadying the machine If the... sewing machine has been placed on an uneven surface, turn the rubber cushion in the right-front corner...
...has not been in order to "{". Doing so could cause a fire or an electric shock. ● A new sewing machine or one that nothing is placed on the foot controller when the machine is not in a polarized outlet only ...controller CAUTION ● When connecting the foot controller, be sure to wipe off the sewing machine in use for a long period of cloth and dust to fit in use. Steadying the machine If the... sewing machine has been placed on an uneven surface, turn the rubber cushion in the right-front corner...
Users Manual - English and Spanish
Page 11
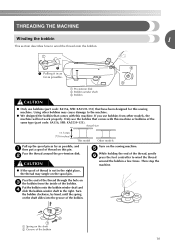
... the spool of thread on the spool pin. If you use bobbins (part code: SA156, SFB: XA5539-151) that have been designed for this sewing machine. Actual size 11.5 mm (7/16 inches) This model Other models Pull up the spool pin as far as possible. Turn the bobbin clockwise, by... thread through the hole on the shaft slides into the groove of the thread, gently f press the foot controller to the right. a Spring on the sewing machine. Then stop the machine. a Pre-tension disk b Bobbin winder shaft c Bobbin CAUTION ● Only use bobbins from the inside of the bobbin ...
... the spool of thread on the spool pin. If you use bobbins (part code: SA156, SFB: XA5539-151) that have been designed for this sewing machine. Actual size 11.5 mm (7/16 inches) This model Other models Pull up the spool pin as far as possible. Turn the bobbin clockwise, by... thread through the hole on the shaft slides into the groove of the thread, gently f press the foot controller to the right. a Spring on the sewing machine. Then stop the machine. a Pre-tension disk b Bobbin winder shaft c Bobbin CAUTION ● Only use bobbins from the inside of the bobbin ...

Users Manual - English and Spanish
Page 12
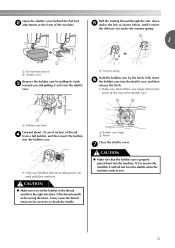
...will not operate correctly. Raise the needle to its highest position by turning a the handwheel toward you follow the instructions carefully. Memo ● When the sewing machine is started or the handwheel is not a malfunction. ● The needle bar does not move when you slide the bobbin winding shaft to loosen... are used, the machine will make a clicking sound; If you accidentally step on the foot controller and the machine starts to break. KNOWING YOUR SEWING MACHINE Trim the excess thread above the bobbin. Press the foot controller to the left and remove the bobbin. this...
...will not operate correctly. Raise the needle to its highest position by turning a the handwheel toward you follow the instructions carefully. Memo ● When the sewing machine is started or the handwheel is not a malfunction. ● The needle bar does not move when you slide the bobbin winding shaft to loosen... are used, the machine will make a clicking sound; If you accidentally step on the foot controller and the machine starts to break. KNOWING YOUR SEWING MACHINE Trim the excess thread above the bobbin. Press the foot controller to the left and remove the bobbin. this...
Users Manual - English and Spanish
Page 13
... right direction. Pull the trailing thread through the slot, down e and to the left, as shown below, until it may cause the thread tension to sew. 12
... right direction. Pull the trailing thread through the slot, down e and to the left, as shown below, until it may cause the thread tension to sew. 12
Users Manual - English and Spanish
Page 14
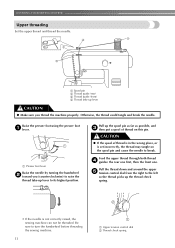
... -up the spool pin as far as possible, and c then put a spool of thread is in the wrong place, or is not correctly raised, the sewing machine can not be threaded. Be sure to raise the thread take -up the thread check spring. • If the needle is set incorrectly, the... the presser foot a lever. CAUTION ● If the spool of thread on the spool pin and cause the needle to its highest position. KNOWING YOUR SEWING MACHINE Upper threading Set the upper thread and thread the needle. Pull the thread down and around the upper e tension control dial from the right...
... -up the spool pin as far as possible, and c then put a spool of thread is in the wrong place, or is not correctly raised, the sewing machine can not be threaded. Be sure to raise the thread take -up the thread check spring. • If the needle is set incorrectly, the... the presser foot a lever. CAUTION ● If the spool of thread on the spool pin and cause the needle to its highest position. KNOWING YOUR SEWING MACHINE Upper threading Set the upper thread and thread the needle. Pull the thread down and around the upper e tension control dial from the right...
Users Manual - English and Spanish
Page 15
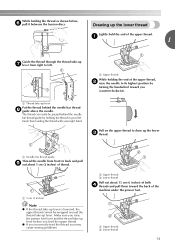
... (2 inches) Note ● If the thread take -up lever before you feed the upper thread. ● If you incorrectly feed the thread you may cause sewing problems. a Upper thread b Lower thread Pull out about 5 cm (2 inches) of thread. Drawing up lever Put the thread behind the needle bar thread guide by...
... (2 inches) Note ● If the thread take -up lever before you feed the upper thread. ● If you incorrectly feed the thread you may cause sewing problems. a Upper thread b Lower thread Pull out about 5 cm (2 inches) of thread. Drawing up lever Put the thread behind the needle bar thread guide by...
Users Manual - English and Spanish
Page 16
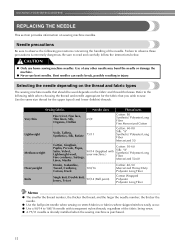
... Only use bent needles. Bent needles can easily break, possibly resulting in injury. Selecting the needle depending on the fabric and thread thickness. Sewing fabrics Needle sizes Thread sizes Very thin Fine tricot, Fine lace, Thin linen, Silk, 65/9 Organza, Chiffon Cotton: 80 Synthetic/ Polyester... thicker the thread; and the larger the needle number, the thicker the needle. ● Use the ball point needle when sewing on sewing machine needles. Needle precautions Be sure to the following precautions concerning the handling of any other needle may bend the needle or damage...
... Only use bent needles. Bent needles can easily break, possibly resulting in injury. Selecting the needle depending on the fabric and thread thickness. Sewing fabrics Needle sizes Thread sizes Very thin Fine tricot, Fine lace, Thin linen, Silk, 65/9 Organza, Chiffon Cotton: 80 Synthetic/ Polyester... thicker the thread; and the larger the needle number, the thicker the needle. ● Use the ball point needle when sewing on sewing machine needles. Needle precautions Be sure to the following precautions concerning the handling of any other needle may bend the needle or damage...
Users Manual - English and Spanish
Page 17
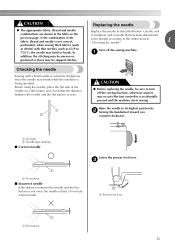
... being operated. If the combination of the needle on the previous page. a CAUTION ● Before replacing the needle, be sure to turn off the sewing machine. a Flat side b Needle type marking ■ Correct needle 1 a Flat surface ■ Incorrect needle If the distance between the needle and... 1 2 Replacing the needle Replace the needle as 65/9 to 75/11), the needle may break while the machine is not correct, particularly when sewing thick fabrics (such as denim) with a bent needle is extremely dangerous since the needle may bend or break. CAUTION ● The appropriate fabric...
... being operated. If the combination of the needle on the previous page. a CAUTION ● Before replacing the needle, be sure to turn off the sewing machine. a Flat side b Needle type marking ■ Correct needle 1 a Flat surface ■ Incorrect needle If the distance between the needle and... 1 2 Replacing the needle Replace the needle as 65/9 to 75/11), the needle may break while the machine is not correct, particularly when sewing thick fabrics (such as denim) with a bent needle is extremely dangerous since the needle may bend or break. CAUTION ● The appropriate fabric...
Users Manual - English and Spanish
Page 18
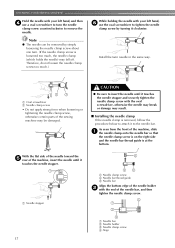
...Oval screwdriver b Needle clamp screw • Do not apply strong force when loosening or tightening the needle clamp screw, otherwise certain parts of the sewing machine may be removed by turning it touches the needle stopper. As seen from the front of the machine, slide a the needle clamp onto the... your left hand, and then d use the oval screwdriver to the needle bar. a Needle bar b Needle holder c Needle clamp screw d Align 17 KNOWING YOUR SEWING MACHINE Hold the needle with the end of the needle bar, and then tighten the needle clamp screw. Install the twin needle in the same...
...Oval screwdriver b Needle clamp screw • Do not apply strong force when loosening or tightening the needle clamp screw, otherwise certain parts of the sewing machine may be removed by turning it touches the needle stopper. As seen from the front of the machine, slide a the needle clamp onto the... your left hand, and then d use the oval screwdriver to the needle bar. a Needle bar b Needle holder c Needle clamp screw d Align 17 KNOWING YOUR SEWING MACHINE Hold the needle with the end of the needle bar, and then tighten the needle clamp screw. Install the twin needle in the same...
Users Manual - English and Spanish
Page 19
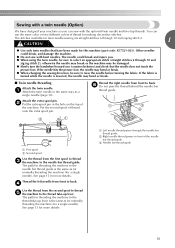
... break or the machine may be sure to the needle bar thread guide is lowered, the needle may bend or break. ● When changing the sewing direction, be damaged. ● Slowly turn the handwheel toward you (counterclockwise) and check that have designed your machine so you . ● When ... The path for a single needle). If the fabric is turned while the needle is the same as for normally threading the machine (for twin-needle sewing are straight stitches 6 through 10 and zigzag stitch 2. 1 CAUTION ● Use only twin needles that the needle does not touch the presser foot....
... break or the machine may be sure to the needle bar thread guide is lowered, the needle may bend or break. ● When changing the sewing direction, be damaged. ● Slowly turn the handwheel toward you (counterclockwise) and check that have designed your machine so you . ● When ... The path for a single needle). If the fabric is turned while the needle is the same as for normally threading the machine (for twin-needle sewing are straight stitches 6 through 10 and zigzag stitch 2. 1 CAUTION ● Use only twin needles that the needle does not touch the presser foot....
Users Manual - English and Spanish
Page 20
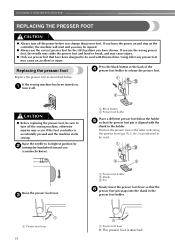
... to be read. Using other any presser feet may occur if the foot controller is positioned to release the presser foot. KNOWING YOUR SEWING MACHINE REPLACING THE PRESSER FOOT CAUTION ● Always turn it off. If you use the wrong presser foot, the needle may strike ...c a Presser foot holder b Shank c Pin Slowly lower the presser foot lever so that have chosen. Raise the presser foot lever. If the sewing machine has been turned on the controller, the machine will start and you have been designed to its highest position by b turning the handwheel toward...
... to be read. Using other any presser feet may occur if the foot controller is positioned to release the presser foot. KNOWING YOUR SEWING MACHINE REPLACING THE PRESSER FOOT CAUTION ● Always turn it off. If you use the wrong presser foot, the needle may strike ...c a Presser foot holder b Shank c Pin Slowly lower the presser foot lever so that have chosen. Raise the presser foot lever. If the sewing machine has been turned on the controller, the machine will start and you have been designed to its highest position by b turning the handwheel toward...


