Users Manual - English and Spanish
Page 2
... fabric while stitching. Return the sewing machine to the symbol "O" position which represents off , symbol "O" position when making any adjustments in this instruction manual. 16. Keep the ventilation openings of lint, dust and loose cloth. 5. To disconnect, turn the main switch to the nearest authorized dealer or service center for use as threading the needle, changing the needle, threading the bobbin, or changing the presser foot. 15. The wrong plate can cause the needle to break...
... fabric while stitching. Return the sewing machine to the symbol "O" position which represents off , symbol "O" position when making any adjustments in this instruction manual. 16. Keep the ventilation openings of lint, dust and loose cloth. 5. To disconnect, turn the main switch to the nearest authorized dealer or service center for use as threading the needle, changing the needle, threading the bobbin, or changing the presser foot. 15. The wrong plate can cause the needle to break...
Users Manual - English and Spanish
Page 3
... USING THIS MACHINE For safe operation 1. Do not store anything on plug. • Always replace the fuse cover. Do not use extension cords. Always consult the operation manual when replacing or installing any other parts to change without notice. up lever, needle, or other hot objects. 2. For a longer service life 1. For additional product information and updates, visit our web site at www.brother.com The contents of this manual and specifications...
... USING THIS MACHINE For safe operation 1. Do not store anything on plug. • Always replace the fuse cover. Do not use extension cords. Always consult the operation manual when replacing or installing any other parts to change without notice. up lever, needle, or other hot objects. 2. For a longer service life 1. For additional product information and updates, visit our web site at www.brother.com The contents of this manual and specifications...
Users Manual - English and Spanish
Page 4
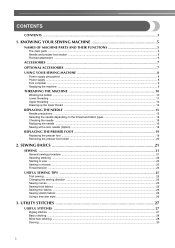
... stretch fabrics ...26 Using a free-arm style ...26 3. UTILITY STITCHES 27 USEFUL STITCHES ...27 Zigzag stitches ...27 Basic stitching ...28 Blind hem stitching ...28 Darning ...30 3 KNOWING YOUR SEWING MACHINE 5 NAMES OF MACHINE PARTS AND THEIR FUNCTIONS 5 The main parts ...5 Needle and presser foot section ...6 Flat bed attachment ...6 ACCESSORIES ...7 OPTIONAL ACCESSORIES 7 USING YOUR SEWING MACHINE 8 Power supply precautions ...8 Power supply ...8 Foot controller ...9 Steadying the machine ...9 THREADING THE MACHINE 10 Winding the bobbin ...10 Lower threading ...11 Upper threading...
... stretch fabrics ...26 Using a free-arm style ...26 3. UTILITY STITCHES 27 USEFUL STITCHES ...27 Zigzag stitches ...27 Basic stitching ...28 Blind hem stitching ...28 Darning ...30 3 KNOWING YOUR SEWING MACHINE 5 NAMES OF MACHINE PARTS AND THEIR FUNCTIONS 5 The main parts ...5 Needle and presser foot section ...6 Flat bed attachment ...6 ACCESSORIES ...7 OPTIONAL ACCESSORIES 7 USING YOUR SEWING MACHINE 8 Power supply precautions ...8 Power supply ...8 Foot controller ...9 Steadying the machine ...9 THREADING THE MACHINE 10 Winding the bobbin ...10 Lower threading ...11 Upper threading...
Users Manual - English and Spanish
Page 6
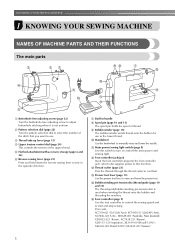
...k Main power/sewing light switch (page 8) Use this machine. j Handwheel Use the handwheel to adjust buttonhole stitching when it is used when winding the thread onto the bobbin and threading the machine. KNOWING YOUR SEWING MACHINE 1 KNOWING YOUR SEWING MACHINE NAMES OF MACHINE PARTS AND THEIR FUNCTIONS The main parts a Buttonhole fine-adjusting screw (page 32) Turn the buttonhole fine-adjusting screw to manually raise and lower the needle. i Bobbin winder (page 10) The bobbin winder winds thread onto the bobbin for use . l Foot controller jack/jack Insert the foot controller plug...
...k Main power/sewing light switch (page 8) Use this machine. j Handwheel Use the handwheel to adjust buttonhole stitching when it is used when winding the thread onto the bobbin and threading the machine. KNOWING YOUR SEWING MACHINE 1 KNOWING YOUR SEWING MACHINE NAMES OF MACHINE PARTS AND THEIR FUNCTIONS The main parts a Buttonhole fine-adjusting screw (page 32) Turn the buttonhole fine-adjusting screw to manually raise and lower the needle. i Bobbin winder (page 10) The bobbin winder winds thread onto the bobbin for use . l Foot controller jack/jack Insert the foot controller plug...

Users Manual - English and Spanish
Page 7
...6 e Needle plate The needle plate is installed onto the presser foot holder assembly. If the accessories are stored in the sewing direction. Attach the appropriate presser foot for sewing straight seams. f Shuttle hook g Shuttle cover Open the shuttle cover to hold the needle in the bag, and then store the bag inside the flat bed attachment. b Presser foot screw Use the presser foot screw to set the bobbin. d Feed dogs The feed dogs feed the fabric in a compartment inside the compartment. Needle and presser foot section Flat bed attachment The accessories are...
...6 e Needle plate The needle plate is installed onto the presser foot holder assembly. If the accessories are stored in the sewing direction. Attach the appropriate presser foot for sewing straight seams. f Shuttle hook g Shuttle cover Open the shuttle cover to hold the needle in the bag, and then store the bag inside the flat bed attachment. b Presser foot screw Use the presser foot screw to set the bobbin. d Feed dogs The feed dogs feed the fabric in a compartment inside the compartment. Needle and presser foot section Flat bed attachment The accessories are...
Users Manual - English and Spanish
Page 8
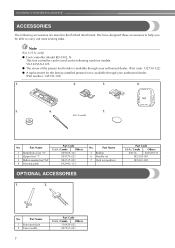
... machine models: VX-1435/LX-3125. ● The screw of the presser foot holder is available through your authorized dealer. (Part code: 132730-122) ● A replacement for the factory-installed presser foot is available through your authorized dealer. (Part number: 138135-122) 1. 2. 3. 4. 5. 6. 7. 90/14 needle No. only) ● Foot controller: Model KD-1902, N This foot controller can be able to carry out most sewing tasks. Part Name 5 Bobbin 6 Needle set 7 Oval screwdriver OPTIONAL ACCESSORIES 1. 2. Note (For U.S.A. We have designed...
... machine models: VX-1435/LX-3125. ● The screw of the presser foot holder is available through your authorized dealer. (Part code: 132730-122) ● A replacement for the factory-installed presser foot is available through your authorized dealer. (Part number: 138135-122) 1. 2. 3. 4. 5. 6. 7. 90/14 needle No. only) ● Foot controller: Model KD-1902, N This foot controller can be able to carry out most sewing tasks. Part Name 5 Bobbin 6 Needle set 7 Oval screwdriver OPTIONAL ACCESSORIES 1. 2. Note (For U.S.A. We have designed...

Users Manual - English and Spanish
Page 12
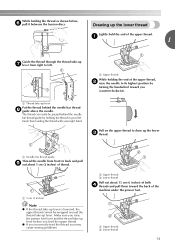
... turn the power off the foot controller. Actual size 11.5 mm (7/16 inches) This model Other models CAUTION ● Make sure you (counterclockwise) and raise the presser foot lever. 1 2 a Wound evenly b Wound poorly 11 g Lower threading Install the bobbin wound with thread. If you could be injured. Use only the enclosed bobbin or bobbins of the same type (part code: SA156, SFB: XA5539-151). Cut the thread, slide the bobbin winder shaft j to sew, you...
... turn the power off the foot controller. Actual size 11.5 mm (7/16 inches) This model Other models CAUTION ● Make sure you (counterclockwise) and raise the presser foot lever. 1 2 a Wound evenly b Wound poorly 11 g Lower threading Install the bobbin wound with thread. If you could be injured. Use only the enclosed bobbin or bobbins of the same type (part code: SA156, SFB: XA5539-151). Cut the thread, slide the bobbin winder shaft j to sew, you...
Users Manual - English and Spanish
Page 15
... lowered, the upper thread cannot be passed behind the needle bar thread h guide above the needle. a Needle bar thread guide Thread the needle from right to back and pull i out about 15 cm (6 inches) of both d threads and pull them toward you may cause sewing problems. a Upper thread b Lower thread Pull out about 5 cm (2 inches) of the machine under the presser foot. a 1 Guide the thread through the thread take -up g lever from front to left hand, then feeding the thread...
... lowered, the upper thread cannot be passed behind the needle bar thread h guide above the needle. a Needle bar thread guide Thread the needle from right to back and pull i out about 15 cm (6 inches) of both d threads and pull them toward you may cause sewing problems. a Upper thread b Lower thread Pull out about 5 cm (2 inches) of the machine under the presser foot. a 1 Guide the thread through the thread take -up g lever from front to left hand, then feeding the thread...
Users Manual - English and Spanish
Page 17
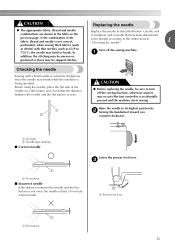
... the machine starts sewing. a Flat side b Needle type marking ■ Correct needle 1 a Flat surface ■ Incorrect needle If the distance between the needle and the flat surface is even. 1 2 Replacing the needle Replace the needle as 65/9 to be skipped stitches. Before using the needle, place the flat side of the fabric, thread and needle is being operated. Lower the presser foot lever. a CAUTION ● Before replacing the needle, be sure to its highest position by...
... the machine starts sewing. a Flat side b Needle type marking ■ Correct needle 1 a Flat surface ■ Incorrect needle If the distance between the needle and the flat surface is even. 1 2 Replacing the needle Replace the needle as 65/9 to be skipped stitches. Before using the needle, place the flat side of the fabric, thread and needle is being operated. Lower the presser foot lever. a CAUTION ● Before replacing the needle, be sure to its highest position by...
Users Manual - English and Spanish
Page 19
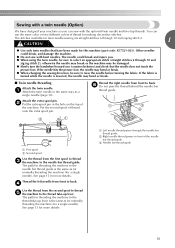
... normally threading the machine (for a single needle). Put the second spool of the needle bar thread guide. The path for threading the machine to the thread take -up lever is lowered, the needle may bend or break. ● When changing the sewing direction, be damaged. ● Slowly turn the handwheel toward you can use the same color or two different colors of thread for making decorative stitches. b Right needle thread passes in the hole on...
... normally threading the machine (for a single needle). Put the second spool of the needle bar thread guide. The path for threading the machine to the thread take -up lever is lowered, the needle may bend or break. ● When changing the sewing direction, be damaged. ● Slowly turn the handwheel toward you can use the same color or two different colors of thread for making decorative stitches. b Right needle thread passes in the hole on...
Users Manual - English and Spanish
Page 20
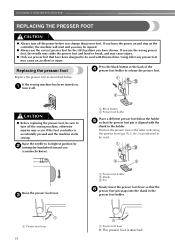
... presser foot pin snaps into the shank in the holder. Raise the presser foot lever. Raise the needle to its highest position by b turning the handwheel toward you change the presser foot. Position the presser foot so the letter indicating the presser foot type (A, I, etc.) is attached. c a Presser foot holder b Shank c Pin Slowly lower the presser foot lever so that have chosen. a Presser foot lever 19 a Presser foot lever X The presser foot is positioned to turn off the sewing machine, otherwise injuries may cause an accident or injury. a Black button b Presser foot holder...
... presser foot pin snaps into the shank in the holder. Raise the presser foot lever. Raise the needle to its highest position by b turning the handwheel toward you change the presser foot. Position the presser foot so the letter indicating the presser foot type (A, I, etc.) is attached. c a Presser foot holder b Shank c Pin Slowly lower the presser foot lever so that have chosen. a Presser foot lever 19 a Presser foot lever X The presser foot is positioned to turn off the sewing machine, otherwise injuries may cause an accident or injury. a Black button b Presser foot holder...
Users Manual - English and Spanish
Page 24
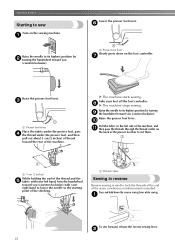
... on the sewing machine. Raise the needle to its highest position by b turning the handwheel toward you (counterclockwise). a Thread cutter Sewing in reverse Reverse sewing is used to sew Lower the presser foot lever. Press and hold down on the back of the presser foot bar to the starting point of the stitching. SEWING BASICS Starting to lock the threads at the end of the seam or wherever reinforcement is needed. g Raise the presser foot lever. a Raise the needle to its...
... on the sewing machine. Raise the needle to its highest position by b turning the handwheel toward you (counterclockwise). a Thread cutter Sewing in reverse Reverse sewing is used to sew Lower the presser foot lever. Press and hold down on the back of the presser foot bar to the starting point of the stitching. SEWING BASICS Starting to lock the threads at the end of the seam or wherever reinforcement is needed. g Raise the presser foot lever. a Raise the needle to its...

Users Manual - English and Spanish
Page 25
... upper tensioncontrol dial to change fabric or thread. For most sewing applications, no adjustment is used. If the problem persists, increase the tension in the bobbin by turning the screw clockwise with thin thread. 1 Note ● If the bobbin thread was incorrectly threaded, the upper thread may be too loose. Memo ● Before beginning to a higher number. ■ Bobbin tension is too loose Loops may need to adjust it when you start to a lower number. Solution Increase the tension...
... upper tensioncontrol dial to change fabric or thread. For most sewing applications, no adjustment is used. If the problem persists, increase the tension in the bobbin by turning the screw clockwise with thin thread. 1 Note ● If the bobbin thread was incorrectly threaded, the upper thread may be too loose. Memo ● Before beginning to a higher number. ■ Bobbin tension is too loose Loops may need to adjust it when you start to a lower number. Solution Increase the tension...

Users Manual - English and Spanish
Page 34
...) 4.8 mm (3/16 inches) Number of the button. Pull the fabric to the left side of the machine, g and then cut the upper thread and the bobbin thread at a low speed, press and hold down the reverse sewing lever to check that the needle goes into the two holes of dial 2 3 4 Attach the button sewing foot "M". UTILITY STITCHES Button sewing Buttons can be attached. Buttons with 2 or with 4 holes can be sewn on the needle plate as c shown below.
...) 4.8 mm (3/16 inches) Number of the button. Pull the fabric to the left side of the machine, g and then cut the upper thread and the bobbin thread at a low speed, press and hold down the reverse sewing lever to check that the needle goes into the two holes of dial 2 3 4 Attach the button sewing foot "M". UTILITY STITCHES Button sewing Buttons can be attached. Buttons with 2 or with 4 holes can be sewn on the needle plate as c shown below.
Users Manual - English and Spanish
Page 44
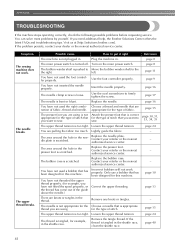
... the needle.) Correct the upper threading. sew. The upper thread tension is pushed to Move the bobbin winder shaft to put it right The machine is tangled, for example, in the shuttle race, clean the shuttle race. Lightly guide the fabric. The area around the hole in the needle plate is tangled in the shuttle race. You have not used a bobbin that has been designed for the type of stitch. Remove any knots or tangles. The upper thread tension...
... the needle.) Correct the upper threading. sew. The upper thread tension is pushed to Move the bobbin winder shaft to put it right The machine is tangled, for example, in the shuttle race, clean the shuttle race. Lightly guide the fabric. The area around the hole in the needle plate is tangled in the shuttle race. You have not used a bobbin that has been designed for the type of stitch. Remove any knots or tangles. The upper thread tension...

Users Manual - English and Spanish
Page 45
... 10 Bobbin is set incorrectly. page 11 44 Replace the needle plate. Replace the presser foot. You have not used a bobbin that has been designed for this machine. Only use a bobbin that has been designed for this machine. page 10 Bobbin is set incorrectly. Adjust the tension of the fabric. page 16 You have not wound the bobbin thread properly. The upper thread breaks. The area around the hole in the presser foot is bent or blunt. The bobbin case is...
... 10 Bobbin is set incorrectly. page 11 44 Replace the needle plate. Replace the presser foot. You have not used a bobbin that has been designed for this machine. Only use a bobbin that has been designed for this machine. page 10 Bobbin is set incorrectly. Adjust the tension of the fabric. page 16 You have not wound the bobbin thread properly. The upper thread breaks. The area around the hole in the presser foot is bent or blunt. The bobbin case is...

Users Manual - English and Spanish
Page 46
The fabric does not feed. Possible cause You have not used the right combination of stitch that is not correct for this machine. The thread tension is tangled in the shuttle race. You have not threaded the upper thread properly or fitted the bobbin properly. Adjust the tension of the upper thread. Remove the needle plate cover and clean the plate and the shuttle race. Attach the presser foot that you want to sew. Choose a thread and needle that you...
The fabric does not feed. Possible cause You have not used the right combination of stitch that is not correct for this machine. The thread tension is tangled in the shuttle race. You have not threaded the upper thread properly or fitted the bobbin properly. Adjust the tension of the upper thread. Remove the needle plate cover and clean the plate and the shuttle race. Attach the presser foot that you want to sew. Choose a thread and needle that you...

Users Manual - English and Spanish
Page 47
INDEX A accessories 7 appliqués 35 B basic stitching 28 blind hem stitching 28 bobbin 11 bobbin case 12 bobbin winder 10 button sewing 33 buttonhole foot 31 buttonhole sewing 31 C cleaning 40 D darning 30 E embroidering 35 extra spool pin 18 Fffelaetdbdeodgastta..c..h..m...e..n..t...66,, 41 26 foot controller 23 free-arm style 26 G gathering 37 H handwheel 5 J joining 38 M main parts 5 main power switch 8 monogramming 35 N needle 15 needle needle needle bcplalaarmtethpr.e.s.ac..dr.e..gw..u..i..d....e...66..,,...14. 716 O oiling 39 ...
INDEX A accessories 7 appliqués 35 B basic stitching 28 blind hem stitching 28 bobbin 11 bobbin case 12 bobbin winder 10 button sewing 33 buttonhole foot 31 buttonhole sewing 31 C cleaning 40 D darning 30 E embroidering 35 extra spool pin 18 Fffelaetdbdeodgastta..c..h..m...e..n..t...66,, 41 26 foot controller 23 free-arm style 26 G gathering 37 H handwheel 5 J joining 38 M main parts 5 main power switch 8 monogramming 35 N needle 15 needle needle needle bcplalaarmtethpr.e.s.ac..dr.e..gw..u..i..d....e...66..,,...14. 716 O oiling 39 ...
Quick Setup Guide - English and Spanish
Page 1
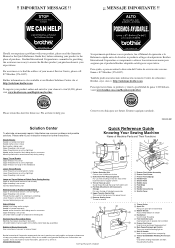
...included accessories 5 Upper Tension Control Dial This controls the tension of the upper thread 6 Reverse Sewing Lever To sew in reverse 0 A F 7 Presser Foot Holder Assembly 8 Presser Foot Screw 9 Presser Foot (Zigzag) 0 Needle Plate A Shuttle Hook B Bobbin Case C Feed Dogs D Needle E Needle Clamp Screw F Shuttle Cover Skips Stitches Needle is not sharp and/or straight Needle is inserted incorrectly Needle and/or thread for fabric being used Quick Reference Guide Knowing Your Sewing Machine Name of Machine Parts and Their Functions 3 5 12 7 8 9 C 6 E D B 4 1 Pattern Selection Dial...
...included accessories 5 Upper Tension Control Dial This controls the tension of the upper thread 6 Reverse Sewing Lever To sew in reverse 0 A F 7 Presser Foot Holder Assembly 8 Presser Foot Screw 9 Presser Foot (Zigzag) 0 Needle Plate A Shuttle Hook B Bobbin Case C Feed Dogs D Needle E Needle Clamp Screw F Shuttle Cover Skips Stitches Needle is not sharp and/or straight Needle is inserted incorrectly Needle and/or thread for fabric being used Quick Reference Guide Knowing Your Sewing Machine Name of Machine Parts and Their Functions 3 5 12 7 8 9 C 6 E D B 4 1 Pattern Selection Dial...

Quick Setup Guide - English and Spanish
Page 2
... Long Fiber Uses common replacement accessories: Bobbin: Class 15 Needle: Standard sewing machine needles Light Bulb: Small screw base sewing machine bulb Remove the hook by turning the handwheel. Replace the bobbin case. Bombilla: Para máquina de coser con base roscada pequeña Insert the retaining ring with your finger with the top opening around the bobbin winder pre-tension disc. Place the thread spool on the pin on the front of Sewing Fabrics, Needles and Thread Combinations Very Thin Sewing Fabrics Fine...
... Long Fiber Uses common replacement accessories: Bobbin: Class 15 Needle: Standard sewing machine needles Light Bulb: Small screw base sewing machine bulb Remove the hook by turning the handwheel. Replace the bobbin case. Bombilla: Para máquina de coser con base roscada pequeña Insert the retaining ring with your finger with the top opening around the bobbin winder pre-tension disc. Place the thread spool on the pin on the front of Sewing Fabrics, Needles and Thread Combinations Very Thin Sewing Fabrics Fine...


