
Users Manual - English
Page 2
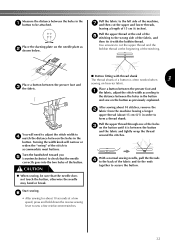
... threading the needle, changing the needle, threading the bobbin, or changing the presser foot. 15.Always unplug the sewing machine from all instructions before changing the light bulb. Always unplug this machine outdoors. 7. It may deflect the needle causing it is used as described in this manual. Use this machine to persons: 1. Return the sewing machine to the symbol "O" position which represents off , symbol "O" position when making any other user service adjustments mentioned in this instruction manual. 16.This sewing machine is being used...
... threading the needle, changing the needle, threading the bobbin, or changing the presser foot. 15.Always unplug the sewing machine from all instructions before changing the light bulb. Always unplug this machine outdoors. 7. It may deflect the needle causing it is used as described in this manual. Use this machine to persons: 1. Return the sewing machine to the symbol "O" position which represents off , symbol "O" position when making any other user service adjustments mentioned in this instruction manual. 16.This sewing machine is being used...

Users Manual - English
Page 3
... to clean the case. Do not drop or hit the machine. 4. If the problem persists, please consult your eye on plug. • Always replace the fuse cover. For additional product information and updates, visit our web site at www.brother.com The contents of this manual and specifications of replacing the plug fuse, use • Maintaining the machine • Leaving the machine unattended 3. FOR USERS IN...
... to clean the case. Do not drop or hit the machine. 4. If the problem persists, please consult your eye on plug. • Always replace the fuse cover. For additional product information and updates, visit our web site at www.brother.com The contents of this manual and specifications of replacing the plug fuse, use • Maintaining the machine • Leaving the machine unattended 3. FOR USERS IN...

Users Manual - English
Page 4
... sewing ...25 Changing the sewing direction ...25 Sewing curves ...25 Sewing thick fabrics ...25 Sewing thin fabrics ...26 Sewing stretch fabrics ...26 Using a free-arm style ...26 3 KNOWING YOUR SEWING MACHINE 5 NAMES OF MACHINE PARTS AND THEIR FUNCTIONS 5 The main parts ...5 Needle and presser foot section ...6 Flat bed attachment ...6 ACCESSORIES ...7 OPTIONAL ACCESSORIES 7 USING YOUR SEWING MACHINE 8 Power supply precautions ...8 Power supply ...8 Foot controller ...9 Steadying the machine ...9 THREADING THE MACHINE 10 Winding the bobbin ...10 Lower threading ...11 Upper threading...
... sewing ...25 Changing the sewing direction ...25 Sewing curves ...25 Sewing thick fabrics ...25 Sewing thin fabrics ...26 Sewing stretch fabrics ...26 Using a free-arm style ...26 3 KNOWING YOUR SEWING MACHINE 5 NAMES OF MACHINE PARTS AND THEIR FUNCTIONS 5 The main parts ...5 Needle and presser foot section ...6 Flat bed attachment ...6 ACCESSORIES ...7 OPTIONAL ACCESSORIES 7 USING YOUR SEWING MACHINE 8 Power supply precautions ...8 Power supply ...8 Foot controller ...9 Steadying the machine ...9 THREADING THE MACHINE 10 Winding the bobbin ...10 Lower threading ...11 Upper threading...
Users Manual - English
Page 6
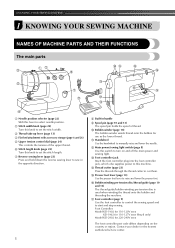
... power and sewing light. n Thread cutter (page 23) Pass the threads through the thread cutter to raise and lower the presser foot. o Presser foot lever (page 13) Use the presser foot lever to cut them. q Foot controller (page 9) Use the foot controller to control the sewing speed and to sew in the opposite direction. 5 h Built-in handle i Spool pin (page 10 and 13) The spool pin holds the spool of the upper thread. g Reverse sewing lever (page 23) Press and hold down the reverse sewing lever to start and stop sewing. p Bobbin winding pre-tension disc/thread guide...
... power and sewing light. n Thread cutter (page 23) Pass the threads through the thread cutter to raise and lower the presser foot. o Presser foot lever (page 13) Use the presser foot lever to cut them. q Foot controller (page 9) Use the foot controller to control the sewing speed and to sew in the opposite direction. 5 h Built-in handle i Spool pin (page 10 and 13) The spool pin holds the spool of the upper thread. g Reverse sewing lever (page 23) Press and hold down the reverse sewing lever to start and stop sewing. p Bobbin winding pre-tension disc/thread guide...
Users Manual - English
Page 7
...the bag inside the flat bed attachment. h Bobbin case i Needle j Needle bar thread guide k Needle clamp screw Use the needle clamp screw to set the bobbin. If the accessories are stored in place. c Presser foot (Zigzag) The presser foot applies pressure consistently on the fabric as the sewing takes place. Attach the appropriate presser foot for sewing straight seams. f Shuttle hook g Shuttle cover Open the shuttle cover to hold the presser foot holder assembly in a compartment inside the compartment. d Feed dogs The feed dogs feed the fabric in a bag, they may fall out...
...the bag inside the flat bed attachment. h Bobbin case i Needle j Needle bar thread guide k Needle clamp screw Use the needle clamp screw to set the bobbin. If the accessories are stored in place. c Presser foot (Zigzag) The presser foot applies pressure consistently on the fabric as the sewing takes place. Attach the appropriate presser foot for sewing straight seams. f Shuttle hook g Shuttle cover Open the shuttle cover to hold the presser foot holder assembly in a compartment inside the compartment. d Feed dogs The feed dogs feed the fabric in a bag, they may fall out...

Users Manual - English
Page 8
... spool pin 2 Twin needle Part Code Americas Others 130920-021 131096-121 7 Note (For U.S.A. KNOWING YOUR SEWING MACHINE ACCESSORIES The following machine models: LS-2000/LS2250PRW/LS2300PRW/LS2350. ● The screw of the presser foot holder is available through your authorized dealer. (Part code: 132730-122) ● A replacement for the factory-installed presser foot is available through your authorized dealer. (Part number: 138135-122) 1. 2. 3. 4. 90/14 needle No. Part Name 1 Zipper foot "I" 2 Darning plate Part Code Americas Others No. We have designed these...
... spool pin 2 Twin needle Part Code Americas Others 130920-021 131096-121 7 Note (For U.S.A. KNOWING YOUR SEWING MACHINE ACCESSORIES The following machine models: LS-2000/LS2250PRW/LS2300PRW/LS2350. ● The screw of the presser foot holder is available through your authorized dealer. (Part code: 132730-122) ● A replacement for the factory-installed presser foot is available through your authorized dealer. (Part number: 138135-122) 1. 2. 3. 4. 90/14 needle No. Part Name 1 Zipper foot "I" 2 Darning plate Part Code Americas Others No. We have designed these...

Users Manual - English
Page 12
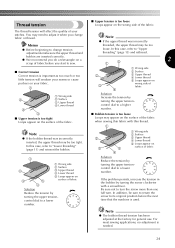
... the bobbin winding shaft to sew, you (counterclockwise) and raise the presser foot lever. 11 Cut the thread, slide the bobbin winder shaft j to its highest position by turning a the handwheel toward you could be injured. ● -" Moving parts - Raise the needle to the left and remove the bobbin. 1 2 a Wound evenly b Wound poorly Lower threading Install the bobbin wound with thread. Then stop the machine. a 1 cm (1/2 inch) CAUTION ● Make sure...
... the bobbin winding shaft to sew, you (counterclockwise) and raise the presser foot lever. 11 Cut the thread, slide the bobbin winder shaft j to its highest position by turning a the handwheel toward you could be injured. ● -" Moving parts - Raise the needle to the left and remove the bobbin. 1 2 a Wound evenly b Wound poorly Lower threading Install the bobbin wound with thread. Then stop the machine. a 1 cm (1/2 inch) CAUTION ● Make sure...

Users Manual - English
Page 17
... replacing the needle, be skipped stitches. Checking the needle Sewing with thin needles (such as described below. a Presser foot lever 1 a Flat surface 16 Raise the needle to turn off the sewing machine. Before using the needle, place the flat side of the fabric, thread and needle is not correct, particularly when sewing thick fabrics (such as denim) with a bent needle is extremely dangerous since the needle may break while the machine is being operated...
... replacing the needle, be skipped stitches. Checking the needle Sewing with thin needles (such as described below. a Presser foot lever 1 a Flat surface 16 Raise the needle to turn off the sewing machine. Before using the needle, place the flat side of the fabric, thread and needle is not correct, particularly when sewing thick fabrics (such as denim) with a bent needle is extremely dangerous since the needle may break while the machine is being operated...
Users Manual - English
Page 19
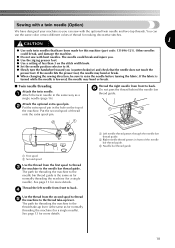
... threading the machine to the needle bar thread guide is lowered, the needle may bend or break. ● When changing the sewing direction, be sure to the thread take -up lever. If the needle hits the presser foot, the needle may bend or break. ■ Twin needle threading Attach the twin needle. a Attach the twin needle in front of the needle bar thread guide. b Right needle thread passes in the same way as for normally threading the machine (for a single needle). a First spool b Second spool Use the thread from the second spool...
... threading the machine to the needle bar thread guide is lowered, the needle may bend or break. ● When changing the sewing direction, be sure to the thread take -up lever. If the needle hits the presser foot, the needle may bend or break. ■ Twin needle threading Attach the twin needle. a Attach the twin needle in front of the needle bar thread guide. b Right needle thread passes in the same way as for normally threading the machine (for a single needle). a First spool b Second spool Use the thread from the second spool...

Users Manual - English
Page 20
... you change the presser foot. Position the presser foot so the letter indicating the presser foot type (A, I, etc.) is aligned with this machine. Raise the presser foot lever. Replace the presser foot as described below the holder e so that the presser foot pin is positioned to release the presser foot. a Black button b Presser foot holder Place a different presser foot below . KNOWING YOUR SEWING MACHINE REPLACING THE PRESSER FOOT CAUTION ● Always turn off the power before you (counterclockwise). If the sewing machine has been turned on the controller...
... you change the presser foot. Position the presser foot so the letter indicating the presser foot type (A, I, etc.) is aligned with this machine. Raise the presser foot lever. Replace the presser foot as described below the holder e so that the presser foot pin is positioned to release the presser foot. a Black button b Presser foot holder Place a different presser foot below . KNOWING YOUR SEWING MACHINE REPLACING THE PRESSER FOOT CAUTION ● Always turn off the power before you (counterclockwise). If the sewing machine has been turned on the controller...
Users Manual - English
Page 23
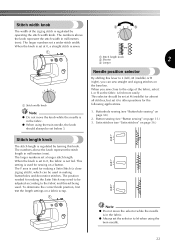
... making a Satin Stitch (a close to 0, the fabric is in the fabric. ● Always set at M (middle) for almost all stitches, but set below 3. The numbers above the knob represent the stitch length in making the Satin Stitch may need to be set at 0, a straight stitch is regulated by turning this lever to other positions for sewing on page 30.) 2. The numbers above the knob represent the stitch width in the fabric. ● When using the twin needle...
... making a Satin Stitch (a close to 0, the fabric is in the fabric. ● Always set at M (middle) for almost all stitches, but set below 3. The numbers above the knob represent the stitch length in making the Satin Stitch may need to be set at 0, a straight stitch is regulated by turning this lever to other positions for sewing on page 30.) 2. The numbers above the knob represent the stitch width in the fabric. ● When using the twin needle...

Users Manual - English
Page 24
... the needle to lock the threads at the end of the stitching. Raise the presser foot lever. a Thread cutter Sewing in reverse Reverse sewing is used to its highest position by i turning the handwheel toward you (counterclockwise). SEWING BASICS Starting to the starting point of the seam or wherever reinforcement is needed. a Raise the needle to cut them. To sew forward, release the reverse sewing b lever. 23 f Turn on the foot controller. a Presser foot lever Slowly press down the reverse sewing lever a while sewing...
... the needle to lock the threads at the end of the stitching. Raise the presser foot lever. a Thread cutter Sewing in reverse Reverse sewing is used to its highest position by i turning the handwheel toward you (counterclockwise). SEWING BASICS Starting to the starting point of the seam or wherever reinforcement is needed. a Raise the needle to cut them. To sew forward, release the reverse sewing b lever. 23 f Turn on the foot controller. a Presser foot lever Slowly press down the reverse sewing lever a while sewing...
Users Manual - English
Page 25
... threaded, the upper thread may need to adjust it when you change tension adjustments make sure the upper thread and bobbin are inserted correctly. ● We recommend you start to a lower number. Be sure not to "Lower threading" (page 11) and reinsert the bobbin. 1 2 3 a Wrong side b Surface c Upper thread d Lower thread e Loops appear on the wrong side of the fabric. Thread tension ■ Upper tension is too loose Loops appear on 5 surface of fabric 4 Solution Reduce the tension by turning the upper tension- control dial...
... threaded, the upper thread may need to adjust it when you change tension adjustments make sure the upper thread and bobbin are inserted correctly. ● We recommend you start to a lower number. Be sure not to "Lower threading" (page 11) and reinsert the bobbin. 1 2 3 a Wrong side b Surface c Upper thread d Lower thread e Loops appear on the wrong side of the fabric. Thread tension ■ Upper tension is too loose Loops appear on 5 surface of fabric 4 Solution Reduce the tension by turning the upper tension- control dial...
Users Manual - English
Page 28
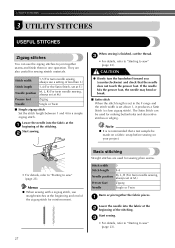
... Satin Stitch, set at F.) Needle position M, L, R (For twin needle sewing, always set at M.) Presser foot Zigzag Needle Single or Twin Baste or pin together the fabric pieces. c • For details, refer to "Starting to sew" (page 23). Stitch width 1-5 (For twin needle sewing, always use the zigzag stitches to join together seams and finish them in the F range and the stitch width is finished, cut the thread. If the needle hits the presser foot, the needle may bend or break. ■ Satin stitch When the stitch length is set...
... Satin Stitch, set at F.) Needle position M, L, R (For twin needle sewing, always set at M.) Presser foot Zigzag Needle Single or Twin Baste or pin together the fabric pieces. c • For details, refer to "Starting to sew" (page 23). Stitch width 1-5 (For twin needle sewing, always use the zigzag stitches to join together seams and finish them in the F range and the stitch width is finished, cut the thread. If the needle hits the presser foot, the needle may bend or break. ■ Satin stitch When the stitch length is set...
Users Manual - English
Page 31
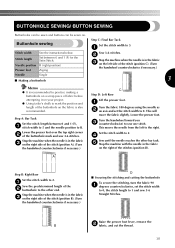
... Set the stitch width to sew one stitch. Step A: Bar Tack Set the stitch length between 0 and 1 (F) for the Satin Stitch. d Sew until the needle reaches the other end. Stop the machine when the needle is in the fabric on . a Sew the predetermined length of the b buttonhole to 0. Needle position R (right position) Presser foot Zigzag Sew 3-6 stitches. Raise the presser foot lever, remove the B b fabric, and cut the thread. 30 BUTTONHOLE SEWING/ BUTTON SEWING Buttonholes can be sewn and buttons can be sewn on the right of the stitches (position...
... Set the stitch width to sew one stitch. Step A: Bar Tack Set the stitch length between 0 and 1 (F) for the Satin Stitch. d Sew until the needle reaches the other end. Stop the machine when the needle is in the fabric on . a Sew the predetermined length of the b buttonhole to 0. Needle position R (right position) Presser foot Zigzag Sew 3-6 stitches. Raise the presser foot lever, remove the B b fabric, and cut the thread. 30 BUTTONHOLE SEWING/ BUTTON SEWING Buttonholes can be sewn and buttons can be sewn on the right of the stitches (position...
Users Manual - English
Page 33
... a thread shank. Place a button between the presser foot and a the fabric, adjust the stitch width according to the distance between the holes in the button and sew on the needle plate as previously explained. Turning the width knob will need to adjust the stitch width to d match the distance between the presser foot and c the fabric. ■ Button fitting with the bobbin thread. Pull the upper thread through one of the holes c on heavier fabric. Start sewing. Measure...
... a thread shank. Place a button between the presser foot and a the fabric, adjust the stitch width according to the distance between the holes in the button and sew on the needle plate as previously explained. Turning the width knob will need to adjust the stitch width to d match the distance between the presser foot and c the fabric. ■ Button fitting with the bobbin thread. Pull the upper thread through one of the holes c on heavier fabric. Start sewing. Measure...

Users Manual - English
Page 43
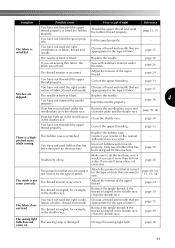
... type of stitch. - Replace the needle plate. Contact your dealer or the nearest authorized service center. Replace the bobbin case. Only use a bobbin that you are using is loose. There are pulling the fabric too much. Remove any knots or tangles. Loosen the upper thread tension. Remove the tangle thread. If you are using . Insert the needle properly. Choose a thread and needle that is not plugged in. page 24 - - The area around the hole in the presser foot...
... type of stitch. - Replace the needle plate. Contact your dealer or the nearest authorized service center. Replace the bobbin case. Only use a bobbin that you are using is loose. There are pulling the fabric too much. Remove any knots or tangles. Loosen the upper thread tension. Remove the tangle thread. If you are using . Insert the needle properly. Choose a thread and needle that is not plugged in. page 24 - - The area around the hole in the presser foot...
Users Manual - English
Page 44
... nearest authorised service center. The area around the hole in the presser foot is scratched. Replace the bobbin case. Contact your retailer or the nearest authorised service center. You have not used a bobbin that has been designed for this machine. Wind the bobbin thread properly. The lower thread is tangled. The thread is tangled on it right The needle is set incorrectly. Correct the upper threading. The thread tension is incorrect. Attach the presser-foot holder properly. page...
... nearest authorised service center. The area around the hole in the presser foot is scratched. Replace the bobbin case. Contact your retailer or the nearest authorised service center. You have not used a bobbin that has been designed for this machine. Wind the bobbin thread properly. The lower thread is tangled. The thread is tangled on it right The needle is set incorrectly. Correct the upper threading. The thread tension is incorrect. Attach the presser-foot holder properly. page...
Users Manual - English
Page 45
.... Remove the tangle thread. page 15 The needle is wrinkled. Adjust the tension of fabric, thread and needle. Remove the needle plate cover and clean the plate and the shuttle race. Contact your retailer or the nearest authorized service center. You have not threaded the upper thread properly or fitted the bobbin properly. Make sure to oil the machine once a week if you are sewing thin fabric, the stitch is damaged. Thread the upper thread and wind the bobbin thread properly. The fabric...
.... Remove the tangle thread. page 15 The needle is wrinkled. Adjust the tension of fabric, thread and needle. Remove the needle plate cover and clean the plate and the shuttle race. Contact your retailer or the nearest authorized service center. You have not threaded the upper thread properly or fitted the bobbin properly. Make sure to oil the machine once a week if you are sewing thin fabric, the stitch is damaged. Thread the upper thread and wind the bobbin thread properly. The fabric...

Users Manual - English
Page 47
...extra spool pin 18 F feed dogs flat bed attachment 66,, 40 26 foot controller 23 free-arm style 26 G gathering 36 H handwheel 5 M main parts 5 main power switch 8 monogramming 34 N needle 15 needle needle needle pbcllaaarmtethpr.e.s.ac..dr.e..wg..u..i..d....e...66..,,...14. 706 needle position selector 22 O oiling 38 P presser presser presser foot foot foot holder lever 656,,, 19 20 13 pre-tension disk 10 R relative chart of sewing fabrics, needles and threads .....15 reverse sewing lever 23 S sewing machine needles 15 shuttle hook removal 40...
...extra spool pin 18 F feed dogs flat bed attachment 66,, 40 26 foot controller 23 free-arm style 26 G gathering 36 H handwheel 5 M main parts 5 main power switch 8 monogramming 34 N needle 15 needle needle needle pbcllaaarmtethpr.e.s.ac..dr.e..wg..u..i..d....e...66..,,...14. 706 needle position selector 22 O oiling 38 P presser presser presser foot foot foot holder lever 656,,, 19 20 13 pre-tension disk 10 R relative chart of sewing fabrics, needles and threads .....15 reverse sewing lever 23 S sewing machine needles 15 shuttle hook removal 40...


