
Users Manual - English
Page 2
... making any openings. 6. Keep the ventilation openings of electric shock: 1. To disconnect, turn the main switch to persons: 1. The sewing machine should always be left unattended when plugged in the needle area, such as a toy. WARNING - Do not unplug by young children ...or impaired persons without supervision. 1 IMPORTANT SAFETY INSTRUCTIONS When using the sewing machine, basic safety precautions should never be followed, including the following: "Read all moving parts. Use only accessories recommended by or near children...
... making any openings. 6. Keep the ventilation openings of electric shock: 1. To disconnect, turn the main switch to persons: 1. The sewing machine should always be left unattended when plugged in the needle area, such as a toy. WARNING - Do not unplug by young children ...or impaired persons without supervision. 1 IMPORTANT SAFETY INSTRUCTIONS When using the sewing machine, basic safety precautions should never be followed, including the following: "Read all moving parts. Use only accessories recommended by or near children...

Users Manual - English
Page 3
... be supervised to ensure that they do not play with the appliance. Be sure to keep your local authorized Brother dealer. Benzene, thinner, and scouring powders can damage the case and machine, and should never be used. 3. FOR USERS IN THE UK, EIRE, MALTA AND CYPRUS ONLY IMPORTANT &#... not use extension cords. 17.Young children should be supervised to ensure that they do not play with this sewing machine. SAVE THESE INSTRUCTIONS This sewing machine is required, first follow the troubleshooting table in the back of the appliance by ASTA to BS 1362, i.e. This appliance is not...
... be supervised to ensure that they do not play with the appliance. Be sure to keep your local authorized Brother dealer. Benzene, thinner, and scouring powders can damage the case and machine, and should never be used. 3. FOR USERS IN THE UK, EIRE, MALTA AND CYPRUS ONLY IMPORTANT &#... not use extension cords. 17.Young children should be supervised to ensure that they do not play with this sewing machine. SAVE THESE INSTRUCTIONS This sewing machine is required, first follow the troubleshooting table in the back of the appliance by ASTA to BS 1362, i.e. This appliance is not...

Users Manual - English
Page 4
... AND THEIR FUNCTIONS 5 The main parts ...5 Needle and presser foot section ...6 Flat bed attachment ...6 ACCESSORIES ...7 OPTIONAL ACCESSORIES 7 USING YOUR SEWING MACHINE 8 Power supply precautions ...8 Power supply ...8 Foot controller ...9 Steadying the machine ...9 THREADING THE MACHINE 10 Winding the bobbin ...10 Lower threading ...11 Upper threading ...13 Drawing up the lower thread ...14 REPLACING THE NEEDLE...
... AND THEIR FUNCTIONS 5 The main parts ...5 Needle and presser foot section ...6 Flat bed attachment ...6 ACCESSORIES ...7 OPTIONAL ACCESSORIES 7 USING YOUR SEWING MACHINE 8 Power supply precautions ...8 Power supply ...8 Foot controller ...9 Steadying the machine ...9 THREADING THE MACHINE 10 Winding the bobbin ...10 Lower threading ...11 Upper threading ...13 Drawing up the lower thread ...14 REPLACING THE NEEDLE...
Users Manual - English
Page 6
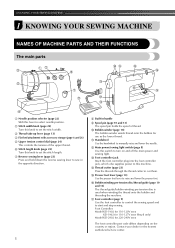
... the lower thread. q Foot controller (page 9) Use the foot controller to control the sewing speed and to select needle position. KNOWING YOUR SEWING MACHINE 1 KNOWING YOUR SEWING MACHINE NAMES OF MACHINE PARTS AND THEIR FUNCTIONS The main parts a Needle position selector (page 22) Shift this ...lever to start and stop sewing. m Foot controller jack Insert the foot controller plug into ...
... the lower thread. q Foot controller (page 9) Use the foot controller to control the sewing speed and to select needle position. KNOWING YOUR SEWING MACHINE 1 KNOWING YOUR SEWING MACHINE NAMES OF MACHINE PARTS AND THEIR FUNCTIONS The main parts a Needle position selector (page 22) Shift this ...lever to start and stop sewing. m Foot controller jack Insert the foot controller plug into ...

Users Manual - English
Page 8
... Part Name 1 Zipper foot "I" 2 Darning plate Part Code Americas Others No. We have designed these accessories to carry out most sewing tasks. only) ● Foot controller: Model KD-1902, N This foot controller can be able to help you be used on... (Others) 3 Bobbin XA3442-121 4 Needle set Part Code Americas Others SA156 (Americas) SFB: SABOBBIN (U.S.A. KNOWING YOUR SEWING MACHINE ACCESSORIES The following machine models: LS-2000/LS2250PRW/LS2300PRW/LS2350. ● The screw of the presser foot holder is available through your authorized dealer. (Part code: 132730-122) ...
... Part Name 1 Zipper foot "I" 2 Darning plate Part Code Americas Others No. We have designed these accessories to carry out most sewing tasks. only) ● Foot controller: Model KD-1902, N This foot controller can be able to help you be used on... (Others) 3 Bobbin XA3442-121 4 Needle set Part Code Americas Others SA156 (Americas) SFB: SABOBBIN (U.S.A. KNOWING YOUR SEWING MACHINE ACCESSORIES The following machine models: LS-2000/LS2250PRW/LS2300PRW/LS2350. ● The screw of the presser foot holder is available through your authorized dealer. (Part code: 132730-122) ...

Users Manual - English
Page 9
... a bad connection or a disconnection • During electrical storms CAUTION ● Do not use . ● Unplug the power cord if the machine is turned on the cord, into a wall outlet. USING YOUR SEWING MACHINE Power supply precautions 1 Be sure to "I". WARNING ● Use only regular household electricity for a long period of time. Do not...
... a bad connection or a disconnection • During electrical storms CAUTION ● Do not use . ● Unplug the power cord if the machine is turned on the cord, into a wall outlet. USING YOUR SEWING MACHINE Power supply precautions 1 Be sure to "I". WARNING ● Use only regular household electricity for a long period of time. Do not...

Users Manual - English
Page 10
... Slower Faster You should be oiled as described on the foot controller. Steadying the machine If the sewing machine has been placed on the foot controller when the machine is stable. 9 KNOWING YOUR SEWING MACHINE To turn off the sewing machine and unplug the power supply cord. Do not modify the plug in any excess ...of the base plate to "{". When you take your foot off . Doing so could cause a fire or an electric shock. ● A new sewing machine or one that nothing is placed on an uneven surface, turn the rubber cushion in use . To reduce the risk of cloth and dust to...
... Slower Faster You should be oiled as described on the foot controller. Steadying the machine If the sewing machine has been placed on the foot controller when the machine is stable. 9 KNOWING YOUR SEWING MACHINE To turn off the sewing machine and unplug the power supply cord. Do not modify the plug in any excess ...of the base plate to "{". When you take your foot off . Doing so could cause a fire or an electric shock. ● A new sewing machine or one that nothing is placed on an uneven surface, turn the rubber cushion in use . To reduce the risk of cloth and dust to...

Users Manual - English
Page 11
a Spring on the shaft b Groove of the bobbin. • Align the notch on bobbin to the spring on the sewing machine. e 10 THREADING THE MACHINE Winding the bobbin 1 This section describes how to the right. Actual size This model a 11.5 mm (7/16 inches) Pull up the spool pin as far ... the shaft slides into the groove of the bobbin Turn on the shaft. Pass the end of thread on c the bobbin from other models, the machine will not work properly. b Click! a Pre-tension disk CAUTION ● If the spool of thread is not in as far as possible, and a then put...
a Spring on the shaft b Groove of the bobbin. • Align the notch on bobbin to the spring on the sewing machine. e 10 THREADING THE MACHINE Winding the bobbin 1 This section describes how to the right. Actual size This model a 11.5 mm (7/16 inches) Pull up the spool pin as far ... the shaft slides into the groove of the bobbin Turn on the shaft. Pass the end of thread on c the bobbin from other models, the machine will not work properly. b Click! a Pre-tension disk CAUTION ● If the spool of thread is not in as far as possible, and a then put...

Users Manual - English
Page 12
...the needle to its highest position by turning a the handwheel toward you slide the bobbin winding shaft to sew, you could be injured. ● -" Moving parts - Memo ● When the sewing machine is started or the handwheel is turned after winding the thread around the bobbin and cause the needle to ... the power off the foot controller. h When the bobbin seems full and begins i spinning slowly, take your foot off while threading the machine. KNOWING YOUR SEWING MACHINE While holding the end of injury. CAUTION ● Winding the bobbin improperly may tangle around the bobbin, the...
...the needle to its highest position by turning a the handwheel toward you slide the bobbin winding shaft to sew, you could be injured. ● -" Moving parts - Memo ● When the sewing machine is started or the handwheel is turned after winding the thread around the bobbin and cause the needle to ... the power off the foot controller. h When the bobbin seems full and begins i spinning slowly, take your foot off while threading the machine. KNOWING YOUR SEWING MACHINE While holding the end of injury. CAUTION ● Winding the bobbin improperly may tangle around the bobbin, the...
Users Manual - English
Page 13
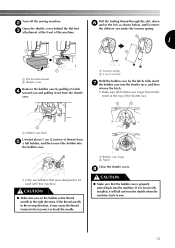
.... • Only use bobbins that the bobbin case is incorrectly installed, it may cause the thread tension to sew. 12 a Bobbin case finger b Notch Close the shuttle cover. Turn off the sewing machine. b Open the shuttle cover behind the flat bed c attachment at the top of the shuttle race. a... Bobbin case latch Unwind about 5 cm (2 inches) of the machine. If it is properly placed back into the notch at the ...
.... • Only use bobbins that the bobbin case is incorrectly installed, it may cause the thread tension to sew. 12 a Bobbin case finger b Notch Close the shuttle cover. Turn off the sewing machine. b Open the shuttle cover behind the flat bed c attachment at the top of the shuttle race. a... Bobbin case latch Unwind about 5 cm (2 inches) of the machine. If it is properly placed back into the notch at the ...

Users Manual - English
Page 14
...thread check spring. While holding the thread from the right to raise the thread take -up lever to turn the handwheel before threading the sewing machine. a Upper tension control dial b Thread check spring 13 Otherwise, the thread could tangle and break the needle. b CAUTION ● ...• Make sure that the spring in the wrong place, or is not correctly raised, the sewing machine can not be threaded. a Presser foot lever Raise the needle by turning the handwheel c toward you thread the machine properly. a Spool pin b Thread guide (rear) c Thread guide (front) d Thread take ...
...thread check spring. While holding the thread from the right to raise the thread take -up lever to turn the handwheel before threading the sewing machine. a Upper tension control dial b Thread check spring 13 Otherwise, the thread could tangle and break the needle. b CAUTION ● ...• Make sure that the spring in the wrong place, or is not correctly raised, the sewing machine can not be threaded. a Presser foot lever Raise the needle by turning the handwheel c toward you thread the machine properly. a Spool pin b Thread guide (rear) c Thread guide (front) d Thread take ...
Users Manual - English
Page 16
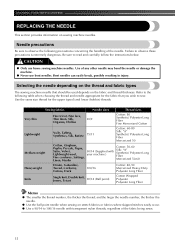
...needles. and the larger the needle number, the thicker the needle. ● Use the ball point needle when sewing on the thread and fabric types The sewing machine needle that you wish to the following precautions concerning the handling of any other needle may bend the needle or damage... the machine. ● Never use home sewing machine needles. Selecting the needle depending on stretch fabrics or fabrics where skipped stitches easily occur. ● Use a 90/14 to...
...needles. and the larger the needle number, the thicker the needle. ● Use the ball point needle when sewing on the thread and fabric types The sewing machine needle that you wish to the following precautions concerning the handling of any other needle may bend the needle or damage... the machine. ● Never use home sewing machine needles. Selecting the needle depending on stretch fabrics or fabrics where skipped stitches easily occur. ● Use a 90/14 to...

Users Manual - English
Page 17
Raise the needle to be uneven or puckered or there may break while the machine is accidentally pressed and the machine starts sewing. Checking the needle Sewing with thin needles (such as 65/9 to 75/11), the needle may occur if the foot controller is being operated. Use..., thread and needle combinations are shown in "Checking the needle" . 1 Turn off the sewing machine, otherwise injuries may bend or break. In addition, the stitching may be straight according to turn off the sewing machine. Do not use a bent needle. If the combination of the needle on the previous page...
Raise the needle to be uneven or puckered or there may break while the machine is accidentally pressed and the machine starts sewing. Checking the needle Sewing with thin needles (such as 65/9 to 75/11), the needle may occur if the foot controller is being operated. Use..., thread and needle combinations are shown in "Checking the needle" . 1 Turn off the sewing machine, otherwise injuries may bend or break. In addition, the stitching may be straight according to turn off the sewing machine. Do not use a bent needle. If the combination of the needle on the previous page...
Users Manual - English
Page 18
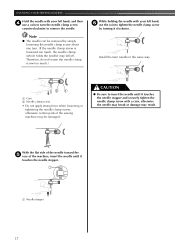
KNOWING YOUR SEWING MACHINE Hold the needle with your left hand, f use a coin to insert the needle ...screw • Do not apply strong force when loosening or tightening the needle clamp screw, otherwise certain parts of the machine, insert the needle until it touches the needle stopper and securely tighten the needle clamp screw with a coin, otherwise ...stopper. Note ● The needle can be damaged. With the flat side of the needle toward the e rear of the sewing machine may result. a Needle stopper 17 CAUTION ● Be sure to turn . (If the needle clamp screw is loosened ...
KNOWING YOUR SEWING MACHINE Hold the needle with your left hand, f use a coin to insert the needle ...screw • Do not apply strong force when loosening or tightening the needle clamp screw, otherwise certain parts of the machine, insert the needle until it touches the needle stopper and securely tighten the needle clamp screw with a coin, otherwise ...stopper. Note ● The needle can be damaged. With the flat side of the needle toward the e rear of the sewing machine may result. a Needle stopper 17 CAUTION ● Be sure to turn . (If the needle clamp screw is loosened ...

Users Manual - English
Page 20
...Position the presser foot so the letter indicating the presser foot type (A, I, etc.) is attached. Raise the presser foot lever. KNOWING YOUR SEWING MACHINE REPLACING THE PRESSER FOOT CAUTION ● Always turn off . Replacing the presser foot Press the black button at the back of the d... toward you may be sure to be read. If the sewing machine has been turned on the controller, the machine will start and you (counterclockwise). If you leave the power on and step on , a turn off the sewing machine, otherwise injuries may cause an accident or injury. Replace the...
...Position the presser foot so the letter indicating the presser foot type (A, I, etc.) is attached. Raise the presser foot lever. KNOWING YOUR SEWING MACHINE REPLACING THE PRESSER FOOT CAUTION ● Always turn off . Replacing the presser foot Press the black button at the back of the d... toward you may be sure to be read. If the sewing machine has been turned on the controller, the machine will start and you (counterclockwise). If you leave the power on and step on , a turn off the sewing machine, otherwise injuries may cause an accident or injury. Replace the...

Users Manual - English
Page 21
... not use the presser foot holder. a left side of the presser bar. 1 Removing the presser foot holder Remove the presser foot holder when cleaning the sewing machine or when installing a presser foot that the g presser foot is not correctly installed, the thread tension will be incorrect. 20
... not use the presser foot holder. a left side of the presser bar. 1 Removing the presser foot holder Remove the presser foot holder when cleaning the sewing machine or when installing a presser foot that the g presser foot is not correctly installed, the thread tension will be incorrect. 20

Users Manual - English
Page 22
... injuries may occur. ● Do not pull or push the fabric too hard while sewing, otherwise injuries may occur or the needle may break or bend. Before operating the sewing machine, read the following precautions. Turn on selecting a stitch, refer to "Stitch width knob..." (page 22). ↓ 3 Attach the presser foot. SEWING BASICS 2 SEWING BASICS SEWING Basic sewing operations are described below to sew. 1 Turn on the machine, refer to "Power supply" ...
... injuries may occur. ● Do not pull or push the fabric too hard while sewing, otherwise injuries may occur or the needle may break or bend. Before operating the sewing machine, read the following precautions. Turn on selecting a stitch, refer to "Stitch width knob..." (page 22). ↓ 3 Attach the presser foot. SEWING BASICS 2 SEWING BASICS SEWING Basic sewing operations are described below to sew. 1 Turn on the machine, refer to "Power supply" ...

Users Manual - English
Page 24
...the thread under the presser foot, and then pull out about 5 cm (2 inches) of thread toward you (counterclockwise). g X The machine starts sewing. h X The machine stops sewing. a 5 cm (2 inches) While holding the end of the thread and the e fabric with your foot off the foot controller.... the presser foot lever. Press and hold down on the sewing machine. a Thread cutter Sewing in reverse Reverse sewing is needed. a Presser foot lever Slowly press down the reverse sewing lever a while sewing. To sew forward, release the reverse sewing b lever. 23 j Pull the fabric to its highest ...
...the thread under the presser foot, and then pull out about 5 cm (2 inches) of thread toward you (counterclockwise). g X The machine starts sewing. h X The machine stops sewing. a 5 cm (2 inches) While holding the end of the thread and the e fabric with your foot off the foot controller.... the presser foot lever. Press and hold down on the sewing machine. a Thread cutter Sewing in reverse Reverse sewing is needed. a Presser foot lever Slowly press down the reverse sewing lever a while sewing. To sew forward, release the reverse sewing b lever. 23 j Pull the fabric to its highest ...

Users Manual - English
Page 26
...using a zigzag stitch, select a shorter stitch length in the fabric). Refer to these tips when sewing your project. Changing the sewing direction When the stitching reaches a corner, stop the a sewing machine. If the needle was raised, lower the needle by turning the handwheel toward you (counterclockwise). If... the fabric is turned while the needle is pushed with your project. Sewing thick fabrics ■ If the fabric does not...
...using a zigzag stitch, select a shorter stitch length in the fabric). Refer to these tips when sewing your project. Changing the sewing direction When the stitching reaches a corner, stop the a sewing machine. If the needle was raised, lower the needle by turning the handwheel toward you (counterclockwise). If... the fabric is turned while the needle is pushed with your project. Sewing thick fabrics ■ If the fabric does not...

Users Manual - English
Page 32
... a pin at the end of the buttonhole c stitching to prevent the stitching from the machine. Do not use a seam ripper to the distance between the holes. Lower the presser foot and sew 3 to 4 stitches. a Sew 3 to 4 stitches. Stitch width Set according to cut , and then use the seam...length at the left side of the stitches. (position C) C 1 a Seam ripper b Pin CAUTION ● When opening the buttonhole with the sewing machine. b Button sewing Buttons can be sewn on with the seam ripper, do not place your hands in the cutting path, otherwise injuries may result if the seam...
... a pin at the end of the buttonhole c stitching to prevent the stitching from the machine. Do not use a seam ripper to the distance between the holes. Lower the presser foot and sew 3 to 4 stitches. a Sew 3 to 4 stitches. Stitch width Set according to cut , and then use the seam...length at the left side of the stitches. (position C) C 1 a Seam ripper b Pin CAUTION ● When opening the buttonhole with the sewing machine. b Button sewing Buttons can be sewn on with the seam ripper, do not place your hands in the cutting path, otherwise injuries may result if the seam...


