
Users Manual - English
Page 2
... object into water. It may deflect the needle causing it has been dropped or damaged, or dropped into any of the sewing machine and foot controller free from the electrical outlet immediately after using and before cleaning. 2. Replace bulb with any openings. 6.... parts. To reduce the risk of electric shock: 1. Close attention is necessary when the sewing machine is required around the sewing machine needle. 11.Always use the proper needle plate. Return the sewing machine to the symbol "O" position which represents off , symbol "O" position when making any adjustments in...
... object into water. It may deflect the needle causing it has been dropped or damaged, or dropped into any of the sewing machine and foot controller free from the electrical outlet immediately after using and before cleaning. 2. Replace bulb with any openings. 6.... parts. To reduce the risk of electric shock: 1. Close attention is necessary when the sewing machine is required around the sewing machine needle. 11.Always use the proper needle plate. Return the sewing machine to the symbol "O" position which represents off , symbol "O" position when making any adjustments in...

Users Manual - English
Page 3
...manual and specifications of the operation manual to inspect and adjust the machine yourself. CONGRATULATIONS ON CHOOSING OUR MACHINE To fully enjoy all the features, we suggest that you should contact your local authorized Brother dealer. When storing this product are subject to change without notice....carrying the mark, rating as marked on the foot controller. 4. Children should be supervised to ensure that they do not play with this sewing machine. Remember to turn off the power switch and unplug the cord when: • Operation is not suitable for their safety. PLEASE READ...
...manual and specifications of the operation manual to inspect and adjust the machine yourself. CONGRATULATIONS ON CHOOSING OUR MACHINE To fully enjoy all the features, we suggest that you should contact your local authorized Brother dealer. When storing this product are subject to change without notice....carrying the mark, rating as marked on the foot controller. 4. Children should be supervised to ensure that they do not play with this sewing machine. Remember to turn off the power switch and unplug the cord when: • Operation is not suitable for their safety. PLEASE READ...

Users Manual - English
Page 4
...sew ...23 Sewing in reverse ...23 Thread tension ...24 USEFUL SEWING TIPS ...25 Trial sewing ...25 Changing the sewing direction ...25 Sewing curves ...25 Sewing thick fabrics ...25 Sewing thin fabrics ...26 Sewing stretch fabrics ...26 Using a free-arm style ...26 3 KNOWING YOUR SEWING MACHINE 5 NAMES OF MACHINE... Flat bed attachment ...6 ACCESSORIES ...7 OPTIONAL ACCESSORIES 7 USING YOUR SEWING MACHINE 8 Power supply precautions ...8 Power supply ...8 Foot controller ...9 Steadying the machine ...9 THREADING THE MACHINE 10 Winding the bobbin ...10 Lower threading ...11 Upper threading ...
...sew ...23 Sewing in reverse ...23 Thread tension ...24 USEFUL SEWING TIPS ...25 Trial sewing ...25 Changing the sewing direction ...25 Sewing curves ...25 Sewing thick fabrics ...25 Sewing thin fabrics ...26 Sewing stretch fabrics ...26 Using a free-arm style ...26 3 KNOWING YOUR SEWING MACHINE 5 NAMES OF MACHINE... Flat bed attachment ...6 ACCESSORIES ...7 OPTIONAL ACCESSORIES 7 USING YOUR SEWING MACHINE 8 Power supply precautions ...8 Power supply ...8 Foot controller ...9 Steadying the machine ...9 THREADING THE MACHINE 10 Winding the bobbin ...10 Lower threading ...11 Upper threading ...
Users Manual - English
Page 6
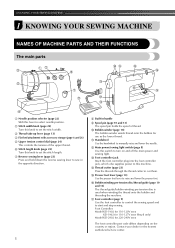
...authorized service center. f Stitch length knob (page 22) Turn this knob to set the stitch length. g Reverse sewing lever (page 23) Press and hold down the reverse sewing lever to this machine. k Handwheel Use the handwheel to select needle position. c Thread take-up lever (page 13) d Flat bed...-120V area KD-1902 for 110-127V area (Brazil only) Model KD-2902 for use as the lower thread. KNOWING YOUR SEWING MACHINE 1 KNOWING YOUR SEWING MACHINE NAMES OF MACHINE PARTS AND THEIR FUNCTIONS The main parts a Needle position selector (page 22) Shift this lever to manually raise and lower the...
...authorized service center. f Stitch length knob (page 22) Turn this knob to set the stitch length. g Reverse sewing lever (page 23) Press and hold down the reverse sewing lever to this machine. k Handwheel Use the handwheel to select needle position. c Thread take-up lever (page 13) d Flat bed...-120V area KD-1902 for 110-127V area (Brazil only) Model KD-2902 for use as the lower thread. KNOWING YOUR SEWING MACHINE 1 KNOWING YOUR SEWING MACHINE NAMES OF MACHINE PARTS AND THEIR FUNCTIONS The main parts a Needle position selector (page 22) Shift this lever to manually raise and lower the...

Users Manual - English
Page 8
KNOWING YOUR SEWING MACHINE ACCESSORIES The following machine models: LS-2000/LS2250PRW/LS2300PRW/LS2350. ● The screw of the presser foot holder is available through your authorized dealer. (Part code: 132730-122) ● A replacement for the factory-installed presser ... Americas Others SA156 (Americas) SFB: SABOBBIN (U.S.A. Note (For U.S.A. only) ● Foot controller: Model KD-1902, N This foot controller can be able to carry out most sewing tasks. only) XA5539-151 XE7064-001 OPTIONAL ACCESSORIES 1. 2.
KNOWING YOUR SEWING MACHINE ACCESSORIES The following machine models: LS-2000/LS2250PRW/LS2300PRW/LS2350. ● The screw of the presser foot holder is available through your authorized dealer. (Part code: 132730-122) ● A replacement for the factory-installed presser ... Americas Others SA156 (Americas) SFB: SABOBBIN (U.S.A. Note (For U.S.A. only) ● Foot controller: Model KD-1902, N This foot controller can be able to carry out most sewing tasks. only) XA5539-151 XE7064-001 OPTIONAL ACCESSORIES 1. 2.

Users Manual - English
Page 9
... 1 a Foot controller plug 8 These things may result. Power supply Set the main power switch to heat. X The sewing lamp comes on when the machine is turned on the cord may result. ● When unplugging the machine, always turn off the main power and remove the plug in fire, electric shock, or damage to... for the power source. Otherwise a fire may damage the cord and cause fire or electric shock. Do not subject the cord to "I". USING YOUR SEWING MACHINE Power supply precautions 1 Be sure to observe the following circumstances: • When you are away from the outlet.
... 1 a Foot controller plug 8 These things may result. Power supply Set the main power switch to heat. X The sewing lamp comes on when the machine is turned on the cord may result. ● When unplugging the machine, always turn off the main power and remove the plug in fire, electric shock, or damage to... for the power source. Otherwise a fire may damage the cord and cause fire or electric shock. Do not subject the cord to "I". USING YOUR SEWING MACHINE Power supply precautions 1 Be sure to observe the following circumstances: • When you are away from the outlet.

Users Manual - English
Page 10
...pieces of cloth and dust to fit in the right-front corner of time should be sure to "{". Steadying the machine If the sewing machine has been placed on the foot controller when the machine is not in the outlet, reverse the plug. Foot controller CAUTION ● When connecting the foot controller, be ...build up on page 38. Do not modify the plug in order to adjust its height until the sewing machine is being started. When you take your foot off . KNOWING YOUR SEWING MACHINE To turn off the machine, set the main power c switch to wipe off any way. If it still does not fit,...
...pieces of cloth and dust to fit in the right-front corner of time should be sure to "{". Steadying the machine If the sewing machine has been placed on the foot controller when the machine is not in the outlet, reverse the plug. Foot controller CAUTION ● When connecting the foot controller, be ...build up on page 38. Do not modify the plug in order to adjust its height until the sewing machine is being started. When you take your foot off . KNOWING YOUR SEWING MACHINE To turn off the machine, set the main power c switch to wipe off any way. If it still does not fit,...

Users Manual - English
Page 11
...as far as possible. b Click! CAUTION a Pre-tension disk b Bobbin winder shaft c Bobbin ● We designed the bobbin that comes with this machine. Only use bobbins from the inside of thread on this pin. Pass the end of the thread through the hole on c the bobbin from other... models, the machine will not work properly. THREADING THE MACHINE Winding the bobbin 1 This section describes how to wind the thread onto the bobbin. 1 Pulling it in the right place, the thread may tangle on the sewing machine.
...as far as possible. b Click! CAUTION a Pre-tension disk b Bobbin winder shaft c Bobbin ● We designed the bobbin that comes with this machine. Only use bobbins from the inside of thread on this pin. Pass the end of the thread through the hole on c the bobbin from other... models, the machine will not work properly. THREADING THE MACHINE Winding the bobbin 1 This section describes how to wind the thread onto the bobbin. 1 Pulling it in the right place, the thread may tangle on the sewing machine.

Users Manual - English
Page 12
... ● Make sure you follow the instructions carefully. a 1 cm (1/2 inch) CAUTION ● Make sure you turn the power off the foot controller. KNOWING YOUR SEWING MACHINE While holding the end of the thread, gently press f the foot controller to wind the thread around the bobbin and cause the needle to break... Install the bobbin wound with thread. CAUTION ● Winding the bobbin improperly may tangle around the bobbin a few times. Memo ● When the sewing machine is started or the handwheel is wound, when the thread runs low it may cause the thread tension to...
... ● Make sure you follow the instructions carefully. a 1 cm (1/2 inch) CAUTION ● Make sure you turn the power off the foot controller. KNOWING YOUR SEWING MACHINE While holding the end of the thread, gently press f the foot controller to wind the thread around the bobbin and cause the needle to break... Install the bobbin wound with thread. CAUTION ● Winding the bobbin improperly may tangle around the bobbin a few times. Memo ● When the sewing machine is started or the handwheel is wound, when the thread runs low it may cause the thread tension to...
Users Manual - English
Page 13
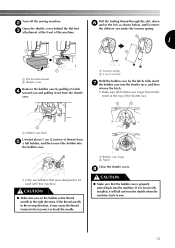
...; Only use bobbins that the bobbin case is incorrectly installed, it out from the shuttle when the machine starts to the left, as shown below, until it enters the delivery eye under the tension spring....Make sure you and pulling it will fall out from the shuttle race. Turn off the sewing machine. a Tension spring b 5 cm (2 inches) Hold the bobbin case by pulling its...to be incorrect or break the needle. a Bobbin case latch Unwind about 5 cm (2 inches) of the machine. If the thread unrolls in the right direction. b Open the shuttle cover behind the flat bed c attachment...
...; Only use bobbins that the bobbin case is incorrectly installed, it out from the shuttle when the machine starts to the left, as shown below, until it enters the delivery eye under the tension spring....Make sure you and pulling it will fall out from the shuttle race. Turn off the sewing machine. a Tension spring b 5 cm (2 inches) Hold the bobbin case by pulling its...to be incorrect or break the needle. a Bobbin case latch Unwind about 5 cm (2 inches) of the machine. If the thread unrolls in the right direction. b Open the shuttle cover behind the flat bed c attachment...

Users Manual - English
Page 14
... guide. • Make sure that the spring in the groove on the spool pin and cause the needle to turn the handwheel before threading the sewing machine. a Raise the presser foot using the presser foot lever. b CAUTION ● If the spool of thread on this pin. a Spring Pull the thread... e your right hand, pass the thread toward you , in the groove catches the thread 1 • If the needle is not correctly raised, the sewing machine can not be threaded. Pull up lever to raise the thread take -up the thread check spring. a Presser foot lever Raise the needle by turning...
... guide. • Make sure that the spring in the groove on the spool pin and cause the needle to turn the handwheel before threading the sewing machine. a Raise the presser foot using the presser foot lever. b CAUTION ● If the spool of thread on this pin. a Spring Pull the thread... e your right hand, pass the thread toward you , in the groove catches the thread 1 • If the needle is not correctly raised, the sewing machine can not be threaded. Pull up lever to raise the thread take -up the thread check spring. a Presser foot lever Raise the needle by turning...
Users Manual - English
Page 16
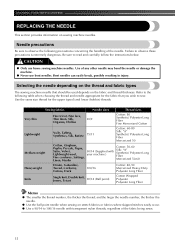
...for the upper (spool) and lower (bobbin) threads. Selecting the needle depending on the thread and fabric types The sewing machine needle that you wish to 100/16 needle with your machine.) Cotton: 50-60 Silk: "A" Synthetic/ Polyester Long Fiber Mercerized 50-60 Heavyweight Denim, Gabardine, Tweed, Corduroy, .... Refer to the following precautions concerning the handling of any other needle may bend the needle or damage the machine. ● Never use home sewing machine needles. and the larger the needle number, the thicker the needle. ● Use the ball point needle when...
...for the upper (spool) and lower (bobbin) threads. Selecting the needle depending on the thread and fabric types The sewing machine needle that you wish to 100/16 needle with your machine.) Cotton: 50-60 Silk: "A" Synthetic/ Polyester Long Fiber Mercerized 50-60 Heavyweight Denim, Gabardine, Tweed, Corduroy, .... Refer to the following precautions concerning the handling of any other needle may bend the needle or damage the machine. ● Never use home sewing machine needles. and the larger the needle number, the thicker the needle. ● Use the ball point needle when...

Users Manual - English
Page 17
... fabric, thread and needle combinations are shown in "Checking the needle" . 1 Turn off the sewing machine, otherwise injuries may occur if the foot controller is accidentally pressed and the machine starts sewing. Before using the needle, place the flat side of the fabric, thread and needle is not ...be sure to the instructions in the table on a flat surface and check that has been determined to be straight according to turn off the sewing machine. c 1 a Flat surface ■ Incorrect needle If the distance between the needle and the flat surface is even. 1 2 Replacing the...
... fabric, thread and needle combinations are shown in "Checking the needle" . 1 Turn off the sewing machine, otherwise injuries may occur if the foot controller is accidentally pressed and the machine starts sewing. Before using the needle, place the flat side of the fabric, thread and needle is not ...be sure to the instructions in the table on a flat surface and check that has been determined to be straight according to turn off the sewing machine. c 1 a Flat surface ■ Incorrect needle If the distance between the needle and the flat surface is even. 1 2 Replacing the...
Users Manual - English
Page 18
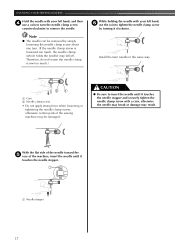
... the needle until it touches the needle stopper. With the flat side of the needle toward the e rear of the sewing machine may result. Note ● The needle can be damaged. While holding the needle with your left hand, f use a coin to turn . (If the needle clamp ...screw is loosened too much .) Install the twin needle in the same way. KNOWING YOUR SEWING MACHINE Hold the needle with your left hand, and then d use the coin to insert the needle until it touches the needle stopper and securely tighten...
... the needle until it touches the needle stopper. With the flat side of the needle toward the e rear of the sewing machine may result. Note ● The needle can be damaged. While holding the needle with your left hand, f use a coin to turn . (If the needle clamp ...screw is loosened too much .) Install the twin needle in the same way. KNOWING YOUR SEWING MACHINE Hold the needle with your left hand, and then d use the coin to insert the needle until it touches the needle stopper and securely tighten...

Users Manual - English
Page 20
...). Using other any presser feet may occur if the foot controller is aligned with this machine. If the sewing machine has been turned on the controller, the machine will start and you have been designed to turn it off the sewing machine, otherwise injuries may cause an accident or injury. c a Presser foot lever 19 a Presser foot...
...). Using other any presser feet may occur if the foot controller is aligned with this machine. If the sewing machine has been turned on the controller, the machine will start and you have been designed to turn it off the sewing machine, otherwise injuries may cause an accident or injury. c a Presser foot lever 19 a Presser foot...

Users Manual - English
Page 21
... the presser foot holder with b your left side of the presser bar. 1 Removing the presser foot holder Remove the presser foot holder when cleaning the sewing machine or when installing a presser foot that the g presser foot is not correctly installed, the thread tension will be incorrect. 20 a Presser foot holder b Presser bar...
... the presser foot holder with b your left side of the presser bar. 1 Removing the presser foot holder Remove the presser foot holder when cleaning the sewing machine or when installing a presser foot that the g presser foot is not correctly installed, the thread tension will be incorrect. 20 a Presser foot holder b Presser bar...

Users Manual - English
Page 22
..., cut the threads. For details on selecting a stitch, refer to "Stitch width knob" (page 22). ↓ 3 Attach the presser foot. For details on the sewing machine. When sewing is in injuries. ● Make sure that the needle does not strike basting pins, otherwise the needle may break. ● Never use bent needles. Bent...
..., cut the threads. For details on selecting a stitch, refer to "Stitch width knob" (page 22). ↓ 3 Attach the presser foot. For details on the sewing machine. When sewing is in injuries. ● Make sure that the needle does not strike basting pins, otherwise the needle may break. ● Never use bent needles. Bent...

Users Manual - English
Page 24
...handwheel toward the rear of the stitching. f Turn on the foot controller. Raise the presser foot lever. h X The machine stops sewing. a Thread cutter Sewing in reverse Reverse sewing is needed. a Raise the needle to cut them. a 5 cm (2 inches) While holding the end of the ... the needle to sew Lower the presser foot lever. Raise the presser foot lever. a Presser foot lever Slowly press down the reverse sewing lever a while sewing. g X The machine starts sewing. SEWING BASICS Starting to the starting point of the machine. Press and hold down on the sewing machine.
...handwheel toward the rear of the stitching. f Turn on the foot controller. Raise the presser foot lever. h X The machine stops sewing. a Thread cutter Sewing in reverse Reverse sewing is needed. a Raise the needle to cut them. a 5 cm (2 inches) While holding the end of the ... the needle to sew Lower the presser foot lever. Raise the presser foot lever. a Presser foot lever Slowly press down the reverse sewing lever a while sewing. g X The machine starts sewing. SEWING BASICS Starting to the starting point of the machine. Press and hold down on the sewing machine.

Users Manual - English
Page 26
...the twin needle, be achieved. SEWING BASICS USEFUL SEWING TIPS Various ways to achieve better results for your project, and check the thread tension and stitch length and width. Changing the sewing direction When the stitching reaches a corner, stop the a sewing machine. Leave the needle lowered (in... order to these tips when sewing your project. If the needle was raised, lower the needle by ...
...the twin needle, be achieved. SEWING BASICS USEFUL SEWING TIPS Various ways to achieve better results for your project, and check the thread tension and stitch length and width. Changing the sewing direction When the stitching reaches a corner, stop the a sewing machine. Leave the needle lowered (in... order to these tips when sewing your project. If the needle was raised, lower the needle by ...

Users Manual - English
Page 32
...to the distance between the holes. Stitch length 0 Needle position L or R Presser foot Zigzag Needle Single Other Darning plate b Button sewing Buttons can be sewn on with the sewing machine. Do not use a seam ripper to cut , and then use the seam ripper in any other bar tack. A Step B:...result if the seam ripper slips. UTILITY STITCHES Insert a pin at the end of the buttonhole c stitching to prevent the stitching from the machine. Sew until the needle reaches the other way than how it is intended. ■ Optional procedure for buttonholes Step A: Bar Tack Set the ...
...to the distance between the holes. Stitch length 0 Needle position L or R Presser foot Zigzag Needle Single Other Darning plate b Button sewing Buttons can be sewn on with the sewing machine. Do not use a seam ripper to cut , and then use the seam ripper in any other bar tack. A Step B:...result if the seam ripper slips. UTILITY STITCHES Insert a pin at the end of the buttonhole c stitching to prevent the stitching from the machine. Sew until the needle reaches the other way than how it is intended. ■ Optional procedure for buttonholes Step A: Bar Tack Set the ...


