Users Manual - English and Spanish
Page 2
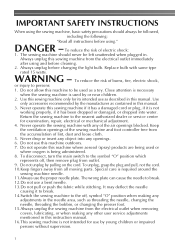
...is being used by the manufacturer as a toy. Never drop or insert any object into water. IMPORTANT SAFETY INSTRUCTIONS When using the sewing machine, basic safety precautions should never be left unattended when plugged in. WARNING - Use only accessories recommended by or near children. 2. ...after using ." To reduce the risk of the air openings blocked. The wrong plate can cause the needle to persons: 1. Return the sewing machine to the symbol "O" position which represents off , symbol "O" position when making any of burns, fire, electric shock, or injury to...
...is being used by the manufacturer as a toy. Never drop or insert any object into water. IMPORTANT SAFETY INSTRUCTIONS When using the sewing machine, basic safety precautions should never be left unattended when plugged in. WARNING - Use only accessories recommended by or near children. 2. ...after using ." To reduce the risk of the air openings blocked. The wrong plate can cause the needle to persons: 1. Return the sewing machine to the symbol "O" position which represents off , symbol "O" position when making any of burns, fire, electric shock, or injury to...
Users Manual - English and Spanish
Page 3
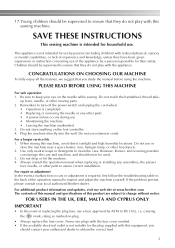
... parts • A power failure occurs during use of this machine, avoid direct sunlight and high humidity locations. SAVE THESE INSTRUCTIONS This sewing machine is not suitable for their safety. PLEASE READ BEFORE USING THIS MACHINE For safe operation 1. up lever, needle, or other hot objects...they do not play with this sewing machine. carrying the mark, rating as marked on the foot controller. 4. CONGRATULATIONS ON CHOOSING OUR MACHINE To fully enjoy all the features, we suggest that you should contact your local authorized Brother dealer. For additional product information...
... parts • A power failure occurs during use of this machine, avoid direct sunlight and high humidity locations. SAVE THESE INSTRUCTIONS This sewing machine is not suitable for their safety. PLEASE READ BEFORE USING THIS MACHINE For safe operation 1. up lever, needle, or other hot objects...they do not play with this sewing machine. carrying the mark, rating as marked on the foot controller. 4. CONGRATULATIONS ON CHOOSING OUR MACHINE To fully enjoy all the features, we suggest that you should contact your local authorized Brother dealer. For additional product information...
Users Manual - English and Spanish
Page 4
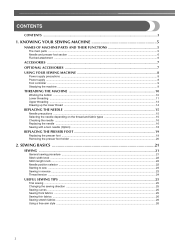
... AND THEIR FUNCTIONS 5 The main parts ...5 Needle and presser foot section ...6 Flat bed attachment ...6 ACCESSORIES ...7 OPTIONAL ACCESSORIES 7 USING YOUR SEWING MACHINE 8 Power supply precautions ...8 Power supply ...8 Foot controller ...9 Steadying the machine ...9 THREADING THE MACHINE 10 Winding the bobbin ...10 Lower threading ...11 Upper threading ...13 Drawing up the lower thread ...14 REPLACING THE NEEDLE...
... AND THEIR FUNCTIONS 5 The main parts ...5 Needle and presser foot section ...6 Flat bed attachment ...6 ACCESSORIES ...7 OPTIONAL ACCESSORIES 7 USING YOUR SEWING MACHINE 8 Power supply precautions ...8 Power supply ...8 Foot controller ...9 Steadying the machine ...9 THREADING THE MACHINE 10 Winding the bobbin ...10 Lower threading ...11 Upper threading ...13 Drawing up the lower thread ...14 REPLACING THE NEEDLE...
Users Manual - English and Spanish
Page 6
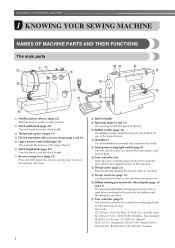
... thread guide/bobbin winding pre-tension disc is used when winding the thread onto the bobbin and threading the machine. f Stitch length knob (page 22) Turn this knob to sew in handle i Spool pin (page 10 and 13) The spool pin holds the spool of the upper ... XC7438-421 (Russia), XD0112-121 (Argentina), XE3414-001 (Brazil(120V)), XE4302-001 (Brazil(220V)),XE3447-001 (Taiwan) 5 KNOWING YOUR SEWING MACHINE 1 KNOWING YOUR SEWING MACHINE NAMES OF MACHINE PARTS AND THEIR FUNCTIONS The main parts a Needle position selector (page 22) Shift this lever to raise and lower the presser foot. j...
... thread guide/bobbin winding pre-tension disc is used when winding the thread onto the bobbin and threading the machine. f Stitch length knob (page 22) Turn this knob to sew in handle i Spool pin (page 10 and 13) The spool pin holds the spool of the upper ... XC7438-421 (Russia), XD0112-121 (Argentina), XE3414-001 (Brazil(120V)), XE4302-001 (Brazil(220V)),XE3447-001 (Taiwan) 5 KNOWING YOUR SEWING MACHINE 1 KNOWING YOUR SEWING MACHINE NAMES OF MACHINE PARTS AND THEIR FUNCTIONS The main parts a Needle position selector (page 22) Shift this lever to raise and lower the presser foot. j...

Users Manual - English and Spanish
Page 8
... (Americas) SABOBBIN (U.S.A. Part Name 1 Extra spool pin 2 Twin needle Part Code Americas Others 130920-021 131096-121 7 Note (For U.S.A. KNOWING YOUR SEWING MACHINE ACCESSORIES The following machine models: LS-2000/LS2250PRW/LS2300PRW. ● The screw of the presser foot holder is available through your authorized dealer. (Part code: 132730-122) ● A replacement for the...
... (Americas) SABOBBIN (U.S.A. Part Name 1 Extra spool pin 2 Twin needle Part Code Americas Others 130920-021 131096-121 7 Note (For U.S.A. KNOWING YOUR SEWING MACHINE ACCESSORIES The following machine models: LS-2000/LS2250PRW/LS2300PRW. ● The screw of the presser foot holder is available through your authorized dealer. (Part code: 132730-122) ● A replacement for the...
Users Manual - English and Spanish
Page 9
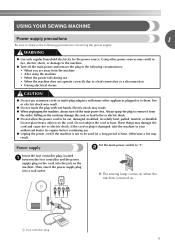
Pulling on . 1 a Foot controller plug 8 USING YOUR SEWING MACHINE Power supply precautions 1 Be sure to observe the following circumstances: • ... disconnection • During electrical storms CAUTION ● Do not use . ● Unplug the power cord if the machine is turned on the cord may damage the cord, or lead to fire or electric shock. ● Do not... for the power source. X The sewing lamp comes on when the machine is not to the machine. ● Turn off the main power first. Do not place heavy objects on the machine. Using other appliances plugged in the ...
Pulling on . 1 a Foot controller plug 8 USING YOUR SEWING MACHINE Power supply precautions 1 Be sure to observe the following circumstances: • ... disconnection • During electrical storms CAUTION ● Do not use . ● Unplug the power cord if the machine is turned on the cord may damage the cord, or lead to fire or electric shock. ● Do not... for the power source. X The sewing lamp comes on when the machine is not to the machine. ● Turn off the main power first. Do not place heavy objects on the machine. Using other appliances plugged in the ...
Users Manual - English and Spanish
Page 10
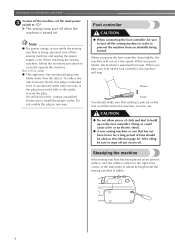
... the risk of cloth and dust to build up on an uneven surface, turn off the sewing machine in order to "{". When you press the foot controller down lightly, the machine will run at a low speed. If the plug does not fit fully in a polarized ...the other). When you press harder, the machine's speed will stop. Steadying the machine If the sewing machine has been placed on the foot controller. KNOWING YOUR SEWING MACHINE To turn off the sewing machine and unplug the power supply cord. When restarting the sewing machine, follow the necessary procedure to install the ...
... the risk of cloth and dust to build up on an uneven surface, turn off the sewing machine in order to "{". When you press the foot controller down lightly, the machine will run at a low speed. If the plug does not fit fully in a polarized ...the other). When you press harder, the machine's speed will stop. Steadying the machine If the sewing machine has been placed on the foot controller. KNOWING YOUR SEWING MACHINE To turn off the sewing machine and unplug the power supply cord. When restarting the sewing machine, follow the necessary procedure to install the ...
Users Manual - English and Spanish
Page 11
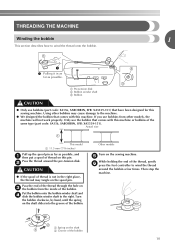
... around the bobbin a few times. Pass the end of the thread through the hole on the spool pin. Using other models, the machine will not work properly. a Spring on the sewing machine. b CAUTION ● If the spool of thread is not in as far as possible, and a then put a spool of the...how to wind the thread onto the bobbin. 1 Pulling it in the right place, the thread may cause damage to the machine. ● We designed the bobbin that comes with this sewing machine. Actual size This model a 11.5 mm (7/16 inches) Pull up the spool pin as far as possible. e While holding...
... around the bobbin a few times. Pass the end of the thread through the hole on the spool pin. Using other models, the machine will not work properly. a Spring on the sewing machine. b CAUTION ● If the spool of thread is not in as far as possible, and a then put a spool of the...how to wind the thread onto the bobbin. 1 Pulling it in the right place, the thread may cause damage to the machine. ● We designed the bobbin that comes with this sewing machine. Actual size This model a 11.5 mm (7/16 inches) Pull up the spool pin as far as possible. e While holding...
Users Manual - English and Spanish
Page 12
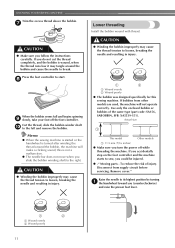
...foot controller. Use only the enclosed bobbin or bobbins of injury. Remove cover." If bobbins from supply circuit before servicing. KNOWING YOUR SEWING MACHINE Trim the excess thread above the bobbin. g Lower threading Install the bobbin wound with thread. CAUTION ● Make sure you ...bobbin seems full and begins spinning i slowly, take your foot off while threading the machine. Cut the thread, slide the bobbin winder shaft j to start. Memo ● When the sewing machine is started or the handwheel is turned after winding the thread around the bobbin and cause...
...foot controller. Use only the enclosed bobbin or bobbins of injury. Remove cover." If bobbins from supply circuit before servicing. KNOWING YOUR SEWING MACHINE Trim the excess thread above the bobbin. g Lower threading Install the bobbin wound with thread. CAUTION ● Make sure you ...bobbin seems full and begins spinning i slowly, take your foot off while threading the machine. Cut the thread, slide the bobbin winder shaft j to start. Memo ● When the sewing machine is started or the handwheel is turned after winding the thread around the bobbin and cause...
Users Manual - English and Spanish
Page 14
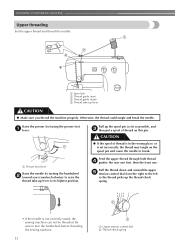
... control dial from the right to break. Feed the upper thread through both thread d guides: the rear one first, then the front one. KNOWING YOUR SEWING MACHINE Upper threading Set the upper thread and thread the needle. Be sure to raise the thread take -up the spool pin as far as possible..., and c then put a spool of thread is in the wrong place, or is not correctly raised, the sewing machine can not be threaded. Raise the presser foot using the presser foot a lever. a Presser foot lever Raise the needle by turning the handwheel b toward you...
... control dial from the right to break. Feed the upper thread through both thread d guides: the rear one first, then the front one. KNOWING YOUR SEWING MACHINE Upper threading Set the upper thread and thread the needle. Be sure to raise the thread take -up the spool pin as far as possible..., and c then put a spool of thread is in the wrong place, or is not correctly raised, the sewing machine can not be threaded. Raise the presser foot using the presser foot a lever. a Presser foot lever Raise the needle by turning the handwheel b toward you...
Users Manual - English and Spanish
Page 16
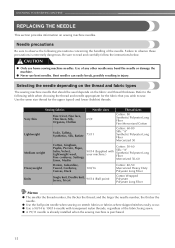
... 90/14 to the following precautions concerning the handling of any other needle may bend the needle or damage the machine. ● Never use home sewing machine needles. Bent needles can easily break, possibly resulting in injury. CAUTION ● Only use bent needles. and the...the fabric being sewn. ● A 75/11 needle is already installed when the sewing machine is extremely dangerous. Selecting the needle depending on sewing machine needles. Refer to 100/16 needle with your machine.) Cotton: 50-60 Silk: "A" Synthetic/ Polyester Long Fiber Mercerized 50-60 Heavyweight ...
... 90/14 to the following precautions concerning the handling of any other needle may bend the needle or damage the machine. ● Never use home sewing machine needles. Bent needles can easily break, possibly resulting in injury. CAUTION ● Only use bent needles. and the...the fabric being sewn. ● A 75/11 needle is already installed when the sewing machine is extremely dangerous. Selecting the needle depending on sewing machine needles. Refer to 100/16 needle with your machine.) Cotton: 50-60 Silk: "A" Synthetic/ Polyester Long Fiber Mercerized 50-60 Heavyweight ...
Users Manual - English and Spanish
Page 17
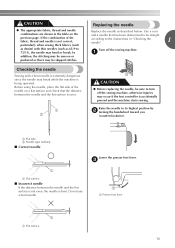
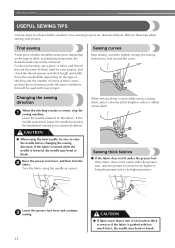
... fabric, thread and needle combinations are shown in "Checking the needle" . 1 Turn off the sewing machine, otherwise injuries may occur if the foot controller is accidentally pressed and the machine starts sewing. Lower the presser foot lever. Use a coin and a needle that the distance between the needle... use a bent needle. Raise the needle to 75/11), the needle may be straight according to turn off the sewing machine. Checking the needle Sewing with thin needles (such as described below. If the combination of the needle on the previous page. In addition, the...
... fabric, thread and needle combinations are shown in "Checking the needle" . 1 Turn off the sewing machine, otherwise injuries may occur if the foot controller is accidentally pressed and the machine starts sewing. Lower the presser foot lever. Use a coin and a needle that the distance between the needle... use a bent needle. Raise the needle to 75/11), the needle may be straight according to turn off the sewing machine. Checking the needle Sewing with thin needles (such as described below. If the combination of the needle on the previous page. In addition, the...

Users Manual - English and Spanish
Page 18
... screw is loosened too much .) Install the twin needle in the same way. With the flat side of the needle toward the e rear of the sewing machine may be removed by turning it clockwise. Note ● The needle can be damaged. a Needle stopper 17 a Coin b Needle clamp screw • Do not ... remove the needle. Therefore, do not loosen the needle clamp screw too much , the needle clamp (which holds the needle) may result. KNOWING YOUR SEWING MACHINE Hold the needle with your left hand, and then d use the coin to insert the needle until it touches the needle stopper.
... screw is loosened too much .) Install the twin needle in the same way. With the flat side of the needle toward the e rear of the sewing machine may be removed by turning it clockwise. Note ● The needle can be damaged. a Needle stopper 17 a Coin b Needle clamp screw • Do not ... remove the needle. Therefore, do not loosen the needle clamp screw too much , the needle clamp (which holds the needle) may result. KNOWING YOUR SEWING MACHINE Hold the needle with your left hand, and then d use the coin to insert the needle until it touches the needle stopper.

Users Manual - English and Spanish
Page 20
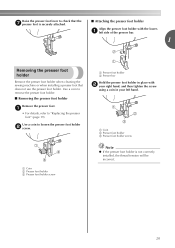
...; Always use presser feet that have chosen. KNOWING YOUR SEWING MACHINE REPLACING THE PRESSER FOOT CAUTION ● Always turn off the sewing machine, otherwise injuries may occur if the foot controller is accidentally pressed and the machine starts sewing. Raise the needle to its highest position by b turning...use the correct presser foot for the stitch pattern you may cause an accident or injury. If the sewing machine has been turned on the controller, the machine will start and you have been designed to release the presser foot. Replacing the presser foot Press the...
...; Always use presser feet that have chosen. KNOWING YOUR SEWING MACHINE REPLACING THE PRESSER FOOT CAUTION ● Always turn off the sewing machine, otherwise injuries may occur if the foot controller is accidentally pressed and the machine starts sewing. Raise the needle to its highest position by b turning...use the correct presser foot for the stitch pattern you may cause an accident or injury. If the sewing machine has been turned on the controller, the machine will start and you have been designed to release the presser foot. Replacing the presser foot Press the...
Users Manual - English and Spanish
Page 21
... not use the presser foot holder. a left side of the presser bar. 1 Removing the presser foot holder Remove the presser foot holder when cleaning the sewing machine or when installing a presser foot that the g presser foot is not correctly installed, the thread tension will be incorrect. 20
... not use the presser foot holder. a left side of the presser bar. 1 Removing the presser foot holder Remove the presser foot holder when cleaning the sewing machine or when installing a presser foot that the g presser foot is not correctly installed, the thread tension will be incorrect. 20
Users Manual - English and Spanish
Page 22
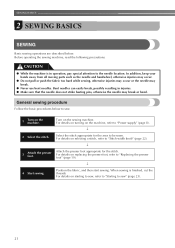
... occur. ● Do not pull or push the fabric too hard while sewing, otherwise injuries may occur or the needle may break or bend. General sewing procedure Follow the basic procedures below . For details on the machine, refer to "Power supply" (page 8). ↓ 2 Select the stitch...9679; Make sure that the needle does not strike basting pins, otherwise the needle may break. ● Never use bent needles. Before operating the sewing machine, read the following precautions. For details on selecting a stitch, refer to "Stitch width knob" (page 22). ↓ 3 Attach the presser ...
... occur. ● Do not pull or push the fabric too hard while sewing, otherwise injuries may occur or the needle may break or bend. General sewing procedure Follow the basic procedures below . For details on the machine, refer to "Power supply" (page 8). ↓ 2 Select the stitch...9679; Make sure that the needle does not strike basting pins, otherwise the needle may break. ● Never use bent needles. Before operating the sewing machine, read the following precautions. For details on selecting a stitch, refer to "Stitch width knob" (page 22). ↓ 3 Attach the presser ...

Users Manual - English and Spanish
Page 24
...presser foot lever. X The machine starts sewing. Take your right hand to lower the needle to the starting point of the presser foot bar to its highest position by b turning the handwheel toward you (counterclockwise). Press and hold down on the sewing machine. a Presser foot lever Slowly ...press down the reverse sewing lever a while sewing. a 5 cm (2 inches) While holding the end of the thread and the e fabric with your ...
...presser foot lever. X The machine starts sewing. Take your right hand to lower the needle to the starting point of the presser foot bar to its highest position by b turning the handwheel toward you (counterclockwise). Press and hold down on the sewing machine. a Presser foot lever Slowly ...press down the reverse sewing lever a while sewing. a 5 cm (2 inches) While holding the end of the thread and the e fabric with your ...
Users Manual - English and Spanish
Page 26
..., raise the presser foot lever even higher to bring the presser foot to its highest position. Changing the sewing direction When the stitching reaches a corner, stop the a sewing machine. Leave the needle lowered (in order to obtain a finer stitch. If the needle was raised, lower ...the needle by turning the handwheel toward you (counterclockwise). Lower the presser foot lever and continue c sewing. 25 CAUTION ● If fabric more ...
..., raise the presser foot lever even higher to bring the presser foot to its highest position. Changing the sewing direction When the stitching reaches a corner, stop the a sewing machine. Leave the needle lowered (in order to obtain a finer stitch. If the needle was raised, lower ...the needle by turning the handwheel toward you (counterclockwise). Lower the presser foot lever and continue c sewing. 25 CAUTION ● If fabric more ...

Users Manual - English and Spanish
Page 32
...stitches. (position B) B Step C: Final Bar Tack Set the stitch width at 5 and stitch length at 0. b Button sewing Buttons can be sewn on with the sewing machine. Sew until the needle reaches the other way than how it is intended. ■ Optional procedure for buttonholes Step A: Bar Tack ...Set the needle position at L, stitch width at 5 a and stitch length at 0. a Turn the fabric 90 degrees counterclockwise and sew 5 - 6 straight...
...stitches. (position B) B Step C: Final Bar Tack Set the stitch width at 5 and stitch length at 0. b Button sewing Buttons can be sewn on with the sewing machine. Sew until the needle reaches the other way than how it is intended. ■ Optional procedure for buttonholes Step A: Bar Tack ...Set the needle position at L, stitch width at 5 a and stitch length at 0. a Turn the fabric 90 degrees counterclockwise and sew 5 - 6 straight...
Users Manual - English and Spanish
Page 37
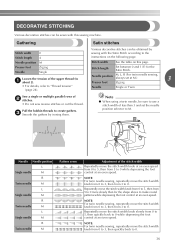
Satin stitches Various decorative stitches can be sewn with the Satin Stitch according to the instructions on this sewing machine. Stitch length Set between 0 and 1 (F) for the shape above to make round patterns while depressing the foot control at an even speed. Note &#...speed from 0 to 5, then from 5 to 0 more slowly than 3 and set at an even speed. c Smooth the gathers by sewing with this page. NOTE: For twin needle sewing, repeatedly move the stitch width knob slowly from 3 to "Thread tension" (page 24). Gathering Stitch width Stitch length Needle position Presser ...
Satin stitches Various decorative stitches can be sewn with the Satin Stitch according to the instructions on this sewing machine. Stitch length Set between 0 and 1 (F) for the shape above to make round patterns while depressing the foot control at an even speed. Note &#...speed from 0 to 5, then from 5 to 0 more slowly than 3 and set at an even speed. c Smooth the gathers by sewing with this page. NOTE: For twin needle sewing, repeatedly move the stitch width knob slowly from 3 to "Thread tension" (page 24). Gathering Stitch width Stitch length Needle position Presser ...


