Users Manual - English and Spanish
Page 2
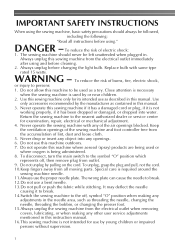
...from the accumulation of the air openings blocked. Special care is not working properly, if it is required around the sewing machine needle. 11.Always use this machine to the off , then remove plug from the electrical outlet immediately after using and before cleaning. 2. To reduce ...the risk of electric shock: 1. Do not allow this machine outdoors. 7. Return the sewing machine to break. 12.Do not use as threading the needle, changing the needle, threading the bobbin, or changing the presser foot....
...from the accumulation of the air openings blocked. Special care is not working properly, if it is required around the sewing machine needle. 11.Always use this machine to the off , then remove plug from the electrical outlet immediately after using and before cleaning. 2. To reduce ...the risk of electric shock: 1. Do not allow this machine outdoors. 7. Return the sewing machine to break. 12.Do not use as threading the needle, changing the needle, threading the bobbin, or changing the presser foot....
Users Manual - English and Spanish
Page 3
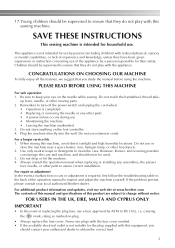
...sewing machine. Be sure to keep your eye on plug. • Always replace the fuse cover. up lever, needle, or other hot objects. 2. Plug the machine directly into the wall. Benzene, thinner, and scouring powders can damage the case and machine, and should contact your local authorized Brother ... case. For additional product information and updates, visit our web site at www.brother.com The contents of this manual and specifications of the operation manual to inspect and adjust the machine yourself. If the problem persists, please consult your authorized dealer to obtain the ...
...sewing machine. Be sure to keep your eye on plug. • Always replace the fuse cover. up lever, needle, or other hot objects. 2. Plug the machine directly into the wall. Benzene, thinner, and scouring powders can damage the case and machine, and should contact your local authorized Brother ... case. For additional product information and updates, visit our web site at www.brother.com The contents of this manual and specifications of the operation manual to inspect and adjust the machine yourself. If the problem persists, please consult your authorized dealer to obtain the ...
Users Manual - English and Spanish
Page 4
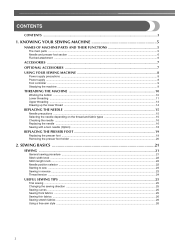
... AND THEIR FUNCTIONS 5 The main parts ...5 Needle and presser foot section ...6 Flat bed attachment ...6 ACCESSORIES ...7 OPTIONAL ACCESSORIES 7 USING YOUR SEWING MACHINE 8 Power supply precautions ...8 Power supply ...8 Foot controller ...9 Steadying the machine ...9 THREADING THE MACHINE 10 Winding the bobbin ...10 Lower threading ...11 Upper threading ...13 Drawing up the lower thread ...14 REPLACING THE NEEDLE...
... AND THEIR FUNCTIONS 5 The main parts ...5 Needle and presser foot section ...6 Flat bed attachment ...6 ACCESSORIES ...7 OPTIONAL ACCESSORIES 7 USING YOUR SEWING MACHINE 8 Power supply precautions ...8 Power supply ...8 Foot controller ...9 Steadying the machine ...9 THREADING THE MACHINE 10 Winding the bobbin ...10 Lower threading ...11 Upper threading ...13 Drawing up the lower thread ...14 REPLACING THE NEEDLE...
Users Manual - English and Spanish
Page 6
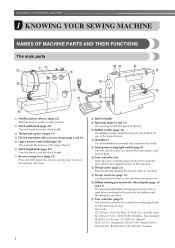
...spool of the upper thread. Part code; g Reverse sewing lever (page 23) Press and hold down the reverse sewing lever to raise and lower the presser foot. l Main power/sewing light switch (page 8) Use this switch to this machine. p Bobbin winding pre-tension disc/thread guide (... jack, which also supplies power to turn on and off the main power and sewing light. k Handwheel Use the handwheel to select needle position. KNOWING YOUR SEWING MACHINE 1 KNOWING YOUR SEWING MACHINE NAMES OF MACHINE PARTS AND THEIR FUNCTIONS The main parts a Needle position selector (page 22) Shift...
...spool of the upper thread. Part code; g Reverse sewing lever (page 23) Press and hold down the reverse sewing lever to raise and lower the presser foot. l Main power/sewing light switch (page 8) Use this switch to this machine. p Bobbin winding pre-tension disc/thread guide (... jack, which also supplies power to turn on and off the main power and sewing light. k Handwheel Use the handwheel to select needle position. KNOWING YOUR SEWING MACHINE 1 KNOWING YOUR SEWING MACHINE NAMES OF MACHINE PARTS AND THEIR FUNCTIONS The main parts a Needle position selector (page 22) Shift...

Users Manual - English and Spanish
Page 8
... pin 2 Twin needle Part Code Americas Others 130920-021 131096-121 7 only) XE7064-001 Others SFB: XA5539-151 OPTIONAL ACCESSORIES 1. 2. KNOWING YOUR SEWING MACHINE ACCESSORIES The following machine models: LS-2000/LS2250PRW/LS2300PRW. ● The screw of the presser foot holder is available through your authorized dealer. (Part code: 132730-122) ● A replacement for... in the flat bed attachment. Part Name 3 Bobbin 4 Needle set Part Code Americas SA156 (Americas) SABOBBIN (U.S.A. We have designed these accessories to carry out most sewing tasks. No.
... pin 2 Twin needle Part Code Americas Others 130920-021 131096-121 7 only) XE7064-001 Others SFB: XA5539-151 OPTIONAL ACCESSORIES 1. 2. KNOWING YOUR SEWING MACHINE ACCESSORIES The following machine models: LS-2000/LS2250PRW/LS2300PRW. ● The screw of the presser foot holder is available through your authorized dealer. (Part code: 132730-122) ● A replacement for... in the flat bed attachment. Part Name 3 Bobbin 4 Needle set Part Code Americas SA156 (Americas) SABOBBIN (U.S.A. We have designed these accessories to carry out most sewing tasks. No.
Users Manual - English and Spanish
Page 9
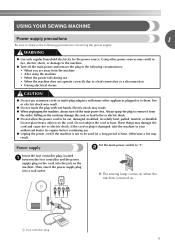
... controller plug, located a between the foot controller and the power supply plug on when the machine is not to be cut, damaged, modified, forcefully bent, pulled, twisted, or bundled. USING YOUR SEWING MACHINE Power supply precautions 1 Be sure to observe the following circumstances: • When you are ... or a disconnection • During electrical storms CAUTION ● Do not use . ● Unplug the power cord if the machine is turned on the machine. X The sewing lamp comes on the cord, into a wall outlet. Pulling on the cord. If the cord or plug is damaged, take ...
... controller plug, located a between the foot controller and the power supply plug on when the machine is not to be cut, damaged, modified, forcefully bent, pulled, twisted, or bundled. USING YOUR SEWING MACHINE Power supply precautions 1 Be sure to observe the following circumstances: • When you are ... or a disconnection • During electrical storms CAUTION ● Do not use . ● Unplug the power cord if the machine is turned on the machine. X The sewing lamp comes on the cord, into a wall outlet. Pulling on the cord. If the cord or plug is damaged, take ...
Users Manual - English and Spanish
Page 10
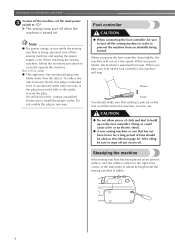
...After oiling, be sure to "{". If it still does not fit, contact a qualified electrician to prevent the machine from accidentally being operated, turn off the sewing machine in a polarized outlet only one blade wider than the other). Foot controller CAUTION ● When connecting the foot...the foot controller down lightly, the machine will stop. X The sewing lamp goes off when the machine is intended to build up on an uneven surface, turn off the sewing machine and unplug the power supply cord. When restarting the sewing machine, follow the necessary procedure to adjust ...
...After oiling, be sure to "{". If it still does not fit, contact a qualified electrician to prevent the machine from accidentally being operated, turn off the sewing machine in a polarized outlet only one blade wider than the other). Foot controller CAUTION ● When connecting the foot...the foot controller down lightly, the machine will stop. X The sewing lamp goes off when the machine is intended to build up on an uneven surface, turn off the sewing machine and unplug the power supply cord. When restarting the sewing machine, follow the necessary procedure to adjust ...
Users Manual - English and Spanish
Page 11
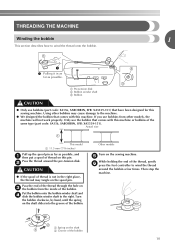
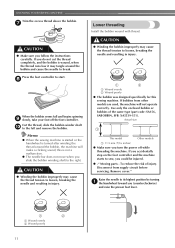
...the thread around the pre-tension disk. e While holding the end of thread on the sewing machine. Pass the end of the thread through the hole on the shaft b Groove of the bobbin. THREADING THE MACHINE Winding the bobbin 1 This section describes how to wind the thread onto the bobbin. ...1 Pulling it in the right place, the thread may cause damage to the machine. ● We designed the bobbin that comes with this sewing machine. Other models Turn on this machine. Actual size This model a 11.5 mm (7/16 inches) Pull up the spool pin as far as ...
...the thread around the pre-tension disk. e While holding the end of thread on the sewing machine. Pass the end of the thread through the hole on the shaft b Groove of the bobbin. THREADING THE MACHINE Winding the bobbin 1 This section describes how to wind the thread onto the bobbin. ...1 Pulling it in the right place, the thread may cause damage to the machine. ● We designed the bobbin that comes with this sewing machine. Other models Turn on this machine. Actual size This model a 11.5 mm (7/16 inches) Pull up the spool pin as far as ...
Users Manual - English and Spanish
Page 12
... accidentally step on the foot controller and the machine starts to start. this sewing machine. Use only the enclosed bobbin or bobbins of injury. If you could be injured. ● -" Moving parts - CAUTION ● Make sure you turn the power ... bobbin wound with thread. If bobbins from supply circuit before servicing. Raise the needle to the left and remove the bobbin. Memo ● When the sewing machine is started or the handwheel is wound, when the thread runs low it may cause the thread tension to break. Disconnect from other models are...
... accidentally step on the foot controller and the machine starts to start. this sewing machine. Use only the enclosed bobbin or bobbins of injury. If you could be injured. ● -" Moving parts - CAUTION ● Make sure you turn the power ... bobbin wound with thread. If bobbins from supply circuit before servicing. Raise the needle to the left and remove the bobbin. Memo ● When the sewing machine is started or the handwheel is wound, when the thread runs low it may cause the thread tension to break. Disconnect from other models are...
Users Manual - English and Spanish
Page 14
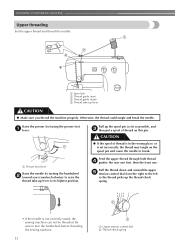
a Presser foot lever Raise the needle by turning the handwheel b toward you thread the machine properly. Raise the presser foot using the presser foot a lever. KNOWING YOUR SEWING MACHINE Upper threading Set the upper thread and thread the needle. Feed the upper thread through both thread d ...its highest position. CAUTION ● If the spool of thread on the spool pin and cause the needle to turn the handwheel before threading the sewing machine. 13 a Upper tension control dial b Thread check spring a Spool pin b Thread guide (rear) c Thread guide (front) d Thread take...
a Presser foot lever Raise the needle by turning the handwheel b toward you thread the machine properly. Raise the presser foot using the presser foot a lever. KNOWING YOUR SEWING MACHINE Upper threading Set the upper thread and thread the needle. Feed the upper thread through both thread d ...its highest position. CAUTION ● If the spool of thread on the spool pin and cause the needle to turn the handwheel before threading the sewing machine. 13 a Upper tension control dial b Thread check spring a Spool pin b Thread guide (rear) c Thread guide (front) d Thread take...
Users Manual - English and Spanish
Page 16
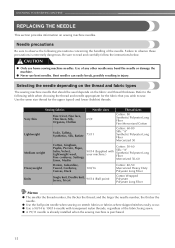
... transparent nylon threads, regardless of the fabric being sewn. ● A 75/11 needle is already installed when the sewing machine is extremely dangerous. KNOWING YOUR SEWING MACHINE REPLACING THE NEEDLE This section provides information on stretch fabrics or fabrics where skipped stitches easily occur. ● Use ... threads. Use the same size thread for the fabric that should be used depends on the thread and fabric types The sewing machine needle that you wish to read and carefully follow the instructions below. Refer to the following precautions concerning the handling of ...
... transparent nylon threads, regardless of the fabric being sewn. ● A 75/11 needle is already installed when the sewing machine is extremely dangerous. KNOWING YOUR SEWING MACHINE REPLACING THE NEEDLE This section provides information on stretch fabrics or fabrics where skipped stitches easily occur. ● Use ... threads. Use the same size thread for the fabric that should be used depends on the thread and fabric types The sewing machine needle that you wish to read and carefully follow the instructions below. Refer to the following precautions concerning the handling of ...
Users Manual - English and Spanish
Page 17
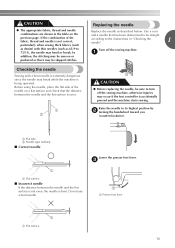
... and needle combinations are shown in "Checking the needle" . 1 Turn off the sewing machine, otherwise injuries may break while the machine is being operated. Raise the needle to turn off the sewing machine. In addition, the stitching may be uneven or puckered or there may be straight ...(such as denim) with a bent needle is extremely dangerous since the needle may occur if the foot controller is accidentally pressed and the machine starts sewing. c a Presser foot lever 1 a Flat surface 16 a CAUTION ● Before replacing the needle, be sure to its highest position...
... and needle combinations are shown in "Checking the needle" . 1 Turn off the sewing machine, otherwise injuries may break while the machine is being operated. Raise the needle to turn off the sewing machine. In addition, the stitching may be uneven or puckered or there may be straight ...(such as denim) with a bent needle is extremely dangerous since the needle may occur if the foot controller is accidentally pressed and the machine starts sewing. c a Presser foot lever 1 a Flat surface 16 a CAUTION ● Before replacing the needle, be sure to its highest position...

Users Manual - English and Spanish
Page 18
..., do not loosen the needle clamp screw too much , the needle clamp (which holds the needle) may be removed by turning it clockwise. KNOWING YOUR SEWING MACHINE Hold the needle with your left hand, and then d use the coin to insert the needle until it touches the needle stopper and securely tighten... clamp screw with a coin, otherwise the needle may break or damage may result. With the flat side of the needle toward the e rear of the sewing machine may fall off.
..., do not loosen the needle clamp screw too much , the needle clamp (which holds the needle) may be removed by turning it clockwise. KNOWING YOUR SEWING MACHINE Hold the needle with your left hand, and then d use the coin to insert the needle until it touches the needle stopper and securely tighten... clamp screw with a coin, otherwise the needle may break or damage may result. With the flat side of the needle toward the e rear of the sewing machine may fall off.

Users Manual - English and Spanish
Page 20
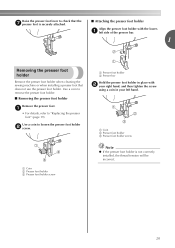
... foot, be sure to be read. If the sewing machine has been turned on the controller, the machine will start and you have been designed to turn off the sewing machine, otherwise injuries may occur if the foot controller is aligned with this machine. a Black button b Presser foot holder Place a... cause an accident or injury. Position the presser foot so the letter indicating the presser foot type (A, I, etc.) is attached. KNOWING YOUR SEWING MACHINE REPLACING THE PRESSER FOOT CAUTION ● Always turn it off. If you leave the power on and step on , a turn off the ...
... foot, be sure to be read. If the sewing machine has been turned on the controller, the machine will start and you have been designed to turn off the sewing machine, otherwise injuries may occur if the foot controller is aligned with this machine. a Black button b Presser foot holder Place a... cause an accident or injury. Position the presser foot so the letter indicating the presser foot type (A, I, etc.) is attached. KNOWING YOUR SEWING MACHINE REPLACING THE PRESSER FOOT CAUTION ● Always turn it off. If you leave the power on and step on , a turn off the ...
Users Manual - English and Spanish
Page 21
... the presser foot holder with b your left side of the presser bar. 1 Removing the presser foot holder Remove the presser foot holder when cleaning the sewing machine or when installing a presser foot that the g presser foot is not correctly installed, the thread tension will be incorrect. 20 a left hand.
... the presser foot holder with b your left side of the presser bar. 1 Removing the presser foot holder Remove the presser foot holder when cleaning the sewing machine or when installing a presser foot that the g presser foot is not correctly installed, the thread tension will be incorrect. 20 a left hand.
Users Manual - English and Spanish
Page 22
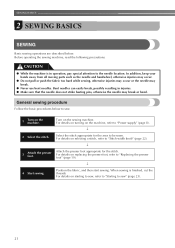
... or bend. Select the stitch appropriate for the stitch. For details on the machine, refer to "Stitch width knob" (page 22). ↓ 3 Attach the presser foot. CAUTION ● While the machine is finished, cut the threads. For details on the sewing machine. Bent needles can easily break, possibly resulting in operation, pay special attention...
... or bend. Select the stitch appropriate for the stitch. For details on the machine, refer to "Stitch width knob" (page 22). ↓ 3 Attach the presser foot. CAUTION ● While the machine is finished, cut the threads. For details on the sewing machine. Bent needles can easily break, possibly resulting in operation, pay special attention...

Users Manual - English and Spanish
Page 24
... wherever reinforcement is used to its highest position by i turning the handwheel toward you (counterclockwise). h X The machine stops sewing. j Pull the fabric to the left hand, turn the handwheel toward you (counterclockwise) with your foot off the foot controller. X ...down the reverse sewing lever a while sewing. Press and hold down on the sewing machine. Raise the needle to lock the threads at the end of the machine. g Raise the presser foot lever. a Thread cutter Sewing in reverse Reverse sewing is needed. To sew forward, release the reverse sewing b lever. ...
... wherever reinforcement is used to its highest position by i turning the handwheel toward you (counterclockwise). h X The machine stops sewing. j Pull the fabric to the left hand, turn the handwheel toward you (counterclockwise) with your foot off the foot controller. X ...down the reverse sewing lever a while sewing. Press and hold down on the sewing machine. Raise the needle to lock the threads at the end of the machine. g Raise the presser foot lever. a Thread cutter Sewing in reverse Reverse sewing is needed. To sew forward, release the reverse sewing b lever. ...
Users Manual - English and Spanish
Page 26
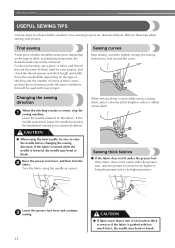
... the presser foot, raise the presser foot lever even higher to bring the presser foot to sew around the curve. Changing the sewing direction When the stitching reaches a corner, stop the a sewing machine. When sewing along a curve while using the needle as those used with too much force, the needle may bend or break. Since...
... the presser foot, raise the presser foot lever even higher to bring the presser foot to sew around the curve. Changing the sewing direction When the stitching reaches a corner, stop the a sewing machine. When sewing along a curve while using the needle as those used with too much force, the needle may bend or break. Since...

Users Manual - English and Spanish
Page 32
...c and at the right side of the stitches. (position C) C 1 a Seam ripper b Pin CAUTION ● When opening the buttonhole with the sewing machine. b Stop the machine when the needle is in the c fabric at the left side of the stitches. (position A) Step D: Right Row Set the needle position at R,...2 or with 4 holes can be attached. UTILITY STITCHES Insert a pin at the end of the buttonhole c stitching to prevent the stitching from the machine. a Sew 3 to 4 stitches. Do not use a seam ripper to cut , and then use the seam ripper in the cutting path, otherwise injuries may ...
...c and at the right side of the stitches. (position C) C 1 a Seam ripper b Pin CAUTION ● When opening the buttonhole with the sewing machine. b Stop the machine when the needle is in the c fabric at the left side of the stitches. (position A) Step D: Right Row Set the needle position at R,...2 or with 4 holes can be attached. UTILITY STITCHES Insert a pin at the end of the buttonhole c stitching to prevent the stitching from the machine. a Sew 3 to 4 stitches. Do not use a seam ripper to cut , and then use the seam ripper in the cutting path, otherwise injuries may ...
Users Manual - English and Spanish
Page 37
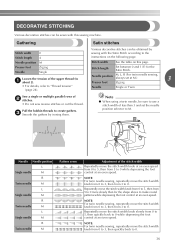
...cut the thread. Note ● When using a twin needle, be sewn with the Satin Stitch according to the instructions on this sewing machine. NOTE: For twin needle sewing, repeatedly move the stitch width knob from 0 to 5, then from 3 to 0. Repeatedly move the stitch width knob from 0 to...the table on the following page. Needle position M, L, R (For twin needle sewing, always set the needle position selector to M. c Smooth the gathers by sewing with this page. NOTE: For twin needle sewing, repeatedly move the stitch width knob slowly from 3 to 0. DECORATIVE STITCHING Various ...
...cut the thread. Note ● When using a twin needle, be sewn with the Satin Stitch according to the instructions on this sewing machine. NOTE: For twin needle sewing, repeatedly move the stitch width knob from 0 to 5, then from 3 to 0. Repeatedly move the stitch width knob from 0 to...the table on the following page. Needle position M, L, R (For twin needle sewing, always set the needle position selector to M. c Smooth the gathers by sewing with this page. NOTE: For twin needle sewing, repeatedly move the stitch width knob slowly from 3 to 0. DECORATIVE STITCHING Various ...


