Users Manual - English and Spanish
Page 2
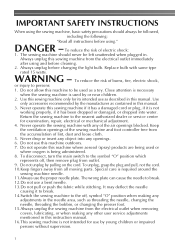
... plug, if it has been dropped or damaged, or dropped into any other user service adjustments mentioned in the needle area, such as threading the needle, changing the needle, threading the bobbin, or changing the presser foot. 15.Always unplug the sewing machine from the electrical outlet when removing covers, lubricating, or...
... plug, if it has been dropped or damaged, or dropped into any other user service adjustments mentioned in the needle area, such as threading the needle, changing the needle, threading the bobbin, or changing the presser foot. 15.Always unplug the sewing machine from the electrical outlet when removing covers, lubricating, or...
Users Manual - English and Spanish
Page 3
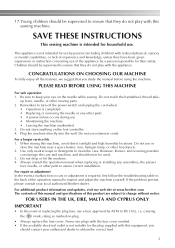
... is intended for the plug supplied with reduced physical, sensory or mental capabilities, or lack of the operation manual to keep your local authorized Brother dealer. If the problem persists, please consult your eye on the needle while sewing. carrying the mark, rating as marked on the foot ...contents of this manual and specifications of the appliance by a person responsible for use by ASTA to clean the case. Do not touch the handwheel, thread take- up lever, needle, or other hot objects. 2. Use only neutral soaps or detergents to BS 1362, i.e. Do not store anything on ...
... is intended for the plug supplied with reduced physical, sensory or mental capabilities, or lack of the operation manual to keep your local authorized Brother dealer. If the problem persists, please consult your eye on the needle while sewing. carrying the mark, rating as marked on the foot ...contents of this manual and specifications of the appliance by a person responsible for use by ASTA to clean the case. Do not touch the handwheel, thread take- up lever, needle, or other hot objects. 2. Use only neutral soaps or detergents to BS 1362, i.e. Do not store anything on ...
Users Manual - English and Spanish
Page 4
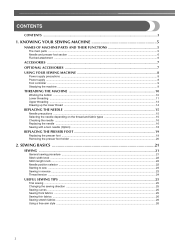
...Stitch width knob ...22 Stitch length knob ...22 Needle position selector ...22 Starting to sew ...23 Sewing in reverse ...23 Thread tension ...24 USEFUL SEWING TIPS ...25 Trial sewing ...25 Changing the sewing direction ...25 Sewing curves ...25 Sewing thick fabrics... SEWING MACHINE 8 Power supply precautions ...8 Power supply ...8 Foot controller ...9 Steadying the machine ...9 THREADING THE MACHINE 10 Winding the bobbin ...10 Lower threading ...11 Upper threading ...13 Drawing up the lower thread ...14 REPLACING THE NEEDLE 15 Needle precautions ...15 Selecting the needle depending on the...
...Stitch width knob ...22 Stitch length knob ...22 Needle position selector ...22 Starting to sew ...23 Sewing in reverse ...23 Thread tension ...24 USEFUL SEWING TIPS ...25 Trial sewing ...25 Changing the sewing direction ...25 Sewing curves ...25 Sewing thick fabrics... SEWING MACHINE 8 Power supply precautions ...8 Power supply ...8 Foot controller ...9 Steadying the machine ...9 THREADING THE MACHINE 10 Winding the bobbin ...10 Lower threading ...11 Upper threading ...13 Drawing up the lower thread ...14 REPLACING THE NEEDLE 15 Needle precautions ...15 Selecting the needle depending on the...

Users Manual - English and Spanish
Page 5
... ...38 Cleaning the machine surface ...39 Cleaning the shuttle race ...39 Cleaning the feed dogs ...40 Bobbin case tension adjustment ...41 TROUBLESHOOTING ...42 When the thread is entangled ...45 INDEX ...46 4
... ...38 Cleaning the machine surface ...39 Cleaning the shuttle race ...39 Cleaning the feed dogs ...40 Bobbin case tension adjustment ...41 TROUBLESHOOTING ...42 When the thread is entangled ...45 INDEX ...46 4
Users Manual - English and Spanish
Page 6
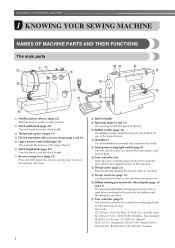
...lower the presser foot. Part code; f Stitch length knob (page 22) Turn this knob to set the stitch length. n Thread cutter (page 23) Pass the threads through the thread cutter to this machine. m Foot controller jack Insert the foot controller plug into the foot controller jack, which also supplies power ...this lever to turn on and off the main power and sewing light. b Stitch width knob (page 22) Turn this switch to select needle position. c Thread take-up lever (page 13) d Flat bed attachment with accessory storage (page 6 and 26) e Upper tension control dial (page 24) This controls ...
...lower the presser foot. Part code; f Stitch length knob (page 22) Turn this knob to set the stitch length. n Thread cutter (page 23) Pass the threads through the thread cutter to this machine. m Foot controller jack Insert the foot controller plug into the foot controller jack, which also supplies power ...this lever to turn on and off the main power and sewing light. b Stitch width knob (page 22) Turn this switch to select needle position. c Thread take-up lever (page 13) d Flat bed attachment with accessory storage (page 6 and 26) e Upper tension control dial (page 24) This controls ...
Users Manual - English and Spanish
Page 7
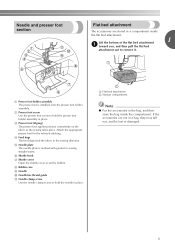
a Presser foot holder assembly The presser foot is marked with guides for the selected stitching. h Bobbin case i Needle j Needle bar thread guide k Needle clamp screw Use the needle clamp screw to set the bobbin. If the accessories are stored in a compartment inside the compartment. b Presser foot ...
a Presser foot holder assembly The presser foot is marked with guides for the selected stitching. h Bobbin case i Needle j Needle bar thread guide k Needle clamp screw Use the needle clamp screw to set the bobbin. If the accessories are stored in a compartment inside the compartment. b Presser foot ...
Users Manual - English and Spanish
Page 11
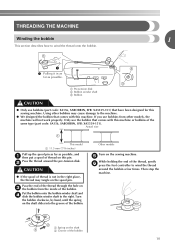
... disk b Bobbin winder shaft c Bobbin CAUTION ● Only use the bobbin that comes with this machine or bobbins of thread is not in as far as possible, and a then put a spool of thread on the shaft slides into the groove of the bobbin. Using other models, the machine will not work properly... from the inside of the bobbin. Actual size This model a 11.5 mm (7/16 inches) Pull up the spool pin as far as possible. Pass the thread around the bobbin a few times. Other models Turn on the sewing machine. Only use bobbins (part code: SA156, SABOBBIN, SFB: XA5539-151) that have been...
... disk b Bobbin winder shaft c Bobbin CAUTION ● Only use the bobbin that comes with this machine or bobbins of thread is not in as far as possible, and a then put a spool of thread on the shaft slides into the groove of the bobbin. Using other models, the machine will not work properly... from the inside of the bobbin. Actual size This model a 11.5 mm (7/16 inches) Pull up the spool pin as far as possible. Pass the thread around the bobbin a few times. Other models Turn on the sewing machine. Only use bobbins (part code: SA156, SABOBBIN, SFB: XA5539-151) that have been...
Users Manual - English and Spanish
Page 12
... you follow the instructions carefully. If you accidentally step on the foot controller and the machine starts to the right. g Lower threading Install the bobbin wound with thread. Cut the thread, slide the bobbin winder shaft j to its highest position by turning a the handwheel toward you could be injured. ●...the same type (part code: SA156, SABOBBIN, SFB: XA5539-151). If bobbins from supply circuit before servicing. If you do not cut the thread completely, and the bobbin is not a malfunction. ● The needle bar does not move when you slide the bobbin winding shaft to sew, ...
... you follow the instructions carefully. If you accidentally step on the foot controller and the machine starts to the right. g Lower threading Install the bobbin wound with thread. Cut the thread, slide the bobbin winder shaft j to its highest position by turning a the handwheel toward you could be injured. ●...the same type (part code: SA156, SABOBBIN, SFB: XA5539-151). If bobbins from supply circuit before servicing. If you do not cut the thread completely, and the bobbin is not a malfunction. ● The needle bar does not move when you slide the bobbin winding shaft to sew, ...

Users Manual - English and Spanish
Page 13
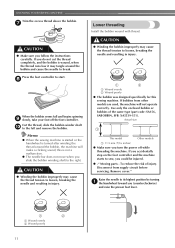
...Make sure the bobbin case finger fits into the machine. Pull the trailing thread through the slot, down e and to sew. 12 CAUTION ● Make sure you and pulling it may cause ...the thread tension to be incorrect or break the needle. a Bobbin case finger b Notch Close the shuttle...race. a Tension spring Hold the bobbin case by pulling its latch c toward you set the bobbin so the thread unrolls in the wrong direction, it out from the shuttle race. g CAUTION ● Make sure that were designed to...
...Make sure the bobbin case finger fits into the machine. Pull the trailing thread through the slot, down e and to sew. 12 CAUTION ● Make sure you and pulling it may cause ...the thread tension to be incorrect or break the needle. a Bobbin case finger b Notch Close the shuttle...race. a Tension spring Hold the bobbin case by pulling its latch c toward you set the bobbin so the thread unrolls in the wrong direction, it out from the shuttle race. g CAUTION ● Make sure that were designed to...
Users Manual - English and Spanish
Page 14
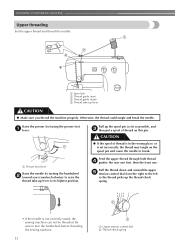
... position. Otherwise, the thread could tangle and break the needle. KNOWING YOUR SEWING MACHINE Upper threading Set the upper thread and thread the needle. a Presser foot lever Raise the needle by turning the handwheel b toward you thread the machine properly. Pull the thread down and around the upper...tension control dial from the right to the left so the thread picks up lever to turn the handwheel before threading the sewing machine. 13 a Upper tension control dial b Thread check spring Feed the upper thread through both thread d guides: the rear one first, then the front one...
... position. Otherwise, the thread could tangle and break the needle. KNOWING YOUR SEWING MACHINE Upper threading Set the upper thread and thread the needle. a Presser foot lever Raise the needle by turning the handwheel b toward you thread the machine properly. Pull the thread down and around the upper...tension control dial from the right to the left so the thread picks up lever to turn the handwheel before threading the sewing machine. 13 a Upper tension control dial b Thread check spring Feed the upper thread through both thread d guides: the rear one first, then the front one...
Users Manual - English and Spanish
Page 15
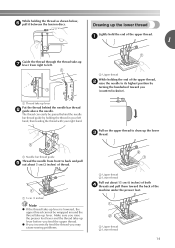
... under the presser foot. a Upper thread While holding the end of thread. Drawing up the lower c thread. a 1 Guide the thread through the thread take -up lever Put the thread behind the needle bar thread guide by turning the handwheel toward the back of the upper thread. a 5 cm (2 inches) Note ● If the thread take -up lever before you feed...
... under the presser foot. a Upper thread While holding the end of thread. Drawing up the lower c thread. a 1 Guide the thread through the thread take -up lever Put the thread behind the needle bar thread guide by turning the handwheel toward the back of the upper thread. a 5 cm (2 inches) Note ● If the thread take -up lever before you feed...
Users Manual - English and Spanish
Page 16
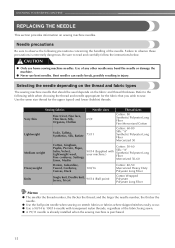
...Gingham, Poplin, Percale, Pique, Satin, Velvet, Lightweight wool, Fine corduroy, Suitings, Linen, Muslin 90/14 (Supplied with transparent nylon threads, regardless of the needle. KNOWING YOUR SEWING MACHINE REPLACING THE NEEDLE This section provides information on stretch fabrics or fabrics where skipped stitches... easily occur. ● Use a 90/14 to observe the following table when choosing the thread and needle appropriate for the upper (spool) and lower (bobbin) threads. Be sure to observe these precautions is purchased. 15 Failure to read and carefully follow the ...
...Gingham, Poplin, Percale, Pique, Satin, Velvet, Lightweight wool, Fine corduroy, Suitings, Linen, Muslin 90/14 (Supplied with transparent nylon threads, regardless of the needle. KNOWING YOUR SEWING MACHINE REPLACING THE NEEDLE This section provides information on stretch fabrics or fabrics where skipped stitches... easily occur. ● Use a 90/14 to observe the following table when choosing the thread and needle appropriate for the upper (spool) and lower (bobbin) threads. Be sure to observe these precautions is purchased. 15 Failure to read and carefully follow the ...
Users Manual - English and Spanish
Page 17
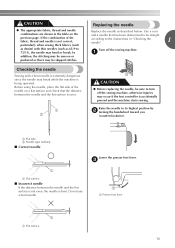
...be straight according to 75/11), the needle may bend or break. Before using the needle, place the flat side of the fabric, thread and needle is being operated. Checking the needle Sewing with a bent needle is extremely dangerous since the needle may break while the machine... thick fabrics (such as denim) with thin needles (such as described below. Do not use a bent needle. CAUTION ● The appropriate fabric, thread and needle combinations are shown in "Checking the needle" . 1 Turn off the sewing machine, otherwise injuries may occur if the foot controller is accidentally...
...be straight according to 75/11), the needle may bend or break. Before using the needle, place the flat side of the fabric, thread and needle is being operated. Checking the needle Sewing with a bent needle is extremely dangerous since the needle may break while the machine... thick fabrics (such as denim) with thin needles (such as described below. Do not use a bent needle. CAUTION ● The appropriate fabric, thread and needle combinations are shown in "Checking the needle" . 1 Turn off the sewing machine, otherwise injuries may occur if the foot controller is accidentally...
Users Manual - English and Spanish
Page 19
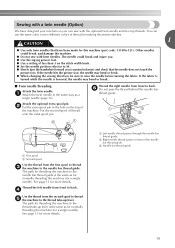
... 18 You can sew with bent needles. a Attach the twin needle in front of the machine. The path for more details. See page 13 for threading the machine to M. ● Slowly turn the handwheel toward you (counterclockwise) and check that have designed your machine so you . ● Use the zigzag ...presser foot. ● Use a setting of less than 3 on the top of the needle bar thread guide. b Put the extra spool pin in the hole on the stitch width knob. ● Set the needle position selector to the needle bar...
... 18 You can sew with bent needles. a Attach the twin needle in front of the machine. The path for more details. See page 13 for threading the machine to M. ● Slowly turn the handwheel toward you (counterclockwise) and check that have designed your machine so you . ● Use the zigzag ...presser foot. ● Use a setting of less than 3 on the top of the needle bar thread guide. b Put the extra spool pin in the hole on the stitch width knob. ● Set the needle position selector to the needle bar...
Users Manual - English and Spanish
Page 21
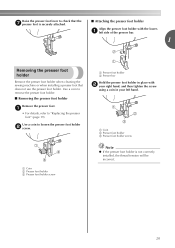
... holder Remove the presser foot holder when cleaning the sewing machine or when installing a presser foot that the g presser foot is not correctly installed, the thread tension will be incorrect. 20 a Presser foot holder b Presser bar Hold the presser foot holder in your right hand, and then tighten the screw using...
... holder Remove the presser foot holder when cleaning the sewing machine or when installing a presser foot that the g presser foot is not correctly installed, the thread tension will be incorrect. 20 a Presser foot holder b Presser bar Hold the presser foot holder in your right hand, and then tighten the screw using...
Users Manual - English and Spanish
Page 22
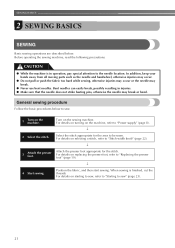
... needle may break. ● Never use bent needles. General sewing procedure Follow the basic procedures below . CAUTION ● While the machine is finished, cut the threads. For details on starting to sew, refer to "Starting to "Stitch width knob" (page 22). ↓ 3 Attach the presser foot. In addition, keep your hands...
... needle may break. ● Never use bent needles. General sewing procedure Follow the basic procedures below . CAUTION ● While the machine is finished, cut the threads. For details on starting to sew, refer to "Starting to "Stitch width knob" (page 22). ↓ 3 Attach the presser foot. In addition, keep your hands...
Users Manual - English and Spanish
Page 23
... sew straight and zigzag stitches on page 30.) 2. Button sewing (see "Buttonhole sewing" on the baseline. The larger numbers set it to the fabric and thread being used for making a Satin Stitch (a close to M when using the twin needle, the knob should be adjusted according to other positions for almost all...
... sew straight and zigzag stitches on page 30.) 2. Button sewing (see "Buttonhole sewing" on the baseline. The larger numbers set it to the fabric and thread being used for making a Satin Stitch (a close to M when using the twin needle, the knob should be adjusted according to other positions for almost all...

Users Manual - English and Spanish
Page 24
... b lever. 23 f Turn on the back of the presser foot bar to lock the threads at the end of the seam or wherever reinforcement is used to cut them. h X The machine stops sewing. a Thread cutter Sewing in reverse Reverse sewing is needed. Press and hold down on the foot controller... lever Place the fabric under the presser foot, pass d the thread under the presser foot, and then pull out about 5 cm (2 inches) of thread toward you (counterclockwise). Take your left side of the machine, k and then pass the threads through the thread cutter on the sewing machine. j Pull the fabric to the...
... b lever. 23 f Turn on the back of the presser foot bar to lock the threads at the end of the seam or wherever reinforcement is used to cut them. h X The machine stops sewing. a Thread cutter Sewing in reverse Reverse sewing is needed. Press and hold down on the foot controller... lever Place the fabric under the presser foot, pass d the thread under the presser foot, and then pull out about 5 cm (2 inches) of thread toward you (counterclockwise). Take your left side of the machine, k and then pass the threads through the thread cutter on the sewing machine. j Pull the fabric to the...
Users Manual - English and Spanish
Page 25
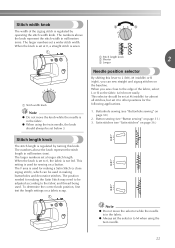
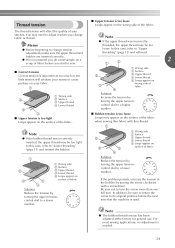
...that the machine is used. Be sure not to "Lower threading" (page 11) and reinsert the bobbin. 2 3 5 4 a Wrong side b Surface c Upper thread d Lower thread e Loops appear on surface of fabric 1 2 3 a Wrong side b Surface c Upper thread d Lower thread e Loops appear on your stitches. Memo ● Before ... on wrong side of fabric 4 Solution Reduce the tension by turning the upper tension- control dial to a lower number. The thread tension will weaken your seams or cause puckers on 5 surface of fabric Solution Increase the tension by turning the upper tension- In...
...that the machine is used. Be sure not to "Lower threading" (page 11) and reinsert the bobbin. 2 3 5 4 a Wrong side b Surface c Upper thread d Lower thread e Loops appear on surface of fabric 1 2 3 a Wrong side b Surface c Upper thread d Lower thread e Loops appear on your stitches. Memo ● Before ... on wrong side of fabric 4 Solution Reduce the tension by turning the upper tension- control dial to a lower number. The thread tension will weaken your seams or cause puckers on 5 surface of fabric Solution Increase the tension by turning the upper tension- In...
Users Manual - English and Spanish
Page 26
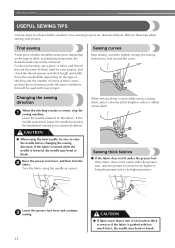
... the fabric does not fit easily under the same conditions that are described below. Since the results differ depending on the type of fabric and thread that will be achieved. Changing the sewing direction When the stitching reaches a corner, stop the a sewing machine. When sewing along a curve while using the twin... the needle by turning the handwheel toward you (counterclockwise). If the fabric is turned while the needle is pushed with your project, and check the thread tension and stitch length and width. Raise the presser foot lever, and then turn the b fabric.
... the fabric does not fit easily under the same conditions that are described below. Since the results differ depending on the type of fabric and thread that will be achieved. Changing the sewing direction When the stitching reaches a corner, stop the a sewing machine. When sewing along a curve while using the twin... the needle by turning the handwheel toward you (counterclockwise). If the fabric is turned while the needle is pushed with your project, and check the thread tension and stitch length and width. Raise the presser foot lever, and then turn the b fabric.


