Users Manual - English
Page 2
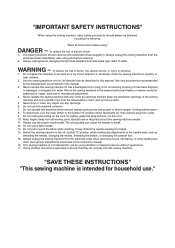
... described in this manual. 3. Do not pull or push the fabric while stitching. DANGER - Never drop or insert any adjustments in this manual. Always unplug the sewing machine from all instructions before changing the light bulb. Young children should never be... - Close attention is necessary when the sewing machine is not intended for examination, repair, electrical or mechanical adjustment. 4. This sewing machine is used or where oxygen is required around the sewing machine needle. 11. "SAVE THESE INSTRUCTIONS" "This sewing machine is not working properly, if it to...
... described in this manual. 3. Do not pull or push the fabric while stitching. DANGER - Never drop or insert any adjustments in this manual. Always unplug the sewing machine from all instructions before changing the light bulb. Young children should never be... - Close attention is necessary when the sewing machine is not intended for examination, repair, electrical or mechanical adjustment. 4. This sewing machine is used or where oxygen is required around the sewing machine needle. 11. "SAVE THESE INSTRUCTIONS" "This sewing machine is not working properly, if it to...
Users Manual - English
Page 6
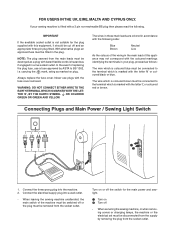
... is marked with the letter 'L' or coloured red or brown. Connecting Plugs and Main Power / Sewing Light Switch 1 2 1. When servicing the sewing machine, or when removing covers or changing lamps, the machine or the electrical set must be fitted in the plug. If your plug, proceed as follows: ... in accordance with the following . Never use a fuse approved by removing the plug from the socket outlet. When leaving the sewing machine unattended, the main switch of this appliance may not correspond with the coloured markings identifying the terminals in the main lead of the...
... is marked with the letter 'L' or coloured red or brown. Connecting Plugs and Main Power / Sewing Light Switch 1 2 1. When servicing the sewing machine, or when removing covers or changing lamps, the machine or the electrical set must be fitted in the plug. If your plug, proceed as follows: ... in accordance with the following . Never use a fuse approved by removing the plug from the socket outlet. When leaving the sewing machine unattended, the main switch of this appliance may not correspond with the coloured markings identifying the terminals in the main lead of the...
Users Manual - English
Page 30
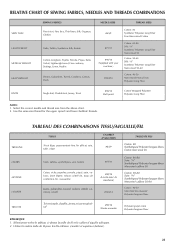
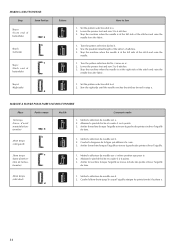
...confection, lin, mousseline Jeans, gabardine, tweed, velours côtelé, canevas, coutil #75/11 #90/14 (Livrés avec la machine) #100/16 Coton: 60-80 Soie: "A" Synthétiques/ Polyester longues fibres Mercerisé calibre 50 Coton: 50-60 Soie: ...SEWING FABRICS Fine tricot, Fine lace, Thin linen, Silk, Organza, Chiffon Voile, Taffeta, Synthetics, Silk, Batiste Cotton, Gingham, Poplin, Percale, Pique, Satin, Velvet, Lightweight wool, Fine corduroy, Suitings, Linen, Muslin Denim, Gabardine, Tweed, Corduroy, Canvas, Duck NEEDLE SIZES #65/9 #75/11 #90/14 (Supplied with your machine...
...confection, lin, mousseline Jeans, gabardine, tweed, velours côtelé, canevas, coutil #75/11 #90/14 (Livrés avec la machine) #100/16 Coton: 60-80 Soie: "A" Synthétiques/ Polyester longues fibres Mercerisé calibre 50 Coton: 50-60 Soie: ...SEWING FABRICS Fine tricot, Fine lace, Thin linen, Silk, Organza, Chiffon Voile, Taffeta, Synthetics, Silk, Batiste Cotton, Gingham, Poplin, Percale, Pique, Satin, Velvet, Lightweight wool, Fine corduroy, Suitings, Linen, Muslin Denim, Gabardine, Tweed, Corduroy, Canvas, Duck NEEDLE SIZES #65/9 #75/11 #90/14 (Supplied with your machine...
Users Manual - English
Page 39
...side of the tailor's chalk line. 3. Arrêter la machine lorsque l'aiguille se trouve à gauche des points et relever l'aiguille du tissu. 1. Set the pattern selection dial to b. 2. Sew the predetermined length of the stitch and raise the needle from the fabric. 1. Abaisser le pied-... la phase a. Lower the presser foot and sew 5 to d. 2. Stop the machine when the needle is at the left side of the stitch and raise the needle. 1. Sew the right side until the needle reaches the stitches formed in step a. Stop the machine when the needle is at the left side of...
...side of the tailor's chalk line. 3. Arrêter la machine lorsque l'aiguille se trouve à gauche des points et relever l'aiguille du tissu. 1. Set the pattern selection dial to b. 2. Sew the predetermined length of the stitch and raise the needle from the fabric. 1. Abaisser le pied-... la phase a. Lower the presser foot and sew 5 to d. 2. Stop the machine when the needle is at the left side of the stitch and raise the needle. 1. Sew the right side until the needle reaches the stitches formed in step a. Stop the machine when the needle is at the left side of...

Quick Setup Guide - English
Page 2
...force when the thread is entangled or the motor is locked. Push the latch levers into the sewing position. ***READ ME FIRST*** Should you still need assistance, call 1-800-284-4357. *KEEP...2 3 4 5 1 2 Raise the needle to raise the needle, then remove the fabric. ∗If machine runs but needle does not move, look for customer service. *For the address of the hook, match the ...to break. D Cleaning bobbin case 1 CAUTION Troubleshooting ∗Do not pull or push fabric while stitching. Grasp the center post of your product: *DO NOT RETURN THIS PRODUCT TO THE STORE *Please...
...force when the thread is entangled or the motor is locked. Push the latch levers into the sewing position. ***READ ME FIRST*** Should you still need assistance, call 1-800-284-4357. *KEEP...2 3 4 5 1 2 Raise the needle to raise the needle, then remove the fabric. ∗If machine runs but needle does not move, look for customer service. *For the address of the hook, match the ...to break. D Cleaning bobbin case 1 CAUTION Troubleshooting ∗Do not pull or push fabric while stitching. Grasp the center post of your product: *DO NOT RETURN THIS PRODUCT TO THE STORE *Please...


